Launching a token on Polygon Network, previously known as Matic Network, is so easy that it doesn’t even require any previous programming experience – as long as you use Moralis. Plus, if you’re familiar with programming on Ethereum, the process is almost exactly the same! Also, with the use of Moralis Speedy Nodes, the time it takes to launch a token on Polygon Network itself is drastically reduced. In this article, we’ll take you through the entire process from beginning to end, explaining how to create a token on Polygon Network with Moralis. Furthermore, we’ll show you the tried-and-tested standard for how to create a Polygon token with Moralis. You’ll be shocked how easy it is to create an ERC-20 Polygon token when you use Moralis!
By following our comprehensive guide to how to create a Polygon token on Polygon, you can cut your deployment time down from weeks to minutes by using Moralis and Moralis Speedy Nodes! If you’d rather get a video walkthrough for how to create a token on Polygon in five easy steps, you’ll find our Moralis YouTube video covering the process here:
Moralis is the premier blockchain middleware solution, that allows you to focus on frontend development. Specifically, Web3 development suffers from a lack of capable tools and backend infrastructure. Moralis solves this, by providing massively powerful backend infrastructure as a service, serverless computing, and much more. For example, Moralis is full of capable features, like the Moralis Price API, Moralis NFT API, or the Moralis Deep Index API, that allows you to build dApps in a matter of hours rather than months!
Introduction to How to Create a Polygon Token
Thanks to the open-source and decentralized nature of blockchain technology, anyone can create a cryptocurrency token. Moreover, it can be really simple and easy – you don’t even need to be a developer (although it will be super easy if you already have some programming skills). But, how to create a Polygon token on Polygon Network with Moralis, and why?
![]()
Firstly, Polygon is a layer-2 network on Ethereum. Ethereum is the largest smart contract-enabled platform and is host to the vast majority of decentralized finance (DeFi) applications. Furthermore, as the second-largest blockchain in existence, the Ethereum Network is one of the most secure and robust in the world. Moreover, Polygon, previously known as Matic Network, as one of the main layer-2 networks on Ethereum, is designed as a scaling solution, increasing throughput and lowering transaction fees. The project has seen immense adoption from some of the top DeFi platforms. Thus, Polygon is a reputable and reliable network to launch a token with. When you work with Moralis, it couldn’t be easier as for how to create a Polygon token.
Ethereum Virtual Machine (EVM)
Polygon Network (previously known as Matic Network) is an Ethereum Virtual Machine (EVM)-based system. EVM-based systems are essentially using the same base code as the Ethereum Network with some minor adjustments when creating a new network.
If you’re familiar with programming on Ethereum, then the exact same development tools and processes apply if you want to create a Polygon token on Polygon Network (Matic Network). The only difference is the network on which the smart contracts are deployed.
As Polygon is an EVM-based system, you can create a Polygon token using Ethereum-based development tools that you would use to build on other EVM-based systems. This includes using the Solidity programming language and the Remix environment for deploying the token.
Also, the process for how to create a Polygon token requires using the same ERC-20 token standard as used on the Ethereum chain. This is the most widely-used token standard across the cryptocurrency industry. In short, the ERC-20 standard is like a template or recipe a developer must follow to ensure their token is compliant with Ethereum-based wallets and exchanges. Using the ERC-20 token standard is arguably the easiest way to launch your own cryptocurrency token.
Before You Get Started with How to Create a Polygon Token
There are a couple of things you need to set up and ensure are in place before you can create a token on Polygon. Don’t worry, they’re very easy and quick tasks to accomplish! We’ve organized the process into just three simple steps below.
1) Get a Polygon Node
The very first thing you need to do when learning how to create a Polygon token is make sure you’re connected to a Polygon node. You cannot deploy anything to the Polygon Network if you don’t have a Polygon Node. Polygon nodes can be thought of as a portal to the network if you want to create a token.
The easiest place to do so is at moralis.io, where you can set up a Polygon Network Speedy Node for free. Simply select the “Speedy Nodes” section from the menu on the left-hand side of the landing page once you have logged in. Then, click on the graphic card to bring up the endpoints. Here you will see a breakdown of the different endpoints including the Polygon Mainnet, Mainnet Archive, Mumbai testnet, and Mumbai Archive testnet. The Mainnet Archive endpoints allow developers to query historical states on the network; this may be required with certain decentralized applications (dApps). However, for the purpose of this article, we will be using the Polygon Mumbai testnet.
2) Connect to MetaMask
Moralis offers a super-easy one-step install process for connecting the networks with MetaMask. Simply click “Add to MetaMask” next to Mumbai testnet. You will need to confirm when MetaMask prompts you to do so. Then, you can easily switch to the Polygon Network. You can confirm which network you’re using through MetaMask by checking the networks dropdown menu at the top of the wallet.

3) Get MATIC Tokens
Following this, the next step in how to create a Polygon token is that you need to get some testnet MATIC tokens. To do so, head to faucet.matic.network where you will be prompted to add your wallet address on the landing page. Copy your account address from your MetaMask wallet and paste it into the account field and select “Submit”. After this has gone through you will need to confirm your details again alongside the payout amount of testnet tokens. Click “Confirm” and you will see some MATIC tokens appear in your MetaMask wallet!
How Long Does It Take to Create a Polygon Token?
Once you are connected to a Polygon node and have some testnet MATIC tokens, you can begin to create a Polygon token! The process is so simple you don’t even need to be a developer. You only really need the technical ability of copying and pasting code before adjusting a few parameters. By following these five simple steps, you can create a Polygon token in just a few minutes!
1. Open Remix
Firstly, head to remix.etherum.org to create your token smart contract. Remix is an Integrated Development Environment (IDE) for Ethereum. Developers can use Remix to write, compile, debug, and execute code writing in Ethereum’s programming language, Solidity.
The first thing you will do is to create a new contract. To do so, right-click “Contracts” on the left-hand side of the page and select “create new contract”. You will then be prompted to name your contract. Make sure it is something relevant to your token project or name!

It is so easy how to create a Polygon token that it has been done thousands of times over. Therefore, to create your own token it’s pointless trying to reinvent the wheel. Rather, you can create a Polygon token on Polygon Network in just a few simple steps using a template.
2. Go to OpenZeppelin
To find the right template, you will need to go to OpenZeppelin where you will find thousands of reputable smart contract templates that have been implemented with countless crypto projects. OpenZeppelin offers templates for decentralized marketplaces, non-fungible tokens (NFTs), initial coin offerings (ICOs) in addition to typical token standards. Furthermore, as OpenZeppelin is an open-source organization, anyone is free to use the provided templates.
![]()
The next step to create a token on Polygon is to select the template for an ERC-20 token on OpenZeppelin. You will need to import the file by copying or selecting “Share” next to the link in OpenZeppelin. Then, return to Remix and paste it into your new contract.
3. Create a Smart Contract
Then go back to OpenZeppelin. If you scroll down on the page with the ERC-20 template, you will see the rest of the token contract. Firstly, copy across the top line of code that specifies the Solidity version. This is paramount to the success of deployment and is needed at the beginning of any Solidity-based smart contract. This will need to be pasted into your smart contract above the import file. After, copy the rest of the token template from OpenZeppelin, and paste it below the import line. Your smart contract should then look like this: (Solidity version may vary depending upon the time of reading).
On the constructor line is where you will need to adjust the name and ticker of your token. Type in your desired token name within the second set of brackets. For example, if you were naming your coin “MyCoin (MYC)”, the code would read:
constructor () public ERC20(“MyCoin”, “MYC”) {
Underneath, the line of code is specifying how many tokens you would like to mint. Adjust to the amount you desire accordingly.
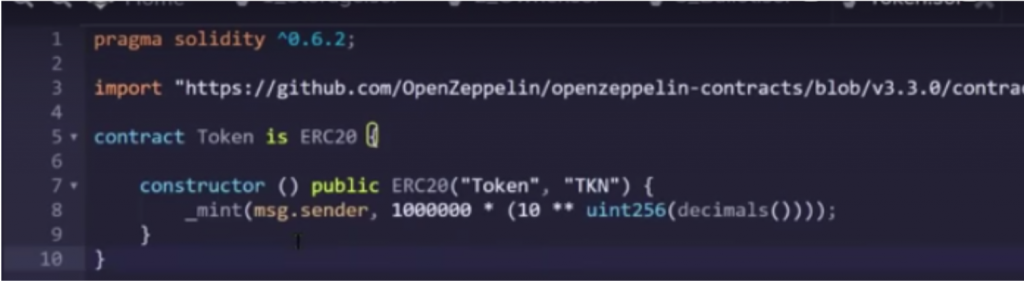
After, the mint function confirms that all the tokens minted will be sent to the wallet address of the creator of the smart contract. “msg.sender” refers to whoever is interacting with the smart contract upon deployment. The information following this specifies the decimal places of the coin. None of this section needs adjusting. See how easy it is how to create a Polygon token of your own when using Moralis!
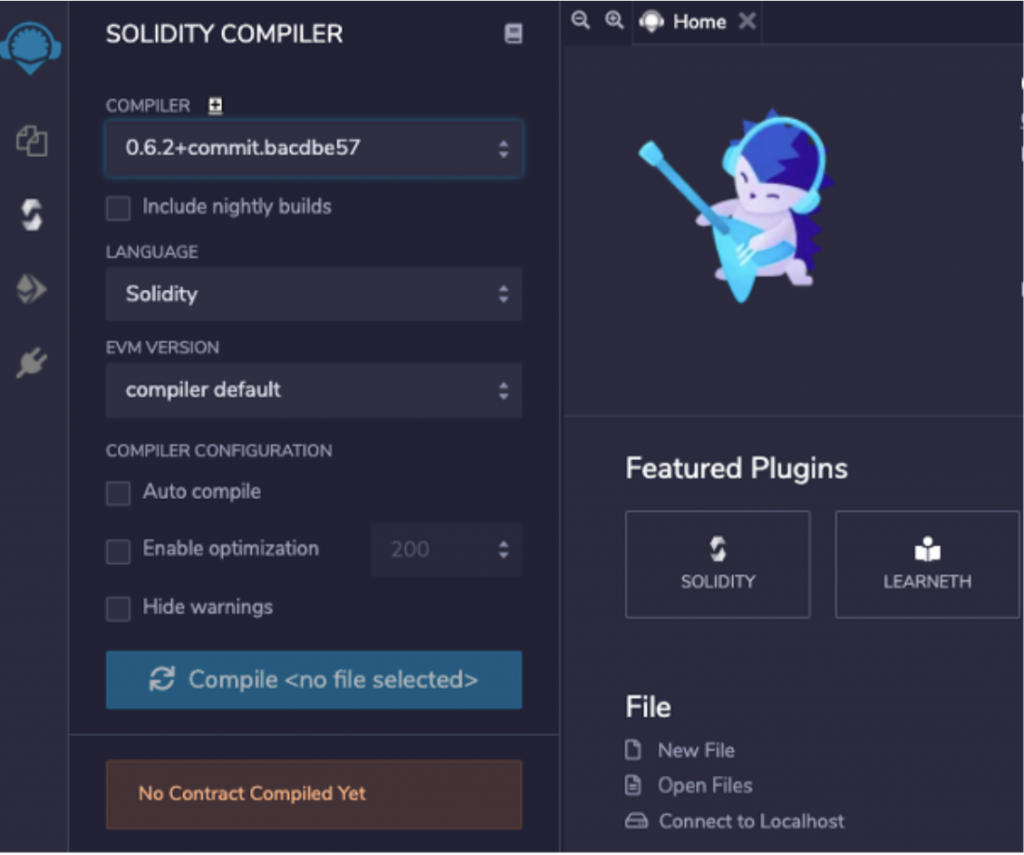
4. Compile the Contract
The next step involves the contract being compiled to ensure the smart contract is valid and doesn’t have any bugs. To do this, you will need to select “Compiler” (second image down on the left-hand menu) and choose the Solidity version used in your contract. The Solidity versions must be the same. Then, simply click “Compile”. When it’s finished, a green tick image will appear next to the compiler image on the left. Then, you can select “Deploy & Run Transactions” using the Ethereum graphic below the compiler.
5. Deploy & Create Your Polygon Network Token!
In this section you will need to ensure the environment menu at the top has “Injected Web3” selected. Underneath, the “Account” will show the wallet address to which the tokens will be sent upon deployment.
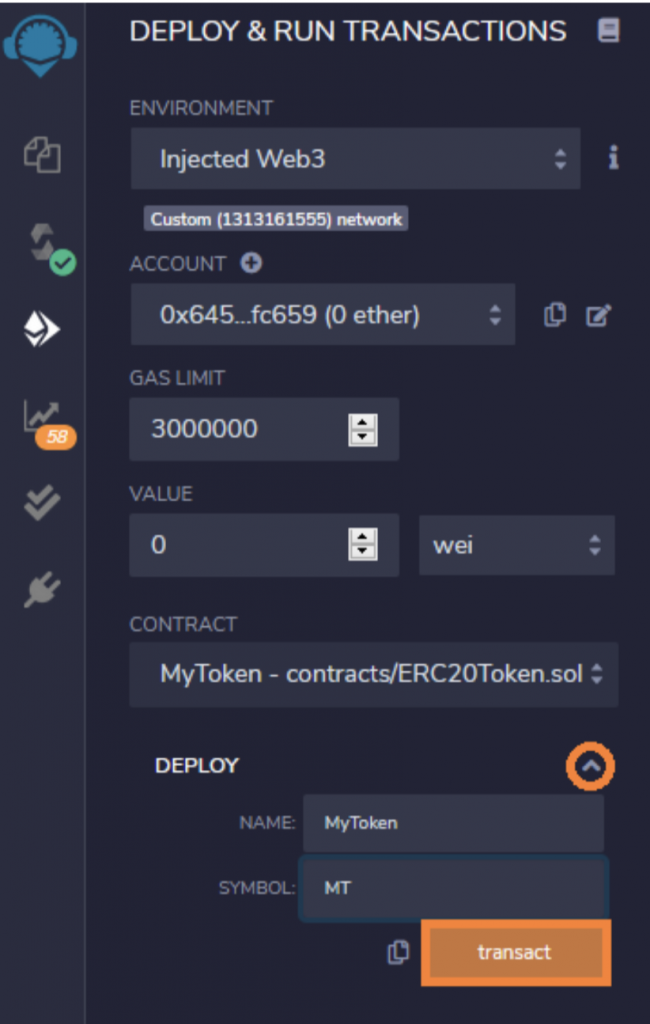
Ensure your MetaMask wallet is connected to the Polygon Mumbai testnet network before clicking “deploy”. After, you will be prompted by MetaMask to confirm the transaction alongside being presented with the gas fee for doing so. Click “confirm”!
How To View Your Polygon Network Token
Congratulations! Now, you know how to create a token on Polygon Network (previously Matic network). Follow these last few steps to learn how you can view your newly-minted tokens.
Your first option is to follow the link from the confirmation pop-up to the Polygon block explorer and see the transaction confirmed with the token and wallet address. Alternatively, if you missed the pop-up, you can go to the Polygon block explorer directly and enter your MetaMask wallet address. This will call up your latest confirmed transaction with this address including the address of your newly minted tokens.
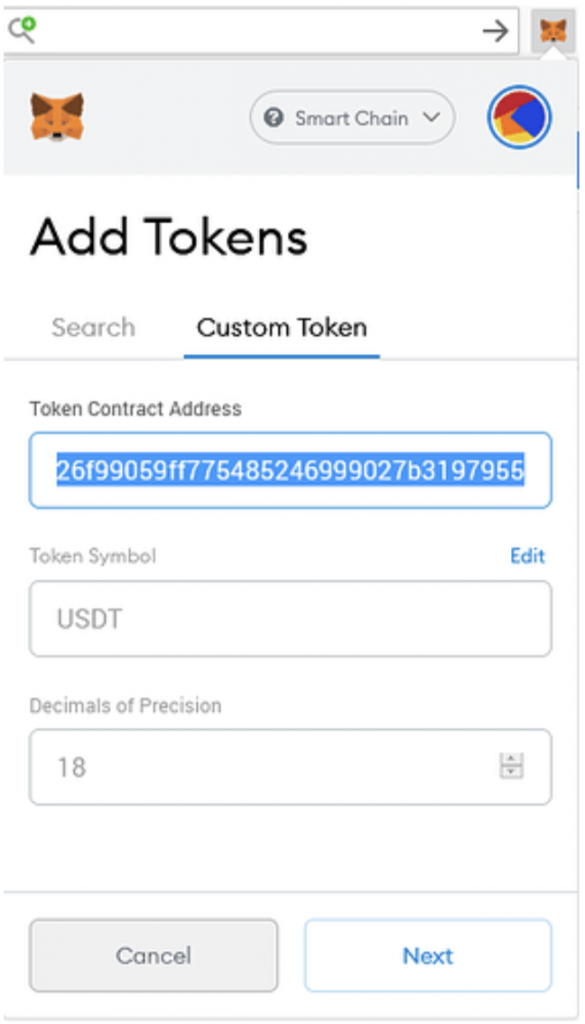
To see your tokens in your MetaMask wallet, copy the token wallet address then click on MetaMask. Scroll down to “Add Token”, then paste your new token address into the prompted “Token Contract Address” field. It should automatically fill in the token ticker and decimal places, so then you just need to click “Next” and you can see all your newly minted tokens in your MetaMask wallet!
How to Create A Polygon Token Summary
That’s it! The process of how to create a Polygon token on Polygon Network (Matic Network) with Moralis is so simple that it doesn’t really require any programming skills. The most technical stage involves copying and pasting information before adjusting the text slightly. However, the adjustments must be done in a way that strictly adheres to the ERC-20 token standard, or else the token won’t deploy correctly or compliantly with other Ethereum applications. Sign up for Moralis for free today and follow our guide for how to create a Polygon token!
Developers, enterprises, and crypto enthusiasts alike can create a Polygon token, with the network seeing a continued increase in adoption. The layer-2 scaling network offers users a higher throughput than the Ethereum blockchain natively. In turn, this reduces transaction confirmation times and gas fees.
![]()
How to create a Polygon token couldn’t be easier than with Moralis. Plus, the entire process is made extremely fast thanks to Moralis Speedy Nodes! Users can create an account within seconds and connect their MetaMask wallet to some of the largest node networks in the industry. If you or anyone of your friends want to know how to create a Polygon token, then the answer is Moralis!
Also, the Moralis blog is a great place to learn how to maximize Web3 development opportunities and abilities. Check out the “What is JavaScript” article to discover one of the most popular programming languages in a Web3 context! Also, to learn more about the Ethereum Virtual Machine (EVM), see the “EVM Explained” article! Also, don’t forget to follow us on Twitter @MoralisWeb3 for the latest Web3 development and Moralis updates! We’d love to hear if you’ve been helped by our guide to how to create a Polygon token!
