If you want to get straight to work, be sure to check out our full Unity SDK boilerplate. In the following article, we go through NFT game development step-by-step. However, for any devs looking to get their hands dirty straight away, be sure to check out this GitHub:
Ethereum Unity Boilerplate for NFT Game Development: https://github.com/ethereum-boilerplate/ethereum-unity-boilerplate
When it comes to creating applications, it can be relatively taxing to develop games. An even more challenging task is to develop games for the decentralized web. This comes as the Web3 development domain has been lacking fundamental development tools. However, with the proper toolbox, game development doesn’t have to be all that difficult, and for Web3 development, the best tool is Moralis. If you are interested in creating ground-breaking Web3 games, follow along as we take a closer look at NFT game development and showcase how you can build a game application in just minutes with Moralis!
Moralis is the number one middleware for developing dApps (decentralized applications) for the decentralized web. With the capable development tools provided by the Moralis platform, we can substantially shorten the development time. Best of all, this does not only apply when it comes to NFT games, but for dApp development in general.
The platform provides users with an infinitely scalable backend infrastructure, leaving users to focus on the applications’ frontend. As such, it is possible to offload the heavy lifting of developing a backend to Moralis.
The platform also facilitates the development process by providing valuable tools. Some of which are Speedy Nodes, the Moralis NFT API, the Moralis Price API, and much more. As this is the case, Moralis is the ultimate platform for dApp and NFT game development.
So, if you want to become a NFT game developer, the first step is to join Moralis!
What are NFTs?
NFT is an abbreviation for Non-Fungible Token, and they have grown tremendously popular recently. One of the many reasons for the popularity boost is the evident benefits for artists. For one, NFTs have proven to be an excellent way for artists to gain financial support from the crypto community. However, what exactly are these non-fungible tokens?
As their name suggests, NFTs are tokens. These digital tokens have the ability to represent ownership of a unique item. With the technology, it is possible to tokenize virtually anything, from art to real estate. Part of the value originates from the fact that only one person can be the official owner. To ensure this ownership, the NFTs are kept secure by blockchains such as Ethereum. This makes it impossible to duplicate an NFT or modify the ownership records without selling the token. Essentially, an NFT can act as digital ownership over a physical asset.
The term ”non-fungible” is an economic term used for goods/assets with unique properties, such as different songs, or unique baseball cards. These are items that are not interchangeable as they have different characteristics. So, for example, it is hard to compare the value of a house to a song. The opposite of non-fungible is fungible. These, on the other hand, are items that are defined by value and not their properties. As such, this makes fungible tokens interchangeable.
From a traditional perspective, there have been issues to replicate the properties of physical assets in a digital world. It has been hard to ensure uniqueness, scarcity, and proof of ownership regarding virtual assets. However, with blockchain technology, it is now possible, and NFTs enable a new internet of assets.
How to Build an NFT Game with Moralis — Frontend
In this section, we will take a closer look at creating our very own NFT game to showcase the power of working with Moralis. With about 100 lines of code, we can create a fully functioning NFT game where the avatars are represented by the tokens that can move around in a 2D environment. In this example, we are going to use Aavegotchi NFTs. However, the logic remains the same for any other NFTs, meaning that we are not limited to Aavegotchis.
A great start to the NFT game development process is to explain the security of the game we are about to create. Security is a highly significant concern since NFT games sometimes reward real prizes. As such, cheating is prohibited, and we need to ensure that our application prevents this.
To ensure a game environment without the possibility to cheat, we’ll put most of the game logic in our backend code. As such, the main task of the frontend is to ask the server if moving the avatar in a direction is valid or not. This means that we can prevent users from hacking the applications and cheating in the game.
So, how is this all possible with only 100 lines of code, you might ask? Well, the short answer is Moralis.
NFT Game Development with Moralis
To enable a quicker and easier Web3 development process, we need the right tools. The ultimate development platform for Web3 is Moralis. Moralis allows us to create an NFT game with ease and significantly shortens the development process. Moralis has already figured out the essentials logic for all dApps, and as a platform user, we get access to all its features.
![]()
Two very crucial features for our NFT game are real-time alerts and the ability to check NFT balances. We’ll use these Moralis tools to get real-time data from the blockchain and check if the users own any NFTs.
Furthermore, Moralis also offers other great tools for dApp development in general. Some examples are native support for IPFS, cross-chain compatibility, and great support for you as a developer. The Moralis blog also features excellent guides for you to check out and get an even greater understanding of what is possible as a Moralis user.
As we’re going to use Moralis when developing our NFT game, the very first step is to sign up with Moralis right away!
Setting up Moralis for NFT Game Development
Before we write the code for the game itself, we must import the Moralis SDK (software development kit) and initialize Moralis. Furthermore, to initialize Moralis, we must first create a server.
- Create a Moralis Server — The first thing that we will do is set up a server with Moralis. Creating a server with Moralis is as easy as it gets and only takes a couple of minutes. To initialize a server, we need to login to Moralis and click the ”+Create a new App” button. When clicked, a drop-down menu will appear with three alternatives. It does not matter which option is selected, but for this example, we recommend a testnet.
Once you have selected which type of server you want to launch, we need to provide our server with a name, select a region, and then choose the networks. Once we are done with our choices, we can simply hit the ”Add Instance” button to spin up the server. Getting the server going might take a few minutes, but it will be up and running shortly. - Moralis SDK — We can easily import the Moralis SDK with a couple of lines of code. The reason for doing so is to enable us to access the development kit in our code to access libraries and other valuable tools when programming. Importing the SDK would look something like this:

- Initialize Moralis — Lastly, we also need to initialize Moralis. For this, we need to find the URL and application ID of our server. This we can find by clicking the ”View Details” button for the server in question. The code would then look something like this with your app ID and server URL:

Authenticating Users
When the players of our game visit the website, we need to enable them to login and authenticate themselves. This authentication occurs through MetaMask and if you are unfamiliar with this extension, checkout this breakdown of Metamask. This is as simple as it gets, and all that we need is one line of code:

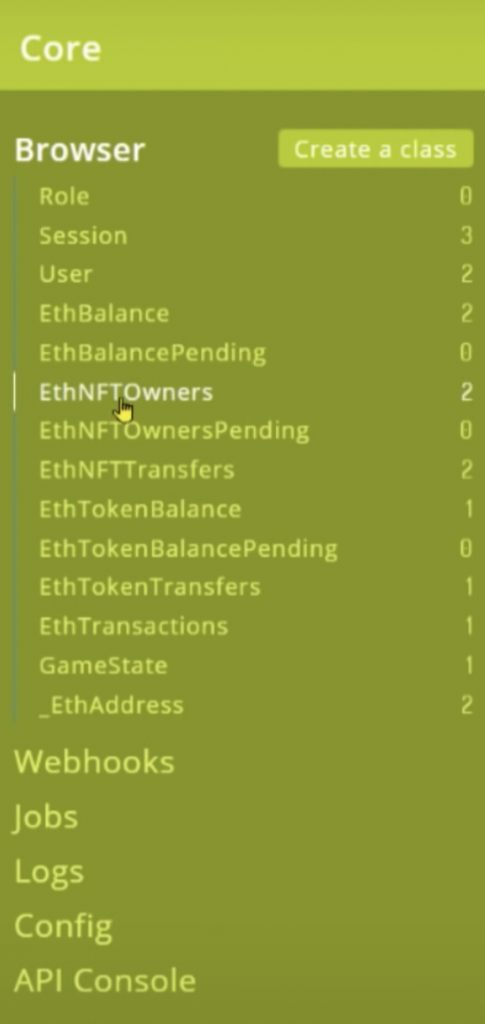
Furthermore, what makes this feature great is the Moralis integration. When a user logs in, and the line of code is executed, a new user will be added to your Moralis database. We can view all the users in the server’s database by clicking the three dots for the server in question and then pressing ”Dashboard”.
To the far left of our dashboard interface, we will be presented with different tabs for ”Browser”, ”Webhooks”, ”Jobs”, etc. Under the ”Browser” tab, we find a few different pages. An example is the ”User” page, where the crypto addresses of all users will appear. However, even more important for this tutorial is that we can see all the NFTs of our users under the ”EthNFTOwners” page. This is quite amazing, just one line of code, and we can view everything from the user’s crypto address to their NFTs.
This showcases the magic of Moralis and is just one of the many reasons that we can create an NFT game in just about 100 lines of code. Furthermore, this shows how Moralis helps to accelerate the development process of crypto dApps, something benefiting the entire industry.
NFT Game Graphics
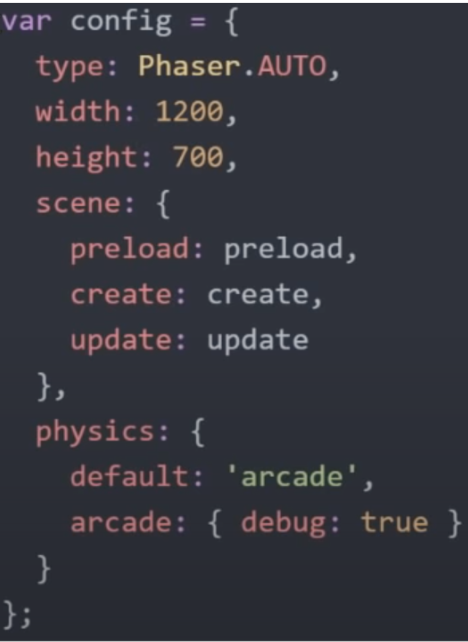
The next step in our game developing process is to set up the graphics of our game. In this example, we use a library called Phaser, a free, fast, and open-source HTML5 game library. This is an excellent library for creating simple drawings like the ones we use for our NFT game. So, to initialize the Phaser game library, an example of the code looks like this:
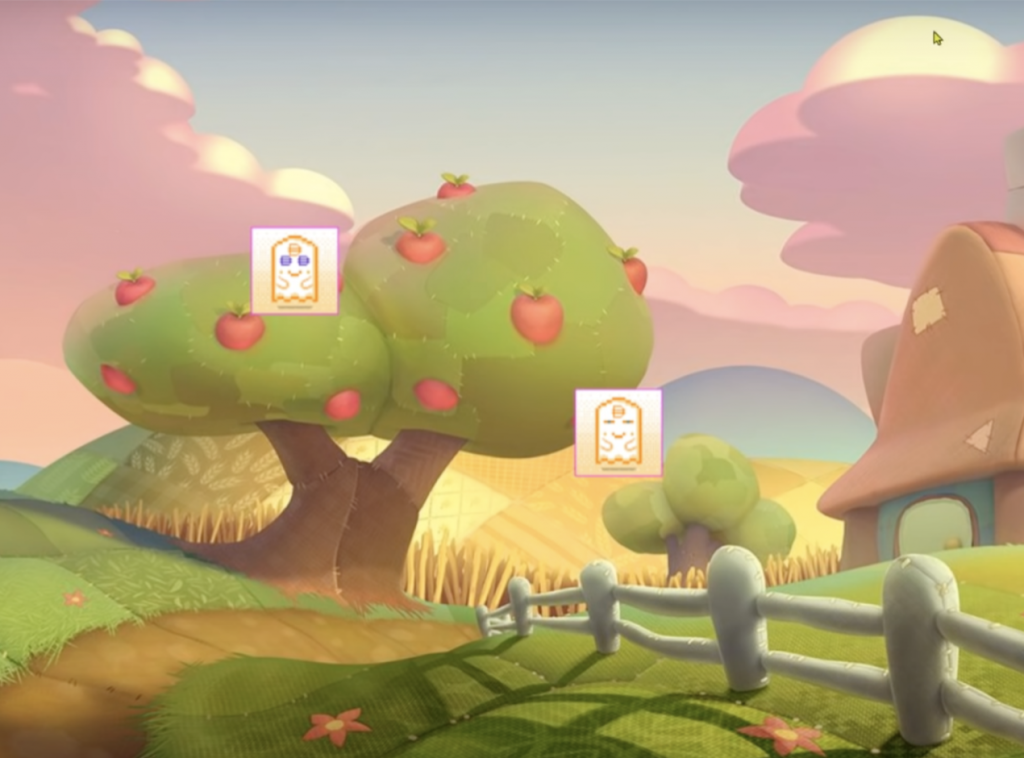
Furthermore, just to show you how the graphics looks, here is a print screen of the game in action:
The NFT Game Lifecycle
Next up, we have the game’s lifecycle. This is something that all games have, which starts with the game loading a bunch of things. So, an example here is that we can use a function called ”preload” where we load the background of our game:
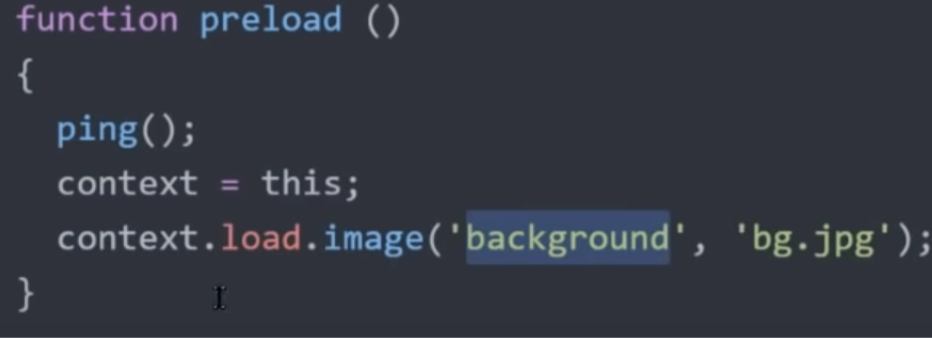
As you can see, we only preload the background of our game, but there are some avatars on the print screen above. However, we can’t preload the avatar since they belong to the player, and we don’t know what players are playing immediately. As such, we don’t know what avatars to put on the screen. The data regarding the avatars is fetched from the blockchain and loaded into another part of the applications.
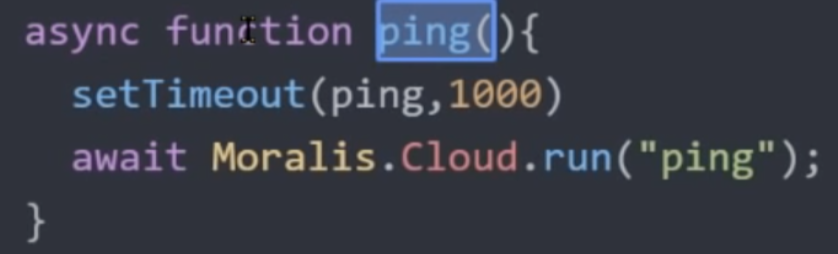
Furthermore, as you can see in the code, we also execute a ”ping()” function. This is important since we need to start pinging the server. The reason for this is that the server needs to be aware of which players are playing the game at this very moment. This ping function is continuously repeating each second. Here is what the function looks like:
Controls and Subscription
After we have created the function for the game’s graphics, we can add the controls and set up a subscription to the GameState. However, what does this mean? If we look at our server database in Moralis, we see a tab called ”GameState”. The GameState tells us where on the map every player/avatar is located. This means that the subscription updates every client as soon as something changes in the GameState. As such, we receive an alert every time another player moves in the world.
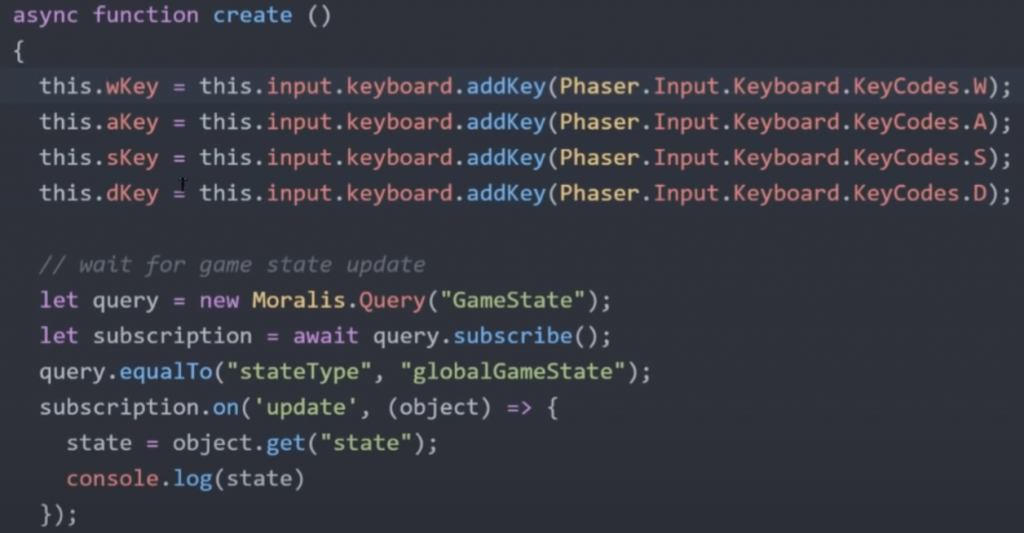
With Moralis, it is possible to avoid all the hassles with building a complex infrastructure with WebSockets, logic to connect to WebSockets, sending data, and so forth; we can just utilize the platform. All that we need is to implement the subscription code from above. This means that all we need are a few lines of code to ensure that our game knows the state of every player on the map.
Update Function
Once we have set up a subscription to the GameState and established the controls for our game, we will also need an update function. This function is listening to what keys are pressed and then sending a request to move the character to the server. Parts of the update function looks like this, which is the request to move our avatar in an upwards direction:
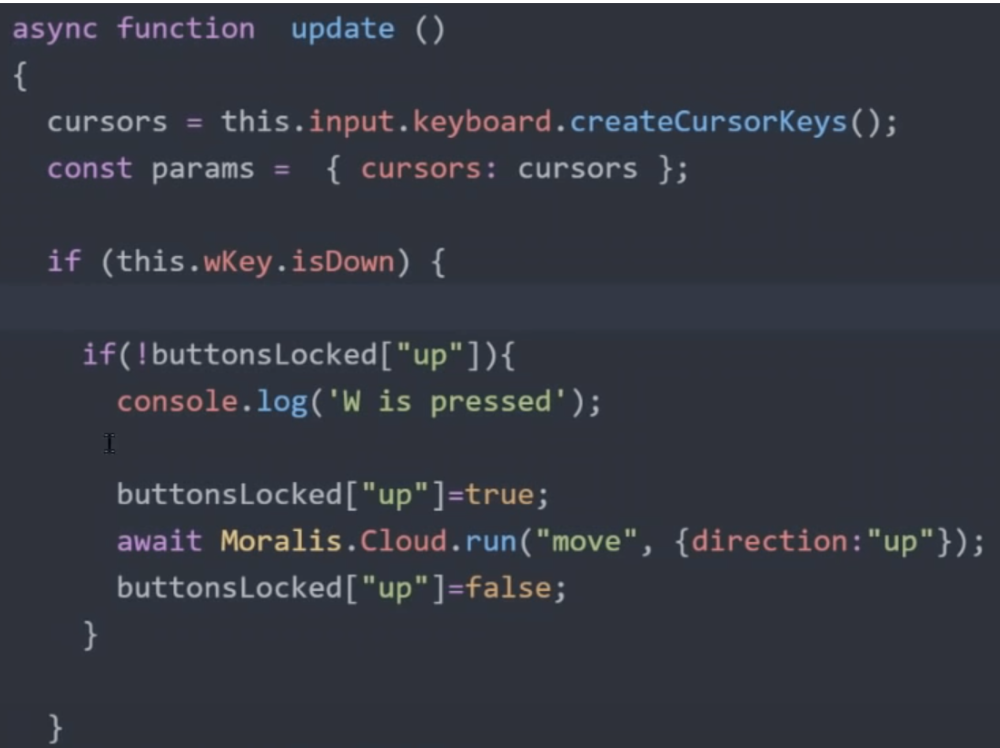
However, a critical takeaway from this snippet is that we are not instantly moving the character in the game; we are only sending a request to the server to do so. The reason for doing so is that the server determines if it is possible to move the character in that direction. As such, it is impossible to move the character without actually playing the game, and the server prohibits users from cheating.
Drawing the State
Lastly, we have a function for drawing the state of the game. The first part of the ”drawState” function is in regards to new players. If the player is unknown, the function fetches the player SVG from your Moralis server, which it gets directly from the blockchain. However, we will dive a bit deeper into how the SVGs are fetched when looking at the backend code of our NFT game.
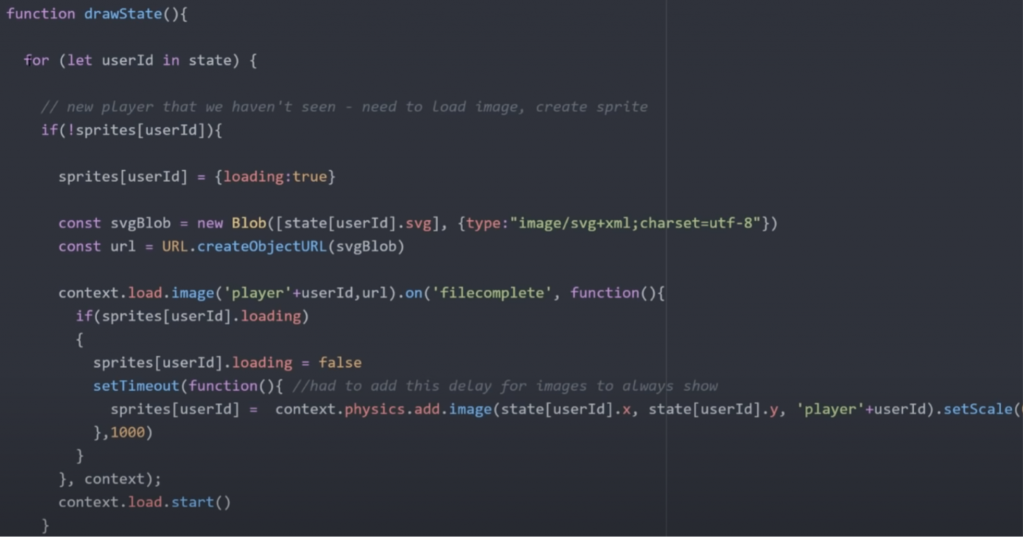
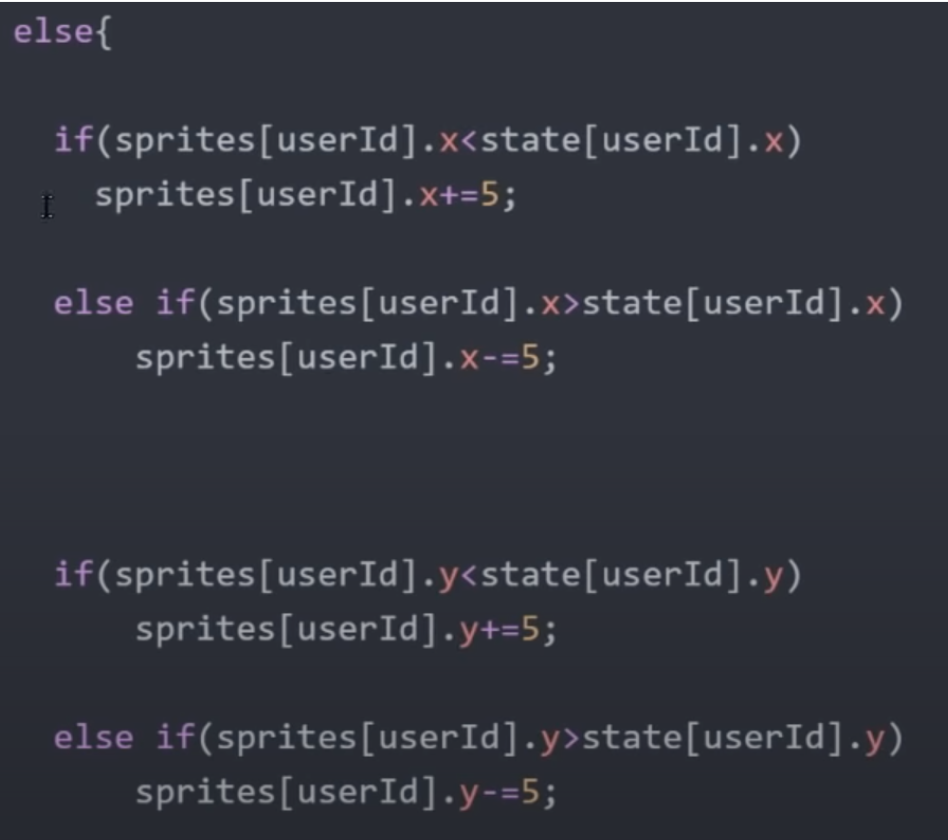
If it isn’t a new player, the game simply moves the player’s avatar around in the game environment. The code in this example looks like this:
So, in summary, only a handful of functions need to be implemented to allow a player to move around in the 2D environment. Furthermore, the code also needs to subscribe to the GameState to supply clients with real-time updates of all other players in the game, something we accomplished with a few lines of code.
This is all for the frontend, and the NFT game development process is quite straightforward with a basic knowledge of programming and JavaScript. This is the power of Moralis, and if you are interested, Moralis.io also provides great guides on creating ETH dApps and Polygon dApps. However, we are not completely done as we still need to develop the backend of our application.
How to Build an NFT Game – Backend
If you find the frontend of the application easy to develop, the backend is even more straightforward, thanks to Moralis. In the backend of our NFT game, we’ll find more of the game logic and a bunch of functions that the frontend calls when someone is playing the game. The first example here is a function for moving the avatars.
Move Function
Whenever a player tries to move their avatar by pressing their keyboard keys, the frontend calls this move function. This function receives the direction in which the avatar should move and then updates the state of the applications.
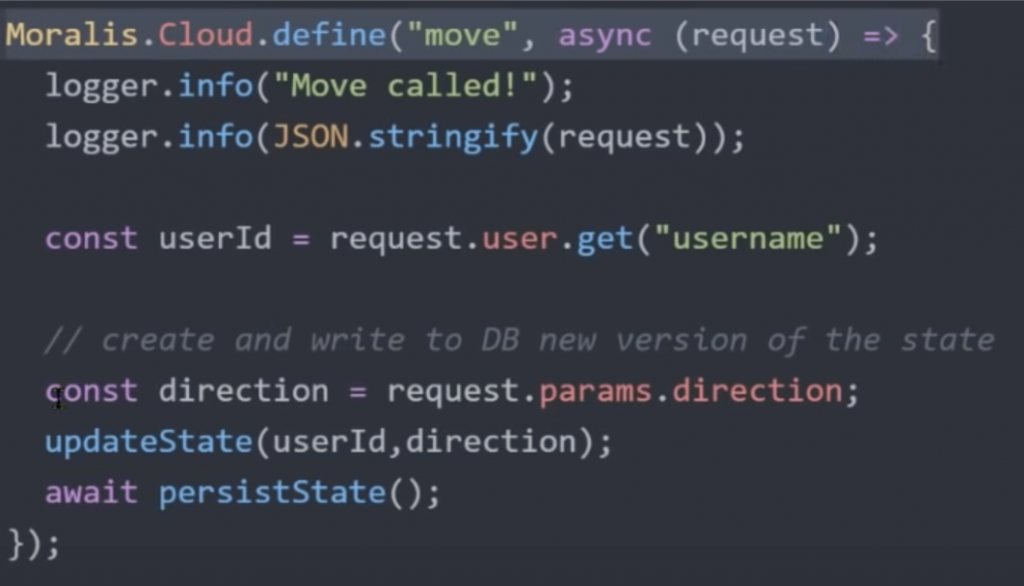
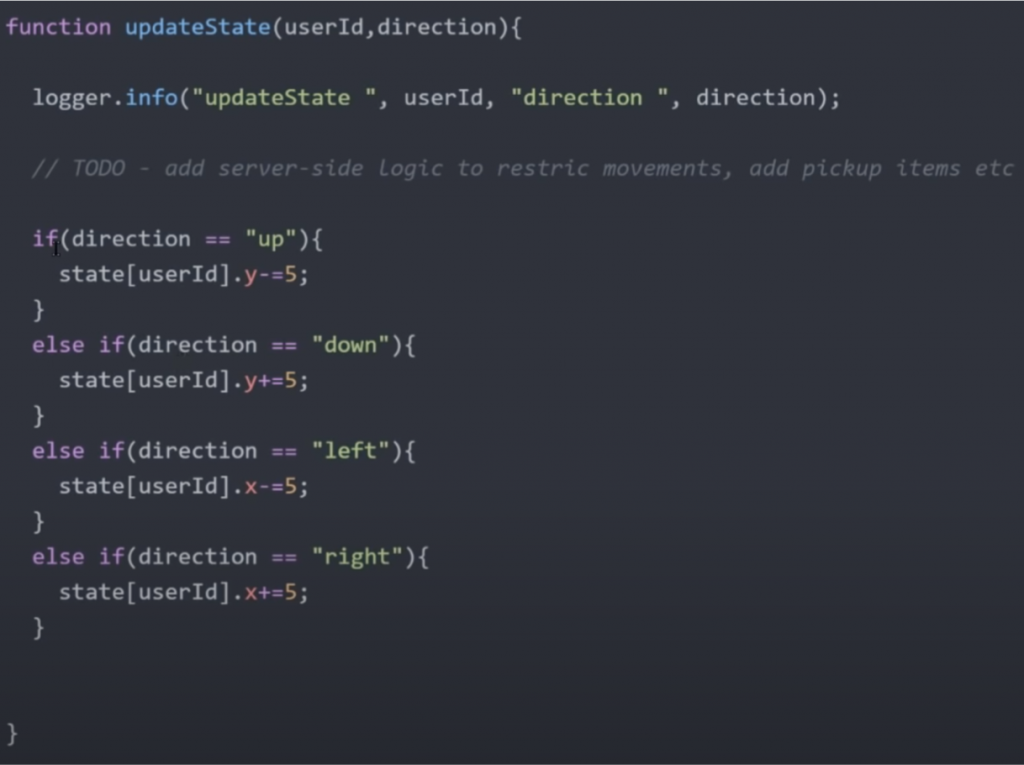
As you can see, the move function also calls the ”updateState” function. This function moves the avatar, and in this example, it moves the users five units in the direction that the player likes to go.
However, as you can see, there is also a comment that explains that we can add further logic here. As such, we can add items that the avatars can pick up or create boundaries/obstacles where the avatars can’t move. The server can check if there is something in the way of the direction in which the player moves and restrict the movement if necessary.
Persist State Function
Another function in this game is the ”persistState” function, and this is where the GameState is saved to the database of our server. This function looks like this:
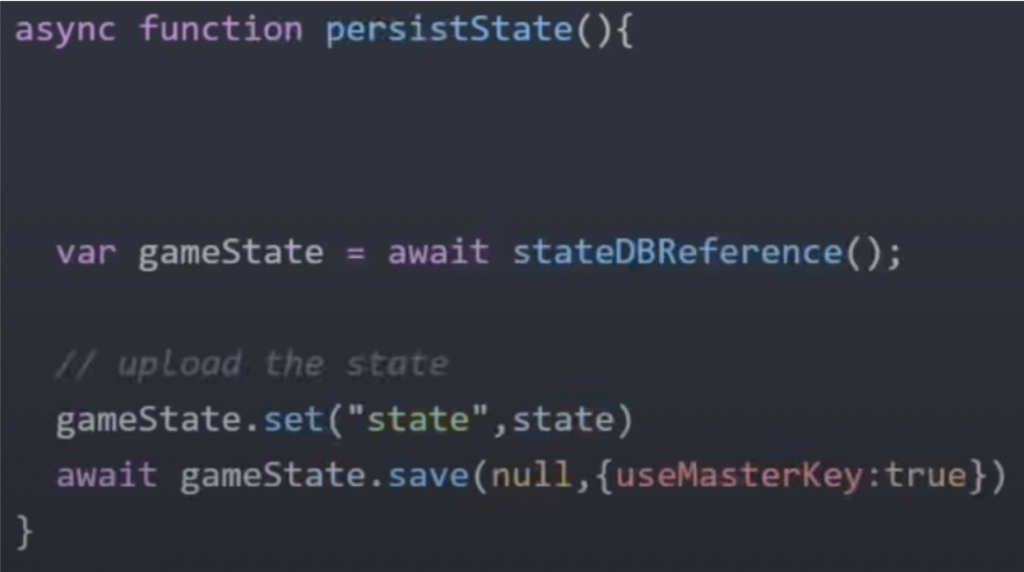
Once the state is saved, every client will be updated with the new GameState, which is how the communication between the clients and server works in real-time. It is a neat and simple solution which only requires less than ten lines of code in combination with the subscription function in the frontend.
Ping Function
In the backend, we also have a ping function that simply checks when a user pings the server and then saves this to the state of the game.
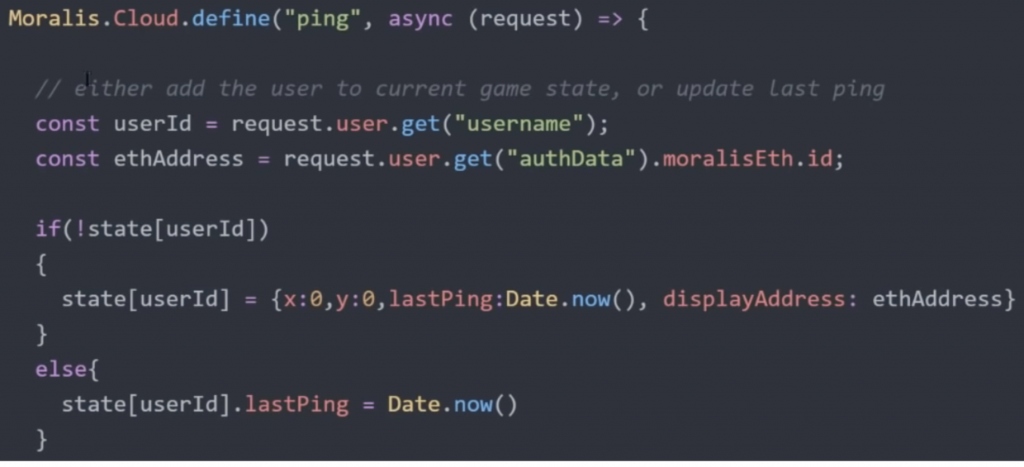
Furthermore, we also use this function to fetch the SVG from the blockchain. The first thing we do here is query the users for their NFTs. Based on this information, we can acquire the user’s SVGs from the blockchain.
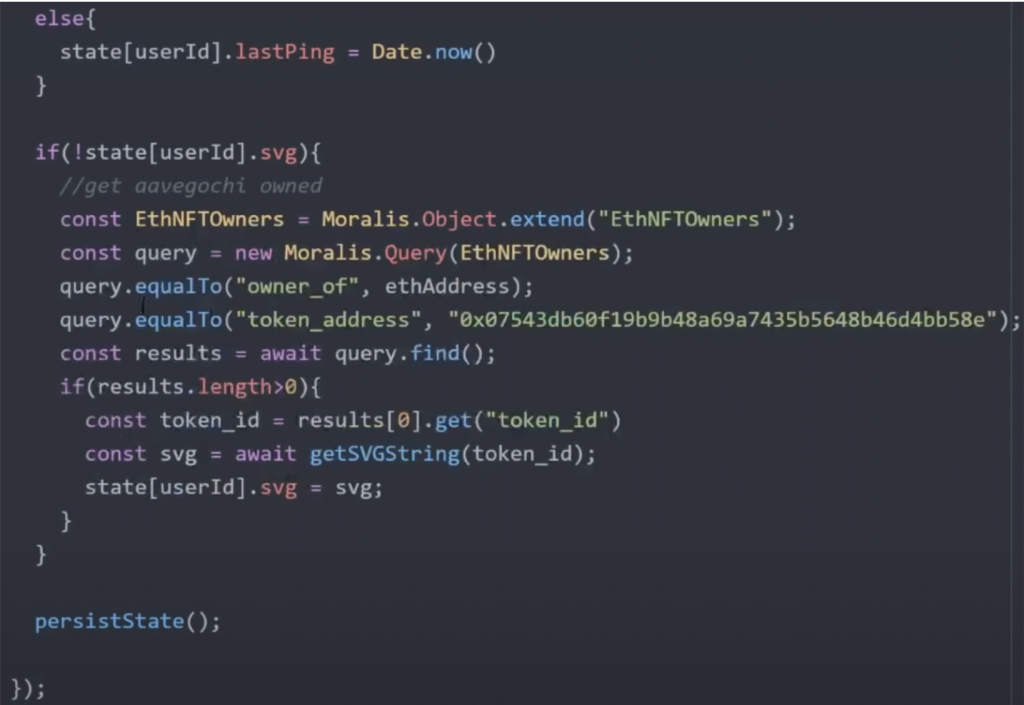
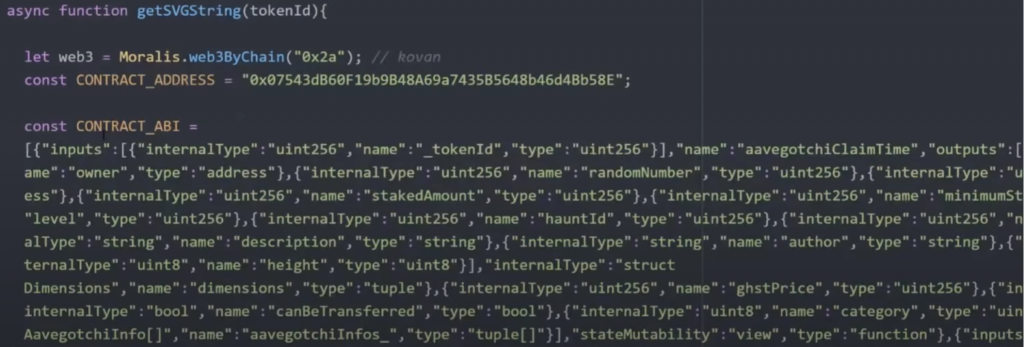
As you can see, the ping function code calls another function called ”getSVGString”, which is how we get the SVG from the blockchain. At first glance, this function can look quite scary since the ABI is pretty substantial. However, we can just copy and paste the ABI from the Aavegotchi contract.
That’s it; these are all the functions that we need to create our first NFT game. We have implemented everything from real-time updates to functions for checking with the server if a move is valid or not. It is not at all complicated, and with the right tools, we can make this game in a matter of minutes!
However, if you still have questions regarding the NFT game development process, we recommend watching the following video from the Moralis YouTube channel. In this tutorial, Ivan on Tech walks you through the complete process to explain more in-depth how the application actually works. Furthermore, towards the end, Ivan also provides some suggestions on how the app’s user experience can be improved.
NFT Game Development — Summary
Even though game development is considered a quite complicated process, it does not have to be. All we need are the proper tools, and for Web3 development, that tool is Moralis. We have showcased how easily we can create an NFT game quickly with the magic of Moralis. We developed an Aavegotchi game with a simple frontend and backend, which only took us a couple of minutes. However, this is just an example to make the process clearer for the readers, and it is possible to create other games with the same logic. As such, we are not at all limited to Aavegotchi.
However, we do need Moralis to make the process more accessible and substantially quicker. The ability to create real-time communication between the clients and the server with less than ten lines of code clearly showcases the power of Moralis. If you remain unconvinced of the platform’s convenience, feel free to check out how easy it is to create Ethereum tokens and BSC tokens with Moralis.
So, if you are looking to get into NFT game development, the first thing you need to do is sign up with Moralis today! Not only will you be able to create notable NFT dApps, but the opportunities with a platform as powerful as Moralis are endless.
