Do you know just how easy it can be to to create a token on Binance Smart Chain (BSC)? BSC operates in a very similar way to Ethereum. Therefore, it couldn’t be easier to launch a BSC token. Best of all, you don’t even need to be a programmer! In this article, we’re going to explore Binance Smart Chain (BSC) and its native BEP-20 tokens, plus the differences between BEP-20 and BEP-2 tokens. Also, we have provided a five-step guide on how to create a BSC token in just a few minutes! In fact, using Moralis’ fully managed, infinitely scalable Web3 backend infrastructure, you’ll be able to follow our “how to create a BSC token” guide in mere minutes!
If you need a refresher on the specifics of Ethereum be sure to check out this Ethereum course if you’d like to discover the fundamentals of smart contracts and decentralized finance (DeFi) on a deeper level. In launching our own token on Binance Smart Chain, we are going to use the Solidity language, and the tools we are going to use are Remix and MetaMask. Follow along our comprehensive guide and we’ll take you through the few easy steps to creating a BSC node with Moralis. Cut down your deployment time of your BSC token from weeks to minutes by using Moralis and Moralis Speedy Nodes! If you’d rather get a video walkthrough for how to create a BSC token in five easy steps, you’ll find our Moralis YouTube video covering the process here:
What is Binance Smart Chain (BSC)?
For newcomers to the crypto industry, Binance is often thought of as just a centralized exchange. However, this is far from true. Binance hosts an entire ecosystem of crypto products, including Binance Launchpad for token sale events, Research Labs as an incubator for projects, enterprise exchange solutions with Binance Cloud, alongside a decentralized exchange (DEX), which holds one of the primary utilities of Binance Chain.
Binance Chain is Binance’s dedicated blockchain for processing and validating decentralized transactions within the Binance ecosystem. The Binance blockchain was additionally designed to host Binance’s native BNB Coin. Also, to give users the choice as to whether they want to interact with trading smart contracts directly with full custody of private keys (Binance DEX) or use the most popular crypto exchange in the world according to trading volume, Binance Exchange.
However, Binance Chain was not designed to facilitate smart contracts. Nevertheless, Binance Chain offers limited capacity when you want to build dApps (decentralized applications). Instead, this is where Binance Smart Chain (BSC) comes in.
Binance Smart Chain (BSC) is a smart contract-enabled blockchain that operates in parallel to the Binance Chain. Although the two chains are fully interoperable, BSC has the infrastructure in place to remain fully operational independently, in the unlikely case that Binance Chain should ever go down.
From a developer’s perspective, BSC will feel incredibly familiar to the Ethereum blockchain. This is because Binance Smart Chain essentially uses the same codebase as Ethereum, but with a few adjusted and updated parameters. From a user’s perspective, Binance Smart Chain (BSC) is arguably the fastest and cheapest fully-operational application-friendly blockchain on the market.
What are BEP-20 tokens?
Now that we have explained the differences between Binance Chain and Binance Smart Chain (BSC), let’s first look at each Binance chain’s native token standards. But, what are token standards, and why do we need them?
The original core Binance Chain hosts BEP-2 token standards. The most popular BEP-2 token users will be familiar with is no doubt Binance’s native BNB Coin. BEP-2 stands for “Binance Chain Evolution Proposal 2” and provides a standard technical framework for developers to create tokens on Binance Chain. Similarly to following a complex recipe, it is imperative to stick to using the provided token standards to ensure each token can be used with applications and wallets already available.
Through use of the novel “dual chain architecture” between Binance Chain and Binance Smart Chain (BSC), the native BNB Coin fuels both the BEP-2 and BEP-20 token standards. But, what’s the difference?
BEP-20 tokens are the standard framework for launching BSC tokens on Binance Smart Chain (BSC), whereas BEP-2 tokens are native to the core Binance Chain. BEP-20 tokens are often likened to the Ethereum ERC-20 token standard. The two are incredibly similar, although are still fundamentally different. ERC-20 token standards provide a framework for cryptocurrency tokens to be created within the Ethereum ecosystem. The BEP-20 token standard is used when someone wants to create a cryptocurrency token on Binance Smart Chain (BSC).
How To Create a Token on Binance Smart Chain (BSC)
The process to launch a token on Binance Smart Chain (BSC) is so simple when using Moralis, you won’t even need to be a developer to do it. If you’re interested in learning how to create a BSC token – read on!
One thing to note when you want to launch a BSC token is the similarities between creating a token on Ethereum and on Binance Smart Chart (BSC). Both require the use of the same programming language, thought process, and tools. The language required to create a BSC token is Solidity, whilst the only tools needed are Remix (the environment for writing and deploying smart contracts) and MetaMask (a Web3 browser crypto wallet to upload, store, and manage your tokens by allowing you to interact with the smart contract).
For the purpose of this article, however, we will be explaining how to create a BSC token on the Binance Smart Chain Testnet. However, the process to launch a BSC token on the Mainnet is exactly the same.
Before You Get Started:
To launch your own BSC token, there are a few things to do in preparation. You will need to install the MetaMask wallet, available to download from https://metamask.io. Also, it is imperative to connect to a Binance Smart Chain node and have some BNB Coin available in your MetaMask wallet. If you’re not sure how to do this, we’ve broken it down into three simple steps!
Step 1 – Get a Node
The first thing to do when creating a token on Binance Smart Chain (BSC) is to find a node that you can connect your MetaMask wallet with. Moralis.io is the best place to do this, offering fast and reliable ‘Speedy Nodes’ on the Ethereum Network, Polygon Network, and the Binance Smart Chain Network. As such, you can connect to Polygon nodes and Ethereum nodes just as easily as to BSC nodes. When using Moralis, you’ll simply sign in and find Speedy Nodes on the left-hand side.
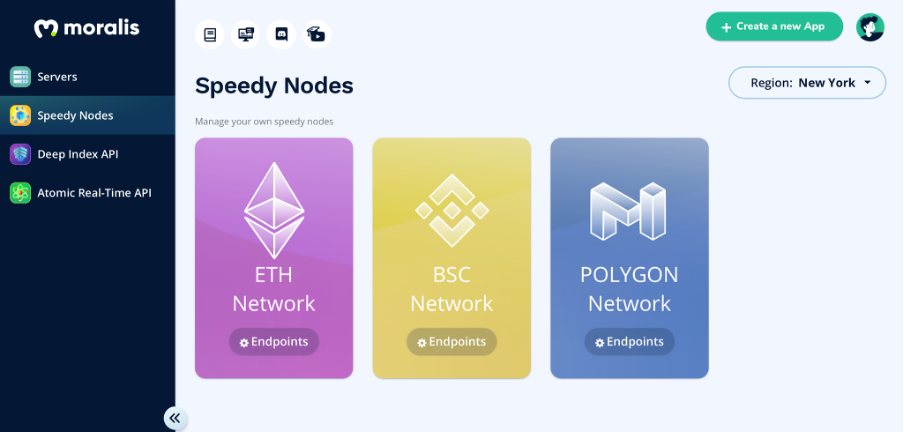
When you select the Binance Smart Chain Network node, you will be presented with Endpoints and the different nodes available. Here, you will see a list of nodes including a Testnet node and Testnet archive node. Click the ‘copy to clipboard’ button (symbol representing a clipboard) of the Testnet node to move on to the next step.
2) Install Custom RCP
For this step, we are going to use the MetaMask wallet. You will use this popular Web3 wallet both to both upload your new BSC token, and to access the tokens upon launch. Now, click the MetaMask fox symbol to bring up the wallet. Upon opening, you can view a list of networks at the top. Scroll down and select “Custom RCP”. You will be presented with a list of entry fields. Fill in the details as follows:
Network Name: BSC Testnet
New RPC URL: (Paste in the URL copied across from the Moralis Binance Smart Chain node)
Chain ID: 97
Currency Symbol: BNB
Block Explorer URL: https://testnet.bscscan.com
3) Get some BNB!
Next, you will need to get some of the native BNB coin to launch your own BSC token. If you are launching on BSC Mainnet, ensure you have some BNB in your wallet at this stage. As we are focusing on creating a BSC token through the testnet, the next step is simply to visit https://testnet.binance.org/faucet-smart to get some testnet BNB coins.
Now, open your MetaMask wallet and copy your wallet address by clicking the account name at the top. Paste your wallet address into the field as prompted on the faucet. Click “Give me BNB” and you will see the drop-down option for 1 BNB. Select this and wait a few moments – you should soon see 1 BNB appear in your MetaMask wallet. If this doesn’t appear, double-check that you are using the correct RPC URL and are connected to the BSC Testnet.
Time to Create a BSC Token!
Launching your own BSC token on Binance Smart Chain (BSC) is incredibly similar to launching an ERC-20 token on Ethereum. On a fundamental level, cryptocurrency tokens are just pieces of code. Moreover, with the pre-set token standards (e.g. BEP-20, BEP-2, ERC-20, or ERC-721 for non-fungible tokens (if you are looking for an NFT)) the majority of the code is already laid out ready to go. There are only a few parameters that need adjusting. Let’s discover just how easy it is to create a BSC token!
1) OpenZeppelin
One of the benefits of decentralization and open-source software is the ability to copy and paste code, then adjust and customize accordingly. The pre-set code token standard needed to launch a BSC token is available through OpenZeppelin, an open-source organization that collates various token standards for developers to use. As BEP-20 is practically the same as Ethereum’s ERC-20 token standard, with a few adjusted parameters, you can use the ERC-20 token standard code when launching a BSC token on Binance Smart Chain (BSC) and adjust accordingly.
![]()
2) Create a New Contract
One of the most popular environments for deploying smart contracts is Remix, so this is where you will be programming your own BSC token. Head over to remix.ethereum.org and go to ‘Contracts’ on the left-hand-side menu. Then, you’ll need to create a new file by selecting the top left symbol of a document. Ideally, you want to name this something relevant to your token/project name. Now, you’re ready to paste across the code!
3) Programming Your Own BSC Token
When copying across the code from OpenZeppelin, there will be certain parameters that will need adjusting and elements to be mindful of when programming your BSC token. These are as follows:
- The first line of code should always be the version of Solidity being used.
- The next line should be to import the token template. This will include a URL link to a Github link that contains the full token structure.
- Then, you will need to copy across the token smart contract. It is at this stage you can customize the parameters of the token.
The second line of the smart contract entered refers to running the constructor when you create a BSC token of your own. It is here you can specify your token’s name and ticker symbol. The next line confirms the minting of the token, and receipt of said minted tokens into the wallet of the person who deployed the smart contract. Here, you can confirm the amount of tokens you would like to be minted.
4) Compile the Contract
When you are done writing out your contract, the next stage is to put it through the compiler to ensure there are no bugs or issues with the contract. To do this, you will need to go to the ‘Solidity compiler’ icon, second down on the left-hand menu underneath ‘File explorers’.
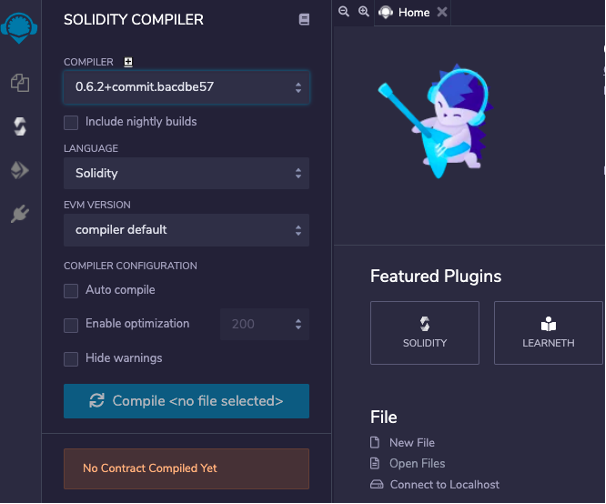
You will need to first select the compiler version from the top drop-down. This is the version of Solidity you are using, which is already specified in your contract. Next, click ‘Compile’! If there are no issues (hopefully not if you’re following these instructions carefully!) you can move on to the next stage!
5) Deploy and Launch Your BSC Token
In this final step, you will need to select the ‘Deploy & run transactions’ symbol beneath the ‘Solidity compiler’ icon on the left. The first drop-down menu prompts you to choose the environment. Make sure you select Injected Web3. Next, make sure your account address is the same as your account address in MetaMask. Underneath the account field, you will see fields for the ‘Gas Limit’ and ‘Value’ with a choice of metrics. Neither of these need adjusting and, for the purpose to create a BSC token of your own, you can just ignore these. Finally, make sure that your contract selected matches the name of the new file you created. Now, click deploy!
How to View Your BSC Token
Congratulations! Shortly after clicking the deploy button in Remix, MetaMask will provide a pop-up automatically confirming the transaction. Here, you have the option to “view on BSCscan”. Click on this link to open up the Binance Smart Chain block explorer.
You will see a breakdown of the transaction hash, status of the transaction, the block height, time stamp, and the wallet address the tokens were created from. Additionally, and more importantly, the ‘To’ contract address shown on BSCscan is the newly-formed contract address for your BSC token.
To see your new BSC tokens in your MetaMask wallet, scroll down to the bottom of the Remix deployment tab to find a list of ‘Deployed Contracts’ with token addresses. The most recent (or perhaps only) token address shown will be your newly-launched BSC token address. Click the ‘copy to clipboard’ symbol next to the token address. The same address will also appear on BSCscan and will work if you copy this address across instead.
After, open up your MetaMask wallet. Scroll down to the button where it says ‘Add Token’. Then, select the right-hand tab; ‘Custom Token’, and paste in your BSC token address in the prompted ‘Token Contract Address’ box. At this point, the token symbol and decimals of precision should automatically fill in. When you go back into your main MetaMask wallet now, you will see your new BSC token!
How to Create a Token on BSC Summary
Following completion of the above steps, you will know how to launch a token on Binance Smart Chain (BSC) using Moralis! The process of doing so is so simple, you don’t even need any programming experience to achieve this goal! Anyone can create a BSC token with Moralis, hopefully, now you can too!
If you would like to dive deeper into programming on Ethereum, Ivan on Tech Academy provides some of the best blockchain education courses anywhere in the world! Experienced developers will be happy to know that Moralis features native IPFS support, and should check out our article covering “What is JavaScript” in a Web3 context, to make the most of their Web3 development.
