Creating dApps (decentralized applications) for Web3 and cryptocurrency tokens on your own might first seem like an arduous task. However, this is not the case when working with Moralis. Instead, Moralis allows you to create and deploy both dApps and your own ERC-20 Ethereum tokens in a matter of minutes. Does this sound too good to be true? Well, don’t take our word for it; read on for a breakdown of the entire process of how to create and deploy Ethereum tokens!
Becoming a token developer with Moralis requires next to no prior development skills. However, it will be quite beneficial to be familiar with the basics of Solidity and smart contracts. Furthermore, we also recommend familiarizing yourself with Moralis as we are utilizing some of the platform’s tools in the development process. So, if you want to follow along and create Ethereum tokens, sign up with Moralis right away! Creating an account is free, and you will get immediate access to the website’s tools.
Moralis comes with a full assortment of capable, innovative tools to make all Web3 tasks as easy as possible. This includes Moralis’ hugely popular Speedy Nodes functionality, the Price API, NFT API, and many others. If you’ve read our previous article explaining “What are dApps?”, you’ll know that Ethereum is hugely popular for building dApps. Naturally, Moralis comes with full support for building Ethereum dApps. As such, what are you waiting for? Use Moralis to deploy your dApps, and read this guide to learn how to create Ethereum tokens in four steps! It has never been easier to create ERC-20 Ethereum tokens.
What is Ethereum?
Before diving deeper into how to create an Ethereum token and becoming a token creator with Moralis, we will take this section to refresh our understanding of what Ethereum is.
In essence, Ethereum is a vibrant, high-profile blockchain network using the cryptocurrency Ether (ETH). Essentially, Ethereum acts as an access point for digital currencies and services for anyone on the planet. Ethereum aids in the ongoing democratization of finance, as it does not discriminate upon the background of people. Moreover, to access this network, all that people really need is a crypto wallet.
What’s more, Ethereum is the number one blockchain for dApp development, and its ecosystem is home to many intriguing platforms. As such Ethereum is at the forefront of DeFi, enabling an innovative online financial system that’s accessible from anywhere in the world. Some of the largest decentralized platforms are powered by this blockchain, and it’s home to thousands of applications.
However, there’s a flip side to Ethereum’s popularity. In fact, Ethereum struggles with issues relating to congestion, due to high usage. Gas prices and transaction times are extremely high, and part of the problem originates from the consensus mechanism. Ethereum currently uses a proof-of-work (PoW) mechanism where validators compete against each other to gain the right to validate a block through a trial and error process. However, as this is partly the reason behind the extensive network congestion, Ethereum will opt for a proof-of-stake (PoS) consensus mechanism with the launch of Ethereum 2.0.
Moreover, even with these issues, Ethereum remains the largest blockchain for development, and there aren’t any indications that this will change any time soon. So, why is Ethereum such a popular environment for developing dApps? Let’s look at some of the main benefits with Ethereum.
Ethereum Benefits
- Privacy — The Ethereum ecosystem of dApps is built around value and not surveillance. This means that, when using Ethereum based dApps, there is no need to provide any personal information. As such, you can remain completely anonymous.
- Financial Evolution — A vast amount of the world’s population remains unbanked due to a lack of financial infrastructure. Ethereum solves this as all you need to access services such as investing, insurance, etc., is a crypto wallet. This means that people lacking the fundamental tools to grow their own economies can participate in a decentralized version of the financial world.
- Censorship — There is no single entity in control of the Ethereum network. As such, it is next to impossible for anyone to stop you from receiving payments or interacting with the services on the Ethereum blockchain.
- No More Intermediaries — Blockchain technology allows for significant innovations and creates a functional peer-to-peer network where people trade directly with one another. As such, it is possible to cut our unnecessary intermediaries, something that can help drive down costs of making transactions.
However, this only covers the very basics of what Ethereum is. There is a lot more to learn about the technology on the official website. Furthermore, you can also discover the extensive ecosystem of dApps powered by Ethereum to better grasp the opportunities of developing with this blockchain. Keep in mind that Moralis has full support for Ethereum dApp development
What are ERC-20 Tokens?
Tokens on the Ethereum blockchain can represent anything. This means that we technically can tokenize virtually anything. This makes tokens a compelling feature of the Ethereum ecosystem. As such, this is a feature that needs to be handled by a standard, which is precisely what the ERC-20 is. ERC-20 tokens are arguably the most well-known cryptocurrency token standard anywhere in the world – so what are ERC-20 tokens exactly, beyond an Ethereum standard?
ERC-20 is a standard of the Ethereum system which enables all tokens to have identical properties. This means that all ERC-20 tokens need to be of the same type and value, making them interchangeable. Any ERC-20 token can, therefore, be changed for another as we have a clear standard for measuring their value. So, what does this standard actually mean?
The ERC-20 standard implements an API for tokens with smart contracts. This standard enables the tokens to be transferred from one account to another, set the total supply of the token, and get the current token balance of an account. However, to be called an ERC-20 token, the smart contract needs to implement the following methods and events:
Methods:
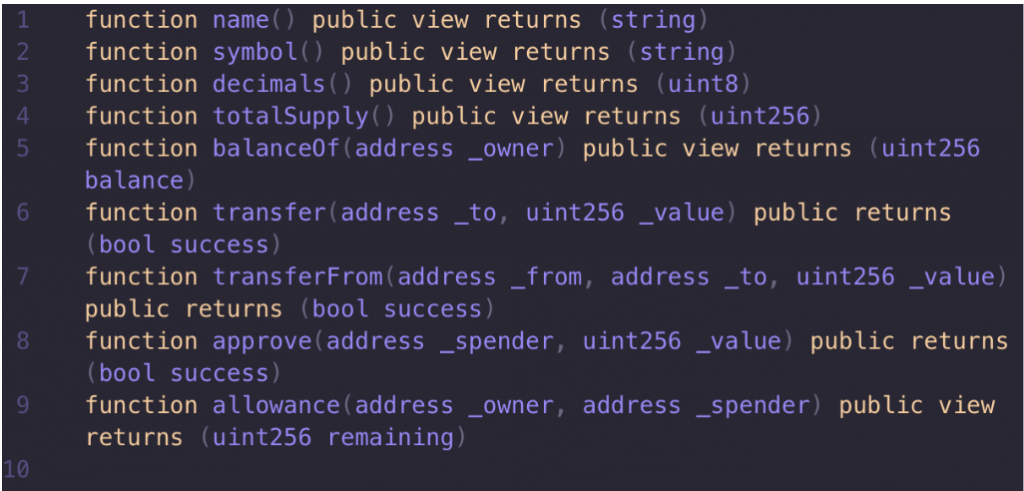
Events:

How to Create Ethereum Tokens Quickly
The best way to become a token creator is with Moralis. Using the platform makes token development easy, quick and there is little to no development background needed to create an Ethereum token. This section will break down all the necessary tools, preparations, and steps required to create ERC-20 Ethereum tokens. So, if this sounds of interest to you, follow along as we take a closer look at the process!
We will use the development and testing framework Brownie to exemplify the process. However, if you are comfortable using other frameworks such as Truffle Suite or Hardhat, the process does not differ drastically. Furthermore, the token we create in this example will be deployed on the Ropsten Ethereum Testnet.
Prior to getting started with our token, we need a few things: a node, Ether, and a MetaMask account. So, let’s break down how we can acquire these three elements starting with the node.
How to get a Node for Creating Ethereum Tokens
So, before we create Ethereum tokens, the first thing that we need to fetch is an Ethereum node. We need a node as this is the way for our software to communicate and interact with the blockchain. Without it, we would not be able to deploy our token on the network.
To get our hands on a node, we must find a node provider. There are several node providers available, but the best one is Moralis. Moralis offers Speedy Nodes, which are some of the fastest, most reliable nodes on the market. Moralis’ Speedy Nodes support four different networks: BSC, Polygon, Arbitrum, and Ethereum.
As we are going to choose Moralis as our node provider, you can go ahead and create a Moralis account if you don’t already have one. Furthermore, if you are interested in connecting to these nodes, the Moralis blog offers several guides on how to connect to Ethereum nodes, BSC nodes, and Polygon nodes.
Get Ether
The second prerequisite to becoming an ERC-20 token creator with Moralis is to acquire some Ether. There are several ways to get you hands on Ether; one option is to buy it using fiat currencies on platforms such as Coinbase. Another option is to swap other tokens for ETH on a decentralized exchange such as Uniswap. However, to even hold any Ether, you will first need to get a crypto wallet, and one great candidate is MetaMask.
Create a MetaMask Account
So, prior to acquiring Ether, we must first get a MetaMask wallet. Not surprisingly, this is also the third thing we need to do before we create Ethereum tokens. To create an account, we must first download either the MetaMask app or add the software as a browser extension. This process is easy, and there are a ton of significant use cases in the world of crypto for MetaMask as it acts as a gateway to the decentralized web.
![]()
However, if you have trouble setting up your MetaMask account, check out this article from the Moralis website. This is a full breakdown of MetaMask and how you set up your first crypto wallet. Now that we have a MetaMask account, Ether, and access to nodes, we can move on to creating Ethereum tokens.
Create Ethereum Tokens
Becoming a token creator with Moralis can be broken down into four different steps: 1) set up a Speedy Node, 2) add initial code/imports, 3) create the contract, and 4) check if the contract is working. These four steps are pretty straightforward. However, we will break down each of these steps to simplify the process even further.
1) Setting up a Speedy Node
As we are working with Brownie, the first thing that we need to do is to add the testnet Ropsten to our framework. So, the first thing that we need to do to establish this connection is to log in to our Moralis accounts. Then we need to click on the Speedy Nodes tab at the far left of our interface.
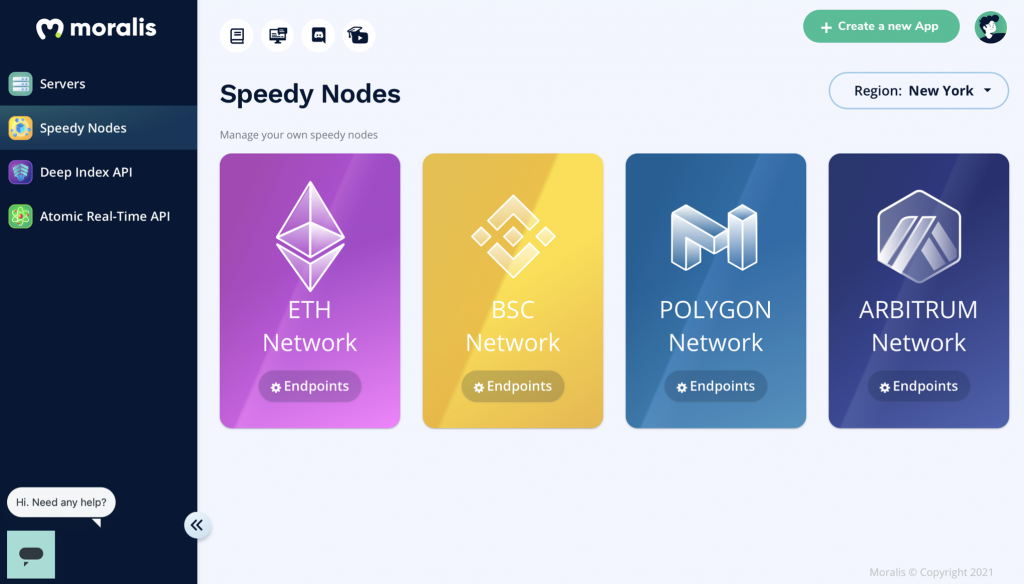
Clicking this tab will present us with four different alternatives, one of which is the Ethereum Network. If we then hit the ”Endpoints” button here, we receive a few options, and the one we want to pick for this example is Ropsten. All we need to do is copy the URL and keep this for later.
Once we have the URL, we move on back to our development software and create the link with just one simple line of code. We will need to provide a name, host, chain ID, and an explorer. This we want to use in the following way:
![]()
As you can see, the name of the network, in this case, is ”ropsten_test”, the host will be the URL that we fetched from Moralis, the chain ID is 3 for Ropsten, and the explorer is your EtherScan.
To ensure that the network is added to Brownie, we can check with the ”brownie networks list” command. If we are successful, the Ropsten network should show up in the list.
2) Initial Code/Imports Before Creating Ethereum Tokens
Before actually creating an Ethereum token, there are a few preparations that we need to do in the development environment of our contract itself. Firstly, we need to add a license identifier, secondly, we need to add a pragma line, and finally, we need to import the proper OpenZeppelin package.
- License Identifier — So, the first thing that we need to do is add a license identifier that enables us to mark the licensing status of our token. For this example, we will use the MIT license as it is free and open source. All we need to do is to input the following into our code:

- Pragma Line — Secondly, we need to add our pragma line that signals what compiler we are using. This is quite simple, and in this example, we will use anything superior to the 0.8.0 version. To do so, the following needs to be included in the code:

- Import OpenZeppelin Packages — The final part of the preparations is to import the proper OpenZeppelin packages. If you have previously developed with Brownie, we can check what packages are already installed by typing ”brownie pm list”. This will list all installed packages. If OpenZeppelin isn’t among the installed packages, we can install by writing ”brownie pm install xxx” with the x:es replaced with the desired OpenZeppelin version.
Once the package is installed, we can import the package into our code with the following line:
![]()
3) Create a Smart Contract
With all the preparations completed, we can create the token itself. Creating a token is quite simple now that we have imported the OpenZeppelin package. So, for this example, we are going to create a token named ”DanielToken”. This would give us the following code to create an ERC-20 token:
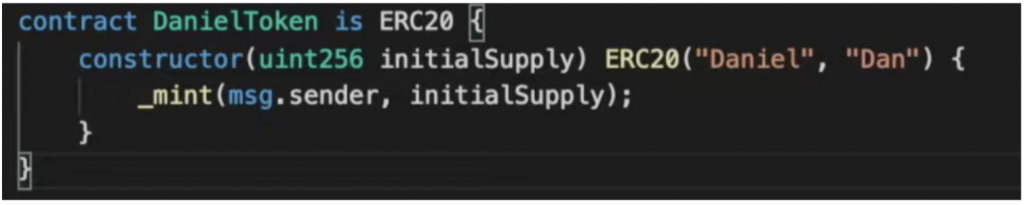
As you can see, the token’s name is ”DanielToken”, and this can be replaced with anything you desire. We can also replace the ”Daniel”, which is what the token will be called, and the symbol ”Dan” with whatever we want in the constructor. As you can see, the constructor also has an initialSupply that needs to be initialized when the token is deployed.
Then we must also create the constructor’s body that consists of the line ”_mint(msg.sender, initialSupply);”.
This is all that you need to do to create your very own ERC-20 compliant token! So, now that you have become a token creator with Moralis, all that remains is to check if the token is working and deploy it on the network.
4) Check if the Contract is Working
The final step prior to deploying a token on the Ropsten network is to ensure that it is working correctly. This we can do by simply inputting the following command ”brownie console”. If the contract compiles successfully, everything is working as it should.
Once we are sure that it is working, we can deploy the contract onto the blockchain.
Deploying an Ethereum Token
Now that we have created a token, we can move on to deploying it. To do this, we must first create a Brownie account. This is quite simple; all we need to do is use the ”brownie accounts new xxx” command, where ”xxx” is replaced with a name for the account.
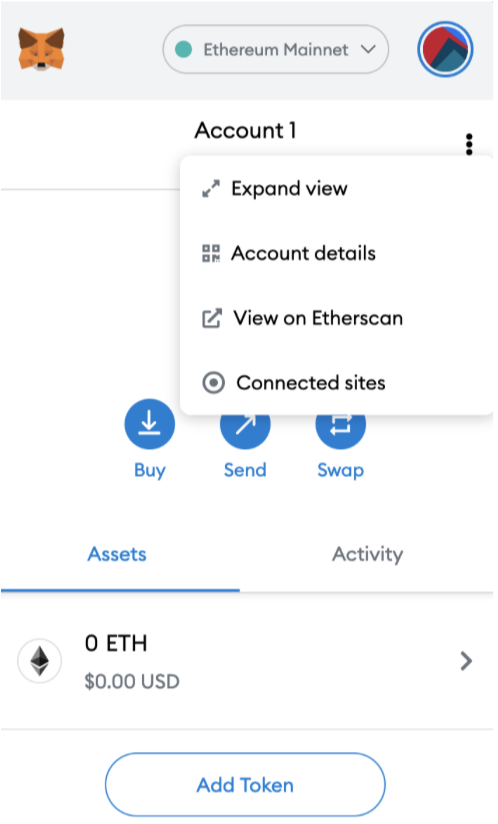
Once the command is executed, the console will ask for the private key of our account. This is another reason why we need MetaMask, which is where we get our key from. So, to get the key, we press the three dots at the top right of our MetaMask interface and hit the ”Account details” alternative. Here we’ll find our key, and we need to input this into the console, hit enter, and follow further instructions.
Next, we need to connect to the network by inputting the following: ”brownie console –network ropsten_test”. Once executed, the project will launch on the Ropsten testnet.
After this, we input ”account = accounts.load(’accountName’)” where the accountName is replaced with the name of your account. Then Brownie will ask for the password, which you set earlier when creating the account.
Once we are logged in we can deploy the account by simply writing ”tokenName.deploy(initialSupply, {’from’:account})” where the “tokenName” is replaced by the name of the token we created and “initialSupply” is replaced with the desired initial supply. Once we have decided on the initial amount, we can execute the command. This will deploy the contract and provide us with an address for our tokens.
View Your Ethereum Tokens in MetaMask
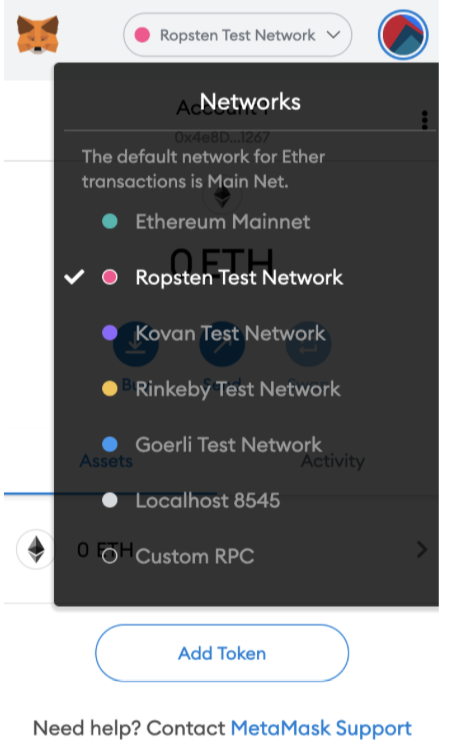
Now that the contract is deployed, we can view our tokens through the address from the console. To do so, we need to copy the address and move on to our MetaMask interface. Then we need to change the network to the Ropsten Test Network that should already exist among the default alternatives.
Once changed, we can go to the assets tab and add a new token. Here we simply input the address, hit next, and then add the token. This will provide our account with the initial supply specified in the deployment process. These are all the necessary steps to becoming a token creator with Moralis.
Furthermore, if you are interested in a video guide, we recommend the following clip from the Moralis YouTube channel breaking down the process of how to create an Ethereum token:
Creating ERC-20 Ethereum Tokens — Summary
It does not have to be a difficult task to create Ethereum tokens. You can become a token creator with Moralis with just some preparations and a few simple steps. All you need is to set up a Speedy Node, make a few preparations, create a smart contract, check if the contract is working, and deploy it on the Ethereum chain.
Furthermore, Moralis does not limit you to creating Ethereum tokens. The process of creating tokens on other chains is quite similar. For one, Moralis offers a great guide on how to create BSC tokens. So, if you are interested in expanding your Web3 development skills, check out the Moralis blog for more content.
Moreover, Moralis is much more than just a platform for creating tokens. The platform provides users with a fully managed backend infrastructure making Moralis the perfect tool for building dApps. To showcase how easy it is to build dApps, check out the following article on how to create Ethereum dApps.
So, if you want to become a dApp developer or create Ethereum tokens, we highly recommend signing up with Moralis today. With an account, you can create both dApps and tokens within a much shorter time frame, along with accessing other valuable tools on the Moralis platform.
