If you’ve been using Moralis for a long time, you’ve probably operated a Moralis server. This feature is no longer available as we transition to Moralis 2.0, but you can now instead set up a self-hosted Web3 server. This gives you access to the same powerful Moralis features and easy access to Moralis’ Web3 APIs. Herein, we show you the exact process of how to accomplish this and connect your server to Moralis. Furthermore, with a self-hosted Web3 server, you can take full control of your backend, data, and database. Also, you can finetune your hosting to reduce hosting costs. Moreover, a self-hosted server for Web3 enables you to tweak any customer code, plugins, and packages, offering a better developer experience.
So, if you are interested in setting up a self-hosted replacement for your Moralis server, read on! To make the process as smooth and straightforward for you as possible, we also prepared several code repositories. Hence, as we move forward, you will save a lot of time by cloning our code or downloading the suitable ZIP files from GitHub. We will also utilize some excellent tools to complete today’s challenge. Aside from Moralis, you will also use MongoDB, Redis, and Heroku. As such, you’ll be able to get your Mongo database, set up your connection string, and deploy your server to production. In short, it will take you about twenty minutes to set up a self-hosted Web3 server.
That said, you can use today’s article if you are just starting with Moralis or looking to migrate your Moralis database. We’ll take you through the process step by step. We also have a neat video tutorial waiting for you at the bottom of this article for additional clarity on how to set up a self-hosted server for Web3!

Set Up a Self-Hosted Web3 Server by Running Parse Server Locally
The first step to setting up a self-hosted Web3 server requires you to run a Parse Server locally. To do this, you must install a compatible version (v16 or above) of NodeJS. You also need to have a package manager ready – either npm or yarn. Moving forward, we will use the latter.
Next, download the “parse-server-migration” project’s ZIP file. Then, unzip the file and open it in Visual Studio Code (VSC). Moving on, you want to install all dependencies using the “yarn install” command:

While the installation of dependencies is underway, open the “.env.example” file. Start by renaming the file to “.env”. Furthermore, inside the file, you’ll see several important environmental variables. As such, you need to obtain their values:

Looking at the screenshot above, you can see that the first variable is your Moralis Web3 API key. To obtain that key, log in to your Moralis dashboard and select the “Web3 APIs” option in the side menu:

Keep the port value as it is. As far as the master key goes, you can set it up yourself (ensure it’s secure). You can follow our lead and use “001” for your application ID. Regarding the server URL, you can use the local server for now. However, once we go to the production phase, you will use a different URL. Furthermore, you will generate the cloud path once you build your project. Additionally, to generate your database URI, you will use your MongoDB account.

Using MongoDB to Generate Your Database URI
In case you don’t have a MongoDB account, create one now. Then, complete the initial setup, including the cluster setup. With that covered, you’ll be looking at something like this:
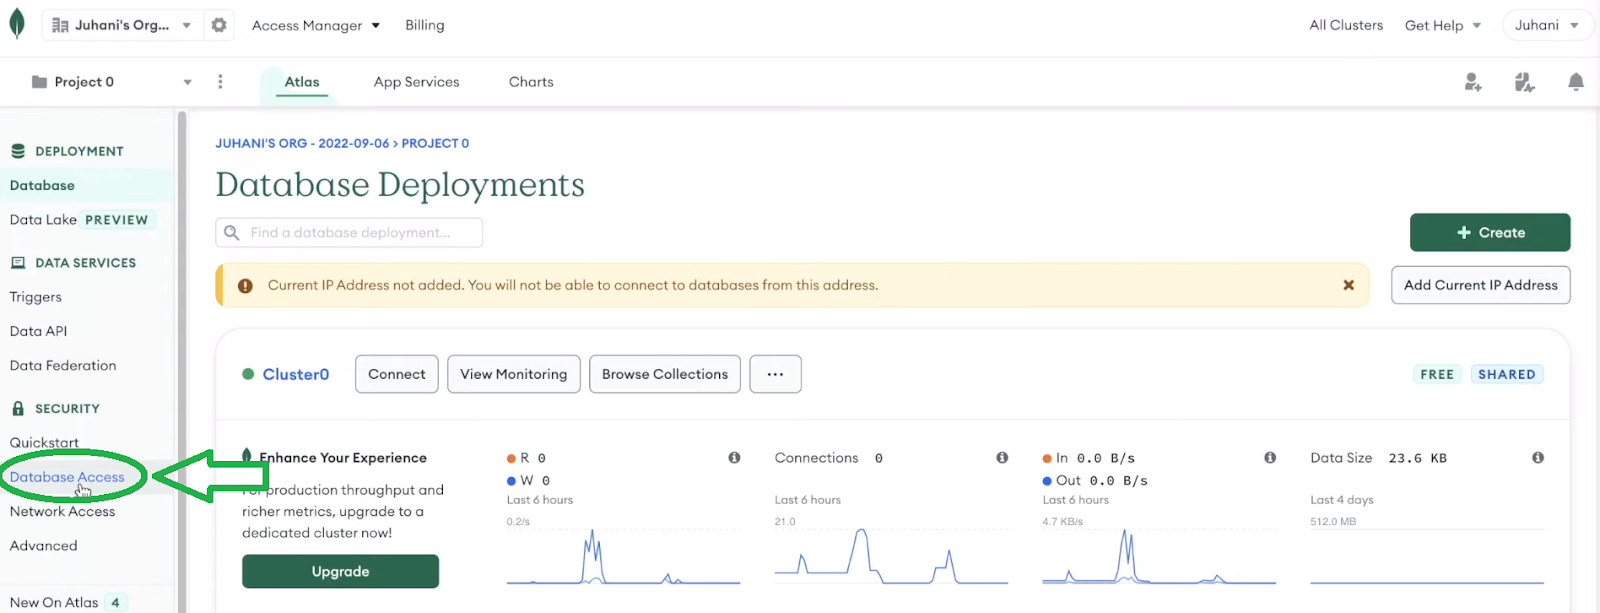
Moreover, as indicated by the above image, you must click on the “Database Access” option from the sidebar. Once on the “Database Access” page, add a new database user using the “Password” authentication method. Then, enter your username and create your password:

Also, don’t forget to give this user both “read” and “write” roles. Then, click on the “Add User” button:

With a new user in place, go to the “Network Access” page and add an IP address:

As you can see in the screenshot above, you can allow access from anywhere. Next, go to the “Database Deployments” page and use the “Connect” option:

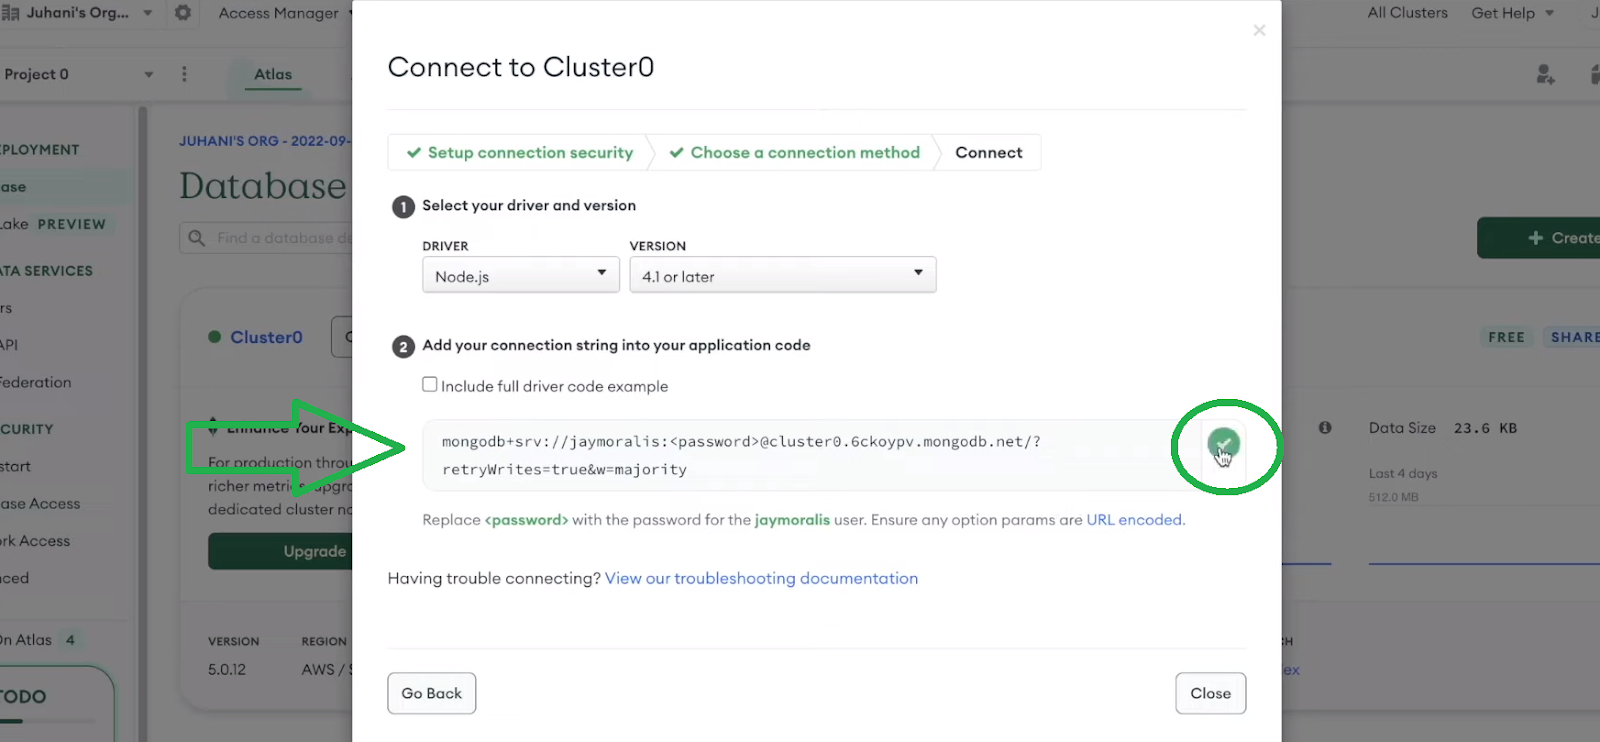
Then, select the “Connect your application” option:

Finally, you’ll be able to copy your database URI:
Then, return to your “.env” file and paste the above-copied URI into the designated area:

With your MongoDB URI in place, you must also tweak the URI. First, replace “<password>” with your actual password and add your database name (“parse” for example):

You are more than halfway through the initial setup for your self-hosted Web3 server. Next, you need to obtain your Redis URI.
Obtaining Your Redis URI
Looking at your “.env” file, you can see that “REDIS_CONNECTION_STRING” is the next variable. As such, make sure to go to the Redis enterprise cloud page and click on the “Try Free” button:

By completing the initial setup, you will most likely create your database. However, in case you haven’t, do so once inside your dashboard:

Next, go to the “Data Access Control” page, select the “Roles” tab, and click on the “Add new role” button:

In the “Create new role” window, enter that role’s name and select your subscription (the one created when creating your Redis database). Moreover, make sure to give this role full access. Also, remember to save the changes and save your new role:

With the new role in place, you can use the “Users” tab of the “Data Access Control” page to create a new user. The role should match the above-created role (e.g., super); hence, you need to come up with a username and password:

Once the above user is ready, you can copy your endpoint from the “Databases” page:

With your endpoint copied, return to VSC and paste it under the “REDIS_CONNECTION_STRING” value, leaving “redis://” in place:

Next, add your Redis user’s username and password at the beginning of the string, followed by “@“:

Note: We’ve used the same username and password in MongoDB and Redis.
Running a Self-Hosted Web3 Server Locally
As far as the “RATE” variables go, you can go with the default values. Further, you can use your terminal and enter the “yarn build” command, which will create the “build” folder. Next, use the “yarn dev” command to get a development server of your backend Parse Server:

You can now use your browser to go to “localhost:1337/server”:

The above error is an indication that the server is up and running. Hence, you can go ahead and create a client where you can call a server and have access to Moralis.
Setting Up and Running a Client
With your self-hosted Web3 server running locally, you must set up and run a client. This is where you can save some time by using our “parse-server-migration-react-client” project. As such, download the ZIP file from GitHub, unzip it, and open the project in VSC. Then, rename the “.env.example” file to “.env” and open it:

If you are familiar with creating dapps using Moralis 1.0, you know you had to obtain your app ID and server URL. However, since you created your own local server above, you can use that server’s details. As such, utilize the values used in the previous section:

Next, install all dependencies using the “yarn install” command. Then, you can use the “yarn start” command to run this project locally. Hence, you should be able to see this boilerplate dapp in your browser. As such, you can play around with its already built-in Web3 authentication:

Once you connect your wallet to the dapp, you can use the “EVM NFTs” option. By doing so, you can explore NFTs on different chains:

If there are actual NFTs in that wallet, the dapp will display them after you click on the “Show NFTs” button:

For a walkthrough of the “NftGrid.tsx” file, use the video below, starting at 10:55. This is where you can see how the Moralis Web3 API works with your self-hosted Web3 server. Essentially, the code follows the same principles as it did with Moralis servers.
Example of Writing to MongoDB
Now that you have your self-hosted Web3 server and your example dapp running locally, you can play around with the functionality. For instance, you can add specific lines of code to the “Home.tsx” script to write to MongoDB (11:28). For starters, you want to import “useMoralis” from “react-moralis“. Then, add a simple function that will add an example object to your database:

Lastly, you also want to add a button that will enable you to call the above example function:
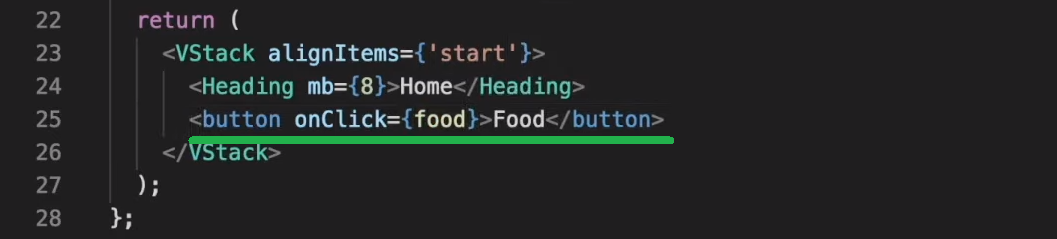
If you now restart your dapp with the “yarn start” command, you should see the “Food” button:

If you click on that button, it will add the above object to your MongoDB. Hence, you can see that by returning to the “Database Deployments” page and clicking on the “Browse Collections” option:

On the “Collections” tab, you’ll be able to see your “parse” database (if you used the same name as us) and the “Food” object:

You can also see that other classes have been added to your database from your Moralis database (0:45). Also, you can migrate elements from unique classes inside your Moralis database (13:52).
Deploying Your Self-Hosted Web3 Server with Heroku
So far, you’ve been running your self-hosted Web3 server locally. However, it is now time you learn how to deploy your server so everyone can access it. This is where we’ll use Heroku. Hence, create or log in to your existing Heroku account and create a new app:

Name your app as you wish, select your region, and click on the “Create app” button:

Then you can use your terminal to push your dapp to Heroku. To do that, you’ll need to download and install the Heroku CLI. Then, you’ll be able to use the “heroku login” command (17:51):

Note: Make sure you are back in the “pare-server-migration” project.
Once you’ve logged in to Heroku using your terminal, enter the “git init” command. Then, use the “heroku git:remote -a moralis-host” command. In case you named your Heroku app differently, use that name instead of “moralis-host“. Next, add all your folders into that repository with the “git add .” command, followed by this: git commit -am “make it better”.

Finally, you push it to the Heroku master branch with the “git push heroku master” command.
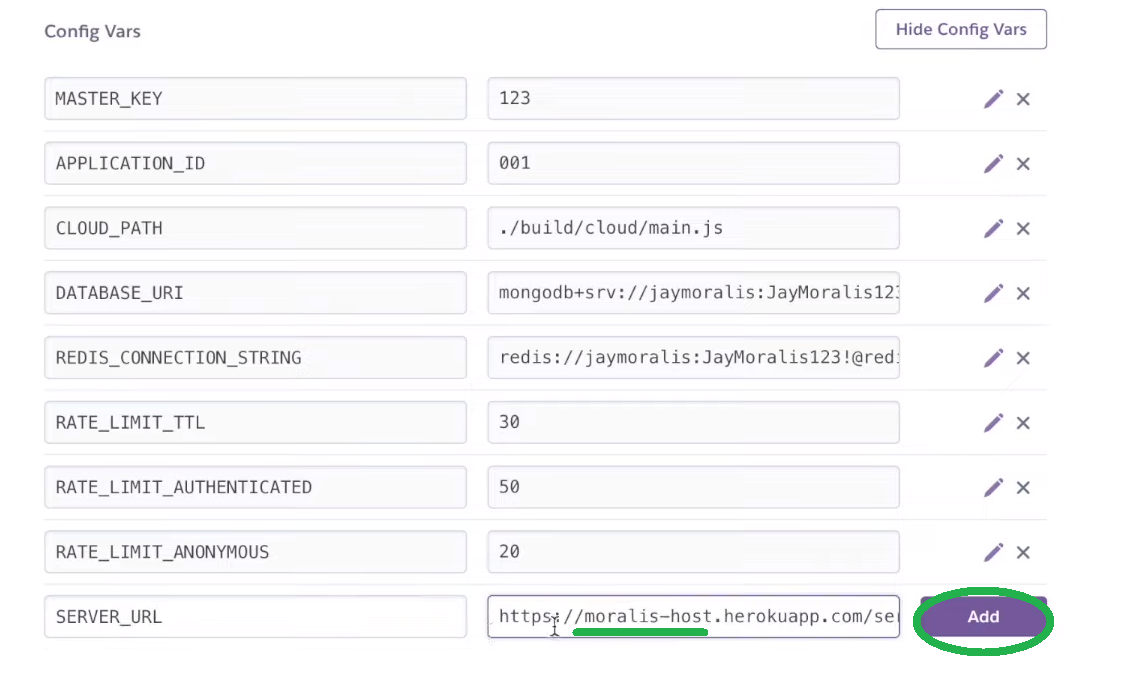
Furthermore, you must manually enter your environmental variables and their values (from “.env”) to Heroku. As such, you will need to go to the “Settings” tab of your Heroku app:

Once on the “Settings” tab, you must click on the “Reveal Config Vars” button:

Then, simply enter all the variables and their values. Last but not least, you also need to add your server URL, which needs to include your Heroku app name followed by “.herokuapp.com/server”:
You can now paste the above server URL into your client-side React app’s “.env” file:

Finally, here’s the video tutorial with all the details:
How to Set Up a Self-Hosted Web3 Server – Summary
Today, you learned how to set up a self-hosted Web3 server. You can use the steps herein to migrate your existing Moralis database effortlessly. Along the way, you had a chance to learn how to use MongoDB and Redis. Hence, you now know how to set up the database and establish a connection string. We first focused on running your self-hosted Web3 server locally. Further, we even showed you how to set up and run a client. Last but not least, you also learned how to deploy your Web3 server using Heroku.
Now that you know how to get Web3 servers up and running, it’s time to dive deeper into dapp development. This is where Moralis’ cross-platform interoperability makes things straightforward. After all, it enables you to use legacy dev tools and programming languages to create killer dapps (decentralized applications). For instance, you can use Firebase or Unity to create awesome Web3 games. With your JavaScript proficiency, you can deploy all sorts of DeFi dapps. If that sounds interesting, make sure to explore the Moralis YouTube channel, the Moralis blog, and the Moralis documentation. With the help of these valuable resources, you can become a Web3 developer for free.
On the other hand, you may be interested in going full-time crypto sooner rather than later. If that’s the case, becoming blockchain certified might make a lot of sense for you. As such, you may want to consider enrolling in Moralis Academy. Aside from top-tier crypto courses, this is the place to get expert mentorship, a personalized study path, and membership in one of the most advancing communities in the industry.

