Are you looking for the easiest and quickest way to build Arbitrum projects? If so, follow along in our three-step tutorial demonstrating exactly how to do so! In this article, you will learn how to build a Web3 Zapper clone for the Arbitrum testnet. Now, if you are eager to get going, you can jump straight into the code by checking out the GitHub repository for the project below:
Full Web3 Zapper Clone Repo – https://github.com/MoralisWeb3/youtube-tutorials/tree/main/ZapperAcademy
To get the project up and running, you only need to add your Moralis API key and configure the code to make it suitable for the Arbitrum testnet. It is as easy as that when working with Moralis! To get your API key and full access to the various Web3 APIs from Moralis, remember to sign up with the best Web3 infrastructure provider immediately. You can create an account for free and start leveraging the full power of Web3 technology today!

Overview
In today’s article, we will explore the Arbitrum testnet, along with showing you how to create a Web3 Zapper clone in three steps:
- Set up the project
- Add your Moralis API key and configure the code
- Install dependencies and start the app
By completing the steps above, you will learn to create your own Zapper clone for the Arbitrum testnet. If you can’t wait to start, click here to jump straight into the Arbitrum projects tutorial!
Along with a guide on how to set up Arbitrum projects, the article explores the ins and outs of the Arbitrum testnet. In doing so, we provide a quick introduction to Arbitrum and the Arbitrum Goerli testnet, along with discovering the network’s various chain IDs. So, if you are unfamiliar with the Arbitrum testnet, scroll down and start in the ”What is the Arbitrum Testnet?” section.
During this Arbitrum projects tutorial, you will come to familiarize yourself with the Moralis EVM API. This is one of Moralis’ highly scalable Web3 APIs, and if you are serious about becoming a blockchain developer, it is worth checking out other interfaces. For instance, check out our article on the number one Ethereum price API, allowing you to seamlessly integrate token data into your applications in no time!
Also, remember to sign up with Moralis if you want to access these amazing Web3 development resources. You can create your account for free and start leveraging the full power of blockchain technology immediately!

How to Build Arbitrum Projects in 3 Steps
In this Arbitrum projects tutorial, we will show you how to briefly set up a full-stack Web3 Zapper clone using the Moralis Ethereum API, NodeJS, React, and web3uikit.
Zapper is a fintech platform enabling you to manage all your DeFi assets in one place. To make this tutorial as straightforward as possible, we will use an already prepared project template to which you only need to make a few configurations.

Once you are done setting up the project, we will hand you over to one of our experts. Our expert will walk you through the code in a comprehensive video tutorial. However, before diving into this Arbitrum projects tutorial, we will provide a quick application demo below!
Application Demo – How Does the Zapper Clone Work?
Let’s jump straight into the application and take a closer look at the landing page:
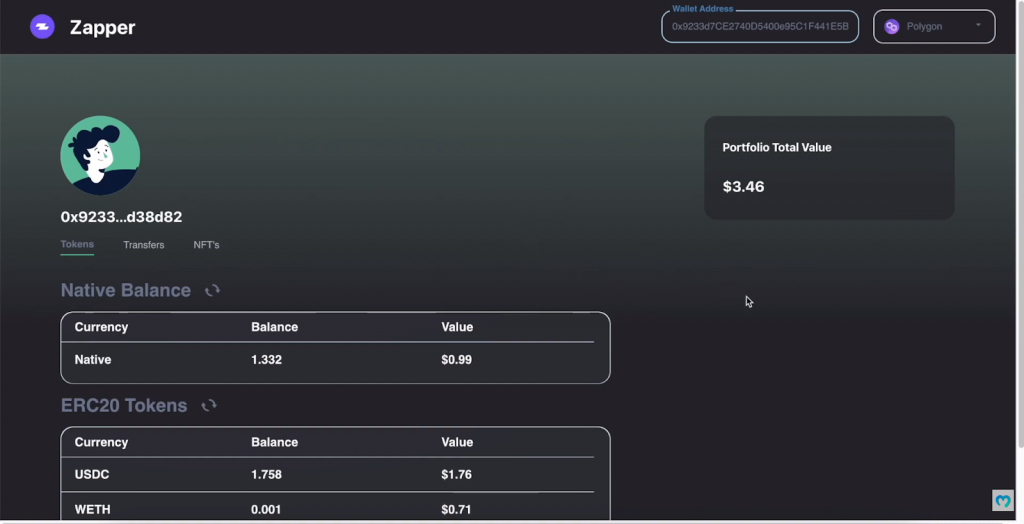
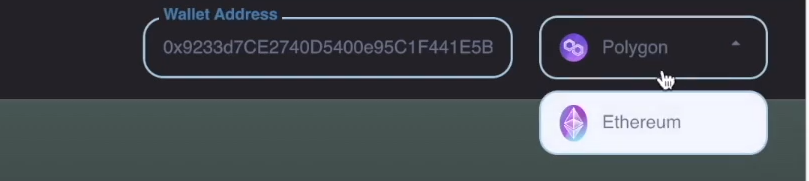
At the top right, we have two input fields; one for a wallet address and one for choosing a blockchain network. The template initially features Polygon and Ethereum, which is why you will need to add the Arbitrum testnet yourself:
Once you add a wallet address and choose a blockchain network, the app displays three tabs: ”Tokens”, ”Transfers”, and ”NFTs”:

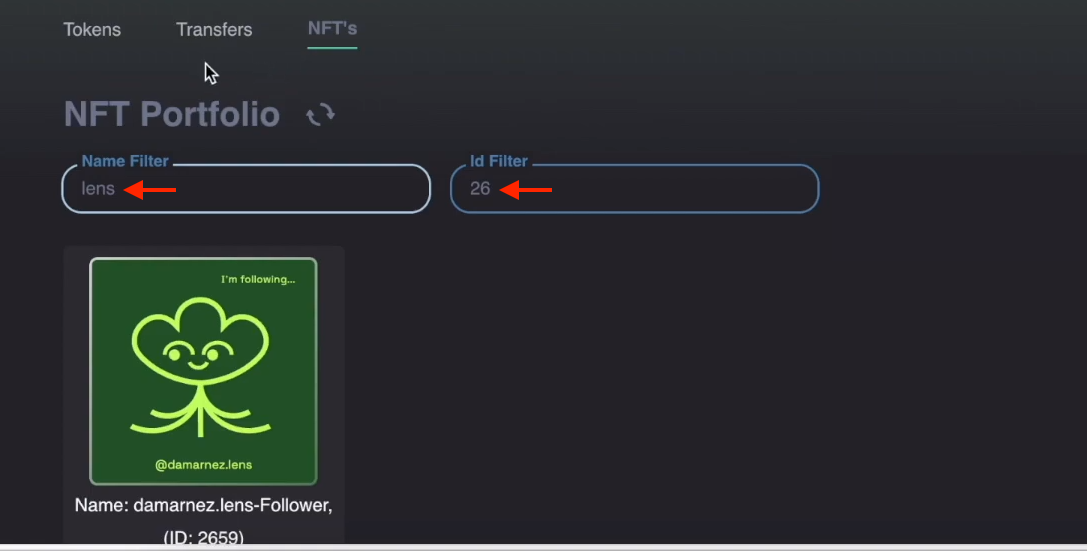
Each tab displays precisely what you can expect; however, let us look closer at the ”NFTs” page, as this page features an exciting filter function. As you can see in the image below, you have the option to filter NFTs based on a name or an ID:
So, if you want to learn how to create this application, join us in the initial step as we show you how to set up the project!
Step 1: How to Build Arbitrum Projects – Set Up the Project
To begin with, the first thing you need to do is set up a new project. As such, go ahead and create a new folder called ”ZAPPER”. From there, open this folder in your preferred integrated development environment (IDE).
In our case, we will be using Visual Studio Code (VSC); however, you can use any IDE you are more comfortable with. But remember that the process might occasionally differ if you opt for another alternative.
With a new project folder at your disposal, you need to clone the application code to your local directory. You can find the complete repository for the project down below:
Complete Zapper Clone GitHub Repository – https://github.com/MoralisWeb3/youtube-tutorials/tree/main/ZapperAcademy
With a copy of the GitHub repository on your local machine, you must add your Moralis API key and configure the code, which we will show you how to do in the next step!
Step 2: How to Build Arbitrum Projects – Add Your Moralis API Key and Configure the Code
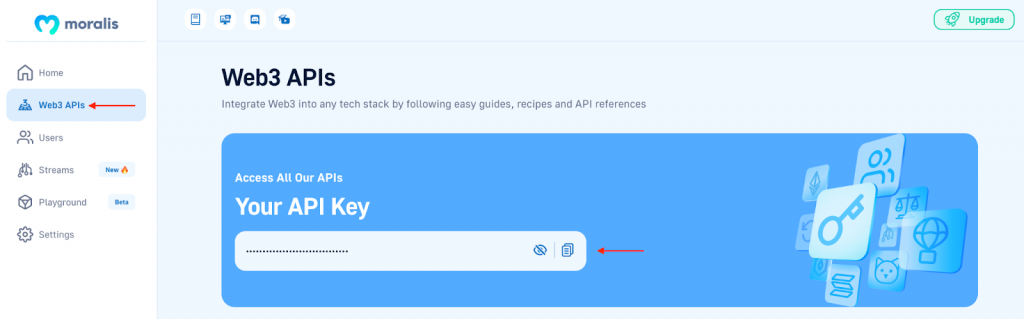
If you have not already, the first thing you need to do from here is to sign up with Moralis. You can create your account for free, which only takes a few seconds. With an account at hand, you need to fetch your API key. To do so, log in to the Moralis admin panel, navigate to the ”Web3 APIs” tab, and click on the copy button:
Next, go back to your code editor, locate the ”.env.example” file in the ”backend” folder, and rename it ”.env”. From there, open the file and set MORALIS_API_KEY to equal your key. It should look something like this:
MORALIS_API_KEY = “JnJn0MWxFNPv4V1PZQY19GH…”
Also, as we showed during the application demo, the original template only features the Ethereum and Polygon networks. Consequently, you must make a few configurations to add the Arbitrum testnet yourself. Due to time limitations, we will not be able to cover all the required configurations. However, we will provide an example that you can use for reference.
For instance, for the /nativeBalance route in the backend folder’s ”index.js” file, the chain is fetched from the app’s UI. Following this, an if statement checks the chain ID to be able to fetch the price in USD, and it looks something like this:
let nativeCurrency;
if (chain === "0x1") {
    nativeCurrency = "0xC02aaA39b223FE8D0A0e5C4F27eAD9083C756Cc2";
} else if (chain === "0x89") {
    nativeCurrency = "0x0d500B1d8E8eF31E21C99d1Db9A6444d3ADf1270";
}
Since you want to make it suitable for the Arbitrum testnet, add the testnet’s chain ID as another else if statement in the same way as the other options. You must also add Arbitrum as an option to the ”frontendUI/src/components/WalletInputs.js” file. Initially, it only looks like this:
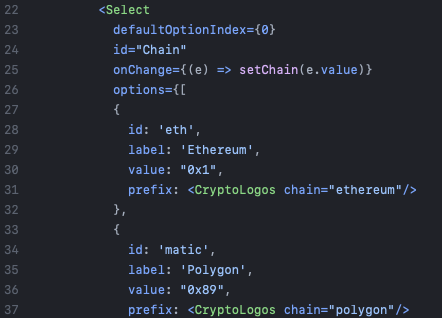
Continue to follow a similar pattern throughout the code to add the Arbitrum testnet in all the required places. If you need further help with this, please watch and follow along in the video below.
Step 3: How to Build Arbitrum Projects – Install Dependencies and Start the App
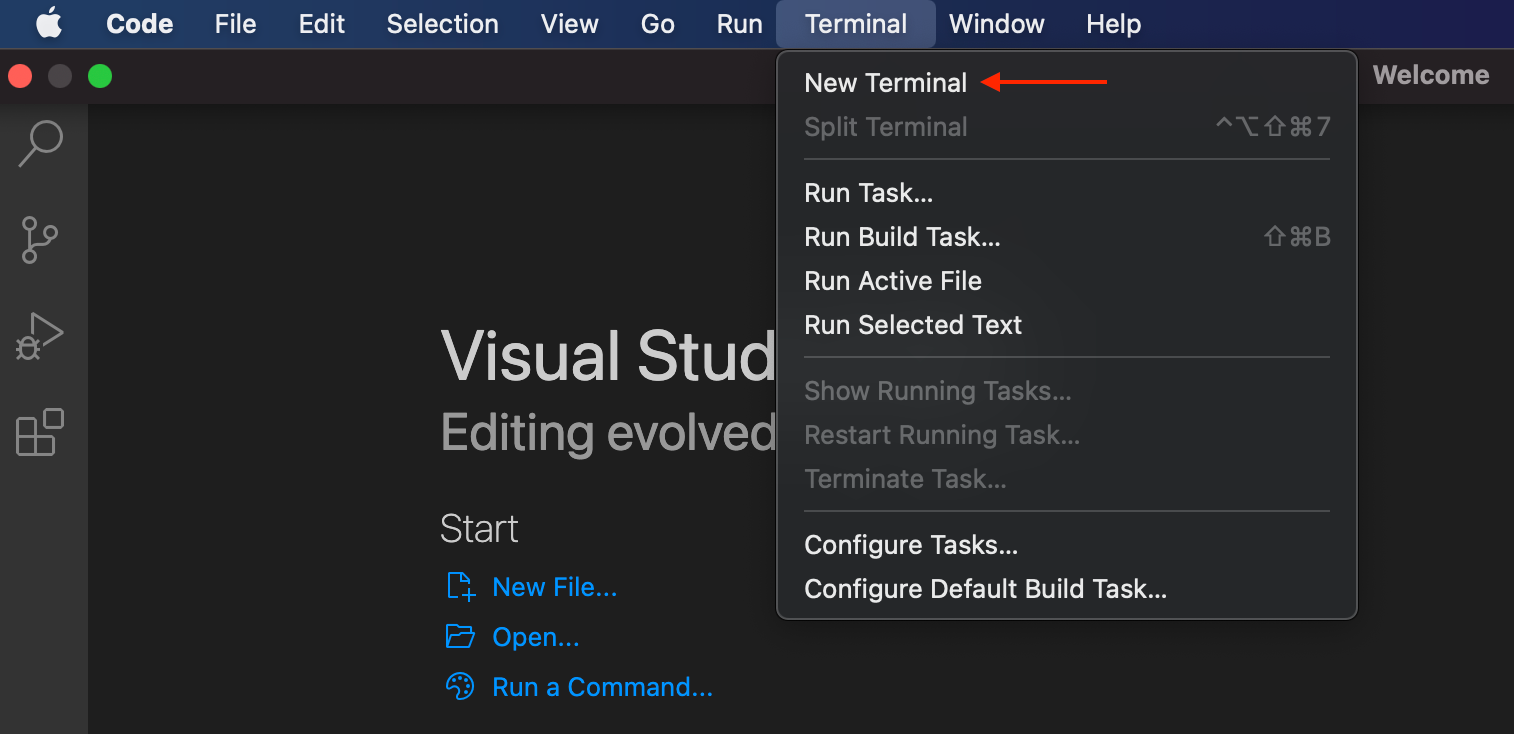
Once you are done configuring the code, you must install the required dependencies. First, you need to open a new terminal. If you are using VSC, you can do so by clicking on the ”Terminal” tab at the top, followed by ”New Terminal”:
Next, cd into the ”backend” folder and run the following two commands:
npm i moralis express cors dotenv nodemon
npm start
The first one installs the required dependencies; meanwhile, the other starts the backend Express server.
Next, cd into the ”frontend” folder and run the two commands below:
npm i axios
npm start
The first command installs Axios, and the other starts the application. Hence, you should now be able to launch the app!
Now that the application is operational, it is time to hand you over to our expert. In the Moralis YouTube video below, one of our talented software engineers provides a comprehensive breakdown of the entire code. Here you can find the essential timestamps for the various parts:
- Intro (00:00)
- NodeJS Backend (02:15)
- React Frontend (05:33)
- Native Balance (09:40)
- ERC-20 Token Balance and Filtering Tokens (27:50)
- Portfolio Total USD Value (40:45)
- Getting Wallet Transfer History (44:57)
- Getting Wallet NFTs (56:27)
- Filtering Wallet NFTs (01:06:27)
- Frontend Styling (01:14:21)
What is the Arbitrum Testnet?
Arbitrum is Offchain Labs’ brainchild, and the mainnet launched two years ago in 2021. The network is a layer-2 (L2) platform with the purpose of solving critical scalability issues of the Ethereum network!
Arbitrum is Ethereum Virtual Machine-compatible (EVM). As such, the network has the capability of running unmodified Ethereum smart contracts. Furthermore, the network leverages a method called ”transaction rollups”, which is a technique where a bunch of transactions is recorded on a layer-1 (L1) network and executed on a scalable layer-2 platform like Arbitrum.
As with all blockchain networks, transactions on the Arbitrum platform require gas fees. Consequently, when developing Arbitrum-compatible applications, developers generally utilize a testnet. This allows them to try their projects safely and securely before committing to a mainnet. In the case of Arbitrum, the main testnet is called the ”Arbitrum Goerli testnet”. Moreover, the Arbitrum Goerli testnet is based on Goerli, which, in combination with the Sepolia testnet, is one of Ethereum’s most prominent testnets. The Arbitrum Goerli testnet is fully EVM-compatible. Hence, it supports Ethereum-based contracts and assets. Testers and developers mostly use this network to debug and try their Arbitrum applications.
However, even though this is a testnet, developers still need to pay for their transactions on the Arbitrum testnet. Fortunately, it is possible to use a crypto faucet to acquire free Arbitrum testnet tokens. To learn more about this, check out our guide on the best Arbitrum faucet!
You can also further explore the ins and outs of layer-2 (L2) platforms by checking out our excellent article on scaling solutions for Ethereum!
Arbitrum Chain ID – How to Add the Arbitrum Testnet
A network’s ”chain ID” is a form of identifier used to distinguish between networks. Furthermore, each network and each testnet has its own unique identifier, and you can find the chain IDs for Arbitrum’s networks down below:
- Arbitrum Mainnet: 42161
- Arbitrum Goerli Testnet: 421613
That said, why do you need these unique chain identifiers? One reason is to add the networks to your Web3 wallet, enabling you to interact with the network. To demonstrate this, let us look at how you can add the Arbitrum Goerli testnet to your MetaMask wallet!
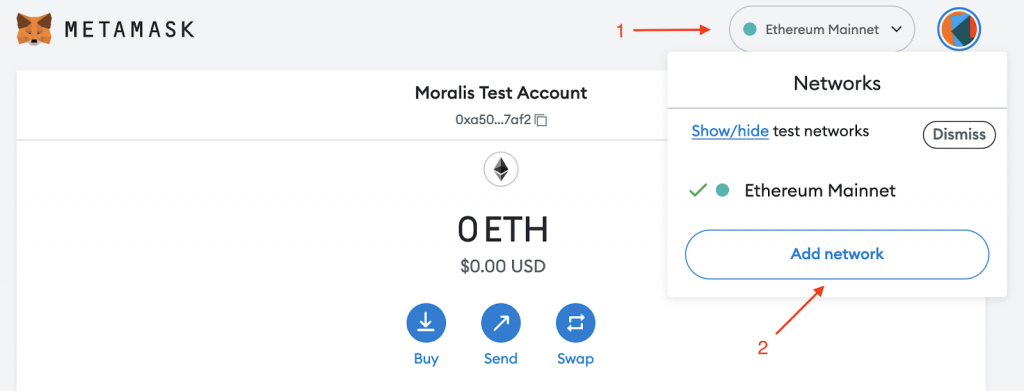
To add the Arbitrum testnet to your MetaMask wallet, start by clicking on the ”Networks” drop-down menu at the top, followed by the ”Add network” button:
Next, you can go ahead and choose the ”Add a network manually” alternative at the bottom:
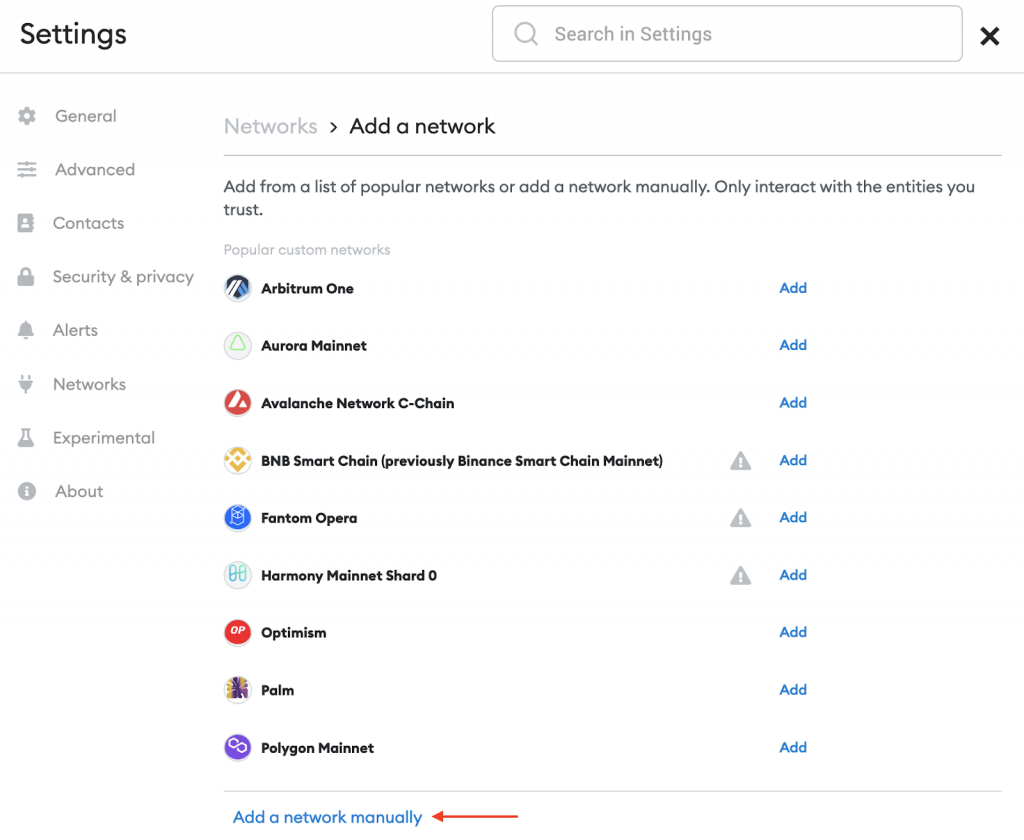
From there, MetaMask will prompt you for a name, an RPC URL, the chain ID, the currency symbol, and a block explorer:
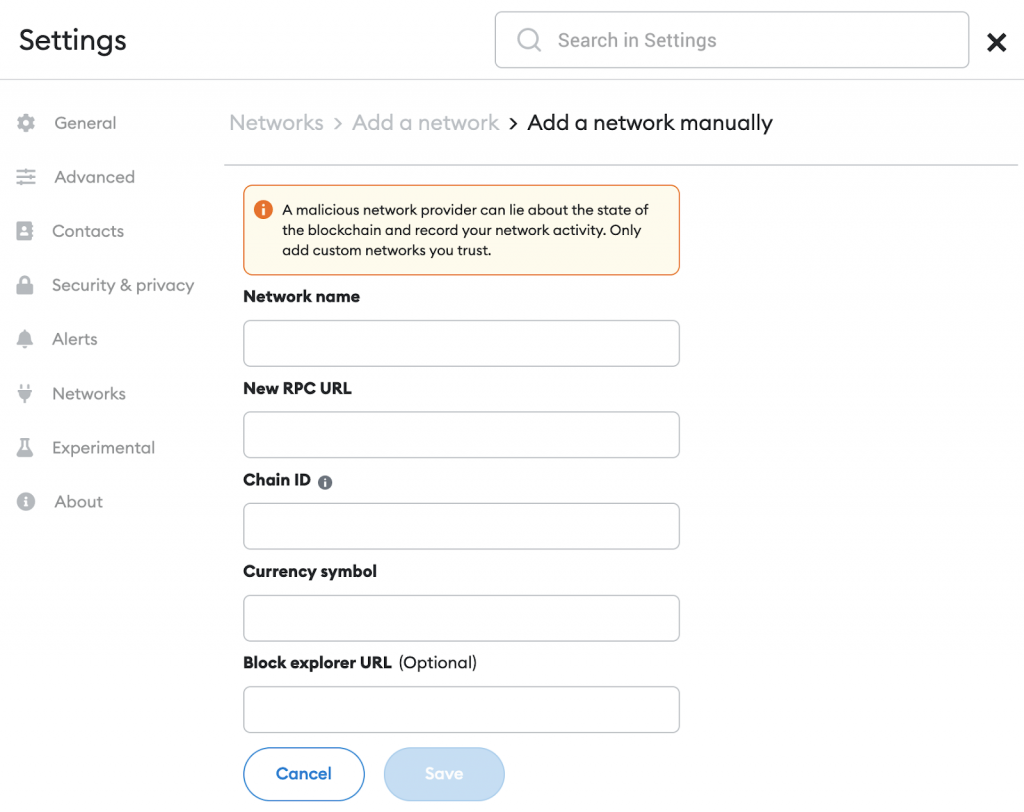
You will be able to find all the corresponding values for the Arbitrum testnet here:
- Network Name: Arbitrum Goerli Testnet
- New RPC URL: https://goerli-rollup.arbitrum.io/rpc
- Chain ID: 421613
- Currency Symbol: ETH
- Block Explorer URL (Optional): https://goerli.arbiscan.io/
Once you hit ”Save”, you will have added the Arbitrum Goerli testnet to your MetaMask wallet and are ready to start interacting with the network!
Summary – What is the Arbitrum Testnet?
In this article, you learned about the Arbitrum testnet and how to set up a Web3 Zapper clone in just three straightforward steps:
- Set up the project
- Add your Moralis API key and configure the code
- Install dependencies and start the app
If you have followed along this far, you now know how to set up your own Arbitrum projects!
If you liked this tutorial, you might also find other guides here on the Web3 blog interesting. For example, check out the following guide on how to get blockchain data, learn how to develop DeFi projects (e.g., an Arbitrum DEX), or explore the Erigon node consensus layer! You can also learn how to build a DEX!
Also, do not forget to sign up with Moralis if you want to access a more seamless Web3 developer experience. No matter the size of your project (startup or enterprise), you can join prominent industry leaders such as MetaMask, Polygon, NFTrade, etc., in leveraging the best Web3 infrastructure provider right now!

What is ERC-4337? Full EIP-4337 Guide