Learn how to create a DEX in this five-step tutorial by either following along in the video above or the steps outlined below. By following along, you’ll create a neat DEX token swap dapp, with one of the key features of our dapp being the ability to fetch real-time token prices. As we move forward, part of our tutorial will include utilizing the “getTokenPrice” endpoint from Moralis, and we will query the token price of an asset. In doing so, we’re going to use two methods:
const responseOne = await Moralis.EvmApi.token.getTokenPrice({
  address: query.addressOne
})
const responseTwo = await Moralis.EvmApi.token.getTokenPrice({
  address: query.addressTwo
})
As far as DEX functionality goes, the 1inch aggregator will simplify things significantly, and you can cover all swap-related features with the following lines of code (when properly integrated):
const allowance = await axios.get(`https://api.1inch.io/v5.0/1/approve/allowance?tokenAddress=${tokenOne.address}&walletAddress=${address}`)
const approve = await axios.get(`https://api.1inch.io/v5.0/1/approve/transaction?tokenAddress=${tokenOne.address}`)
const tx = await axios.get(`https://api.1inch.io/v5.0/1/swap?fromTokenAddress=${tokenOne.address}&toTokenAddress=${tokenTwo.address}&amount=${tokenOneAmount.padEnd(tokenOne.decimals+tokenOneAmount.length, '0')}&fromAddress=${address}&slippage=${slippage}`)
If you are eager to learn how to create a DEX by properly implementing the above-presented code snippets, make sure to dive into today’s tutorial. Create your free Moralis account and follow our lead!

Overview
By taking on our tutorial on how to create a DEX, you’ll get to follow our instructions throughout the five main steps. Along the way, you’ll learn how to use some of the most amazing Web3 tools, with Moralis leading the pack. To create the frontend portion of this example DEX, you’ll be using React. For your backend, you’ll use NodeJS. As such, the Moralis JS SDK will be the go-to tool for covering blockchain-related backend functionalities. You’ll also work with Axios – a promise-based HTTP client for JavaScript, wagmi library, and the 1inch aggregator. Nonetheless, below the tutorial, you can also learn what a DEX is.
Tutorial: How to Create a DEX with Moralis in 5 Steps
These are the five steps that you need to complete in order to learn how to create a DEX with Moralis, wagmi, 1inch, and JavaScript:
- Project Setup
- Build a DEX Header
- Create a DEX by Building a Swap Page
- Implementing Backend DEX Functionality
- Interacting with the 1inch Aggregator
Note: Our repo will provide you with styling files so that you can focus entirely on the Web3 functionality. However, feel free to explore the CSS scripts.
Step 1: Project Setup
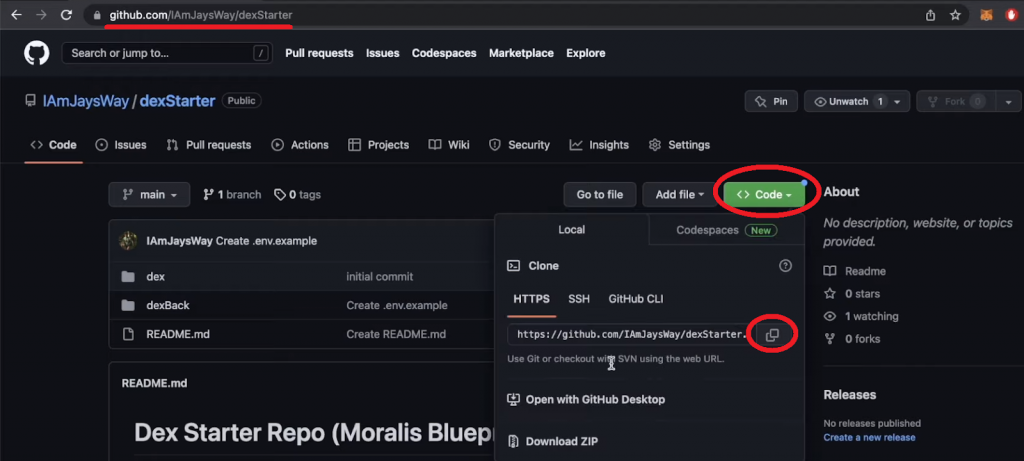
We created a special “dexStarter” repo so that you do not need to start today’s challenge from scratch. As such, make sure to visit our GitHub page and copy the URL address as outlined in the above screenshot. Then, open a new project in Visual Studio Code (VSC) and clone the code using the following command:
git clone https://github.com/IAmJaysWay/dexStarter
Next, target the “dexStarter” folder with this command:
cd dexStarter
Inside the “dexStarter” folder, you have the “dex” folder, which is where the frontend components exist, and the “dexBack” folder covering the backend. Essentially, you are starting with a simple React app on the frontend and a NodeJS app on the backend.
Before you move on to adding the required lines of code, make sure to install all the required dependencies. First, “cd” into your frontend folder and run the command below:
npm install
Then you can run your frontend with the following:
npm run start
As a result, you should see “Dex” on “localhost:3000”:

Step 2: Build a DEX Header
Open the “App.js” script from the “dex/src” folder and import the “Header.js” component:
import Header from "./components/Header";
With the above line of code in place, you can use the “Header” component in your “App” function:
function App() {

  return (

    <div className="App">
      <Header />

     </div>
  )
}
Next, open the “Header.js” script from the “dex/src/components” folder. This is where you’ll add the lines of code that will include a logo, page options, and the “Connect” button at the top of your frontend. At the top, import the image:
import Logo from "../moralis-logo.svg";
import Eth from "../eth.svg";
Next, tweak the code inside the “Header” function to display the components mentioned above. You can simply use the following lines of code:
function Header(props) {

  const {address, isConnected, connect} = props;

  return (
    <header>
      <div className="leftH">
        <img src={Logo} alt="logo" className="logo" />
        <div className="headerItem">Swap</div>
        <div className="headerItem">Tokens</div>
      </div>
      <div className="rightH">
        <div className="headerItem">
          <img src={Eth} alt="eth" className="eth" />
          Ethereum
        </div>
        <div className="connectButton" onClick={connect}>
          {isConnected ? (address.slice(0,4) +"..." +address.slice(38)) : "Connect"}
        </div>
      </div>
    </header>
  );
}
The updated “App.js” and “Header.js” scripts provide these results:

To make the above “Swap” and “Tokens” options active, return to the “App.js” file and first import the “Swap” and “Tokens” components and “Routes“:
import Swap from "./components/Swap";
import Tokens from "./components/Tokens";
import { Routes, Route } from "react-router-dom";
Then, add the “mainWindow” div with proper routes inside the “Header” div:
<Header connect={connect} isConnected={isConnected} address={address} />
<div className="mainWindow">
  <Routes>
    <Route path="/" element={<Swap isConnected={isConnected} address={address} />} />
    <Route path="/tokens" element={<Tokens />} />
  </Routes>
</div>
With the above routes in place, return to the “Header.js” script and import “Link” below the existing imports:
import { Link } from "react-router-dom";
Next, wrap your “Swap” and “Tokens” divs in their link components:
<Link to="/" className="link">
  <div className="headerItem">Swap</div>
</Link>
<Link to="/tokens" className="link">
  <div className="headerItem">Tokens</div>
</Link>
As a result, the “Swap” and “Token” buttons now take you to the corresponding routes:

Step 3: Create a DEX by Building a Swap Page
Start by opening the “Swap.js” script and first import the “Ant Design” UI framework components that you’ll need to create a DEX:
import React, { useState, useEffect } from "react";
import { Input, Popover, Radio, Modal, message } from "antd";
import {
  ArrowDownOutlined,
  DownOutlined,
  SettingOutlined,
} from "@ant-design/icons";
Next, add a “tradeBox” div to the “Swap” function with a slippage setting option that utilizes Ant Design:
function Swap() {
  const [slippage, setSlippage] = useState(2.5);

  function handleSlippageChange(e) {
    setSlippage(e.target.value);
  }

  const settings = (
    <>
      <div>Slippage Tolerance</div>
      <div>
        <Radio.Group value={slippage} onChange={handleSlippageChange}>
          <Radio.Button value={0.5}>0.5%</Radio.Button>
          <Radio.Button value={2.5}>2.5%</Radio.Button>
          <Radio.Button value={5}>5.0%</Radio.Button>
        </Radio.Group>
      </div>
    </>
  );

  return (
      <div className="tradeBox">
        <div className="tradeBoxHeader">
          <h4>Swap</h4>
          <Popover
            content={settings}
            title="Settings"
            trigger="click"
            placement="bottomRight"
          >
            <SettingOutlined className="cog" />
          </Popover>
        </div>
      </div>
    </>
  );
}
The above lines of code are reflected on your frontend – on the root route (Swap):

Adding Token Input Fields
Moving on, you want to add the required input fields that will allow users to select the tokens and, in turn, use the swap feature of this DEX. So, inside the “tradeBox” div, below the “tradeBoxHeader” div, create a new div and call it “inputs“:
<div className="inputs">
  <Input
   placeholder="0"
   value={tokenOneAmount}
   onChange={changeAmount}
   disabled={!prices}
  />
  <Input placeholder="0" value={tokenTwoAmount} disabled={true} />
  <div className="switchButton" onClick={switchTokens}>
   <ArrowDownOutlined className="switchArrow" />
  </div>
  <div className="assetOne" onClick={() => openModal(1)}>
   <img src={tokenOne.img} alt="assetOneLogo" className="assetLogo" />
   {tokenOne.ticker}
   <DownOutlined />
  </div>
  <div className="assetTwo" onClick={() => openModal(2)}>
   <img src={tokenTwo.img} alt="assetOneLogo" className="assetLogo" />
   {tokenTwo.ticker}
   <DownOutlined />
  </div>
Also, make sure to add the state variables for both inputs below the above “Slippage” state variable:
const [tokenOneAmount, setTokenOneAmount] = useState(null);
const [tokenTwoAmount, setTokenTwoAmount] = useState(null);
const [tokenOne, setTokenOne] = useState(tokenList[0]);
const [tokenTwo, setTokenTwo] = useState(tokenList[1]);
const [isOpen, setIsOpen] = useState(false);
const [changeToken, setChangeToken] = useState(1);
Below the “handleSlippageChange” function, you want to add functions that will handle the changing of amounts of tokens and the switching of tokens:
function changeAmount(e) {
  setTokenOneAmount(e.target.value);
  if(e.target.value && prices){
    setTokenTwoAmount((e.target.value * prices.ratio).toFixed(2))
  }else{
    setTokenTwoAmount(null);
  }
}

function switchTokens() {
  setPrices(null);
  setTokenOneAmount(null);
  setTokenTwoAmount(null);
  const one = tokenOne;
  const two = tokenTwo;
  setTokenOne(two);
  setTokenTwo(one);
  fetchPrices(two.address, one.address);
}
As far as selecting tokens, the “tokenList.json” file provides you with an array of tokens: their ticker, icon, name, address, and decimals:

To access that list, you need to import it into your “Swap.js” script; add this line under the other imports:
import tokenList from "../tokenList.json";
Token Selection Modals
If you looked at the lines of code inside the “inputs” div closely, you saw two “openModal” functions. So, to make these two function properly and, thus, create a DEX, you need to add the following lines of code above your “tradeBox” div at the top of “return“:
return (
  <>
    {contextHolder}
    <Modal
      open={isOpen}
      footer={null}
      onCancel={() => setIsOpen(false)}
      title="Select a token"
    >
      <div className="modalContent">
        {tokenList?.map((e, i) => {
          return (
            <div
              className="tokenChoice"
              key={i}
              onClick={() => modifyToken(i)}
            >
              <img src={e.img} alt={e.ticker} className="tokenLogo" />
              <div className="tokenChoiceNames">
                <div className="tokenName">{e.name}</div>
                <div className="tokenTicker">{e.ticker}</div>
              </div>
            </div>
          );
        })}
      </div>
    </Modal>
You also need to add the “openModal” and “modifyToken” functions:
function openModal(asset) {
  setChangeToken(asset);
  setIsOpen(true);
}

function modifyToken(i){
  setPrices(null);
  setTokenOneAmount(null);
  setTokenTwoAmount(null);
  if (changeToken === 1) {
    setTokenOne(tokenList[i]);
    fetchPrices(tokenList[i].address, tokenTwo.address)
  } else {
    setTokenTwo(tokenList[i]);
    fetchPrices(tokenOne.address, tokenList[i].address)
  }
  setIsOpen(false);
}
With the modals in place, it’s also time to add the “Swap” button below the “inputs” div:
<div className="swapButton" disabled={!tokenOneAmount || !isConnected} onClick={fetchDexSwap}>Swap</div>
So by this point, you know how to create a DEX frontend that lets you choose tokens and enter their amount, which activates the “Swap” button:

This means it’s time to add the backend functionality. As you set your backend in place, you must update the above “swap.js” script to make proper calls to your backend.
Step 4: Implementing Backend DEX Functionality
To focus on your dapps backend, open the “dexBack” folder. First, make sure you get your Moralis Web3 API key. This is where your free Moralis account comes to play. Once you log in to your account, you’ll be able to access your admin area and copy your API key:

Then, paste your key into the “.env.example” file and rename it “.env”. Next, open the “index.js” file, which represents the core of your NodeJS backend dapp and already includes the required lines of code. You need to open a new terminal and “cd” into the “dexStarter” folder and then into “dexBack”. Then, run the “npm install” command to install all the backend dependencies. To actually fetch token prices, you need to tweak the “index.js” script. This is where you’ll finally implement the “getTokenPrice” lines of code from the introduction of today’s article.
Note: You can read more about the “Get ERC-20 token price” endpoint and other Moralis Web3 Data API endpoints in the Moralis Web3 documentation.
Here’s the updated “app.get” function that makes the “/tokenPrice” endpoint fetch token prices in USD:
app.get("/tokenPrice", async (req, res) => {

  const {query} = req;

  const responseOne = await Moralis.EvmApi.token.getTokenPrice({
    address: query.addressOne
  })

  const responseTwo = await Moralis.EvmApi.token.getTokenPrice({
    address: query.addressTwo
  })

  const usdPrices = {
    tokenOne: responseOne.raw.usdPrice,
    tokenTwo: responseTwo.raw.usdPrice,
    ratio: responseOne.raw.usdPrice/responseTwo.raw.usdPrice
  }

  return res.status(200).json(usdPrices);
});
After updating and saving your “index.js” file, enter “node index.js” into your backend terminal to run your backend.
Note: You can access the final backend “index.js” file on GitHub.
Getting Token Prices from Backend to Frontend
The next step of this tutorial on how to create a DEX is all about getting token prices from your backend to your frontend. So, return to your “swap.js” script and first import Axios at the top where you have other imports:
import axios from "axios";
Next, add the following state variable under your existing state variables:
const [prices, setPrices] = useState(null);
You must also add a proper function to fetch the token prices from the backend. So, below the “modifyToken” function, add the “fetchPrices” async function and corresponding “useEffect“:
async function fetchPrices(one, two){

    const res = await axios.get(`http://localhost:3001/tokenPrice`, {
      params: {addressOne: one, addressTwo: two}
    })


    setPrices(res.data)
}


useEffect(()=>{

  fetchPrices(tokenList[0].address, tokenList[1].address)

}, [])
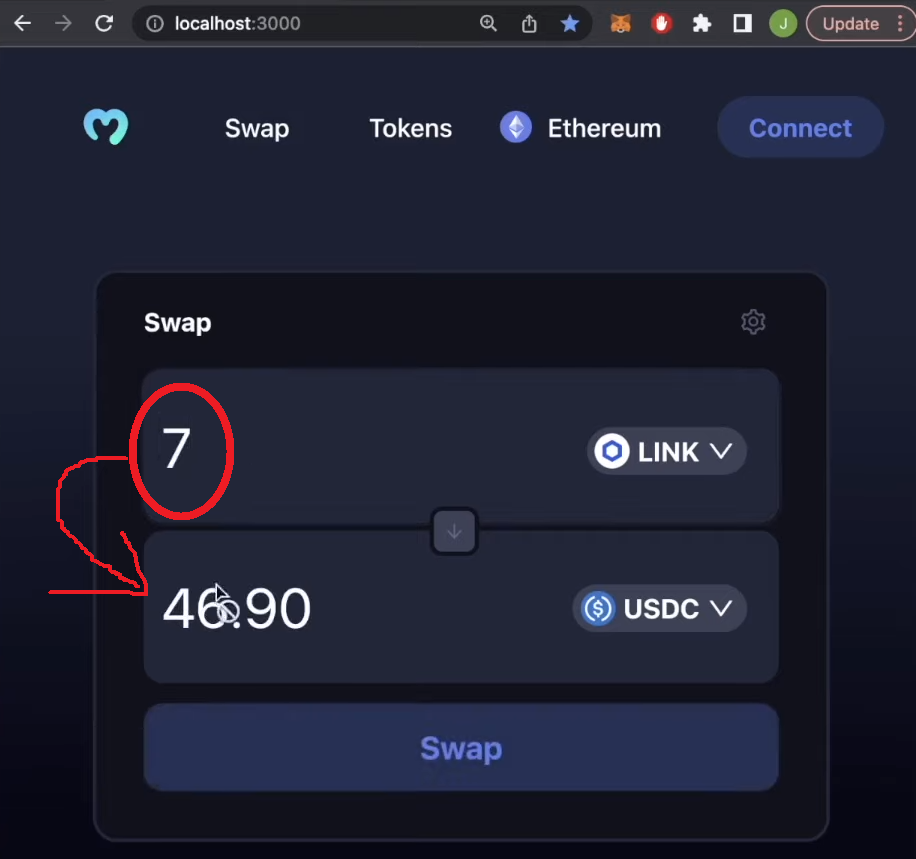
With the above lines of code, your DEX can now fetch token prices and calculate their ratios. Based on that ratio, the frontend automatically populates the amount of the other token once users enter the amount of the first one:
Web3 Wallet Connection
Before you finally move on to using the 1inch aggregator to add the last pieces of the puzzle, make sure to add functionality to your “Connect” button. Thanks to the wagmi library, this will be relatively easy.
Access your frontend “index.js” file inside the “dex/src” folder. First, import several components from wagmi and a public provider by pasting the following two lines of code below the existing imports:
import { configureChains, mainnet, WagmiConfig, createClient } from "wagmi";
import { publicProvider } from "wagmi/providers/public";
Next, configure the chains, and create a client by adding the following snippets of code below the imports:
const { provider, webSocketProvider } = configureChains(
  [mainnet],
  [publicProvider()]
);

const client = createClient({
  autoConnect: true,
  provider,
  webSocketProvider,
});
You also need to wrap “BrowserRouter” with “WagmiConfig” inside “React.StrictMode”:
<React.StrictMode>
   <WagmiConfig client={client}>
     <BrowserRouter>
       <App />
     </BrowserRouter>
   </WagmiConfig>
 </React.StrictMode>
Note: You can access the final frontend “index.js” script on GitHub.
To make the “Connect” button work properly, you must also tweak the “App.js” script. Start by importing the wagmi components and MetaMask connector below the existing imports:
import { useConnect, useAccount } from "wagmi";
import { MetaMaskConnector } from "wagmi/connectors/metaMask";
Inside the “App” function (above “return”), add the following lines of code to destructure the address and connect a new user:
const { address, isConnected } = useAccount();
const { connect } = useConnect({
  connector: new MetaMaskConnector(),
});
Note: The “App.js” lines of code provided previously already include these variables, so you don’t have to worry about updating them. The same goes for the “Header.js” script. However, if you are interested in a detailed code walkthrough regarding the “Connect” button, make sure to use the video at the top (57:25).
With the above tweaks in place, your “Connect” button now allows you to connect with your MetaMask:

Step 5: Interacting with the 1inch Aggregator
In this final step of today’s “how to create a DEX” feat, you need to integrate the 1inch aggregator. The latter will bring the actual exchange functionalities to your dapp. This is also where you’ll finally implement the 1inch API endpoints presented in the intro. So, reopen “Swap.js” and start adding the following lines of code:
- Under existing imports, import the proper hooks from wagmi:
import { useSendTransaction, useWaitForTransaction } from "wagmi";
- Add “props” to the “Swap” function:
function Swap(props) {
  const { address, isConnected } = props;
- Below the existing state variables, add another one that will store transaction details and wait for a transaction to go through:
const [txDetails, setTxDetails] = useState({
  to:null,
  data: null,
  value: null,
});

const {data, sendTransaction} = useSendTransaction({
  request: {
    from: address,
    to: String(txDetails.to),
    data: String(txDetails.data),
    value: String(txDetails.value),
  }
})

const { isLoading, isSuccess } = useWaitForTransaction({
  hash: data?.hash,
})
- Add the following “fetchDexSwap” async function below “fetchPrices” (you can get the 1inch API links in the “Swagger” section of the 1inch documentation):
async function fetchDexSwap(){

  const allowance = await axios.get(`https://api.1inch.io/v5.0/1/approve/allowance?tokenAddress=${tokenOne.address}&walletAddress=${address}`)

  if(allowance.data.allowance === "0"){

    const approve = await axios.get(`https://api.1inch.io/v5.0/1/approve/transaction?tokenAddress=${tokenOne.address}`)

    setTxDetails(approve.data);
    console.log("not approved")
    return

  }

  const tx = await axios.get(`https://api.1inch.io/v5.0/1/swap?fromTokenAddress=${tokenOne.address}&toTokenAddress=${tokenTwo.address}&amount=${tokenOneAmount.padEnd(tokenOne.decimals+tokenOneAmount.length, '0')}&fromAddress=${address}&slippage=${slippage}`)

  let decimals = Number(`1E${tokenTwo.decimals}`)
  setTokenTwoAmount((Number(tx.data.toTokenAmount)/decimals).toFixed(2));

  setTxDetails(tx.data.tx);

}
- Under the existing “useEffect“, add an additional three “useEffect” functions to cover transaction details and pending transactions:
useEffect(()=>{

    if(txDetails.to && isConnected){
      sendTransaction();
    }
}, [txDetails])

useEffect(()=>{

  messageApi.destroy();

  if(isLoading){
    messageApi.open({
      type: 'loading',
      content: 'Transaction is Pending...',
      duration: 0,
    })
  }

},[isLoading])

useEffect(()=>{
  messageApi.destroy();
  if(isSuccess){
    messageApi.open({
      type: 'success',
      content: 'Transaction Successful',
      duration: 1.5,
    })
  }else if(txDetails.to){
    messageApi.open({
      type: 'error',
      content: 'Transaction Failed',
      duration: 1.50,
    })
  }

},[isSuccess])
Note: The final “Swap.js” file awaits you on GitHub. For a detailed code walkthrough and explanation of the 1inch aggregator, use the video at the top, starting at 1:04:14.
What is a DEX (Decentralized Exchange)?
A decentralized exchange, or DEX, is an exchange that emulates the functionalities of a centralized exchange. However, it is based on a decentralized system. In other words, the backend of these exchanges exists on a blockchain and is, therefore, transparent and immutable. Thanks to smart contracts, transferring currency between two accounts doesn’t require an intermediary to facilitate a transaction. Plus, with a proper DEX, there’s no centralized authority behind the exchange. This means that there’s no single point of failure, which is one of the main pitfalls of centralization.
The possibility of eliminating intermediaries is one of the main advantages of decentralized exchanges. As you can imagine, eliminating the need for a mediator to take custody of funds before transferring them to another person or account eliminates the need to trust. After all, blockchain tech is all about trustless operations. As a result, the exchange of tokens/currency (trades) occurs directly between two parties (blockchain addresses).
Another major downside of centralized exchange systems is that whenever you deposit crypto into the system, you give up control over your assets. Sure, you can still withdraw or trade the assets. However, as a user, you give up control of the private keys of your assets. Then, whenever you perform any actions, you ask the platform to sign a transaction on your behalf. As mentioned above, DEX eliminates this control by employing verified and transparent smart contracts. These contracts allow users to remain in complete control of their assets until the point they execute a transaction/trade. Moreover, following the above tutorial, you already know how to create a DEX in five steps.
How to Create a DEX in 5 Steps – Summary
By completing today’s tutorial, you learned how to create a DEX in five steps using NodeJS, React, the Moralis Web3 Data API, wagmi, and the 1inch aggregator:
- Project Setup
- Build a DEX Header
- Create a DEX by Building a Swap Page
- Implementing Backend DEX Functionality
- Interacting with the 1inch Aggregator
We made your journey a lot simpler by providing you with detailed instructions and the required code to get to the finish line without breaking a sweat. Now that you know how to create a DEX, you can utilize the tools you got acquainted with herein to BUIDL all sorts of dapps.
If you need more practice or inspiration, make sure to explore our other tutorials. You can find them in the Moralis docs, on the Moralis YouTube channel, and on the Moralis blog. The latter is also a great place to expand your blockchain development horizons by diving into all sorts of crypto topics. For instance, some of the latest articles explain how to use IPFS with Ethereum, how to develop blockchain applications, how to get started with Solana blockchain app development, how to get testnet APT from an Aptos faucet, what the best tools and practices for smart contract security are, and much more.
If you want to take a more professional approach to your blockchain development education, you should consider enrolling in Moralis Academy. This is also the place to learn Web3 programming for beginners!