Unless you’ve just entered the crypto space, you’ve probably noticed that Avalanche and its Solidity-compatible dApps have seen a lot of attention lately. This is primarily due to the many benefits Avalanche and its platform offers. The potential of Avalanche has gained traction among dApp developers due to its high-speed smart contract platform and low fees. As such, it’s a great time to learn how to build Avalanche dApps. Therefore, we’ll expand on this topic, exploring why you should build Avalanche dApps but, most importantly, how to build Avalanche dApps in minutes with Moralis.
Whether you’ve already been creating Web3 applications on other chains or if you’re a complete beginner to blockchain development, using the information herein will advance your development knowledge so you can build dApps on Avalanche more efficiently. In fact, building Avalanche dApps has never been easier. With Moralis’ platform, you can skip all the complicated and time-consuming backend development. Furthermore, Moralis provides developers with full Avalanche support, as Moralis announced in September 2021. As such, Moralis has the most convenient, quickest, and easiest way to build Avalanche dApps.
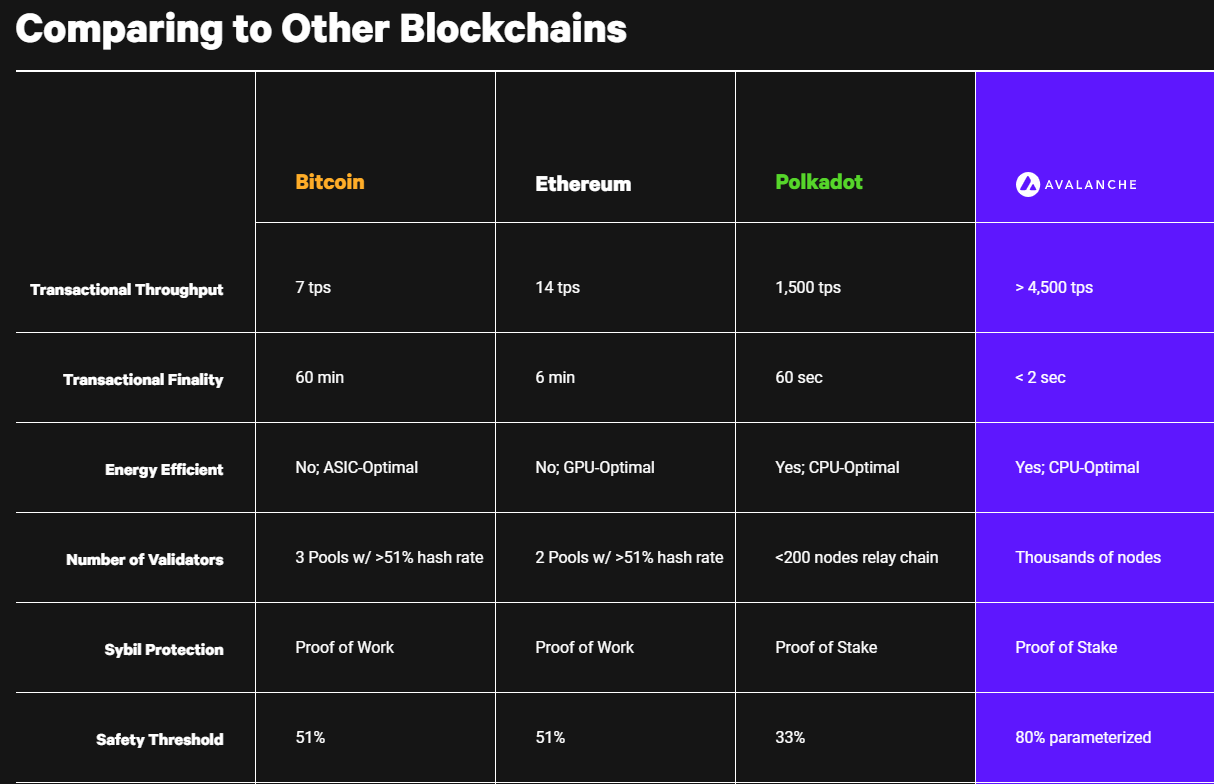
However, before we show how to build an Avalanche dApp, let’s go over some basics regarding Avalanche and also see how it compares to other blockchains.
What are Avalanche dApps?
Decentralized applications or dApps have been emerging left and right ever since the birth of smart contracts on Ethereum. Moreover, decentralized apps are essentially applications built on various blockchains. Furthermore, dApps are also known as Web3 applications or apps.
As such, Avalanche dApps are all Web3 applications built on top of the Avalanche chain. The Avalanche chain is relatively new; its mainnet was launched in 2020. However, it has already managed to gain recognition among both investors and developers. As such, Avalanche is now a reputable open-source platform for launching a wide range of dApps, including DeFi (decentralized finance) apps and other custom blockchain implementations.
What is AVAX?
AVAX is the ticker of Avalanche’s native currency. Among other use cases, this coin or native token is required to cover transaction costs on Avalanche’s chain. Fortunately, these fees are extremely low and nothing compared to gas fees on other blockchains such as Ethereum. Thus, AVAX and transaction fees are something you need to account for if you plan to build Avalanche dApps.
Moralis provides an easy way to acquire AVAX. With Moralis, you can integrate a DEX in an easy way so users can acquire AVAX on your Avalanche dApp. For more information regarding how to create a DEX, see the following article from Moralis’ blog: “How to Create a DEX in 5 Steps”.
Why Build Avalanche dApps?
Two of Avalanche’s main points of interest are its impressive scaling capabilities and fast confirmation times. The chain is also environment friendly as it uses the proof-of-stake (PoS) security validation method. If we also account for significantly lower transaction fees than on Ethereum, it’s not surprising at all that developers and users find a certain appeal in Avalanche’s blockchain.
Moreover, it’s worth pointing out that Avalanche represents the first smart contract platform built with decentralized finance in mind. Thus, functionalities such as asset issuance, automated market makers, borrowing and lending, and decentralized exchanges can easily be built on top of Avalanche. In addition, Avalanche aims to facilitate the speedy development of Solidity-compatible dApps, which means it offers a simple transition for all Ethereum developers. On top of that, Avalanche is also fully interoperable with Ethereum tooling, assets, and apps right out of the box. As such, it features comprehensive Ethereum support.
While Ethereum remains the leader for dApp development, exploring options of developing on other reputable emerging chains, such as Avalanche, can be well worth it. With the Ethereum chain being closer to mainstream adoption, there is also more competition, which makes it more challenging for your dApp to be noticed, while it may stand out more easily on a less populated chain. Furthermore, one can easily get inspiration for their Avalanche dApp by following the example of popular dApps on Ethereum. Then, just add some unique twists to the dApp and deploy it on the Avalanche chain.

The Simplest Way to Build Avalanche dApps
While there are several ways to build Avalanche dApps, most of them require Solidity proficiency and tend not to make things as simple and straightforward as they should be. However, with Moralis’ platform and the utilization of JavaScript, you can create and deploy Avalanche dApps quickly and easily, and the best part is that Moralis is free to use!
If you’ve used Moralis’ SDK before, you know how much it simplifies the otherwise complicated and tedious backend development of dApps. It basically eliminates all of the backend codings and allows you to devote your attention to frontend development. As such, you end up saving time and resources while also delivering a much better user experience. Not to mention that you get to deploy your apps within impressive timeframes.
Moreover, as the ultimate Web3 development platform, Moralis has been built from the ground up with cross-chain interoperability in mind. As such, all dApps built with the help of this excellent tool can be easily deployed on any of the supported chains (Moralis’ team of developers is constantly adding support for new reputable chains). This means that by deciding to build Avalanche dApps with Moralis, you do not limit yourself in any way. If you decide to deploy the same app on other chains (such as Ethereum, BSC, or Polygon), you can move over seamlessly.
In case you do not have a Moralis account yet, make sure to sign up before moving on to the next section. That way, you’ll be able to follow along with our example project and thus learn how to build Avalanche dApps in minutes.
How to Build Avalanche dApps – Example Project
We believe that the best way to learn anything is by taking on simple tasks. That way, you learn as you build. As such, we’re going to take on an example project where we will build an Avalanche wallet tracker.
Before we jump into creating our Avalanche dApp, we’d like to show you what we’re going to develop. Look at the images below to get a clearer picture. When you set off to build Avalanche dApps or any other decentralized projects, it’s important to have at least a vague vision of what you are building. This makes the process easier.
This is how our Avalanche dApp will look like:
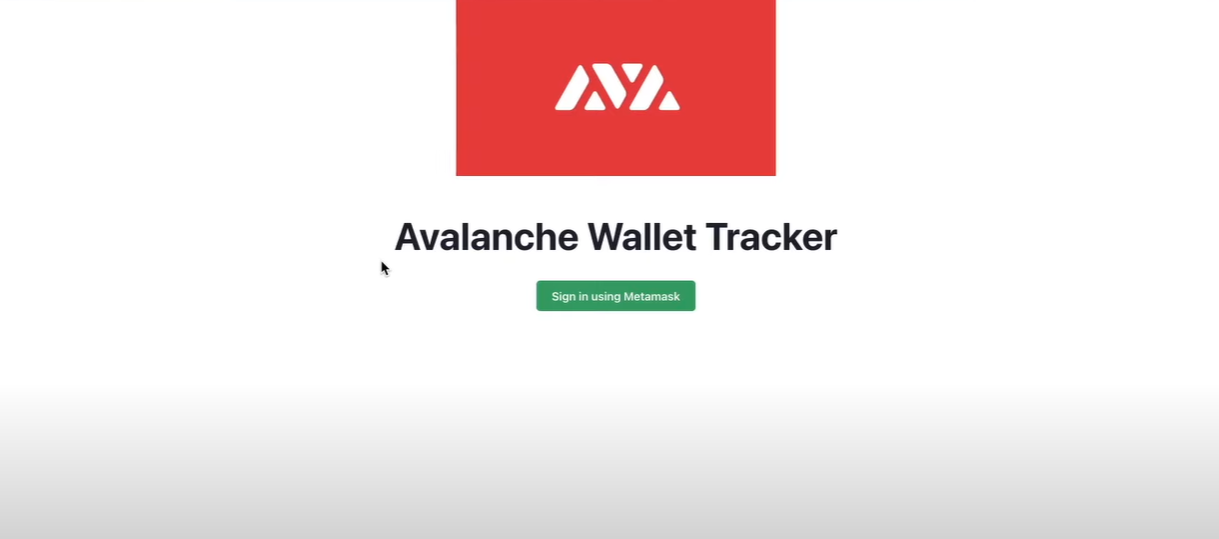
Clicking the button will enable users to sign in. Once signed in, they will see the following dashboard:
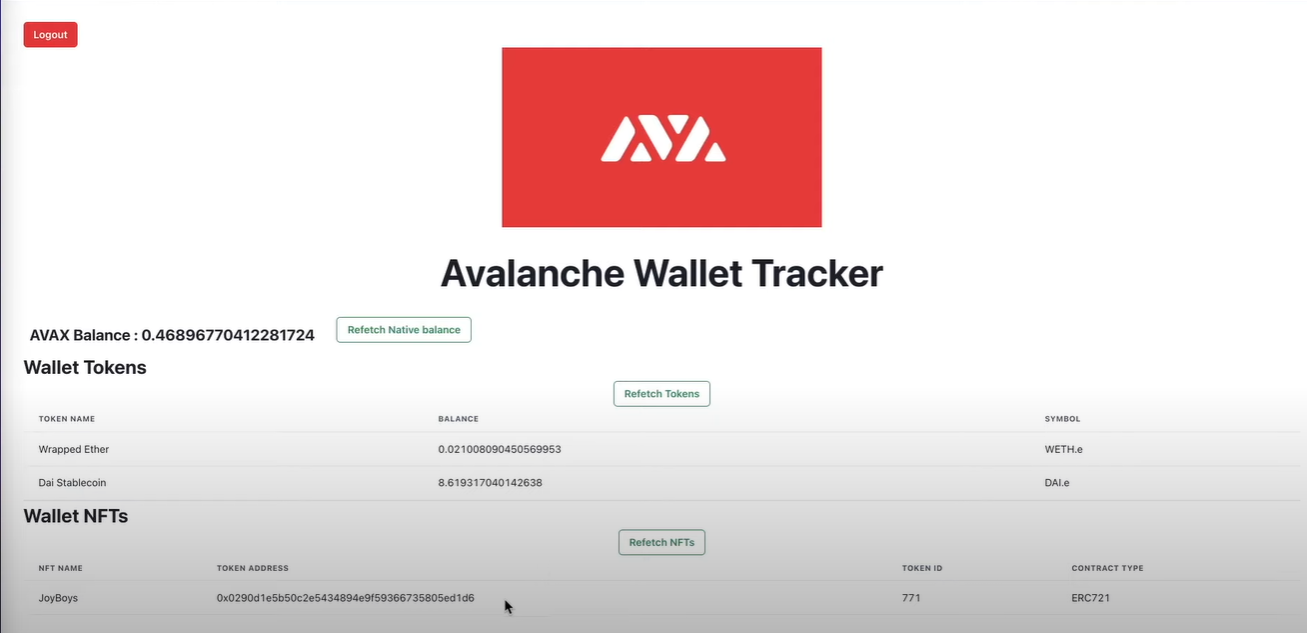
As you can see, the dashboard will display a user’s AVAX balance, tokens and their balances, and NFTs.
Depending on your level of coding skill and familiarity with Moralis, the above may seem like a lot of work. However, we assure you that you will wonder how easily we can have such a wallet tracker ready in minutes. Especially the backend part, which would otherwise take weeks if not months, we’ll be able to cover with three snippets of code. This is all possible when using Moralis that does all the heavy lifting backend-related work on our behalf.
Setting Up Moralis to Build Avalanche dApps
Aside from Moralis itself, there are other useful tools that we recommend using when creating dApps, such as MetaMask and Visual Studio Code. For more details on obtaining and setting up these tools, please check out our “Ethereum Development for Beginners” guide. Moreover, below are the Moralis setup steps you need to complete if you want to build Avalanche dApps or Web3 apps on any other chain:
- Sign Up or Log In to Your Moralis Account – If you still haven’t created your free Moralis account, make sure to do so now. Simply follow the link provided previously (or click here), enter your email address, set up your password, and confirm your email address (you’ll receive an email with a confirmation link). If you already have an active Moralis account, log in to the platform.
- Create a Moralis Server – Once logged in, you want to create a Moralis server. Do so by clicking the “+ Create a new Server” button in the top-right corner of your Moralis admin interface. From the drop-down menu that appears (see the image below), click the “Mainnet Server” option.

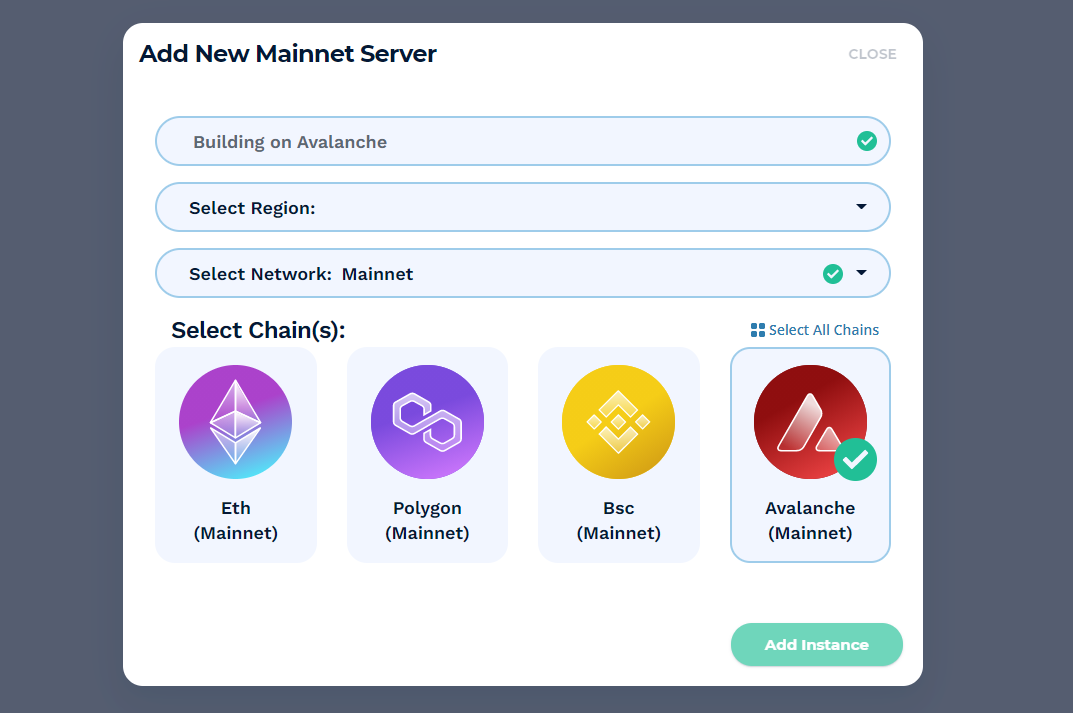
In the pop-up window, enter all the required details: input a server name (it can be anything you want), select your region, network, chain(s) (since we’re building on Avalanche, make sure to select accordingly), and click the “Add instance” button.
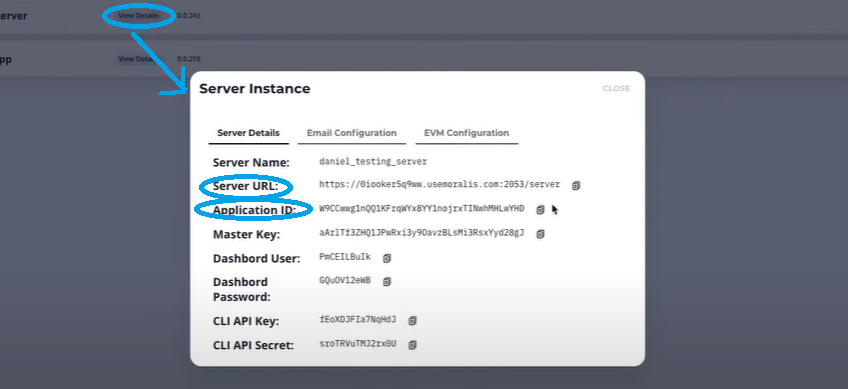
- Access Server Details – After successfully creating your server, you’ll need to obtain some of its details (to use inside your “.js” file). You access the server details by clicking the “View Details” button next to your server name. This will bring up a pop-up window containing the details:
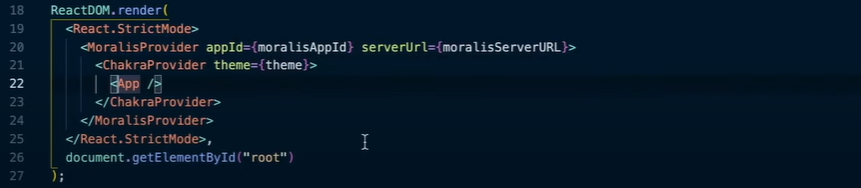
- Initialize Moralis – After populating the “.js” file with the Moralis server details, you gain access to powerful backend functionality. For our example, we’ll be using an “index.js” file. We insert the application ID and server URL obtained in the previous step in that file:

How to Build Avalanche dApps – Wallet Tracker Example
Please complement the code we give in step four of the previous section with these lines of code (also inside the “index.js” file):
Now, all the backend functionality of Moralis is at our disposal, and we can focus on further details of our Avalanche application. For that purpose, we’ll be using the “App.js” file, where we will program our app components.
Build Avalanche dApps with Moralis
Thanks to the power of Moralis, we’ll have minimal work regarding the backend. Essentially, our app will have three main components: getting native balance, getting token balance, and getting NFTs. This is the code that helps us take care of that:
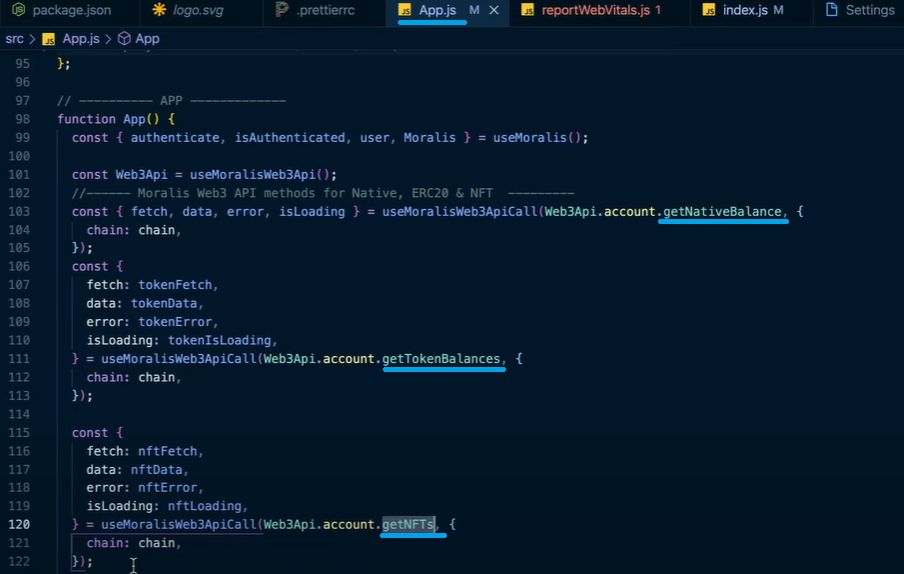
Using the above snippets of code for “getNativeBalance”, “getTokenBalances”, and “getNFTs”, we’re able to get all the details (the latest data) directly from the Avalanche blockchain for every user that logs in to our dApp using MetaMask (or other supported wallets). This way of authentication is also built-in by default into Moralis. Moreover, you can see us making use of it in line 99 above.
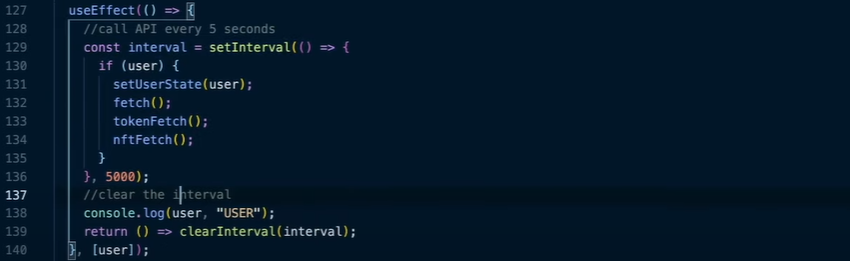
Furthermore, we want to ensure that our wallet tracker app is regularly refreshing and thus displaying updated balances. We achieve this by adding the following lines of code to our “App.js” file:
In addition, we also want our dApp to be able to detect if users decide to switch from Avalanche to another network from inside their MetaMask. We achieve this functionality by implementing the following lines of code:

Moreover, we want to ensure that users who do not connect to Avalanche follow the authentication steps. We cover this by providing them with instructions we display in our wallet tracker interface. Here is the code that takes care of this part:
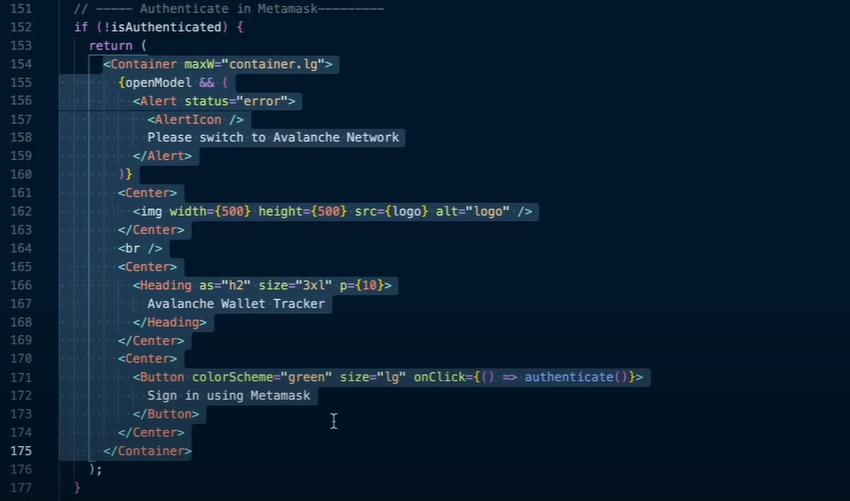
Note: For our Avalanche dApp example, we focus on using MetaMask to authenticate users. However, you can use other popular wallet providers for that purpose. Of course, if that’s the case, the text to be displayed must be adjusted accordingly.
The Cosmetics of Our Avalanche dApp
With the code implemented from the previous section, the functionality of our app has already been taken care of. As you saw, Moralis’ SDK makes collecting details from the blockchain extremely easy. Now, it’s time to make sure our Web3 app looks appealing (as shown in the images from the “How to Build Avalanche dApps – Example Project” section).
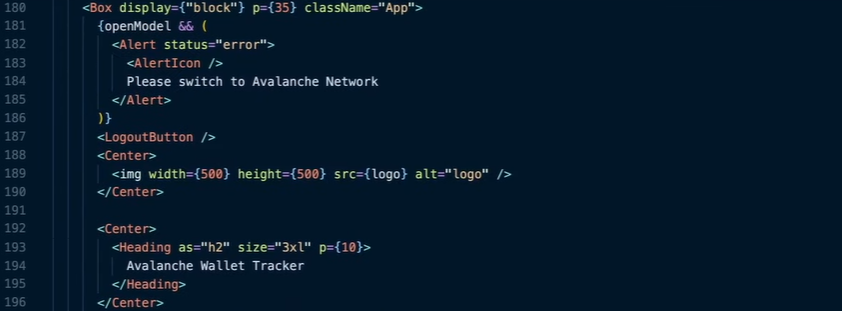
We want the wallet tracker to display the logo and the heading. Here is the code that takes care of that:
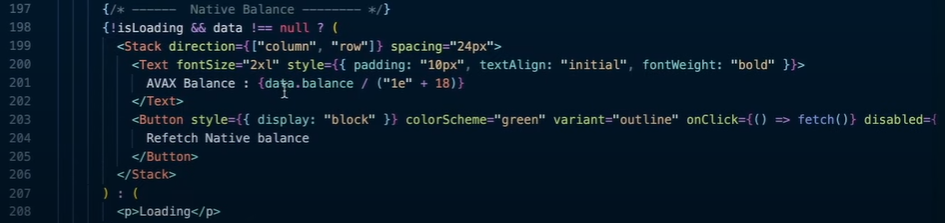
Next, we want to neatly display the native balance, token balances, and NFTs.
The following will display the native balance:
The following lines of code will display token balances and NFTs, and we use tables to make things displayed in an organized manner:
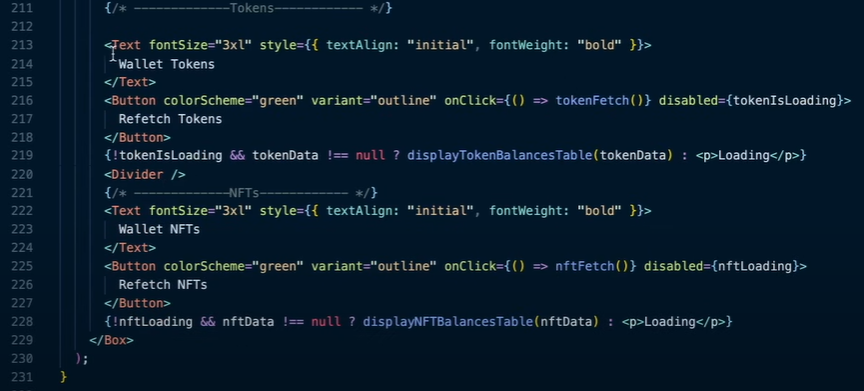
Fortunately, the code for the tables is simple. You can have a look at the table used for displaying tokens below. We will not include the one for NFTs since it’s similar.

That’s it for our Avalanche dApp example project. If you prefer to follow along with a video tutorial, we have one covering the same steps as described throughout this “How to Build Avalanche dApps – Example Project” section. As such, feel free to take a look at the following video called “Build Avalanche Dapp in 5 Minutes”:
How to Build Avalanche dApps in Minutes – Summary
We’ve covered quite a lot of ground in the sections above. You’ve learned what Avalanche dApps are and why this may be the best time to start building them. Moreover, you now know that AVAX is the native coin of the Avalanche chain and that you need some AVAX to cover the network fees, which are fortunately extremely low.
Moreover, you’ve been introduced to Moralis and have hopefully grasped the benefits Moralis can offer to your Web3 programming path. In addition, we’ve shown how to build Avalanche dApps in minutes by taking on an example project where we created a wallet tracker.
With all that information, you are properly equipped to decide whether or not you want to focus on creating more advanced Avalanche dApps. If this article sparked your interest and you would like to dig deeper into other block projects, then we suggest checking out Moralis’ blog. There we have countless guides that will show you how to build on Ethereum, BSC, Polygon, and Arbitrum.
To your success with dApps development!
