Although Arbitrum doesn’t have its own native token, Arbitrum comes with intricate ties to Ethereum. Specifically, this means that users can deploy an ERC-20 token to the Arbitrum layer-2 solution, effectively creating an “Arbitrum token”. As a layer-2 solution built on and secured by the Ethereum blockchain, Arbitrum ERC-20 tokens combine off-chain speed and functionality with the on-chain security and metrics of Ethereum’s well-known layer-1. With Moralis Speedy Nodes, it’s easy to learn how to create an Arbitrum token in minutes. You will use handy templates that function the way you need them to while providing a safe and secure deployment option. In fact, if you use Moralis, you’ll be able to learn how to create an Arbitrum token in 6 steps.
Learning how to create an Arbitrum token is much simpler than you think. By leveraging Moralis Speedy Nodes, the process of deploying your Arbitrum crypto token is quick, easy, and secure. Follow along with our step-by-step guide and you’ll be on your way to becoming a part of the Arbitrum and Ethereum Web3 revolution and deploying your first Arbitrum token. If you’re interested in using more of Moralis’ powerful features, be sure to sign up for Moralis for free. This will allow you to create Ethereum ERC-20 tokens in 4 steps, create a BSC token in 5 steps, and now also how to create an Arbitrum token in 6 steps. Moreover, Moralis also provides you with the necessary functionality to build NFT games, and much, much more.
![]()
Creating an Arbitrum Token: What You Need to Know
To deploy an Arbitrum crypto token using their smart contract platform, you will build on top of the Ethereum Blockchain using Solidity and Python programming languages. Additionally, you will use tools like OpenZeppelin Library, Brownie, and MetaMask wallet. Learn more about Brownie’s Python-based framework in our article, ETH Brownie explained.
You might feel more comfortable learning how to create an Arbitrum token after first taking a refresher on Ethereum-based tokens. Brushing up with Ethereum Smart Contract programming may also be a great idea to get you ready for building on Arbitrum’s layer-2 solution.
![]()
For some people, it is also helpful to have a video walkthrough to guide them when learning how to create an Arbitrum token. For those folks, Moralis has also created a short video guide on “How to Create an Arbitrum Token in 10 Minutes with Python.”
It’s also important to know about Arbitrum, what the Arbitrum layer-2 solution offers, and why you would use it to build your token projects and dApps. Let’s start our guide of how to build an Arbitrum token with some basic background information about the Arbitrum platform and how it works. Then we’ll move straight to the 6 steps to building an Arbitrum token, leveraging Moralis Speedy Nodes.
What is Arbitrum?
In short, Arbitrum is a layer-2 platform for cryptocurrencies and scalable smart contracts that is fast, private, and secure. Their scaling solution utilizes Optimistic Rollups to improve the speed and efficiency of Ethereum-based dApps.
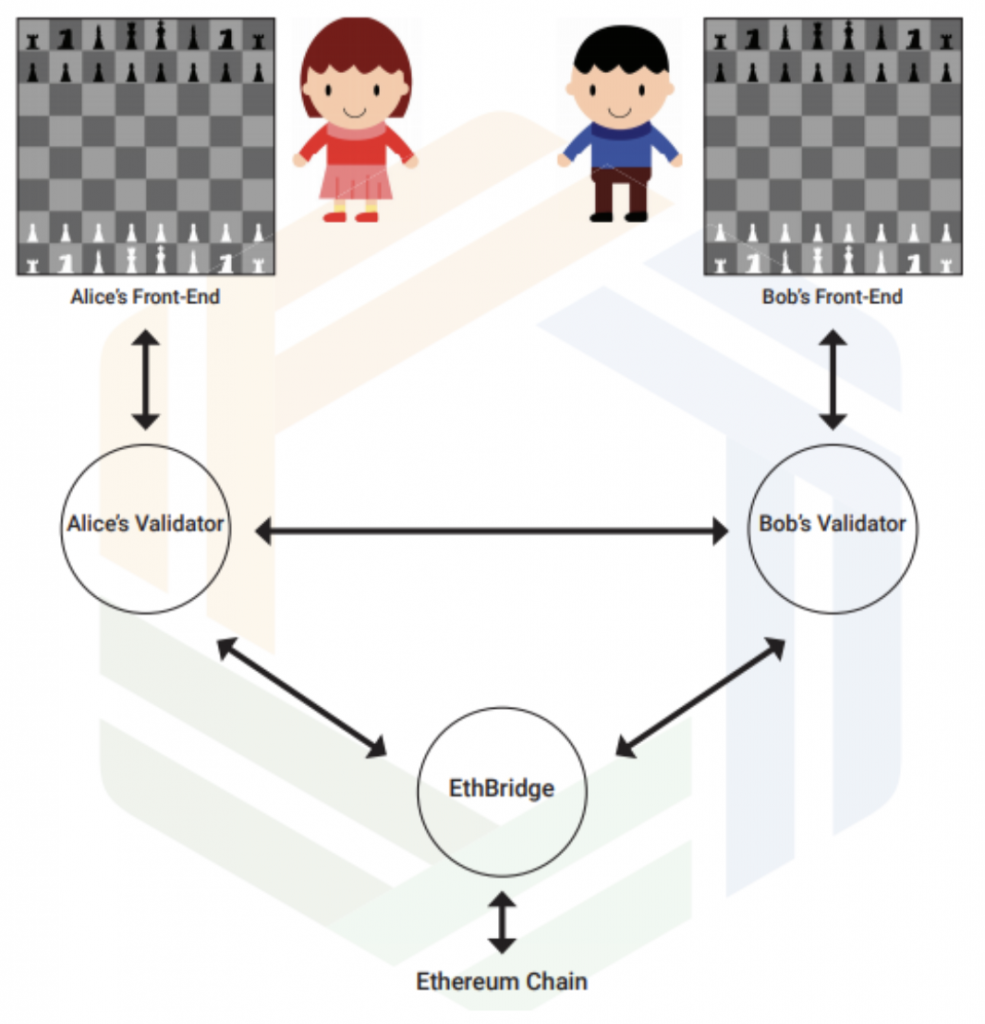
Developers can take their Solidity contracts and run them using the Arbitrum compiler, gaining access to rollup technologies that increase the speed and efficiency of transactions. A component known as “EthBridge” connects Arbitrum with Ethereum, enabling communications and tokens to pass back and forth freely. With Moralis Speedy Nodes, developers can create and bring their dApps to market with just a few steps.

The 3 main components of Arbitrum are:
- The Compiler is a component that takes Solidity-written contracts, compiles them, and links them into one executable file that runs on the Arbitrum Virtual Machine (AVM). This reduces the AVM’s on-chain footprint and enables faster interactions.
- EthBridge is an Ethereum-based dApp that was created by Arbitrum’s team at Offchain Labs. It serves as a bridge between the Ethereum Network and Arbitrum’s layer-2 infrastructure, including Arbitrum crypto tokens. EthBridge has access to all the interactions happening in Arbitrum and can enable zero gas fees. Its other main purpose is handling off-chain dispute resolutions between validators.
- Validators are responsible for the main bulk of the work done via Arbitrum. Each Arbitrum dApp has its own set of validators. Developers choose who the validators can be. The validators store the activities of the Arbitrum Virtual Machine (AVM) and adhere to the code within the dApps to ensure that the AVM executes correctly.
Developers and teams building decentralized apps (dApps) benefit in multiple ways by using the Arbitrum platform. One way is that it is compatible with Moralis, the next-gen dApp infrastructure platform that streamlines the building of decentralized apps. Other benefits include:
Scalability
Scalability with Ethereum-based applications has long been a challenge for developers. Network congestion and high fees when using the Ethereum network can be prohibitive when trying to scale the user base of your dApps. The costs and wait times can also mean added security issues.
Moreover, dApps built on Artbitrum only interact with Ethereum’s main chain when starting up, or sending or receiving digital assets outside of Arbitrum. All other interactions happen off-chain. With the bulk of transactions occurring on layer-2, Arbitrum provides a solution for scaling Ethereum-based dApps.
Privacy
The only data that Ethereum’s layer-1 publishes are cryptographic hashes for the dApp’s state and public actions such as sending or receiving calls, currency, or messages. For each dApp, the developer may select their validators and can even set the controls as to what the dApp’s users can see. Users’ machines have the ability to verify the data if they receive it but the feature is optional and depends on the specifications of each dApp.
When building your dApp on the Arbitrum platform with Moralis, one of the most important decisions for developers will be how to choose the validators. Arbitrum provides multiple configuration possibilities for varying types of smart contracts. More about this can be found in the Arbitrum Whitepaper.
AnyTrust Guarantee
Arbitrum’s AnyTrust Guarantee refers to correct executions and interoperability with Ethereum.
Setting itself apart from other state channel, private chain, or sidechain solutions, Arbitrum offers a guarantee of correct executions – even if only one validator is acting honestly and the others are colluding to cheat the system. Other solutions involve a majority of validators being honest and when a problem crops up, the entire state must migrate to the main chain for dispute resolution.
The AnyTrust Guaranteed helps to protect validators. If a rogue situation occurs with the other validators, you can still have ownership rights and force the dApps to perform as intended and even give you the currency you are owed. When all users in a dApp can be validators, then they all have this special guarantee related to correct behavior.
Interoperability
Being interoperable with Ethereum provides a huge bonus to developers and startup teams. Developers using Solidity to write their dApps can access Arbitrum’s open-source compiler for generating Arbitrum-compatible code. Arbitrum crypto tokens, since they are Ethereum-based, can transfer between layer-1 (Ethereum) and layer-2 (Arbitrum).
With Arbitrum’s layer-2 smart contract platform, developers can create scalable, private, and secure dApps that are interoperable with Etheruem’s massive infrastructure. This means they can interact with other DeFi protocols and digital asset platforms.
If you are a developer that’s been building with Moralis and are excited to show off your work, check out our #BuildWithMoralis program. This initiative helps developers share their success and build awareness around their projects. Developers from all over the world can inspire each other and collaborate. It’s just one way that Moralis gives developers the ultimate building experience!

What are Arbitrum Tokens?
First and foremost, there is no “Arbitrum Token” as an individual digital asset trading on exchanges. Instead, Arbitrum tokens are Ethereum-based cryptocurrencies that unlock layer-2 capabilities. This gives them the power to scale and become more efficient while still enjoying the security of Ethereum’s blockchain network.
Now that you know all about Arbitrum, it’s time to show you how to create an Arbitrum token! We’ll provide you with a quick guide with only 6 steps and you’ll be on your way to layer-2 scalability using Moralis Speedy Nodes and Arbitrum. This is easy, seeing as Moralis features full support for Arbitrum nodes.
Are you looking to build a dApp and scale quickly? Moralis Speedy Nodes are engineered from the ground up to handle millions of users and billions of daily requests.
How to Create an Arbitrum Token in 6 Steps
Preparation – What will you need?
- Have a MetaMask wallet ready. If you already are using MetaMask, you can open the browser wallet after deploying your smart contract. From there you’ll be able to enter your token’s contract address and view your newly minted Arbitrum tokens once you’ve gone through all the stops.
Now you are ready to deploy! Simply follow these 6 steps to create an Arbitrum token:
Step-by-Step Guide for How to Create an Arbitrum Token
Step 1 – Open Github Repository
To get the code needed for creating an Arbitrum token, open the Github repository that Moralis has set up. Use the repository to retrieve the code you need as you learn how to create an Arbitrum token. Once you’ve opened up the repository, go to:
Step 2 – Set your Network
Using the Python programming language, use the following code to set up your network:
brownie networks add arbitrum_rinkeby host=’YOUR LINK’ name=Arbitrum Rinky’ chainid=421611 explorer=’https/rinkeby_explorer.arbitrum.io/#/’
- Arbitrum_rinkeby is the name chosen for educational purposes. You can change your network name to whatever you want.
- host=’YOUR LINK’ is provided by Moralis, see Step 3 for further instructions:
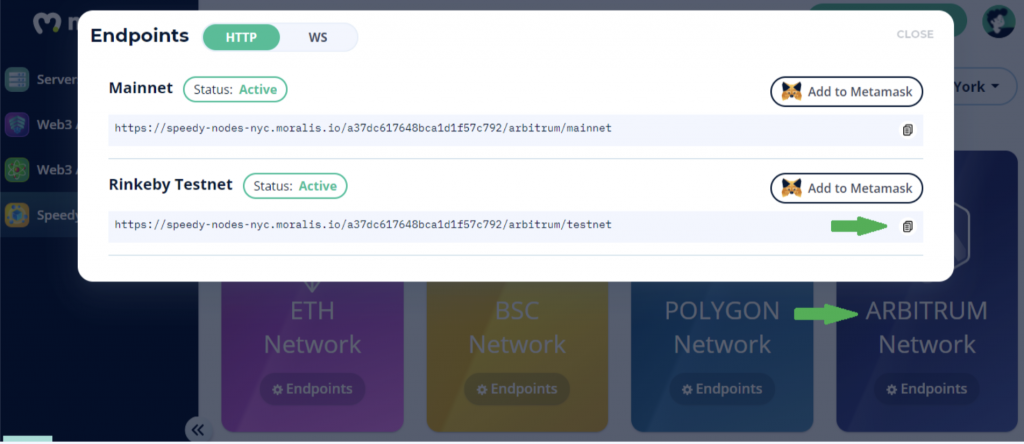
Step 3 Link to the Host
To select the Host, sign in to your Moralis account if you already have one. If not, go ahead and sign up for free. Then go to:
Speedy Nodes
Arbitrum Network
Rinkeby Testnet
Copy the Rinkeby Testnet link and paste it where YOUR LINK shows in host=’YOUR LINK’
When done correctly, your network name should appear when you enter:
brownie networks list
Step 4 – Enter the Smart Contract
This contract is copied from a smart contract template provided by OpenZeppelin. Using templates helps ensure that the contract is safe and secure.
You can disregard the ERC-20 icon that you see in the configuration. It is not part of the blockchain but is just a third party UI element that deals with the token. The focus here is on the logic and you can worry about the UI later.

Step 5 Enter the Arbitrum Network
Enter the Arbitrum Network by writing:
Brownie console -network arbitrum_rinkeby
Once you’re entered the network, you’ll see confirmation that:
- MyTokenProject is now the active project, and;
- Brownie environment is ready
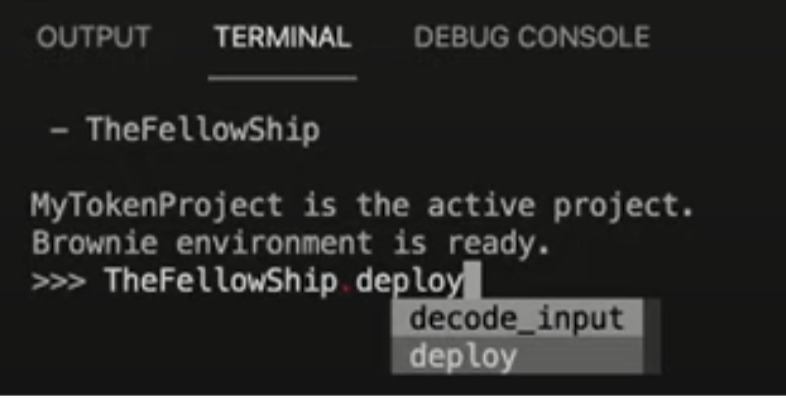
Step 6 – Deploy Your Arbitrum Token
Since the token in our smart contract example is called “TheFellowShip” and “Tolkien” is the symbol, for deployment, write:
>>> TheFellowShip deploy
But you’ll see this gives you a popup asking for an account:
To get past this, write the following:
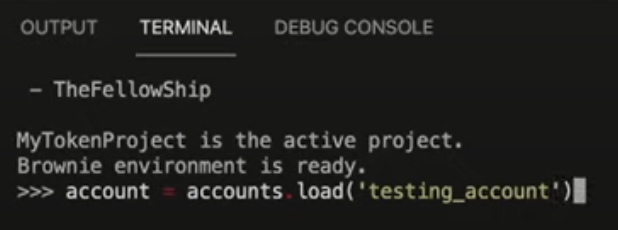
You will receive a prompt to enter the password to unlock your account.
Then you can deploy your token. In this case, it’s called TheFellowShip.
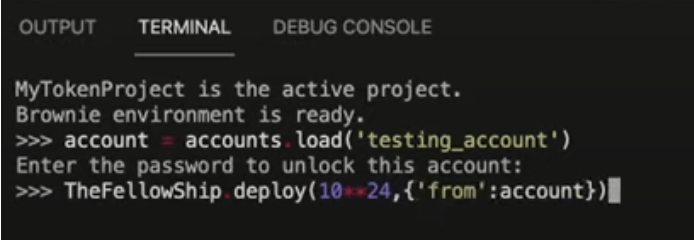
In the example above, you see the developer has set their Arbitrum token’s initial supply as 1 million (10 to the 24th to include the six zeros of 1,000,000 and the 18 decimal points enabled by the Ethereum Network).
Once you enter the above contract, account, and token supply, wait a moment for the deployment, which will show as below when complete:

In the above, you’ll see three important elements:
- The block on the Ethereum Network that this smart contract was deployed to
- Amount of gas used in the transaction/deployment
- Contract address
With the contract address, you can now go back to MetaMask, select Arbitrum Testnet as the Network, and add your token using the contract address. Your token will show including the initial supply you designated and the number of decimal points (18).
In Summary – How to Create an Arbitrum Token in 6 Easy Steps
- Open the Github Repository
- Set your Network
- Link to the Host
- Enter the Smart Contract
- Enter Arbitrum Network
- Deploy Your Arbitrum Token with Initial Supply
Scalability networks like Arbitrum allow for developers to infuse the dApps they are building with speed and cost-efficiency. At the same time, the dApps enjoy the privacy features of Arbitrum as well as the security and interoperability with the Ethereum Network. Moralis Speedy Nodes make setting up an Arbitrum token easy and quick. They also provide the perfect development environment rich with all the right tools and templates along with a supportive community. So, what are you waiting for? Get building with Moralis!
