Smart contracts play a crucial part in the emergence of dApps (decentralized applications). Specifically, smart contracts are a fundamental piece of technology enabling developers to create innovative solutions for industries such as DeFi (decentralized finance). However, even though they are such an essential aspect of Web3 development, not everyone is aware of how to create smart contracts. For this reason, we’ll take this article to examine the smart contract development process and exemplify by creating our very own contract.
We’ll go through the fundamentals of smart contracts, the programming language Solidity, and the process of creating a simple smart contract with Remix. However, if you’d rather watch a video explaining the process, you can watch the following Moralis YouTube video:
Furthermore, if you are looking to expand your Web3 development skills, we highly recommend checking out Moralis.io. Moralis is the ultimate middleware for developing dApps, and it provides users with an infinitely scalable backend infrastructure. However, as we limit this article to look closer at creating a very simple smart contract, we won’t be using Moralis. But, when it comes to developing more complex and useful applications, Moralis is the right tool for you.
As the platform provides a fully managed backend infrastructure, we can significantly shorten development time and leave Moralis to do the heavy lifting for us. Furthermore, the platform also offers excellent development tools like native support for MetaMask, IPFS, Speedy Nodes, the Moralis Price API, and much more.
So, if you are looking to become a dApp developer, we recommend signing up with Moralis right away. With an account, you can move to market within a significantly shorter timeframe and create more advanced applications.
What are Smart Contracts?
To put it simply, a smart contract is a program running on a blockchain, such as Ethereum. Smart contracts consist of two different parts; a collection of code and some data. The code is the functions of the contracts; meanwhile, the data is considered the state. These two components of each smart contract reside on a specific address on a blockchain.

For Ethereum, all smart contracts are a type of account. As such, smart contracts have the ability to make transactions and hold a balance. However, they differ from regular accounts in the aspect that there is no user in control. Instead, the smart contract/account is managed by the code within the contract itself.
As the contracts are considered accounts, it is also possible for us as users of the blockchain to interact with all smart contracts. For example, we can submit a transaction, and as a result, the contract will execute the functions in the code. This basically means that the contacts supply a set of rules and then enforce them via the code written by the contract programmer(s).
To exemplify, a smart contract is often referred to as a digital vending machine. This is quite an accurate analogy since we acquire the desired output through the required input, much like a traditional vending machine.
Anyone can develop and deploy smart contracts; all that is required is the proper skills. The most commonly used programming language is Solidity, which we will take a closer look at in the following section. However, if you have further interest in learning more about smart contracts, we recommend checking out our ”What are Smart Contracts?” article!
What is Solidity?
As we mentioned in the previous section, the go-to programming language for smart contract development is Solidity. So, what exactly is Solidity, and why is the language extensively used when programming smart contracts?
![]()
Solidity is a high-level, object-oriented programming language used to write smart contracts compatible with the EVM (Ethereum Virtual Machine). Solidity is a curly bracket language with substantial influences from well-established programming languages like JavaScript and C++. This means that prior knowledge of, for example, JavaScript gives any programmer an edge when learning Solidity.
With similar characteristics to JavaScript, Solidity is much compatible with how we humans express instructions. So, instead of binary numbers/code, programmed utilize letters and numbers to code the smart contracts for the blockchain world.
Furthermore, once the smart contracts written with Solidity are complete, they are compiled to the EVM’s byte code. The reason for this is to make these programs compatible with any EVM blockchain.
Moreover, we have mentioned some similarities to other languages, but how does this language differ from others? Solidity is considered to be the first contract-oriented language. This means that it is highly adapted for developing smart contracts. As such, the language comes with built-in commands to enable a more accessible blockchain development experience. As an example, this means that programmers can access an address or timestamp of a particular block with ease.
However, this only covers the very basics of the programming language; if you have further interest, we recommend the following in-depth breakdown of Solidity on the Moralis blog.
What is Remix?
Remix is an open-source desktop and web application that is an IDE or integrated development environment specializing in Ethereum development. This makes Remix an excellent tool for developing smart contracts with the Solidity programming language. The development environment features a fast development cycle with a vast set of useful plugins. Not only is the Remix IDE great for developing smart contracts, but it is also a learning platform.
As the Remix IDE specializes in Ethereum and smart contract development, the environment features several valuable tools to be utilized throughout the development process. An example is a built-in compiler enabling you to compile your contracts directly in the development environment. It is also possible to deploy the contracts through Remix and test them directly. Furthermore, you can also customize your IDE with plugins to fit your specific needs.
Moreover, we will use the Remix IDE when taking a closer look at how to create smart contracts. This means that we’ll discover some of the main features of the development environments. We will, among other things, go through how we can compile and deploy our contracts directly through the Remix IDE.
So, if this sounds interesting to you, then follow along as we look closer at the process of creating a smart contract from scratch with Remix!
How to Create Smart Contracts
Now that we have familiarized ourselves with concepts such as smart contracts, Solidity, and Remix, we can move on to creating our very first smart contract. The first thing that we will do is open our browser and launch the web application of Remix. There is no need to create an account with Remix, and we can start developing right away. However, before we start developing, let’s explore Remix.
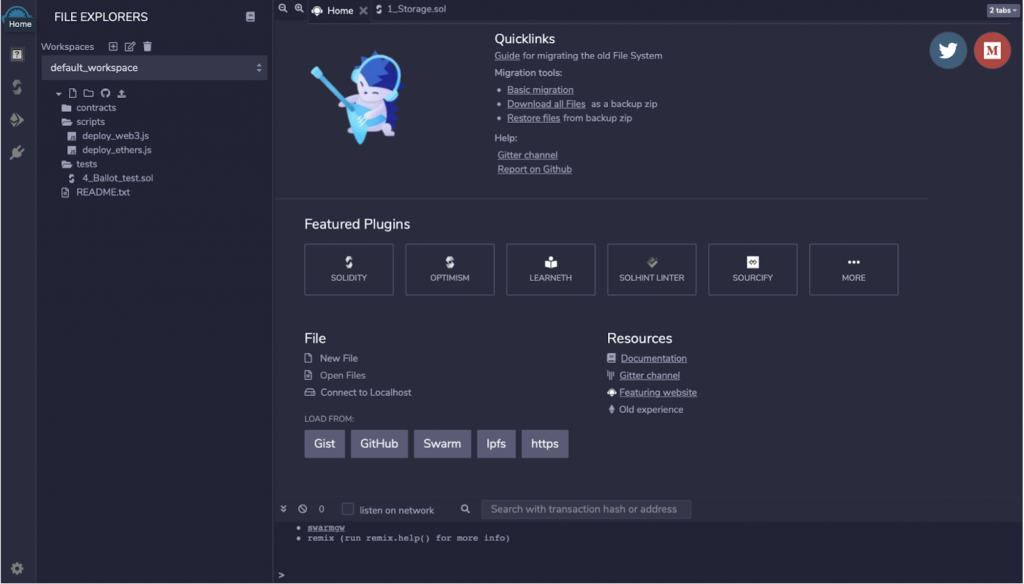
The image above is a printscreen from an initial launch of the Remix web app. As you can see, we have a few different options. The first thing we notice is the featured plugins on the homepage. Among these plugins, we have Solidity, Optimism, LearnETH, etc. However, we can also click the ”More” button to discover additional plugins. These are great since they can help during the development process. Furthermore, some of these plugins are also created to teach new developers about Ethereum programming. So, if you are interested in learning more about ETH development, feel free to explore more plugins.
Below the plugins, we find buttons for creating, importing, or loading files from, for example, GitHub. We can also find buttons for additional resources such as documentation.
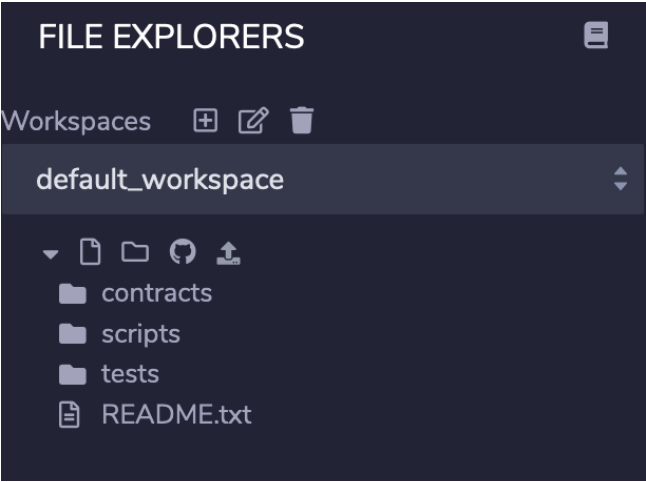
Moreover, we also have the file explorer menu to the left, where we can see an already default workspace. This workspace contains folders for contracts, scripts, and tests. You can, for example, take a closer look at the default contracts to give you an idea of what a smart contract looks like. Besides this menu, we also have a navigation bar with tabs for compiling, deploying, etc.
Create a Smart Contract File with Remix
Now that we have familiarized ourselves with Remix, we can move on to creating our first contract. The first step is to create an entirely new workspace by clicking the ”+” button that you can find above the default workspace to the left.
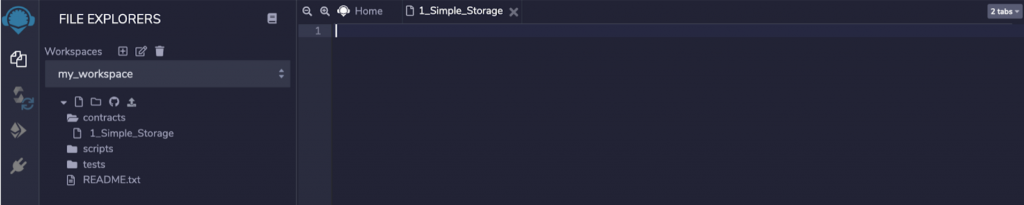
When creating a new workspace, Remix provides a folder structure that, for example, contains the same contracts from the default workspace. However, we don’t need these, and we can go ahead and delete them.
The next step is to create a new contract file, which we can do by right-clicking the contracts folder and adding a new file. The smart contract we are going to create here is a very simple contract for storing data, and as such, we will call this file ”1_Simple_Storage.sol”. Our first smart contract file might look something like this:
Now, the first thing that we will do is declare what version of Solidity that we are going to use. For this, we need to add a pragma line that looks like this:
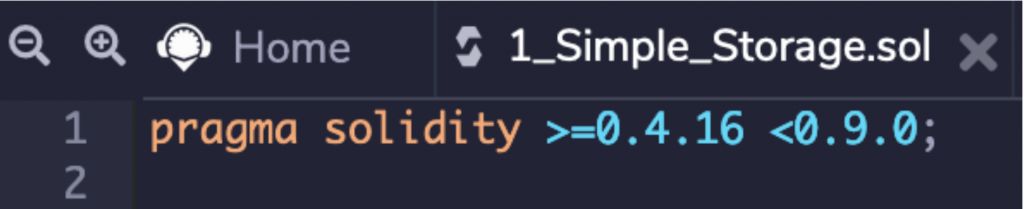
The keyword here is ”pragma”, and then we set a range of Solidity versions which the compiler will choose from. The one picked will be whichever comes first with the highest version. And just like that, we have declared our version of Solidity that we are going to use.
Create Smart Contracts
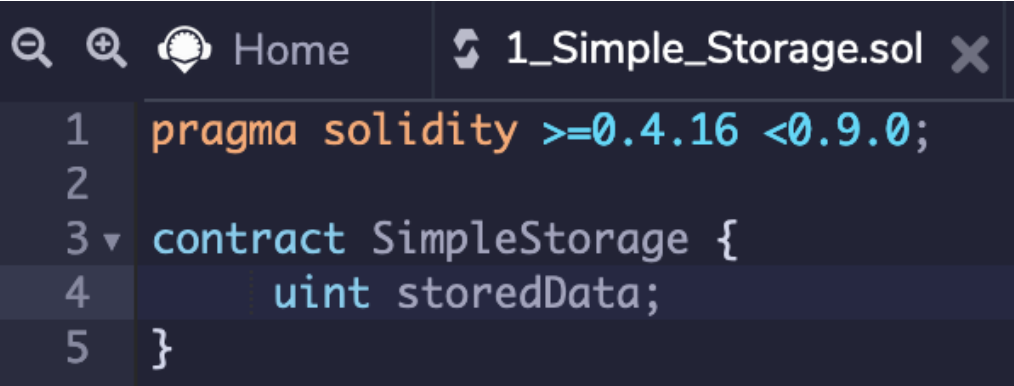
With the Solidity version declared through the pragma line, we can create our very own smart contract. To create a contract, we need to use the ”contract” keyword and declare a name. In this example, we call the contract ”SimpleStorage” and finish by adding curly brackets at the end.

Contracts work similarly to regular classes in any other object-oriented programming language that you might be more familiar with. As such, we are between the curly brackets going to declare any variables and functions that we need to access outside/within the contract.
The first thing that we’ll do in this example is to declare a variable. We are going to call this variable ”storedData”, and it will be of a ”uint” data type. ”uint” is an abbreviation for undefined integer, and in this case, it refers to an integer larger than zero. The purpose of the ”storedData” variable will simply be to store data.
Create Functions for our Smart Contracts
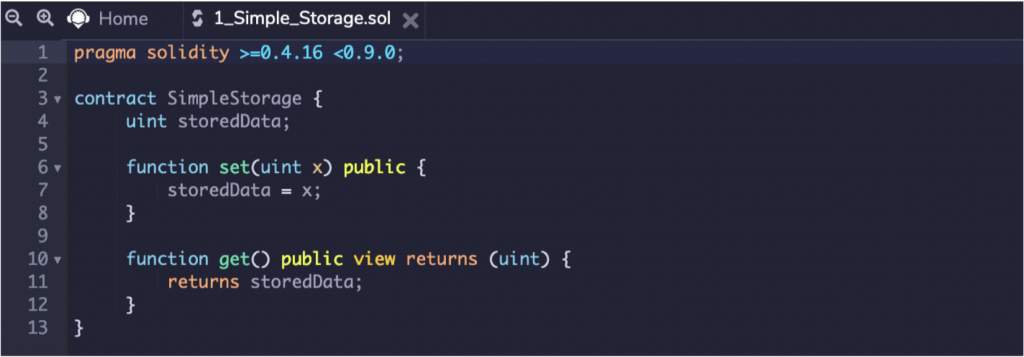
Next up, we are going to create two functions. The first function that we’ll create will be used to assign a value to our ”storedData” variable. For this reason, we will call this function ”set”, and this function will take an argument in the form of a ”uint” to match the type of the ”storedData” variable. We’ll call the argument ”x” and then end with curly brackets.
Within the curly brackets, we simply change the value of the variable “storedData” to the value of ”x”. Furthermore, we will also add the keyword ”public” to declare that the function can be called externally. This would give us a function that looks like this:

Along with a function to set the value, we will also create a function to acquire the value of ”storedData”. We will call this function ”get”, and this function does not require any argument as we are only returning the value of ”storedData”. We’ll also make this function public as we would like to access this function from outside the contract.
However, as this is a get-function, we must declare the value that the function will return. This is defined by the keyword ”returns” followed by the variable type in parentheses, which in this case is a ”uint”. Within the curly brackets, we need only write ”return storedData” for the function to return the value of the ”storedData” variable. Lastly, we can also add the keyword ”view” prior to ”returns” as this function won’t change the state of the contract in any way.

That’s it; this is all it takes to make a straightforward smart contract for storing data. In total, this is what the contract looks like:
Compiling and Deploying Smart Contracts
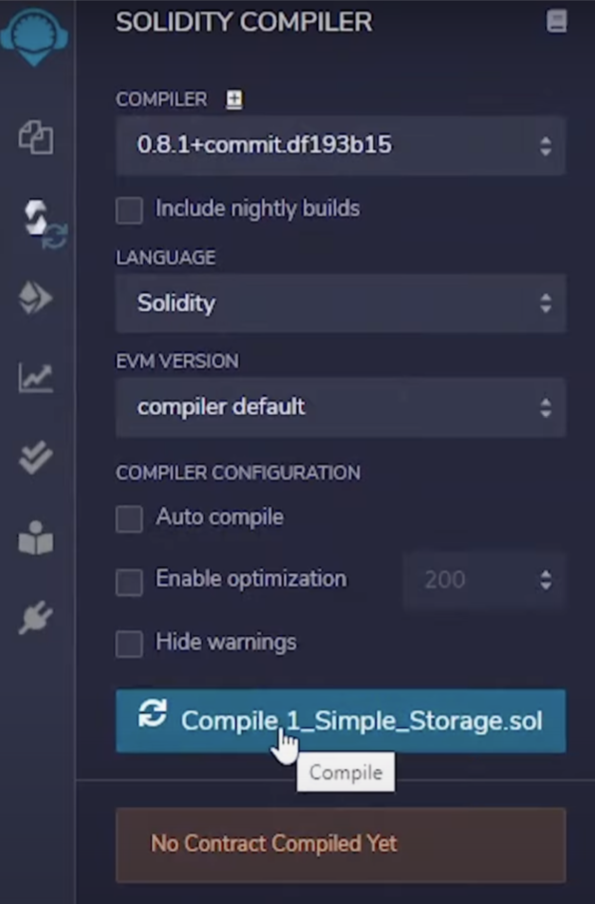
With our first contract complete, we can move on to compiling our contract. To do so, we can navigate ourselves to the far left of our Remix interface and choose the Solidity compiler tab. This will provide us with a menu for compiling our contract, and with the contract selected, we can simply hit the ”Compile 1_Simple_Storage.sol” button to compile the contract.
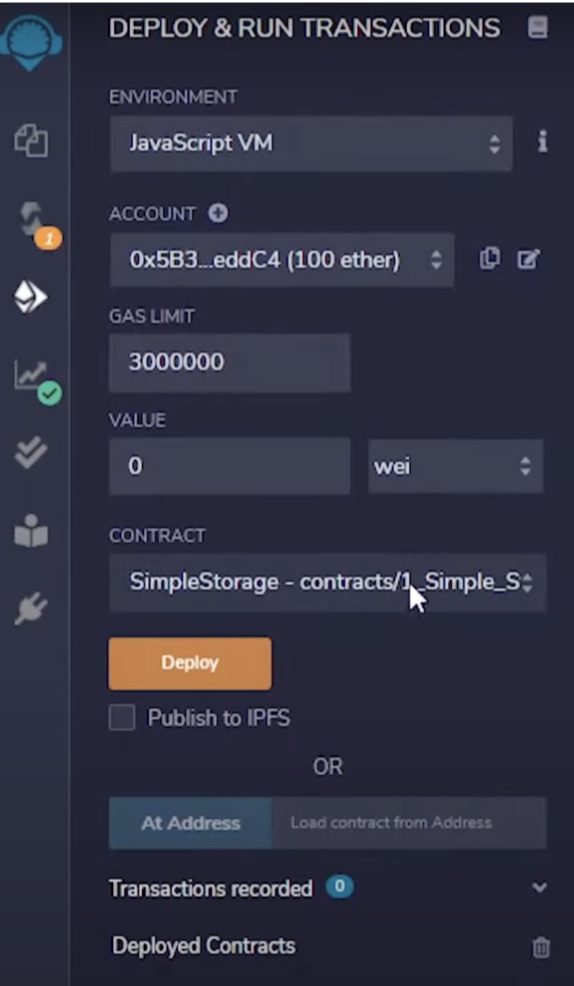
After this, we can move on to the deploy tab, located just below the Solidity compiler tab. All we need to do here is to make sure that the environment is set to JavaScript VM, choose the account we want to use, and then hit the deploy button.
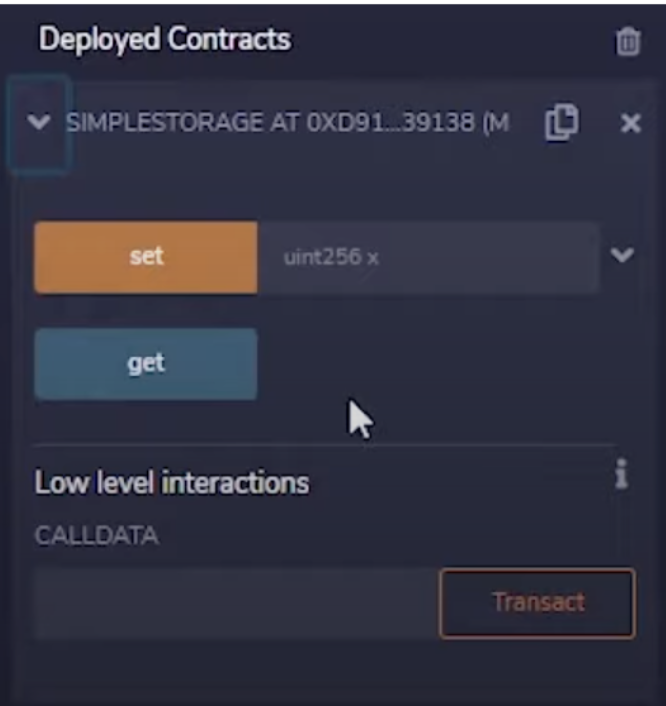
Once the contract is deployed, the menu will receive a minor change as the contract will appear underneath ”Deployed Contracts”. If we click the arrow beside the contract in question, we can actually test our contracts relatively easily.
We can both set the value of the contract variable with the ”set” function and acquire the value with the ”get” function. If we try to get the value before setting a value, the contract will return zero as a default. However, if we input ”5” into the box besides the ”set” button, we will also receive ”5” if as a result of hitting the ”get” button.
This is one of the many great functionalities of Remix as it is super easy to test our contracts. As such, the Remix IDE is excellent for beginners as it provides a clear visualization of what the contract is supposed to do and can demonstrate if the contract is working as it should.
How to Create Smart Contracts — Summary
The value of smart contracts is undoubtedly high as they are essential for dApp development. They are a significant part of enabling a decentralized web filled with useful and revolutionizing applications. However, even with a component of such importance, not everyone is aware of how to create smart contracts. This is the reason why we have taken this article to look at the fundamentals of smart contract development.
The contract that we created throughout this article is without a doubt simple, and the usability of this simple smart contract can be argued. One thing is for sure, and that is that the contract comes with its limitations. However, this tutorial only covers the very basics of smart contract development, and as we learn to make them more complex, we’ll also see an increase in use cases.
Moreover, as the complexity of our contracts increases, we’ll also need more valuable tools to help us through the development process. The first tool that we should familiarize ourselves with is Moralis, as this is the ultimate platform for Web3 development. The platform offers a selection of tools and useful guides from the Moralis blog. For example, if you want to learn how to develop dApps and tokens, check out these two articles: ”How to Build Polygon dApps” and ”How to Create Ethereum Tokens”.
So, if you are looking to become a better smart contract and dApp developer, do not hesitate and sign up with Moralis today!
