If you’re familiar with the crypto and Web3 space, you know that Binance’s blockchain network used to consist of two separate blockchains: Binance Chain and Binance Smart Chain (BSC). However, as two components of a larger ecosystem, Binance recently found that it was time to highlight the connection between the blockchains and the BNB token, by transitioning and rebranding the blockchain to BNB Chain. Furthermore, rebranding its blockchain network also serves to distance the BNB ecosystem from the Binance brand, a point that we’ll get to later on. For this reason, we will in this article explore BNB Chain further and teach you how to create a BNB Chain token with Moralis.
To begin with, we’ll take a closer look at Binance Chain, and BSC’s recent rebranding to BNB Chain. Following this, we’re also going to dive deeper into the process of creating a BNB Chain token quickly. In fact, with the help of Moralis, we’ll be able to accomplish this in minutes. The accessibility of token development originates from the backend infrastructure provided by the system along with some essential development tools of the platform, one of which is Moralis Speedy Nodes.
The Speedy Nodes service from Moralis provides some of the fastest and most reliable blockchain nodes on the market. Moreover, not only are you able to access nodes for BNB Chain but other networks alike. Thus, if you’re interested in developing tokens for other networks, check out our guides on how to create a Polygon token or how to create Ethereum tokens.
So, if you want to become more proficient in Web3 development, join Moralis straight away. Doing so is the fastest and most accessible route if you’d like to become a blockchain developer!
What is BNB Chain?
The decision to rebrand Binance’s blockchain network to “BNB Chain” was partly made to highlight the interoperable nature of the ecosystem’s two blockchains and the BNB token while simultaneously distancing its blockchain network from the Binance brand. The reason behind this transition is that BNB is more than Binance. BNB stands for ”Build and Build”, and it’s the native token of BNB Chain. As such, the token, together with BNB Chain, is its own living ecosystem that now takes a different course from that of Binance.
These blockchains were formerly known as Binance Chain and Binance Smart Chain (BSC). However, with the transition to BNB Chain, Binance Chain also transitioned to BNB Beacon Chain, and BSC to BNB Smart Chain (still abbreviated ”BSC”). As such, the BNB Chain ecosystem consists of two separate blockchains.
The first of the two blockchains was BNB Beacon Chain, which at the time of launch, was called Binance Chain. The primary purpose of this chain is to process and validate decentralized transactions within the BNB Chain ecosystem. Moreover, they designed the chain to host the ecosystem’s native currency, BNB. However, the chain isn’t equipped to facilitate smart contracts, which previously limited the ecosystem and gave birth to BSC.
BSC is compatible with smart contracts, and it operates alongside BNB Beacon Chain. As such, even though these chains are intertwined, they remain separate. This means that they have the potential to work independently if, for example, one of the chains goes offline.
Developing on BSC is a relatively similar experience to the Ethereum blockchain. So, if you have experience with Ethereum’s ecosystem, you will most likely have no trouble developing with BNB Smart Chain. This is because BSC basically utilizes the same codebase as Ethereum in combination with being EVM-compatible.
What are BEP-20 Tokens?
With a better understanding of the BNB Chain ecosystem and its two components, BNB Beacon Chain and BSC, we can move on and take a closer look at the BEP-20 and BEP-2 token standards. However, before diving deeper into what they entail, we need to understand why token standards requirements exist in the first place. Once we’ve done so, we can move on and explore how to create a BNB Chain token.
Within the crypto industry, tokens are compelling features, and there are thousands of different alternatives on the market. As such, it becomes imperative to regulate tokens ensuring that they have the same qualities and characteristics. This provides compatibility, meaning that new tokens work with dApps and protocols that already exist. Token standards are, therefore, a way of ensuring that all tokens implement a minimum interface that makes them compatible in a complete ecosystem.
With the interoperability achieved through the ”dual-chain” architecture of the BNB Chain ecosystem, the native BNB token fuels both the BEP-20 and BEP-2 token standards. So, what exactly is the difference between the two?
BEP-2 is the token standard for BNB Beacon Chain; meanwhile, BEP-20 regulates tokens on BSC. The BEP-20 token standard is often compared to ERC-20 since they are quite similar in many ways. However, it is essential to know that they are two separate standards for different blockchains. In fact, the ERC-20 is the token standard for the Ethereum blockchain.
So, to summarize, the BEP-20 token standard is implemented when creating cryptocurrency tokens for BNB Smart Chain, and BNB Beacon Chain uses the BEP-2 standard.
How to Create a Token on BNB Chain
Creating a BNB Chain token doesn’t have to be difficult. In fact, with Moralis, we’ll be able to do so in a matter of minutes. Moreover, you don’t actually have to be a developer to create a BNB Chain token! So, if you are interested in learning how to launch your own token, then follow along as we guide you through the complete process.
If you have experience creating tokens on the Ethereum network, you’ll be familiar with the process. Both Ethereum and BNB Chain token development are relatively similar as you’ll be using the same programming languages, tools, and thought processes. As such, we’ll utilize Solidity as the programming language. In addition, the tools we’re going to use are Remix, which is an IDE (Integrated Development Environment), and MetaMask, one of the largest cryptocurrency wallets.
We’re going to be breaking down the process into five simple steps:
- Finding an OpenZeppelin contract template.
- Creating a contract file.
- Programming the contract.
- Compiling the token contract.
- Deploying the contract.
As this is a tutorial on how to create a BNB Chain token, we’ll be doing so for the ecosystem’s testnet. However, if you’d like to launch a token on BNB Chain’s mainnet, the process doesn’t differ significantly.
Lastly, if you’d rather watch a video that explains the entire process, be sure to check out this clip from the Moralis YouTube channel:
How to Create a BNB Chain Token – Prerequisites
Before you learn how to create a BNB Chain token, there are a few prerequisites that we need to take care of. First, we need to create a MetaMask account since this is essential for us to interact with smart contracts. Along with acquiring a MetaMask wallet, we must also add the BNB Chain testnet network to our wallet. Lastly, we’re also going to acquire some BNB for the testnet, which will allow us to pay for the transaction to launch the tokens to the network. So, with no further ado, let’s dive right into acquiring a MetaMask wallet.

To get your own MetaMask wallet, you’ll first need to visit their official website and install MetaMask as an extension to your web browser. With the extension at hand, you can click on the ”Get Started” button and create your wallet. It is possible to either import an existing wallet using a seed phrase or create one from scratch. However, this should depend on your preferences, so we won’t be going into any further detail on the setup process.
Getting a Node and Changing MetaMask Network
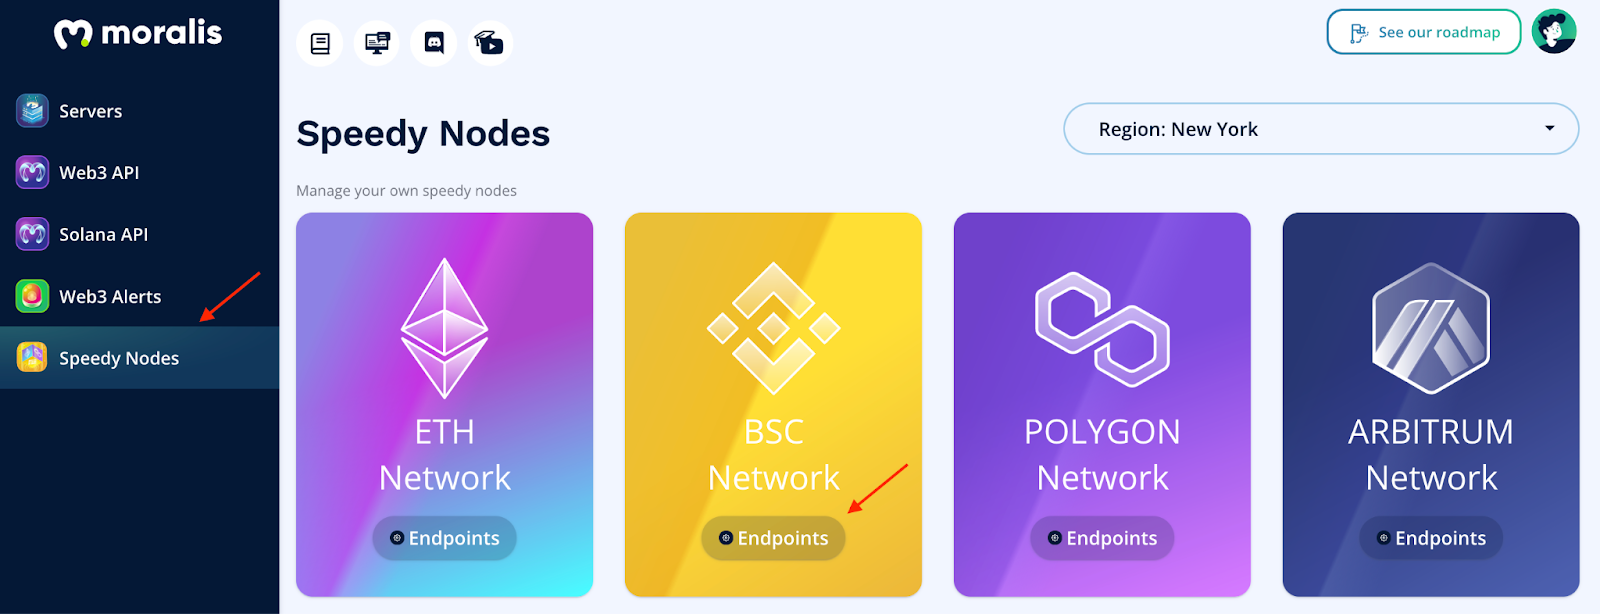
To add BNB Chain’s testnet to your MetaMask wallet, the first thing you need is a blockchain node. The quickest and easiest way to get a hold of a node is through Moralis. Or, more specifically, the Speedy Nodes service. Furthermore, with Moralis Speedy Nodes, it’s quite easy to access blockchain nodes from several different networks such as Ethereum, BNB Chain, Polygon, etc.
So, to acquire the BNB Chain node that you’re going to need for this “how to create a BNB Chain token” tutorial, the first thing you’ll need to do is sign up with Moralis. With a Moralis account, you can log in and navigate to the “Speedy Nodes” tab at the far left of the admin panel. Once you click on this tab, a few different alternatives will appear, one of which will be the BNB Chain network. To get the node, you’ll need to press the” Endpoints” button, which will provide you with URLs. These URLs are the BNB Chain nodes.
Now that you have the node at your disposal, there are two ways to add the network to your MetaMask wallet. You can add it by clicking on the ”Add Network” button in your MetaMask interface. If you opt for this alternative, you’ll need to input some information manually, and it should look something like this (the ”New RPC URL” should be the Speedy Node URL):

The second alternative is even more straightforward. As you might notice, when you click on the ”Endpoints” button, you’ll have the option to click on ”Add to MetaMask”. You can simply hit this button, and it will prompt your MetaMask wallet and automatically add the BNB Chain network.

Acquiring Some BNB Tokens
With the BNB Chain testnet network added to your wallet, we can move on and get some BNB tokens. Since we’re working with the testnet, we can acquire testnet BNB for free through a faucet. So, to get BNB, you can visit the following website:
https://testnet.binance.org/faucet-smart
As you can see from the faucet, you’ll need to input your wallet address. You’ll be able to find your address at the top of your MetaMask interface. You can copy this address, make sure that you have the proper network selected, paste this into the faucet, and click on the ”Give me BNB” button. This will take a couple of seconds, but you’ll receive one BNB in your MetaMask wallet momentarily.
How to Create a BNB Chain Token – Creating the Token
Now, with the prerequisites all finalized, it’s time to get to the actual process and learn how to create a BNB Chain token. Creating a BNB Chain token is easy since the process is quite similar to launching an ERC-20 token on the Ethereum network. Moreover, since we are working with well-established token standards such as BEP-20 and ERC-20, a majority of the code is already laid out for you to utilize.
However, the templates are generic, and there might be a few adjustments that need to be made. Nonetheless, let’s kick this off by discovering where we can find a template for creating a BNB Chain token!
OpenZeppelin
A major convenience of decentralization and open-source software is the possibility to copy and paste code that we can adapt to fit our development needs. As such, we can fetch token templates directly from OpenZeppelin.

OpenZeppelin is an open-source organization that accumulates token standards. Moreover, as the BEP-20 standard is essentially the same as Ethereum’s ERC-20 token standard, it is possible to utilize an ERC-20 template and make a few adjustments to fit BNB Chain. Thus, you can use this template in the next step when we create the contract. Here is what the template looks like:
// contracts/GLDToken.sol
// SPDX-License-Identifier: MIT
pragma solidity ^0.8.0;

import "@openzeppelin/contracts/token/ERC20/ERC20.sol";

contract tokenName is ERC20 {
  constructor() ERC20("tokenName", "currencySymbol") {
// contracts/GLDToken.sol
// SPDX-License-Identifier: MIT
pragma solidity ^0.8.0;

import "@openzeppelin/contracts/token/ERC20/ERC20.sol";

contract GLDToken is ERC20 {
  constructor(uint256 initialSupply) ERC20("Gold", "GLD") {
    _mint(msg.sender, initialSupply);
  }
}
Creating a Token Contract
The next step is to create the token contract itself. To do so, we’ll be utilizing the Remix IDE. So, let’s head over to “remix.ethereum.org” and create a new contract file. All you’ll need to do is right-click on the “Contracts” folder to the left of the interface and create a new file. We recommend naming the contract based on what you’re going to call the token. The next step is to copy the template code from OpenZeppelin and paste this into your contract file.
Programming Your BNB Chain Token
Once we paste the code into our contract, there are a few alterations that we need to take care of to customize the contract to fit our needs. So, let’s dive a bit deeper into the code. By doing so, we’ll be one step closer in our quest to learn how to create a BNB Chain token!
The first line of the template specifies which version of Solidity we’ll use when compiling the contract, and this is further called “the pragma line”. The second line of the code is where we import the OpenZeppelin token contract, which is the contract that our file will inherit from.
After this, we implement the contract itself, and in the case of the template, it is called ”GLDToken”. Here you are free to customize the contract to fit your specific preferences.
Within the curly braces of the token contract, we find two constructors. We can simply remove the ”initialSupply” variable for the first one. The second constructor is used to specify the token’s name and symbol. This means that you are free to change these to essentially whatever you’d like.
Within the curly braces that follow the constructors, we have the ”_mint()” function, which is used to mint the actual tokens. The first parameter, ”msg.sender”, specifies that the tokens sends to the wallet address that deploys the contract. The second parameter specifies the initial supply. Moreover, you can remove the variable ”initialSupply” here as well and replace it with ”100 * (10 ** uint256(decimals())))”. This will mint 100 tokens, and if you’d like another amount, simply change ”100” to your desired number.
Contract Example:
// SPDX-License-Identifier: MIT
pragma solidity ^0.8.0;

// contracts/GLDToken.sol
// SPDX-License-Identifier: MIT
pragma solidity ^0.8.0;

import "@openzeppelin/contracts/token/ERC20/ERC20.sol";

contract tokenName is ERC20 {
  constructor() ERC20("tokenName", "currencySymbol") {
    _mint(msg.sender, 100 * (10 ** uint256(decimals())));
  }
}
Compiling the Token Contract
With the BEP-20 token smart contract finalized, the next step is to compile the contract. As we opted to work with Remix, this process became relatively easy. To compile the contract, all you need to do is click on the ”Solidity Compiler” tab at the left of the Remix interface. Then you need to select the correct Solidity version, which should match the one specified in the contract, and hit ”Compile”.

Deploying the Token Contract
We’ve now reached one of the final steps in our quest. As a result, you’ve probably realized that it’s incredibly easy to create a BNB Chain token when using the right tools. So, let’s take a look at our final step.
Once the contract compiles successfully, all that remains is to deploy the contract to the BNB Chain testnet. To do so, you’ll need to navigate to the ”Deploy and run transactions” tab beneath ”Solidity Compiler”. Here, you’ll need to make a few selections.
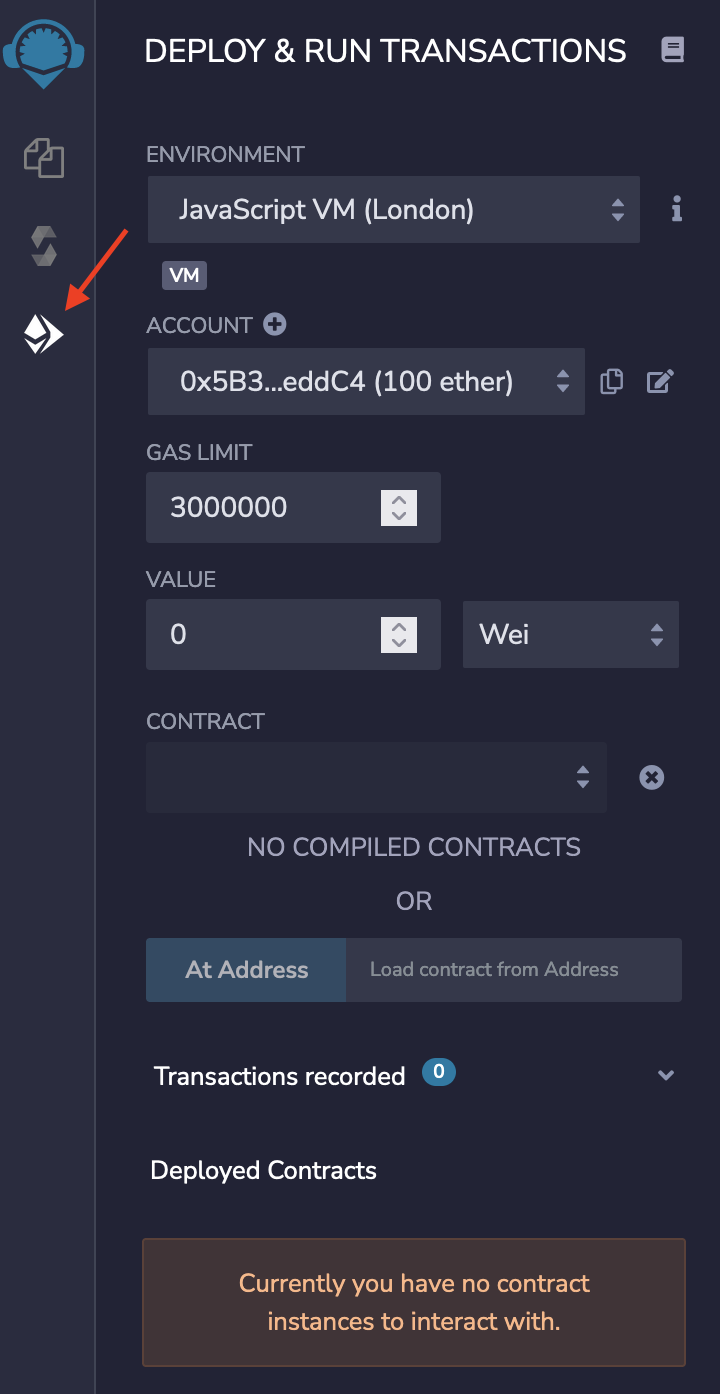
First, you need to ensure that you’ve set the environment to ”Injected Web3” and that your MetaMask network is the BNB Chain testnet. Following this, ensure that the account has the same address as your MetaMask. Finally, make sure that the correct contract is selected. If so, you can hit ”Deploy”.
Now that’s it for the process of how to create a BNB Chain token! If you followed along, you were hopefully able to develop, compile, and deploy your very own BNB Chain token! In the following section, we’ll show you how to add the token to your MetaMask wallet.
How to Create a BNB Chain Token – Viewing the BNB Chain Token
With the token contract deployed to BNB Chain’s testnet, the last step in this process is to add the token to our MetaMask wallet. As soon as the transaction finalizes, you can click on the ”Activity” tab in your wallet. There you’ll be able to find all of the latest transactions. The last transaction should be the deployment of your contract to the blockchain.
If you can click on the transaction, a new window will appear and present various details regarding the event. From here, you can visit the ”BscScan” website by clicking on “View on block explorer”. This will present a bunch of information; however, in this case, we are interested in the ”Interacted With (To)” address. You can go ahead and copy this address and go back to the MetaMask interface.

Once back at MetaMask, you can continue by clicking on the ”Assets” tab and then ”Import Tokens”. Here you need to paste the address, and the rest of the information should automatically fill in. Now all that remains is to click on ”Add Custom Tokens”, and the tokens should be added to your wallet and show up under the ”Assets” tab!
How to Create a BNB Chain Token – Summary
If you followed the guide in this article, you’re now well aware of how to launch a token on BNB Chain using the Moralis operating system. Moreover, with the aid of Moralis, we were able to create a BNB Chain token with a few prerequisites and five simple steps:
- Finding an OpenZeppelin contract template.
- Creating a contract file.
- Programming the contract.
- Compiling the token contract.
- Deploying the contract.
What’s more, you don’t really need any prior development experience to complete the process! As such, anyone can create a BNB Chain token with Moralis.
However, if you want to learn more about Web3 development, be sure to check out the Moralis blog. Here you’ll find great articles on how to build BSC dApps, the best languages for blockchain development, and the metaverse. Moreover, you can also learn more about other tools from Moralis, such as the NFT API, Price API, Web3UI Kit, and much more!
So, if you have ambitions to take your Web3 development game to the next level and become a blockchain developer, sign up with Moralis. Creating an account only takes a couple of seconds, and you’ll receive full access to all of the platform’s tools!
