Syncing and indexing smart contract events enables blockchain developers to use public on-chain data. Furthermore, you can then incorporate the synced data into your dApp (decentralized applications) to trigger specific functions or display particular pieces of information in a user-friendly manner. Moreover, as Ethereum keeps growing its user base and remains as the leading chain for smart contracts deployment, a dApp developer focusing on Ethereum development will benefit from knowing how to sync and watch a smart contract event. Therefore, in this full guide, we’ll help you level up your programming skills, teaching you how to sync and index smart contract events with Moralis. Once done, you’ll be able to utilize Moralis’ smart contract events sync tool to get notified instantly when new events happen in real-time!
Moreover, an aspiring blockchain developer tends to avoid working with smart contracts; however, you should know that there are several tools available that make things a lot simpler. For one, you can use OpenZeppelin to get a wide range of smart contract templates. You can then deploy them with ease using Remix. However, to sync and index smart contract events, Moralis is the ultimate tool a programmer should take advantage of. This leading Web3 development platform, also known as “Firebase for crypto”, comes with the ultimate Web3 SDK and API, including the Ethereum API and NFT API. As such, it enables you to take care of all blockchain-related backend development by copying and pasting short snippets of code from Moralis’ documentation while you devote your attention to creating the best frontend. Moreover, to work with Moralis, you only need to be JavaScript-proficient. With that in mind, let’s tackle the “sync and index smart contract events with Moralis” quest herein.

What are Smart Contract Events?
Before we take a closer look at how to sync and index smart contract events using Moralis, we want to make sure that you all have a clear understanding of what smart contract events are. Smart contracts are a specific set of coded rules that execute predefined actions once the predetermined conditions are met. When considering this simple definition of smart contracts, it’s logical to think that something meaningful will happen within smart contracts, or should we say, based on their code. So, when something meaningful happens within a smart contract, it is developed to emit events. As such, smart contract events are essentially signals to dApps or other smart contracts that the contract is emitting to the signal wanting to communicate with them. Of course, it is up to the developers of the smart contracts to define when the events should emit.
For instance, let’s look at the ERC-20 token standard smart contract. Whenever somebody sends an ERC-20 token, the related contract will emit a “Transfer” event. Moreover, that event will contain all the details about the transfer. With that in mind, you can imagine that being able to listen to smart contract events in real-time is extremely important when creating dApps. As such, let’s take on an example task where we show you how to sync and index smart contract events with Moralis.
Sync and Index Smart Contract Events with Moralis
We believe that the best way to learn something is by showing you how it works in practice. Therefore, we will take on an example project where we will sync and index smart contract events for one of the most popular NFT collections – CryptoPunks. Our assumption will be that we have a decentralized application in which we want to track all CryptoPunks transfers in real-time and also see all historical transfer events. However, before we can sync and index smart contract events with Moralis, we need to create a Moralis server. To see how to complete this simple setup, use the instructions below.

How to Create a Moralis Server
To obtain Moralis’ full backend functionality, you need to create a Moralis server. The latter is also essential to sync and index smart contract events. So, here are the steps to follow:
- Create a Free Moralis Account – Follow the link to create your free Moralis account. Just enter your email address and create your password. Then, complete the process by confirming your account (click the confirmation link in the email sent to you). In case you already have your Moralis account, just log in.
Create a Moralis Server – After logging in, you will access your Moralis admin area. From there, select the “Servers” tab (as shown in the image below). Then, click on “+ Create a new Server” in the top-right corner. Next, select the network type from the drop-down menu. Since CryptoPunks are a live project, select the “Mainnet Server” option. However, when working on example projects, we recommend selecting the “Testnet Server” option (use our Ethereum testnet guide).

Then, another pop-up window will appear where you need to enter your server’s name (this can be anything you want), select region, network, and chain(s) (CryptoPunks are on Ethereum). Finally, spin up your server by clicking on the “Add Instance” button.

Once you’ve successfully created your Moralis server, you are ready to take things to another level. In case you wanted to build your first dApp, you’d need to obtain your server’s details. However, in our case, we will not be creating any dApps. Instead, we will sync and index smart contract events. As such, we need to get to the “Sync” tab.
Sync and Index Smart Contract Events – Example Project
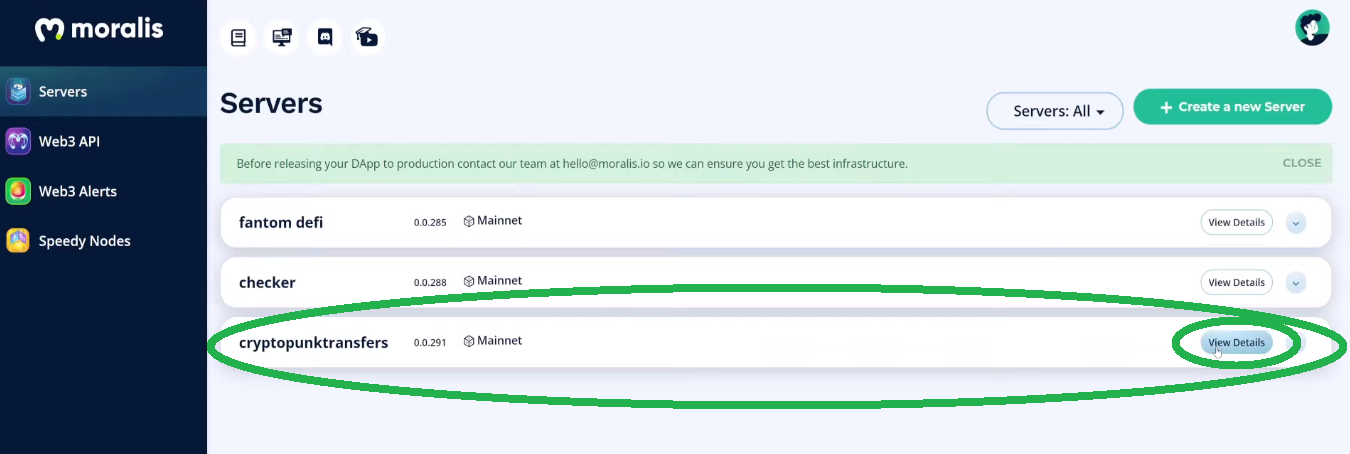
To sync and index smart contract events with Moralis, click on the “View Details” button:
Once you click on the “View Details” button, a pop-up window will appear. By default, the “Server Details” tab is selected (this is where you obtain your server URL and application ID when creating dApps). For the purpose of our example project, we need to select the “Sync” tab, which is on the far right side:

After clicking on the “Sync” tab button, you will see the window shown in the image below. Since you’ve just created your server, there should be no sync services on it. To add your new sync service, click on “Add New Sync”:
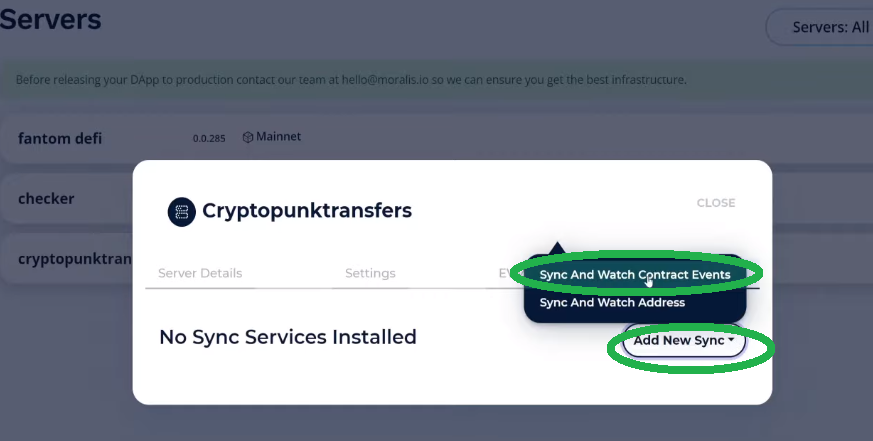
Now, once you click on the “Add New Sync” button, two options will appear. Make sure to select the top one – just click on the “Sync and Watch Contract Events” option. Next, you will finally see the options to configure sync and index smart contract events. The configuration process is simple; essentially, you just copy and paste publicly available on-chain data. However, since this may be your first time dealing with on-chain data, we will guide you through the process step-by-step to show you exactly where you can obtain the necessary details for our example project (CryptoPunks).
Sync and Index Smart Contract Events – Using On-Chain Data
You’ve finally come to the core of our example project. By properly completing this step, you will be able to sync and index smart contract events for our CryptoPunks example project. Of course, you can then use this example to apply the same principles to any other smart contract.
At this point, you should be on the “Sync” tab and ready to enter the specific parameters/details under “Configure Sync and Watch Contract Events”:

Looking at the image above, you can see that you first need to select the proper chain. Since you’ve only selected the Ethereum mainnet when creating your server, this is the only option you should have. Just click on it, and it will be marked with a green checkmark. When it comes to the description, you can write whatever you want; however, we went with “CryptoPunk Transfers”, so feel free to follow our lead.
Next, you need to click/check the “Sync_historical” option (it is already selected by default). That way, you will also include the historical data for all CryptoPunk transfers with a single click:

Using Etherscan to Obtain the Topic
As far as the topic goes, you need to obtain the right details. To do this for Ethereum-based projects, you must go to Etherscan. Use the search bar and type in “CryptoPunks”:

Then, click on any of the transaction hashes on any of the “Transfer Punk” methods on the “Transfers” tab, which will take you to that transaction’s details:

Once on the “Transaction Details” page, make sure to select the “Logs” tab:

There you’ll see the “Transfer” and “PunkTransfer” names. Moreover, “PunkTransfer” is the one that interests us. To get the topic, we use “PunkTransfer” and the details inside the parentheses (only the types):

Of course, you need to enter that topic into your “Sync” tab, under “Configure Sync and Watch Contract Events”:

Using Etherscan to Obtain the ABI
Next, you need to enter the proper ABI into the “Abi” field. Fortunately, you can find it on Etherscan as well. To locate the ABI, you need to click on the contract address of CryptoPunks:

On the next page, scroll down a bit and click on the “Contract” tab:

Once on the “Contract” tab’s page, make sure you are in the “Code” section and then scroll down again:

Stop when you see “Contract ABI”:

You can see a rather long array; fortunately, you only need a specific part of it. To find it, use the search option and type in “PunkTransfer”. This will automatically highlight the part of the ABI that interests you:

Now, copy the entire object containing the highlighted “PunkTransfer”:

Finally, paste the copied object (highlighted above) into the “Abi” section in your “Sync” tab:

Using Etherscan to Obtain the Contract Address
Now you need to obtain the proper contract address. This is the one you’ve clicked on at the beginning of the previous step. However, you can find it on the current page of Etherscan as well (if you’ve followed the steps accordingly) – just scroll to the top. Then, click on the “copy” icon next to it:

Next, paste it into your “Sync” tab:

The table name is the final detail required to complete the adding of your new sync. Here, you can again use whatever you wish; however, we went with “PunkTransfers”:

To finally sync and index smart contract events for our CryptoPunks example, click on the “Confirm” button. After doing so, your new sync and watch contract event will be listed in the “Sync” tab:

By completing the simple steps above, you’ve empowered Moralis to sync and index smart contract events for all CryptoPunks transfers in real-time, including all historical transactions.
Sync and Index Smart Contract Events at Your Disposal – Moralis Dashboard
You can easily access the details picked up by the sync added in the previous section, and these are available within your Moralis dashboard. Essentially, the latter is a database you get with every Moralis server. Moreover, to access your dashboard, click on the arrow icon next to the “View Details” button, followed by “Dashboard”:

Inside your dashboard, you will now see the “PunkTransfers” class, which was automatically added as you created the sync:

Inside this class, you can see all details related to the transfers of CryptoPunks, neatly arranged in columns. This means that all this data is now available to you if you decide to use it in your dApps. Moreover, all future transactions will also be added to your dashboard in real-time.
Nonetheless, in case you’re more of a video person, make sure to watch the video below, where one of Moralis’ experts takes on the same steps as covered above:
Full Guide to Sync and Index Smart Contract Events – Summary
We hope that you’ve completed all of the steps above and now know how to sync and index smart contract events using Moralis. All it takes are a couple of simple tasks, starting with creating your Moralis server and adding a new sync instance. Moreover, thanks to publicly-available on-chain data, you can easily obtain all required details using Etherscan (when working with Ethereum). Furthermore, once your sync is set up properly, all the data becomes available to you and your dApps within your Moralis dashboard. However, this is just the beginning; it’s now up to you to use the power of Moralis and deploy phenomenal dApps!
Moving forward, if you’d like to expand your blockchain horizons even further, we suggest visiting the Moralis YouTube channel and the Moralis blog. There you’ll find a lot of educational content, including multiple example projects. For instance, you can learn how to build a decentralized messaging app, create an OpenSea clone, mint NFTs without gas fees, create a Reddit clone for Web3, how to send Ethereum transactions with one line of code, get familiar with the ultimate Ethereum iOS dev kit, learn to use the ultimate Web3 boilerplate, and much more.
On the other hand, in case you are not JavaScript-proficient yet and would like to go full-time crypto, make sure to visit Moralis Academy.