For blockchain developers, allowing users to swap ERC-20 tokens on their dapp (decentralized application) is highly beneficial. For example, enabling this feature will reduce the rate of users bouncing to other platforms to swap tokens. As a result, user engagement on your platform will increase substantially. But, implementing such a token swap feature for ERC-20 tokens might seem quite challenging. However, with the help of enterprise-grade Web3 APIs and SDKs, you can effortlessly implement such features, including building a token swap ERC-20 tokens component! If you see the power in this, follow along in this article as we explore the very process of how to token swap ERC-20 tokens!
As we move forward, we will first show you a quick demo of our example ERC-20 token swap dapp. Doing so will give you a transparent picture of what to expect from today’s tutorial. Also, it will help you decide whether or not you want to roll up your sleeves and build your own instance of our token swap dapp for ERC-20 tokens. If so, you’ll learn how to dive into Web3 development using Web2 tools such as NextJS. Furthermore, that is all possible thanks to Moralis. In addition, with the Moralis SDK, you will learn how to use the 1inch aggregator and “wagmi” hooks. Hence, the combination of these tools will make today’s challenge rather straightforward. After all, you’ll be able to token swap ERC-20 tokens using your own dapp in less than 20 minutes. So, if that sounds interesting, create your free Moralis account and follow our lead!

Token Swap ERC-20 Tokens – Our Example Demo Dapp
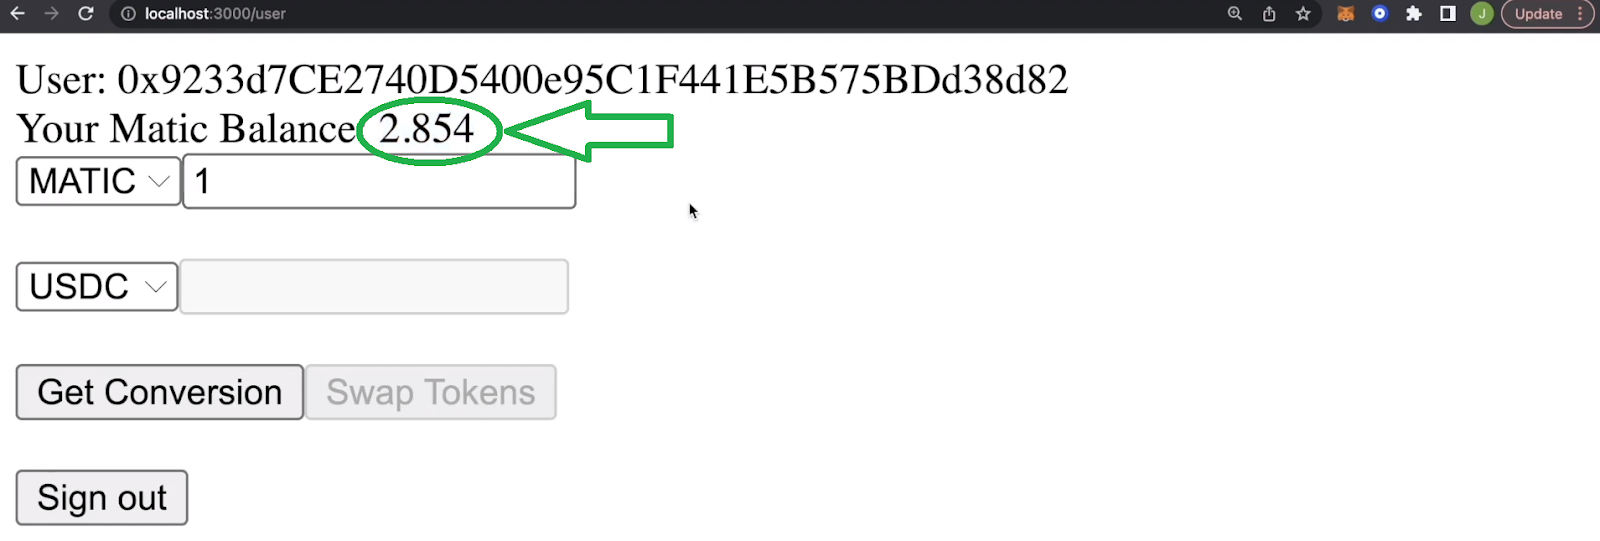
Below is a screenshot of our example ERC-20 tokens swap dapp:

As you can see by examining the above image, we focused on creating a simple yet neat UI. Accordingly, our example dapp displays the user’s wallet address at the top. Of course, to do that, a user must first authenticate themselves. This is where we use Moralis’ Web3 authentication solution.
Below the connected Web3 wallet’s address, our UI also displays the native token balance. Since we focused on the Polygon blockchain, you can see the balance of MATIC (Polygon’s native coin). However, it’s worth mentioning that Moralis is all about cross-chain interoperability. As a result, you can deploy your dapp on Ethereum or any other EVM-compatible chain.
Further down our dapp’s UI, users can select the “entry” token – a token they want to swap. On the right side of that menu is an entry field. The latter allows users to enter or select the amount of the “entry” token they wish to swap:

Moving on, you can see the second drop-down menu, which lets users choose the “output” token – a token they want to swap to or for. This is where we added “USDC” and “WETH”, as seen below. However, you can add as many ERC-20 tokens to that list as you want:

So, after users enter the amount of the native token that they want to swap and select the “output” tokens, they need to click on “Get Conversion”. This button ensures that users see the amount of the “output” tokens they can receive:
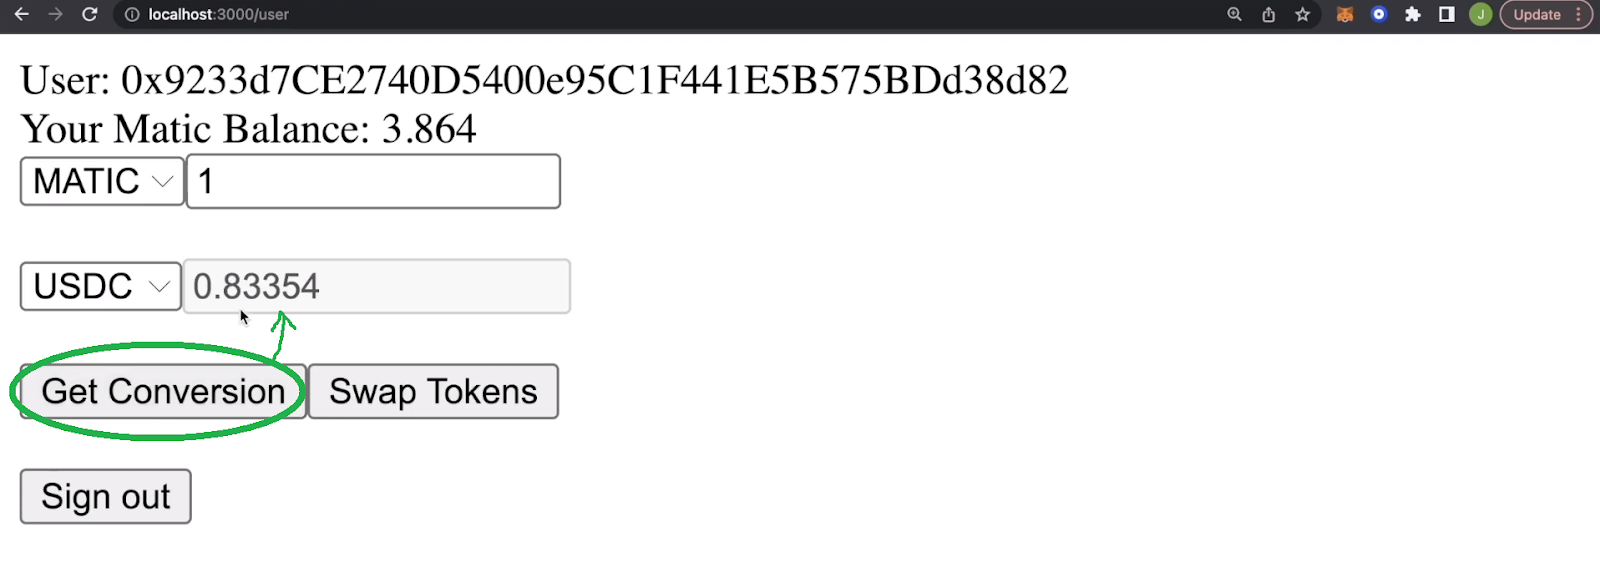
Swapping ERC-20 Tokens
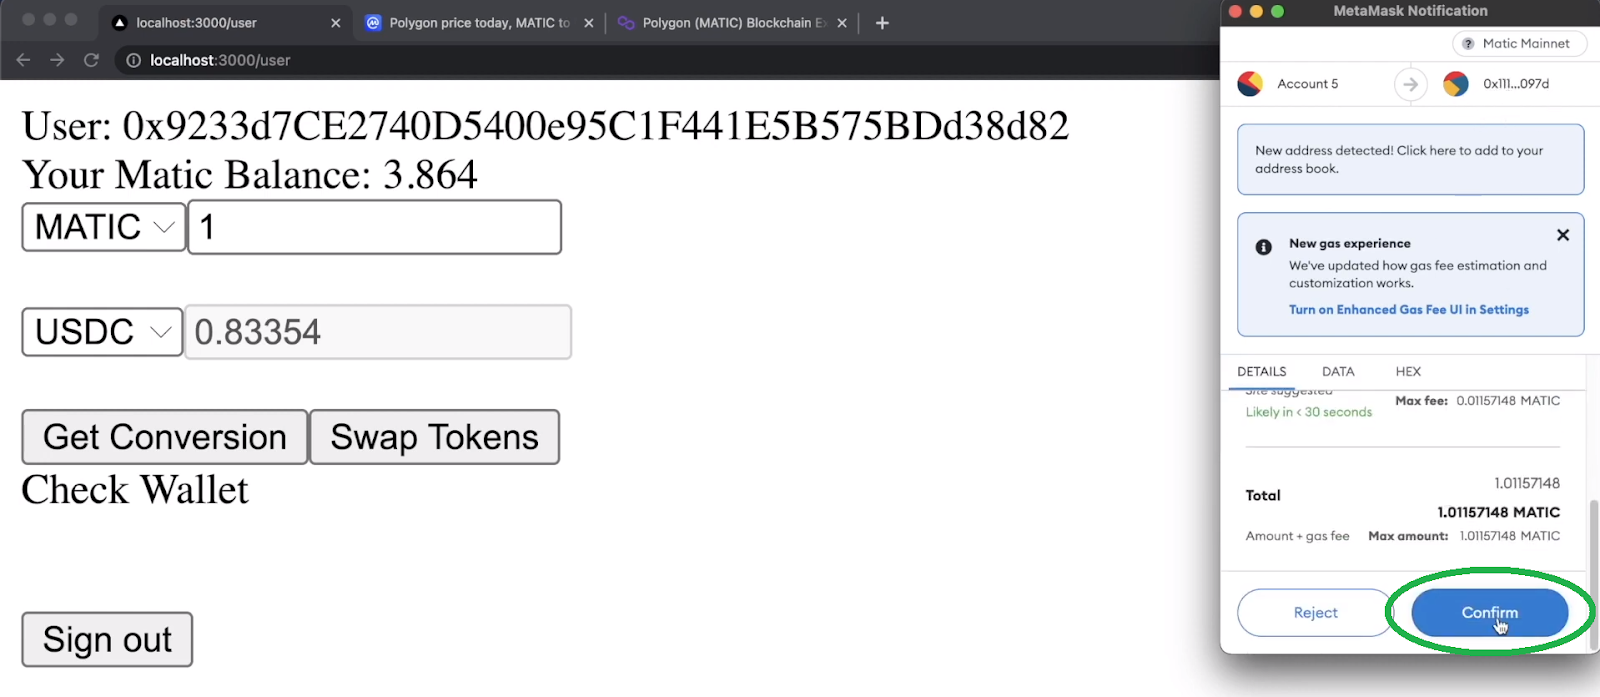
Nonetheless, looking at the above two screenshots, obtaining the current conversion rate activates the “Swap Tokens” button. Thus, users can click on that button to finally token swap ERC-20 tokens. So, when users click on the “Swap Tokens” button, their MetaMask extension pops up, asking for their confirmation:

The above screenshot indicates that MetaMask is connected to the Polygon chain (“Matic Mainnet”). You can also see some gas fees related to this particular swap. Of course, you probably know that gas fees are essential for all on-chain transactions on any type of blockchain. Essentially, users need to confirm the above notification by clicking on the “Confirm” button:
After users token swap ERC-20 tokens, our dapp also displays their transaction hash:
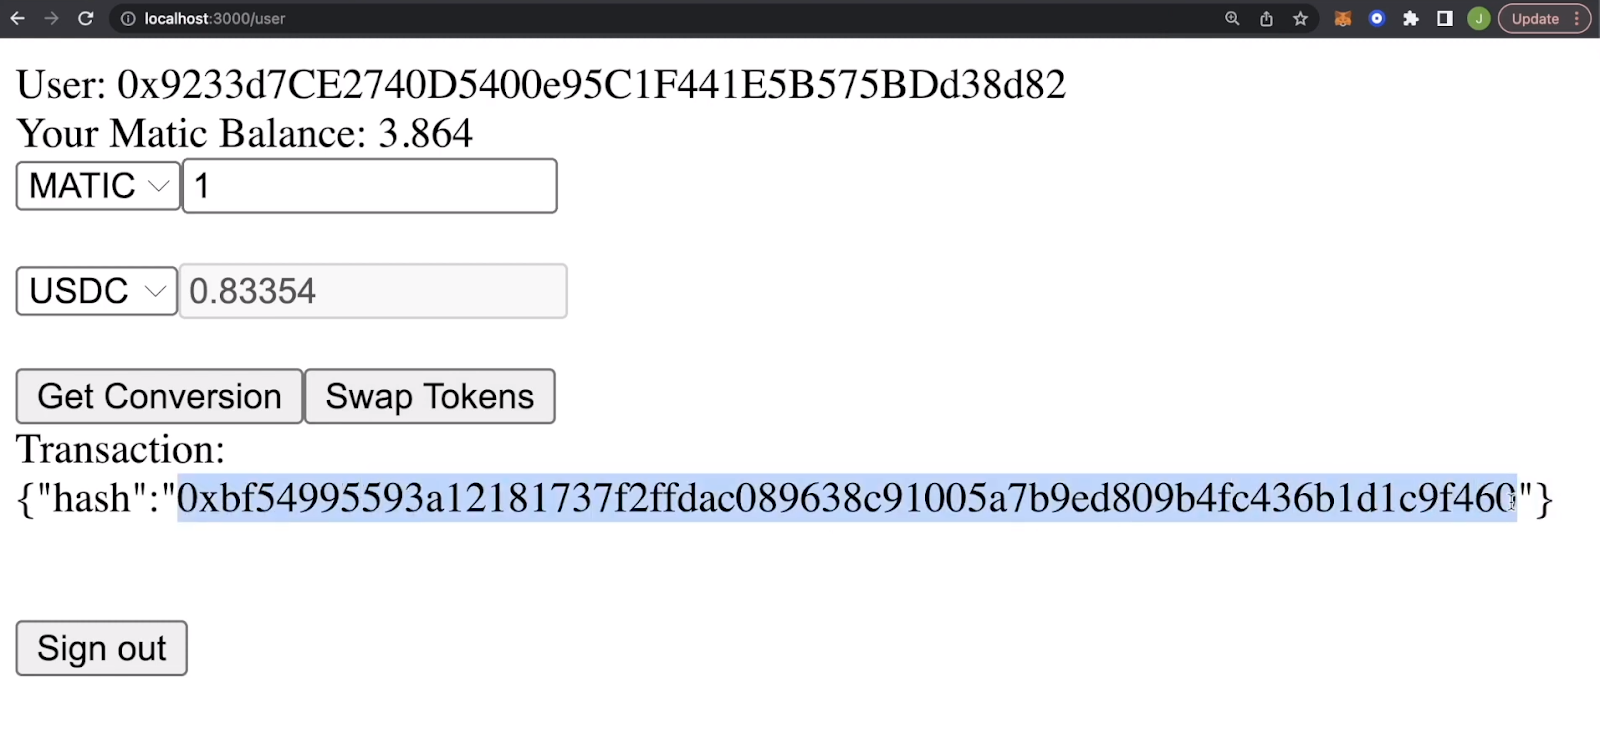
Furthermore, users can copy the transaction hash and use it with a relevant blockchain explorer. That way, they can view the details of the relevant transaction. Since our dap is based on the Polygon chain, users need to use PolygonScan to explore their transaction:

Once the transaction is processed, PolygonScan shows all its details:

Furthermore, users’ wallets also reflect their token swaps:
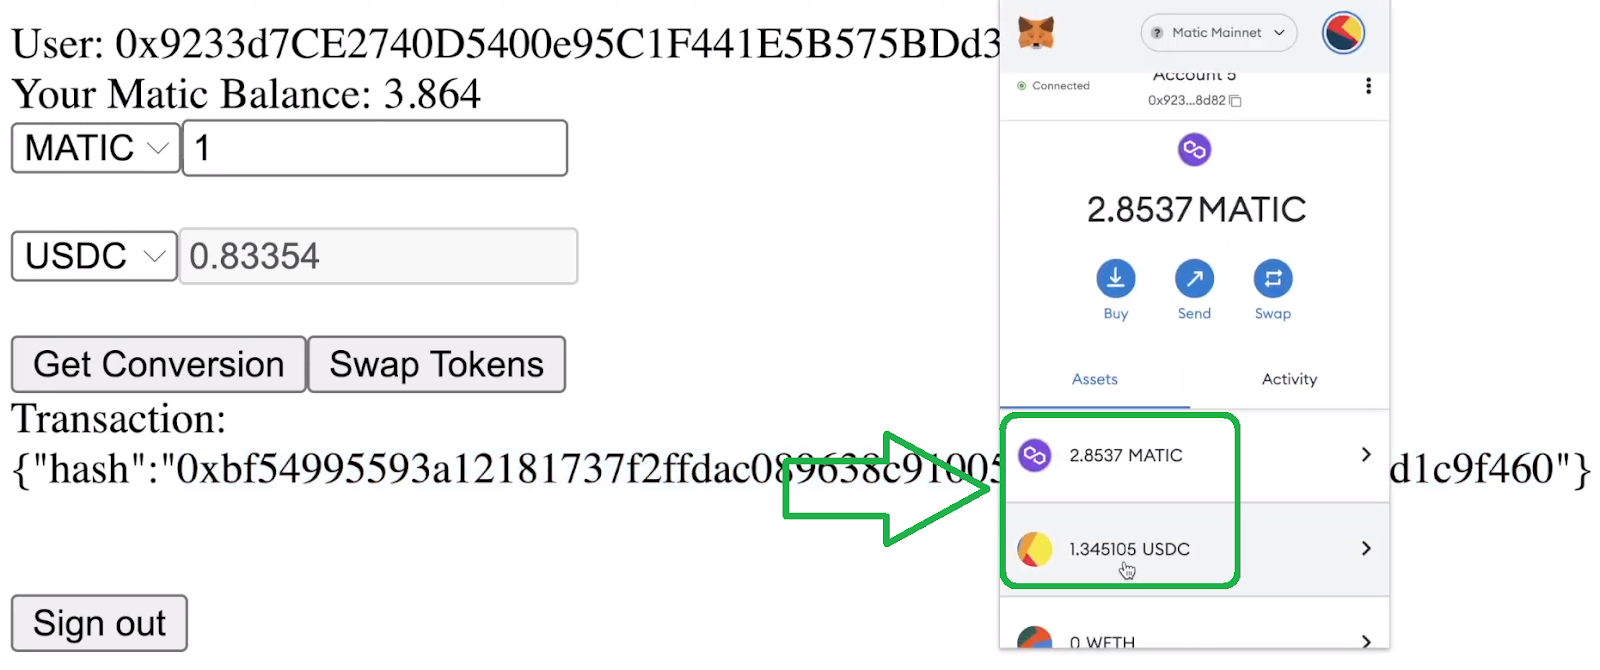
In addition, when users refresh the dapp’s page, it displays their updated balance:
Last but not least, our example dapp also offers users to disconnect their wallets by clicking on the “Sign out” button.
If you enjoyed the above demonstration, you are probably eager to start building. If so, we invite you to follow our lead and create your own instance of our token swap dapp.
Offer Users to Token Swap ERC-20 Tokens – Building with NextJS, Moralis, 1inch, and Wagmi
We will build today’s project upon one of our past example projects, which already includes Web3 authentication. Thus, go to GitHub and clone the “MultipleWalletAuthentication” code (starter code). On the other hand, you can also clone our finished code. However, keep in mind that we presume you started with the starter code moving forward.
Getting Started
After cloning the starter code, it’s time to open the project. To avoid any confusion, we recommend you follow our lead and use Visual Studio Code (VSC). Then, use VSC’s terminal to install all the required dependencies. You do that with the “npm i” command:

Next, open the “.env.local” file, where you need to paste in your Moralis Web3 API key:
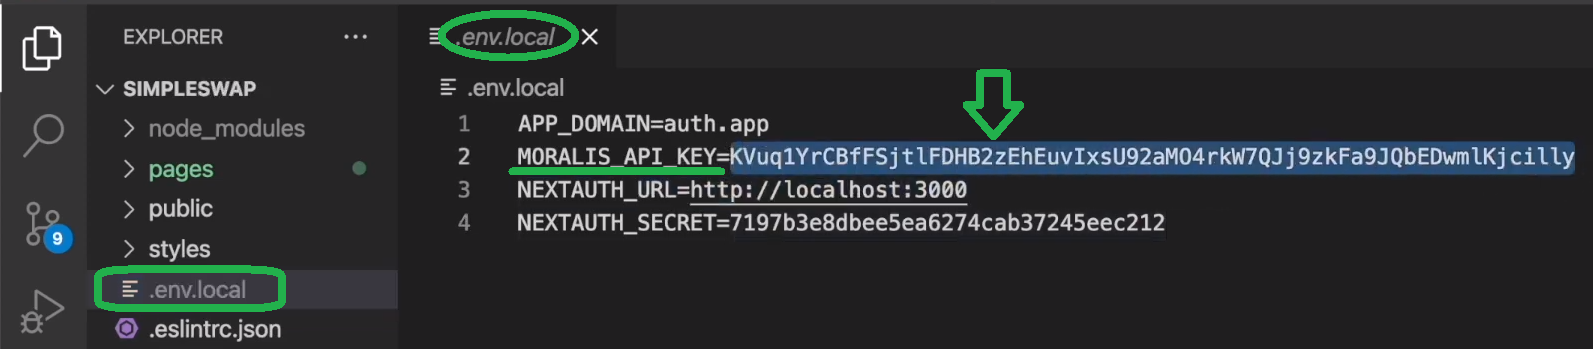
This is your cue to obtain your Moralis Web3 API key. So, you need to have your Moralis account ready. If you haven’t done so yet, use the “create your free Moralis account” link in the intro. With your Moralis account set up, you’ll be able to access your admin area. There, you will get to copy your Web3 API key. Once you successfully set up your Moralis account, which shouldn’t take you more than a minute, you will access your Moralis dashboard. This is where you’ll see the “Web3 APIs” tab in the side menu:

Once on the “Web3 APIs” page, use the “copy” icon to get your Moralis Web3 API key:

Finally, return to the “.env.local” file and paste your key.
Next, you use the “npm run dev” command to open your development server. After doing so, you’ll be able to use your browser to preview the initial stage of your swap dapp:

We encourage you to use the “Authenticate via MetaMask” button to land on the “user” page:

As we move on, we’ll focus on tweaking the above “user” page. We’ll add the functionality needed to token swap ERC-20 tokens, as demonstrated in the demo above.
Coding “user.js” to Token Swap ERC-20 Tokens
Start by opening the “user.js” file, which is located inside the “pages” folder:

Looking at the initial lines of code, it already contains some details about the connected wallets. Thus, you can use that as a foundation upon which you’ll add the token swap functionality.
So, go to the top of the file and import Moralis:
import Moralis from "moralis";
Then, use the “getServerSideProps” async function to initialize Moralis. Moreover, also use the “getNativeBalance” endpoint from the “account” API type of the Moralis EVM API:
  await Moralis.start({ apiKey: process.env.MORALIS_API_KEY });

  const response = await Moralis.EvmApi.account.getNativeBalance({
    address: session.user.address,
    chain: 0x89,
  });
Note: You can see “0x89” used above. That’s the Polygon chain ID. In case you wanted to token swap ERC-20 tokens on any other EVM-compatible chain, you’d need to use that chain’s ID. Use the Moralis documentation to explore the IDs of supported chains.
Next, tweak the “return” part of the “getServerSideProps” function to get a proper response:
  return {
    props: { user: session.user, balance: response.raw },
  };
Nonetheless, make sure to also pass the “balance” prop inside the “User” function:
function User({ user, balance }) {
Moving forward, you need to tweak the “User” function’s code so it will render users’ balances.
Implementing ERC-20 Token Swap Functionalities
Begin by returning to the top of the “user.js” file and import “useState” from React:
import { useState } from "react";
Then, go back to the “User” function and add the following constants:
  const [fromToken] = useState("0xEeeeeEeeeEeEeeEeEeEeeEEEeeeeEeeeeeeeEEeE");
  const [toToken, setToToken] = useState(
    "0x2791Bca1f2de4661ED88A30C99A7a9449Aa84174"
  ); //USDC ERC20 Contract
  const [value, setValue] = useState("1000000000000000000");
  const [valueExchanged, setValueExchanged] = useState("");
  const [valueExchangedDecimals, setValueExchangedDecimals] = useState(1e18);
  const [to, setTo] = useState("");
  const [txData, setTxData] = useState("");


  const { data, isLoading, isSuccess, sendTransaction } = useSendTransaction({
      request: {
          from: user.address,
          to: String(to),
          data: String(txData),
          value: String(value),
      },
})
Note: Current code doesn’t use the above constants yet. You will utilize them as you move on.
With the constants in place, start adding the appropriate functions. These functions must display selected tokens and their values correctly. You’ll achieve that with the “changeToToken” and “changeValue” functions:
  function changeToToken(e){
    setToToken(e.target.value);
    setValueExchanged("");
  }

  function changeValue(e){
    setValue(e.target.value * 1E18);
    setValueExchanged("");
  }

Implementing the 1inch Aggregator
To implement the 1inch aggregator, add the “get1inchSwap()” function inside the “User” function. This function will enable users to token swap ERC-20 tokens. Following are the required lines of code:
  async function get1inchSwap(){
    const tx = await axios.get(`https://api.1inch.io/v4.0/137/swap?fromTokenAddress=${fromToken}&toTokenAddress=${toToken}&amount=${value}&fromAddress=${user.address}&slippage=5`);
    console.log(tx.data)
    setTo(tx.data.tx.to);
    setTxData(tx.data.tx.data);
    setValueExchangedDecimals(Number(`1E${tx.data.toToken.decimals}`));
    setValueExchanged(tx.data.toTokenAmount);
    }
If you are interested in learning more about the 1inch aggregator, use the video below (9:22). This is where our in-house expert will show you how to generate the URL address used in the above “get1inchSwap()” function. However, as you can see, we’ve already tweaked this URL so that it takes in the above-defined constants. Of course, you can adjust the above constant according to your needs.
Nonetheless, you can also see that the “get1inchSwap()” function also uses “axios”. Hence, make sure to jump back to the top of the “user.js” file and import that HTTP client:
import axios from "axios";
In addition, you can also see that we set the appropriate state variables inside the “get1inchSwap()” function.

Wagmi Hooks
So, to put the data the “get1inchSwap()” function will use, your code needs to send transactions. This is where “wagmi” enters the scene. By using this React hook tool, you can add executive functionality to the “Swap Tokens” button. More precisely, you’ll be using “useSendTransaction“. As such, return to the top of the “user.js” file and import that hook from “wagmi“:
import { useSendTransaction } from "wagmi";
This was the final piece of the puzzle to enable users to token swap ERC-20 tokens. Now, your dapp will be able to send swap transactions to the 1inch aggregator.
Hence, you now need to set in place a proper UI that will include the buttons, which will trigger the proper functions.
UI to Token Swap ERC-20 Tokens
The following “return” part of the “User” function takes care of your UI for the ERC-20 swap dapp:
  return (
    <div>
      <div>User: {user.address}</div>
      <div>Your Matic Balance: {(balance.balance / 1e18).toFixed(3)}</div>
      <select>
        <option value="0xEeeeeEeeeEeEeeEeEeEeeEEEeeeeEeeeeeeeEEeE">
          MATIC
        </option>
      </select>
      <input
        onChange={(e) => changeValue(e)}
        value={value / 1e18}
        type="number"
        min={0}
        max={balance.balance / 1e18}
      ></input>
      <br />
      <br />
      <select name="toToken" value={toToken} onChange={(e) => changeToToken(e)}>
        <option value="0x7ceB23fD6bC0adD59E62ac25578270cFf1b9f619">WETH</option>
        <option value="0x2791Bca1f2de4661ED88A30C99A7a9449Aa84174">USDC</option>
      </select>
      <input
        value={
          !valueExchanged
            ? ""
            : (valueExchanged / valueExchangedDecimals).toFixed(5)
        }
        disabled={true}
      ></input>
      <br />
      <br />
      <button onClick={get1inchSwap}>Get Conversion</button>
      <button disabled={!valueExchanged} onClick={sendTransaction}>Swap Tokens</button>
      {isLoading && <div>Check Wallet</div>}
      {isSuccess && <div>Transaction: {JSON.stringify(data)}</div>}
      <br />
      <br />
      <button onClick={() => signOut({ redirect: "/signin" })}>Sign out</button>
    </div>
  );
}
Looking at the lines of code above, you can see the “Get Conversion” and “Swap Tokens” buttons. You can also see that they trigger the above-defined functions. Furthermore, above, you can see that this code focuses on “USDC” and “WETH”. As such, it’s worth repeating that you could easily add many other ERC-20 tokens and expand the list of options. To do this, you’d only need a token’s ticker and address and add an additional “option value”. Of course, the 1inch aggregator also needs to have a pool for that trading pair for users to be able to token swap those ERC-20 tokens of interest.
Code Walkthrough
If you are interested in diving deeper into the code presented above, use the video below. This is also where you can see previews of our example dapp at several stages covered above. Nonetheless, let us also remind you that you can access the entire code using the “finished code” link above:

Open the “pages” folder to access the “user.js” file:

This gives you a chance to select the entire code and paste it into VSC and ensure that there are no errors.
Last but not least, here’s the video tutorial that we’ve been referencing throughout the article:
How to Token Swap ERC-20 Tokens – Summary
Today’s article gave you a chance to learn how to build a dapp that enables users to token swap ERC-20 tokens. We started with a quick demo of our example token swap dapp and then walked you through the building steps. By cloning our “starter” code, you didn’t need to worry about implementing Web3 authentication functionality. You just had to obtain your Moralis Web3 API key and paste it into the “.env.local” file. Then, you focused on tweaking the “user.js” file, where most of the additional code went into the “User” function. Along the way, you imported Moralis’ SDK, 1inch, and wagmi and used these tools to create a proper dapp. Ultimately, you can now use this dapp to token swap ERC-20 tokens.
Moreover, we encourage you to focus on creating a more eye-catching UI. Make sure to add additional ERC-20 tokens or try focusing on other chains. Nonetheless, try building a more advanced dapp where the token swap functionality will be just one of many excellent features. So, for that purpose, you can use the Moralis YouTube channel and the Moralis blog. After all, both of these outlets host a ton of excellent tutorials.
Nonetheless, it’s worth pointing out that the crypto domain offers countless career opportunities. So, going full-time crypto might be the right path for you. In that case, becoming blockchain certified can make all the difference. If you want to obtain the required knowledge and level up your confidence, consider enrolling in Moralis Academy.
