As non-fungible tokens, or NFTs, are one of blockchain’s most popular use cases that faces a prominent future, it’s not surprising that blockchain users seek out such assets to purchase on marketplaces like OpenSea. It’s also not a “shocker” that developers are looking for ways to clone OpenSea as they could, in turn, potentially build the next popular NFT marketplace. However, suppose you’ve just gotten started as a blockchain developer and recently discovered the basics of NFT token development. In that case, you might be wondering how to create an OpenSea clone quickly and turn it into a revenue-generating platform. Fortunately, by taking advantage of Moralis’ excellent Web3 tools, you’ll be able to build an NFT marketplace like OpenSea and have your OpenSea clone up and running in less than two hours.

In this article, you’ll learn how to use the ultimate Web3 development platform – Moralis (a.k.a. Firebase for crypto) and the greatest Web3 boilerplate to create your own OpenSea clone. Thanks to Moralis’ SDK and its ultimate NFT API, you get to focus on the frontend while you cover all backend needs by copying and pasting short snippets of code provided in Moralis’ documentation. Furthermore, with Moralis, you get to overcome all of the limitations of RPC nodes and future-proof your dApps (decentralized applications). The latter is secured thanks to Moralis’ cross-chain interoperability, enabling you to deploy dApps across all supported chains by tweaking single lines of code.
Create Your Own OpenSea Clone with Moralis
If this is your first time using Moralis, do not worry, as we will show you how to make the most out of this incredible platform in the shortest time possible. Moreover, we’ve also created the ultimate Web3 boilerplate that speeds up the process of creating dApps. As such, we will start by showing you how to properly set things up to use these two essential blockchain development tools.
After the setup, we will do a preview of the OpenSea clone that we’ll be creating to give you a good sense of what to expect moving forward. Finally, we’ll roll up our sleeves and tweak the boilerplate code and add the necessary code to get proper functionality. This is the part where we will let one of Moralis’ experts guide you with a detailed video tutorial to make every step as clear as possible. Moreover, make sure to take action and implement each step yourself in order to create your own OpenSea clone.
OpenSea Clone – Web3 Boilerplate and Moralis Setup
This is where we show you how to put our Web3 boilerplate to use. The setup steps are simple and quick; even if you’re a complete beginner, it shouldn’t take you more than 15 minutes to have the Web3 boilerplate dApp up and running. As such, complete these steps:
- Go to the ultimate Web3 boilerplate webpage on GitHub: https://github.com/ethereum-boilerplate/ethereum-boilerplate
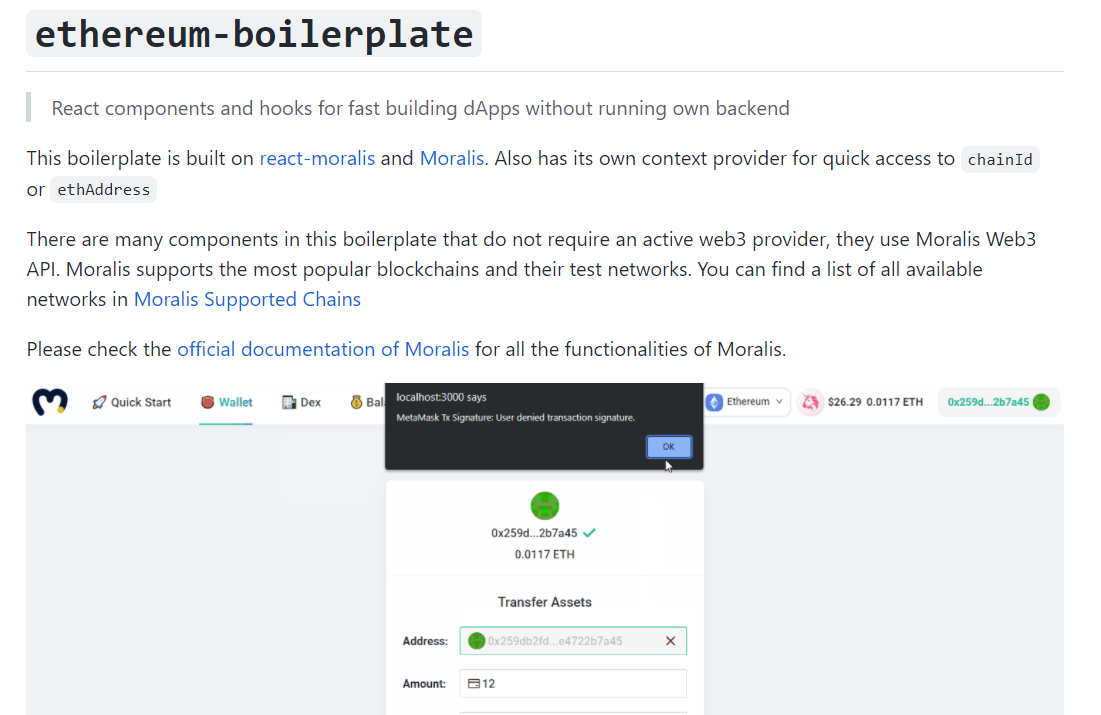
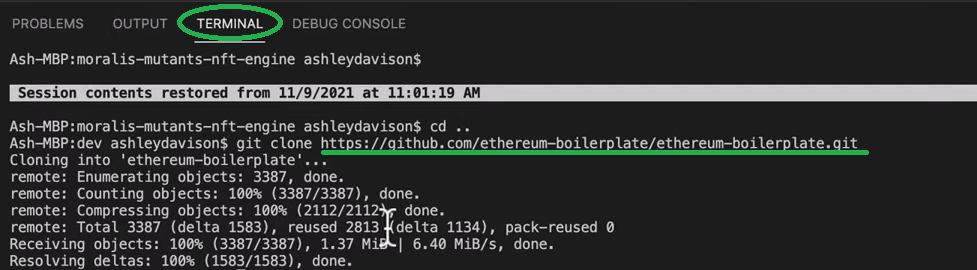
- Next, fork or clone the “ethereum-boilerplate” depository using “git clone https://github.com/ethereum-boilerplate/ethereum-boilerplate.git”. Actually, once on the site, you can just use the copy button:

Then, open your code editor (we use Visual Studio Code [VSC]) and paste the above address in VSC’s terminal:
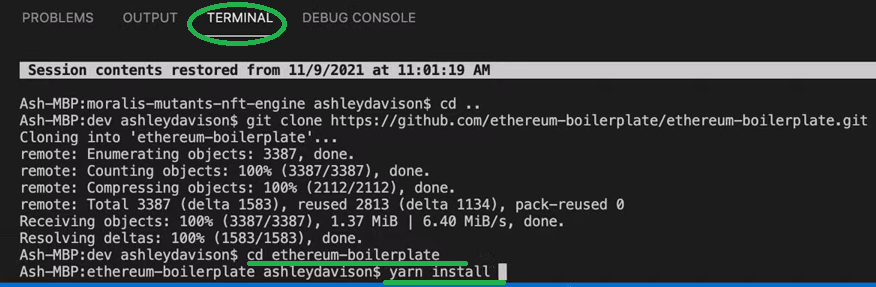
- Moving forward, you need to install all dependencies (use your code editor’s terminal):
- cd ethereum-boilerplate
- yarn install
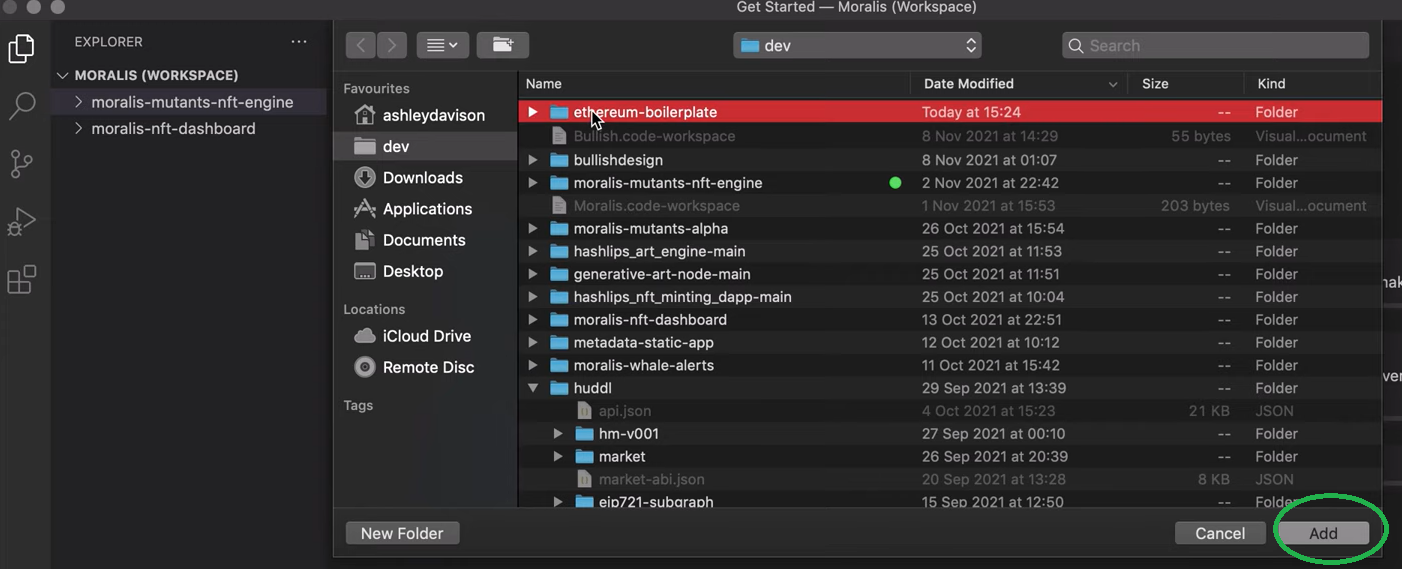
- Next, add the “ethereum-boilerplate” folder to your code editor:
- Now it’s time to rename the “.env.example” file into “.env”. Right-click on “.env.example” and select “rename”:

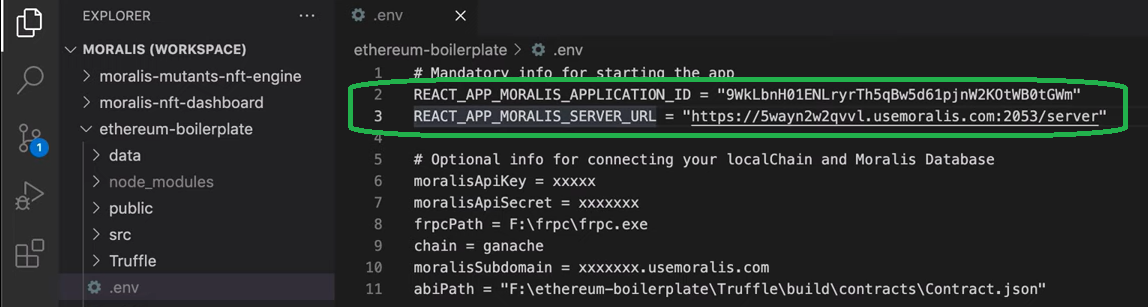
- Then, use your Moralis server’s “appId” and “serverUrl” inside the file you’ve just renamed above (“.env”):
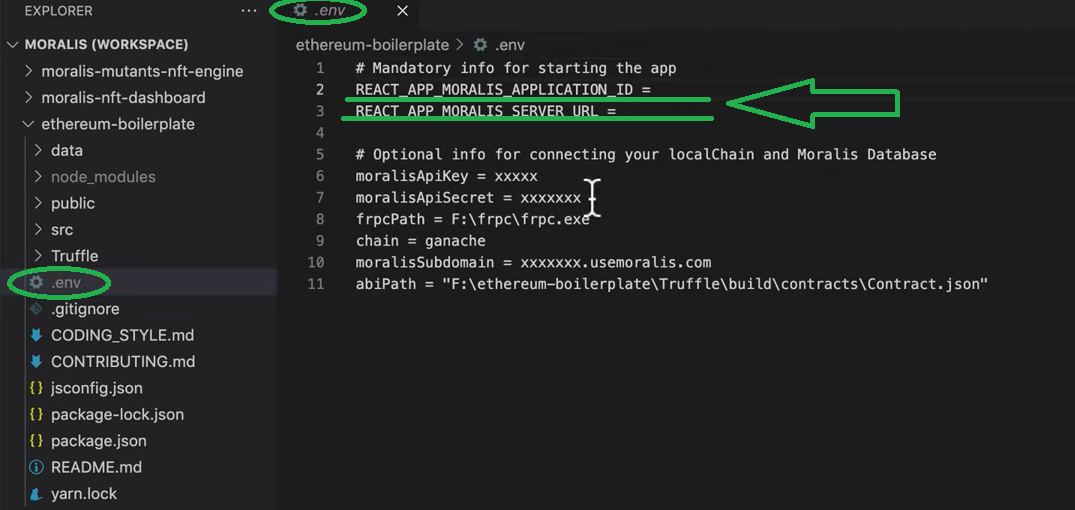
Note: To set up your Moralis server and obtain its details, use the instructions in the “Moralis Server Setup” subsection below. Once you obtain the server URL and application ID, copy and paste them to the “.env” file:
- Finally, it’s time to run your boilerplate dApp. Just enter or paste “yarn start” inside your code editor’s terminal:


Note: Instead of using “yarn”, you may also use the “npm” package manager.
Moralis Server Setup
If you’d like to use the ultimate Web3 boilerplate or build your completely unique dApp using Moralis’ Web3 API, you need to set up your Moralis server. Here are the steps that will guide you through the process:
- Create Your Free Moralis Account – Create your free Moralis account at Moralis. Then, enter your email address, create your password, and click the confirmation link that will be sent to you. However, if you already have an active Moralis account, just log in.
Create a Moralis Server – Once logged in, click on the “Servers” option of your Moralis admin area. Then, click on the “+ Create a new Server” button (top-right corner). Next, select the network type that best suits your needs from the drop-down menu. The “Testnet Server” option (connect to Ethereum testnets) is usually the best option when working on new projects. However, to make your dApps available to users, you’ll need to select “Mainnet Server”.

Then, enter the server name (this can be anything you want), select region, network, and chain(s) (we used Mumbai’s testnet) in the pop-up window:
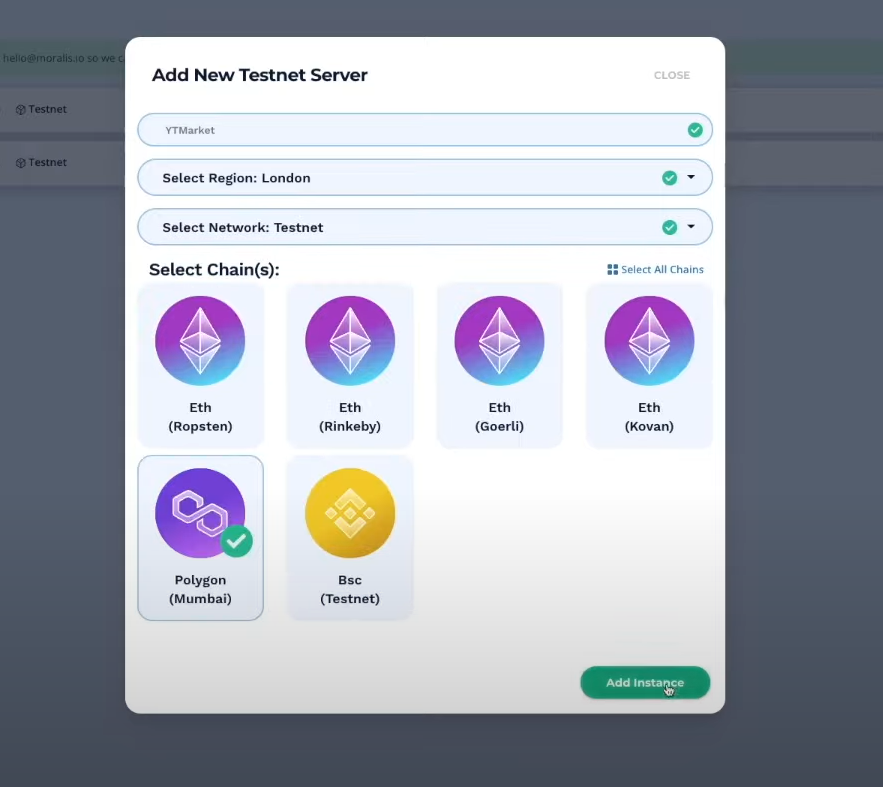
Complete the server setup by clicking on “Add Instance”.
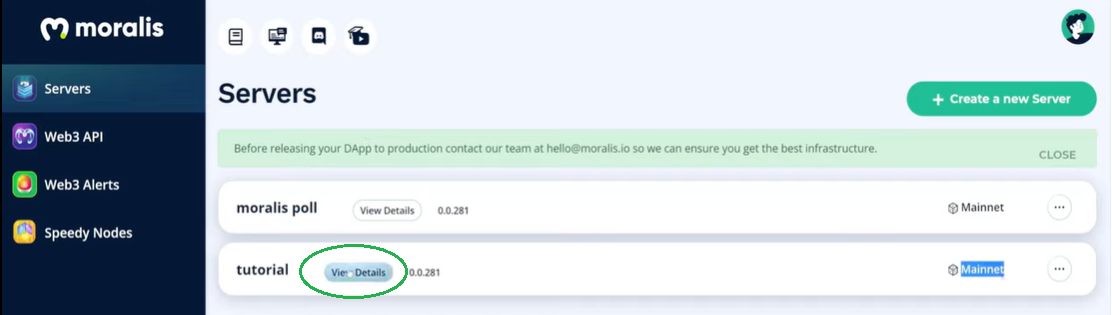
- Access Server Details – Now that your server is up and running, you can access its details by clicking on the “View Details” button next to your server name:
Then, a pop-up window will appear. This is where you’ll find your server’s URL and application ID. Moreover, you get to copy the details by clicking the copy icon:
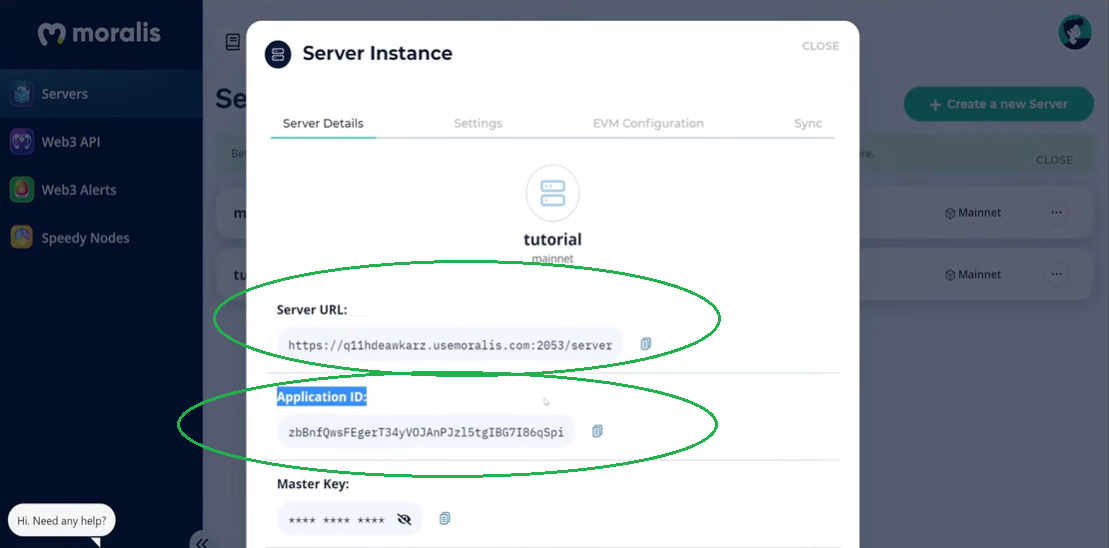
- Initialize Moralis – All that is left is to populate your “.env” file. So, paste in your Moralis server’s details (application ID and server URL) to obtain the full backend functionality covered by Moralis (step six from the previous section):

Note: Don’t use the details from the image above (use your server’s details).
OpenSea Clone Preview
Now that you’ve set things up, you’re ready to apply the necessary tweaks and add proper code to actually create your own OpenSea clone. However, before we do this, let’s do a preview of our OpenSea clone. As such, let’s take a look at the following image:
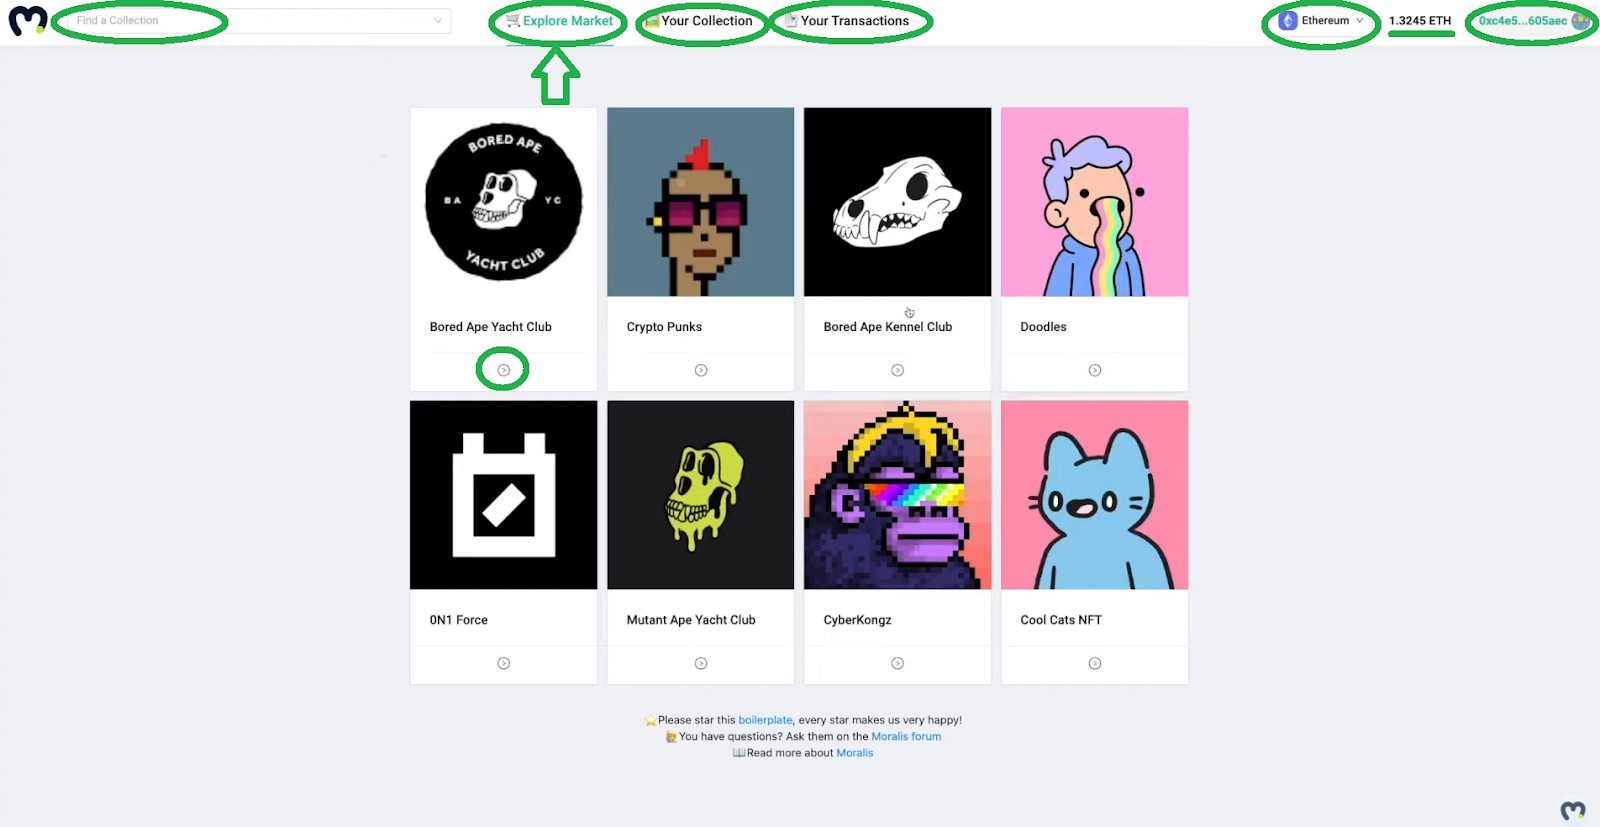
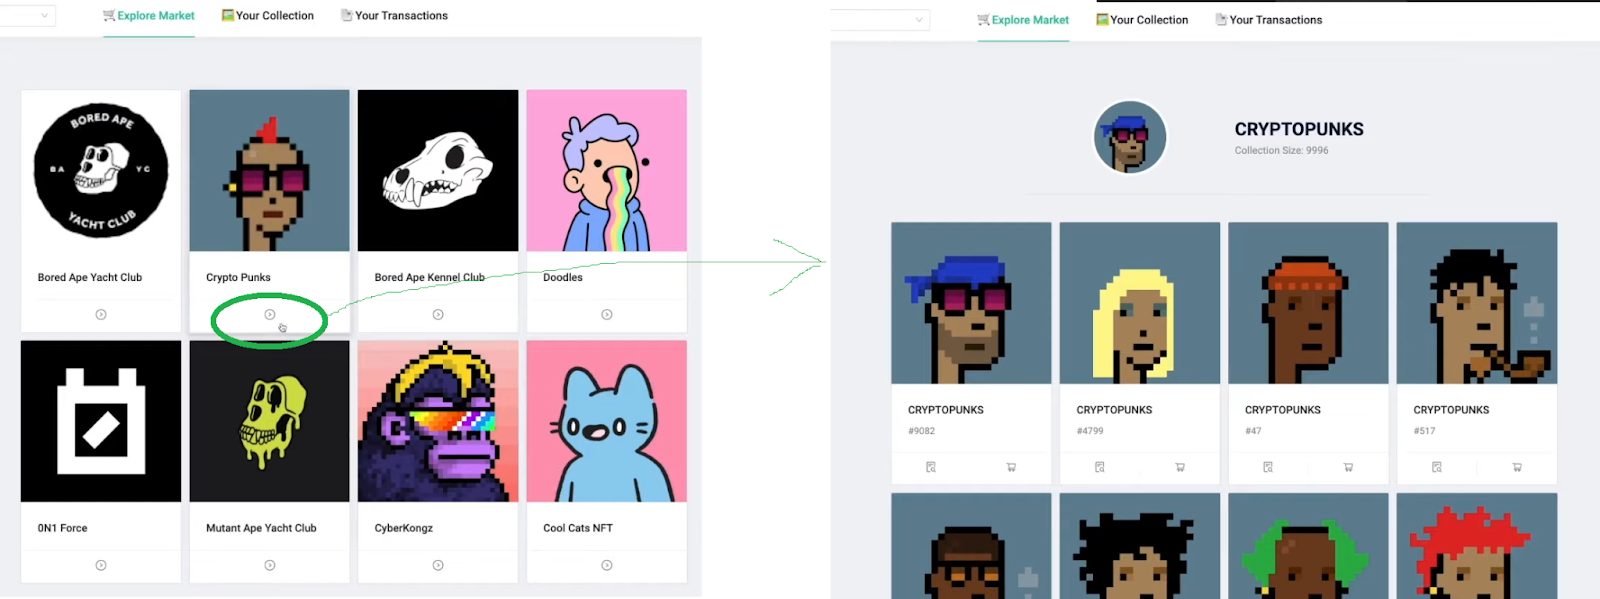
Looking at the image above, you can see that our OpenSea clone offers several options, all required to cover the full functionality of an NFT marketplace like OpenSea. Starting at the top-left corner, you can see a search option. This is where users can enter keywords to find specific NFT collections. Next, we have the “Explore Marketplace” option. This is the currently available menu option, and it is where users get to view popular collections. By clicking the arrow icons under each collection, users get to view all NFTs of that collection:
Next to “Explore Marketplace” is the “Your Collection” tab, which is where the available NFTs in the connected wallet are displayed:
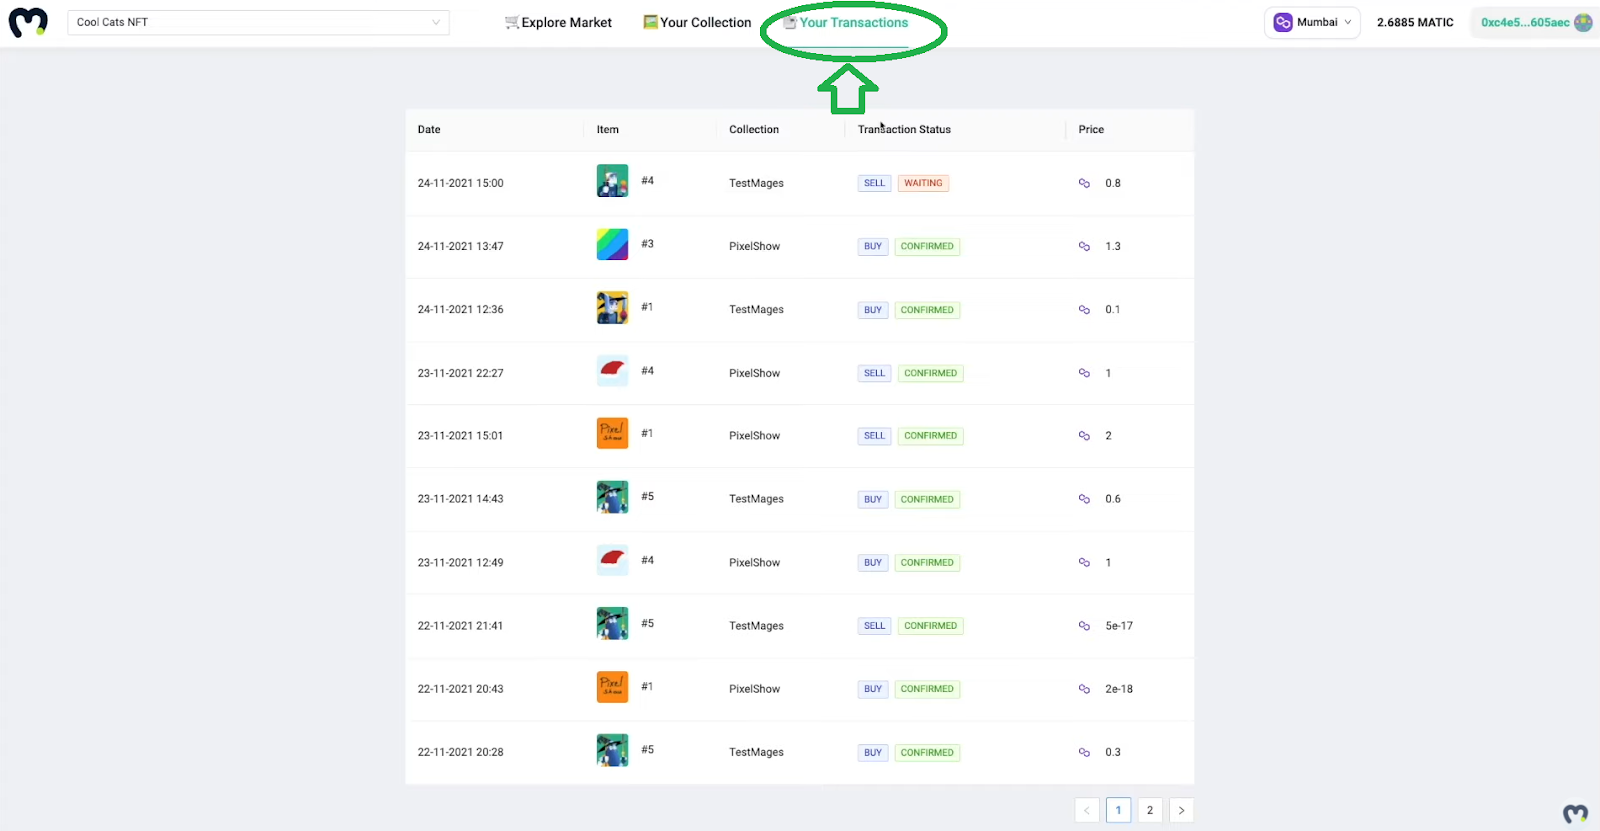
Moving further to the right, we have the “Your Transactions” tab. This is where all transactions related to the connected address are displayed:
Choose Your Blockchain
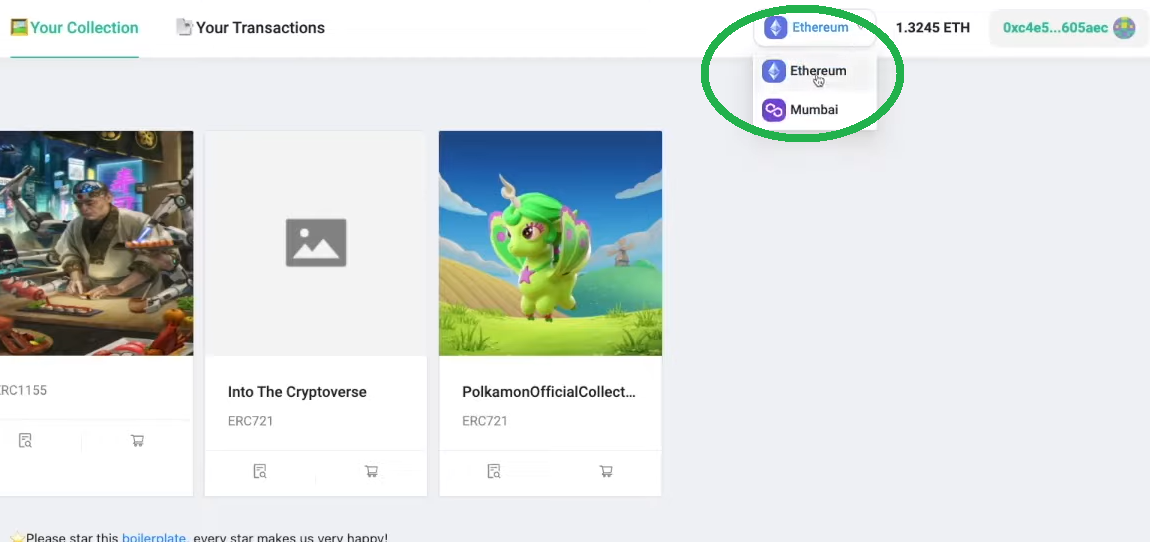
Next, we also have an option to select between multiple chains (all chains that Moralis supports). For the purpose of this example project, we added Polygon’s testnet (Mumbai); however, if you had added one of Ethereum’s networks, it would have been included in the drop-down menu as shown below. Users get to switch between the supported chains by clicking an option of their choice and confirming the switch in their MetaMask extension.
Furthermore, users also have the option to list their NFTs for sale by clicking on the cart icon under any of their NFTs:
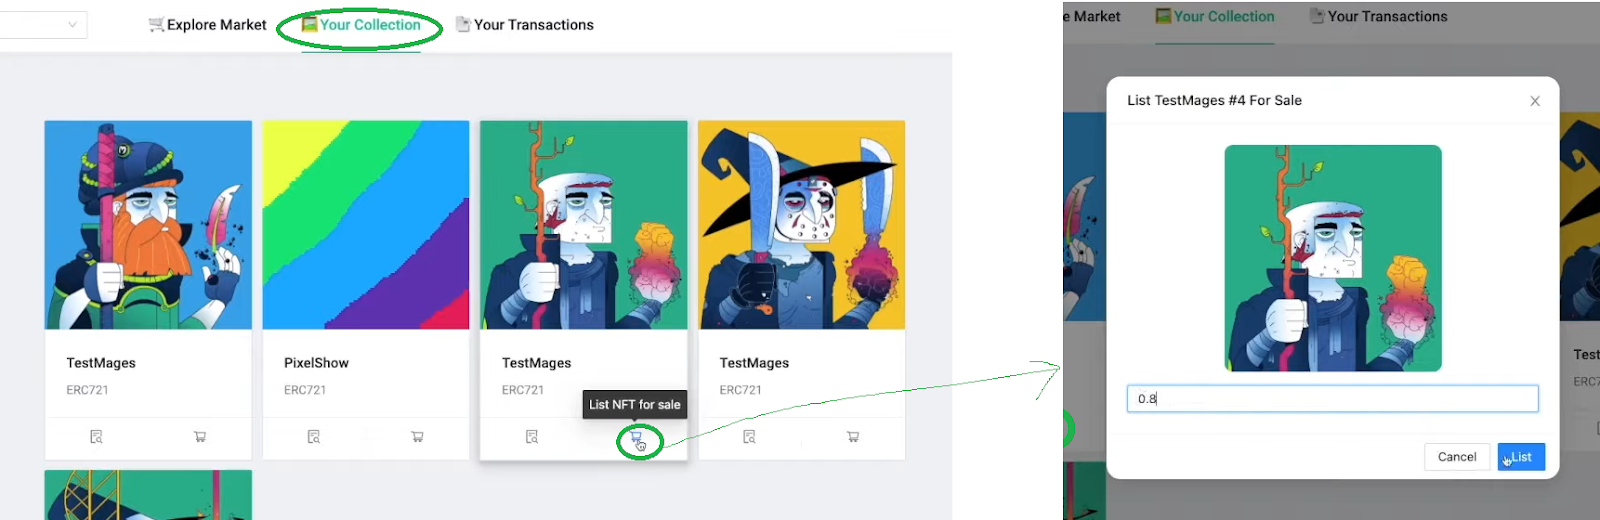
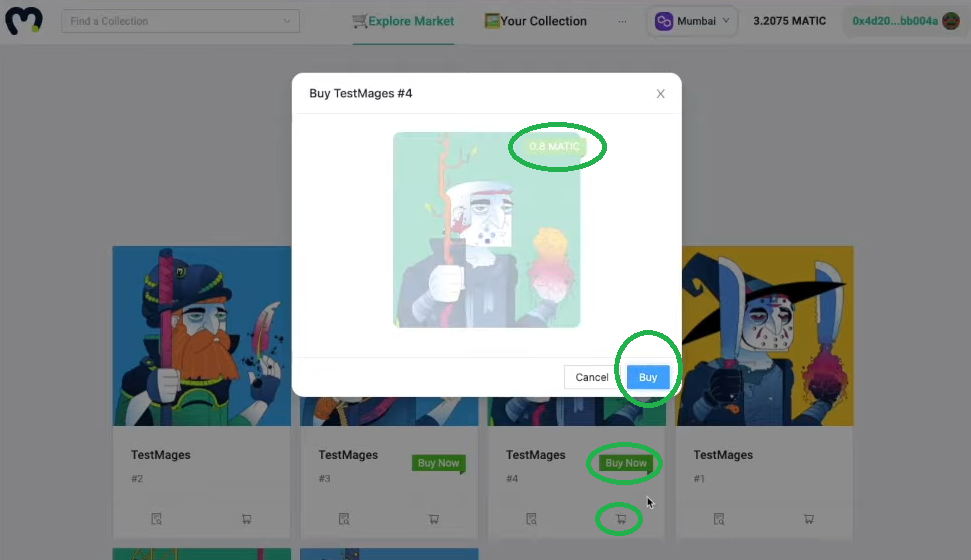
In the pop-up window, they get to enter the price and confirm their action by clicking the “List” button. Again, MetaMask will automatically prompt them to confirm their transaction. Listed items can then be purchased by other users:
Boilerplate Tweaks
We don’t know about you, but we think that our OpenSea clone looks quite incredible. Moreover, the best thing is that we used our Web3 boilerplate’s clean design as a base. Furthermore, we also used the boilerplate’s login option, NFT displaying, network-switching button, and balance displaying. On the other hand, there were many options provided by the boilerplate’s dApp that we didn’t use for our OpenSea clone.
If you want to create your own OpenSea clone using the ultimate Web3 boilerplate, perform the following clean up (watch the video below starting at 8:05):
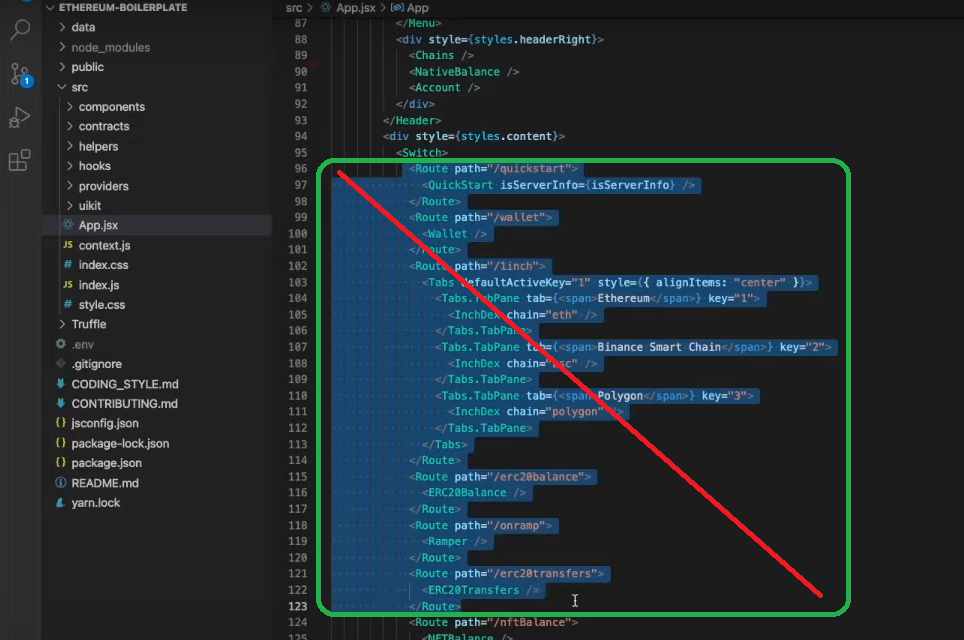
- Navigate to the “src” folder inside your code editor and select the “App.jsx” file to start removing the things we do not need.
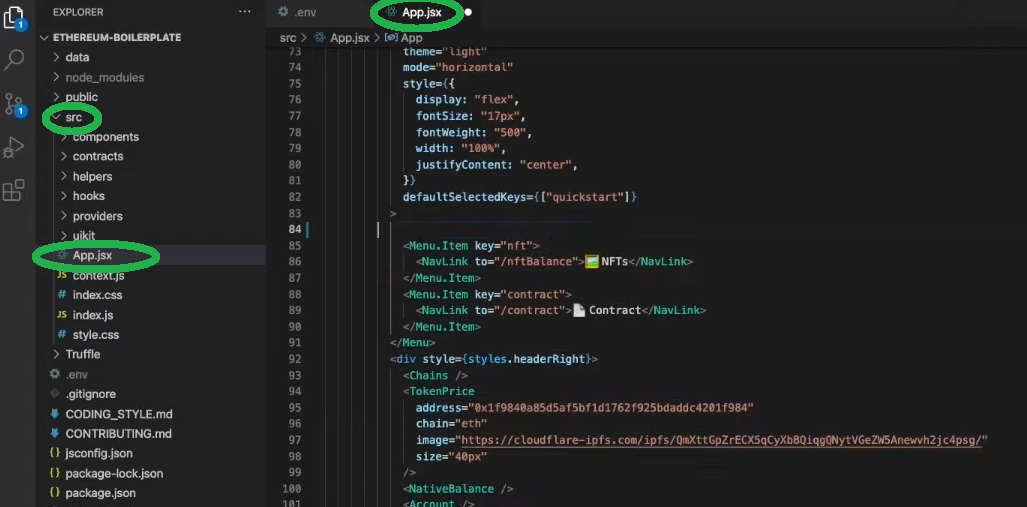
- Inside the header, there are many menu items that your OpenSea clone won’t need. As such, delete the following:

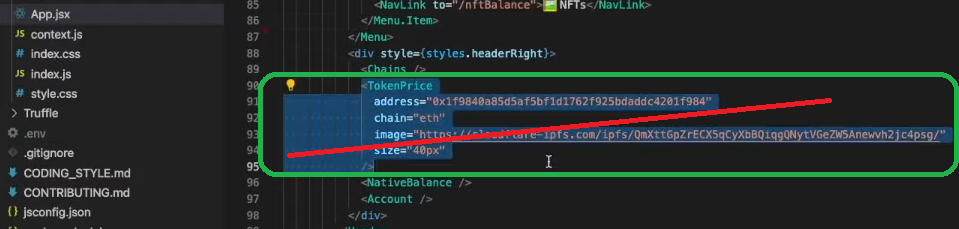
Also, delete “TokenPrice”:
- Next, delete the routes related to the ones you’ve just deleted above:
Also, delete the “contract” and “nonauthenticate” routes:

- Now, we make sure that our OpenSea clone redirects to “nftBalance” after users log in:

- Next, there are many “import” lines related to the items deleted above, which we can now get rid of to make our code cleaner. This is what you should have after removing unnecessary lines:

If you now refresh your boilerplate dApp, you should see the following:
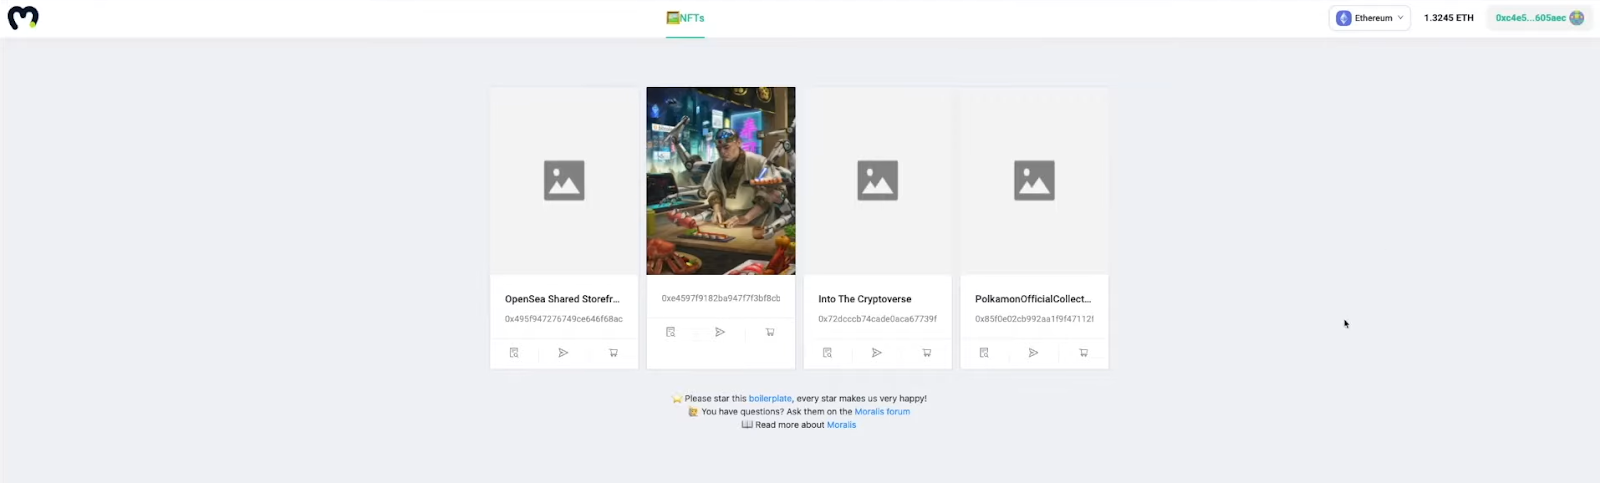
At this point, you can already see some similarities with our OpenSea clone (as presented in the “OpenSea Clone Preview” section). As such, this is an excellent starting point for further programming to create your own OpenSea clone. Moreover, we tackle this interesting part in the next section.
Beyond the Web3 Boilerplate
As mentioned previously, we will now hand you over to one of Moralis’ experts that’ll guide you through the rest of this project (video below starting at 9:50). He will first show you how to add menu tabs relevant to an NFT marketplace and make them functional. Once this is done, he will show you how simple it is to use smart contracts when working with Remix (44:03). Furthermore, to gain full functionality of your OpenSea clone, he will also guide you through the process of setting up “listeners” for your smart contract events (46:30). Moreover, this is also where you’ll be introduced to your Moralis database, which is another powerful aspect of Moralis’ SDK.
Below is the video that we’ve been referencing throughout this article. It clearly covers all of the setups and previews covered above, as well as the Web3 boilerplate tweaks and additional coding to create a fully functional OpenSea clone on the Mumbai testnet.
In addition, we also made the entire code of the “create your own OpenSea” quest available at GitHub.
Create an OpenSea Clone: Build an NFT Marketplace Like OpenSea – Summary
If you’ve completed all of the steps above, you should now have a fully functional OpenSea clone on your hands. By exploiting Moralis and the ultimate Web3 boilerplate, you’ve been able to completely avoid dealing with countless tedious and time-consuming steps of blockchain development. As a matter of fact, aside from using a smart contract template, you only had to deal with frontend development. Furthermore, by using the Web3 boilerplate’s components, you’ve also been provided with a clean user interface.
If you’ve enjoyed this example project, we invite you to visit Moralis’ YouTube channel and Moralis’ blog. On both of these outlets, you can find a ton of free content explaining various aspects of blockchain development and various example projects. For instance, you can learn how to mint NFTs without gas fees (lazy mint NFTs), how to create a Reddit clone for Web3, how to send Ethereum transactions with one line of code, how to generate thousands of NFTs, how to create an Ethereum chat app, and much more.
Anyone proficient in JavaScript and able to use MetaMask qualifies for working with Moralis. Moreover, they can subsequently create all sorts of phenomenal decentralized applications. However, in case you don’t know JavaScript yet, we encourage you to enroll in Moralis Academy’s 2021 JavaScript Programming for Blockchain Developers course. By doing so, you’ll learn this easy-to-use universal programming language in the best way possible to use it for blockchain development. Furthermore, if you want to go full-time crypto, make sure to check out other valuable courses at Moralis Academy.