NFTs, or non-fungible tokens, remain a hot topic for anyone interested in building dApps on the blockchain. Specifically, learning how to create and launch an NFT marketplace should interest those wanting to get started in NFT token development. Moreover, as we’ve barely touched the surface of this new blockchain movement, there’s never been a better time to explore NFTs and their blockchain use cases. As such, any aspiring blockchain developer should get started immediately by learning the fundamentals of NFTs. However, suppose you already know the basics, including how to generate non-fungible tokens. In that case, you’ll appreciate this guide even more as we’ll explore how to launch an NFT marketplace with Moralis.
NFT marketplaces create exposure for digital art. Moreover, they are relevant to large brands and corporations. Several of the world’s top NFT marketplaces already feature exclusive brands and corporate-owned content. Therefore, mastering how to launch an NFT marketplace or NFT store is a highly-valued Web3 skill that can bolster your career as a developer. With Moralis, the most comprehensive Web3 development tool on the market today, learning how to create an NFT marketplace becomes a simplified and markedly quicker process.
Even as the current NFT market is worth billions of dollars, these are still the early days. Given NFTs’ many applications extending to gaming, other types of real estate property, art, and financial products, those working in blockchain development can still capitalize on their NFT skills. Furthermore, a massive opportunity awaits creators of new NFT games or those who launch an NFT marketplace to capture a new audience.
Launch an NFT Marketplace – Initial Steps
To learn how to launch an NFT marketplace or NFT store, you need to understand the fundamentals of NFTs. Furthermore, you must grasp the leading NFT standards being used on Ethereum today, ERC-721 and ERC-1155. We’re not going to dive deeper into these standards mentioned herein. However, at Moralis’ blog, we have excellent guides covering those topics.
So, what are NFTs? NFTs, or non-fungible tokens, are blockchain tokens that represent unique values or items. Hence, they stand alone and cannot be freely interchanged with other NFTs the way conventional money is interchanged. Unlike fungible tokens – as represented by those created under the ERC-20 standard – they cannot be treated as currency. Whereas one unit can be swapped for another in the same fungible token standard, NFTs have unique identifiers that make them unsuitable as money. Therefore, each NFT is distinguishable as a unique digital artifact carrying a specific value.
What is an NFT Marketplace or NFT Store?
An NFT marketplace is any Web3 application that allows you to buy and sell NFTs. The primary purpose of most NFT marketplaces is to enable users to create NFTs and sell them afterward as collectibles.
However, some NFT marketplaces control the NFT listings and may limit them to specific creators or brands. Others have curatorship power over the goods sold. Hence, in such situations, users don’t simply mint and list their own NFTs. Marketplaces can also sell products that are not necessarily artwork or creative pieces. You will learn that there is more than enough room for customization if you decide to launch an NFT marketplace. Hence, an NFT marketplace can be customized and treated like any other online bazaar, with features unique to the business objectives.
In this aspect, Moralis, the ultimate Web3 development platform, provides the best range of options for anyone who wants to launch an NFT marketplace. Using Moralis Speedy Nodes, anyone can connect to various blockchains. Moreover, Moralis allows you to connect to Ethereum nodes. It also supports Polygon nodes and Arbitrum nodes. Recently, Moralis just announced its full support for Avalanche nodes. Therefore, you can easily launch an NFT marketplace with cross-chain features, allowing the use of tokens from multiple blockchains in a single NFT store. What’s more, with the powerful Moralis NFT API, you can get the metadata about an NFT, get all the NFTs in a collection, and supercharge your NFT build with just a single line of code.
Launch an NFT Marketplace – Demo
To further study how to launch an NFT marketplace, let’s look at a pre-built example. Here, we have a simple NFT marketplace with features such as:
- Display native token balance or ETH belonging to the user.
- Display a section that showcases current offerings available for sale.
- A buy and sell section that displays NFTs on which the user can take specific actions, such as offering it as an item for sale.
- Allow a user to see their NFT collection.

With such features, we now have an idea of what is needed to launch an NFT marketplace. Moralis’ SDK will make everything smoother and more efficient, which provides you with the ultimate toolkit for your Web3 projects. We are also using the Moralis NFT API, which gives you the power to interact with various kinds of software and get the information you need for your NFTs.
Basic Actions in an NFT Store
Here, we demonstrate the basic actions that a user can perform in an NFT store. When you launch an NFT marketplace, it is a given that you can provide basic capabilities to the user, such as listing and buying NFTs.
Listing NFTs in an NFT Store
Users should be able to upload their NFTs quickly and enter the required token information with ease. Afterward, the NFTs should be ready to list. In this example, the user selects an NFT from the collection. It initially appears in the “Buy/Sell” section.
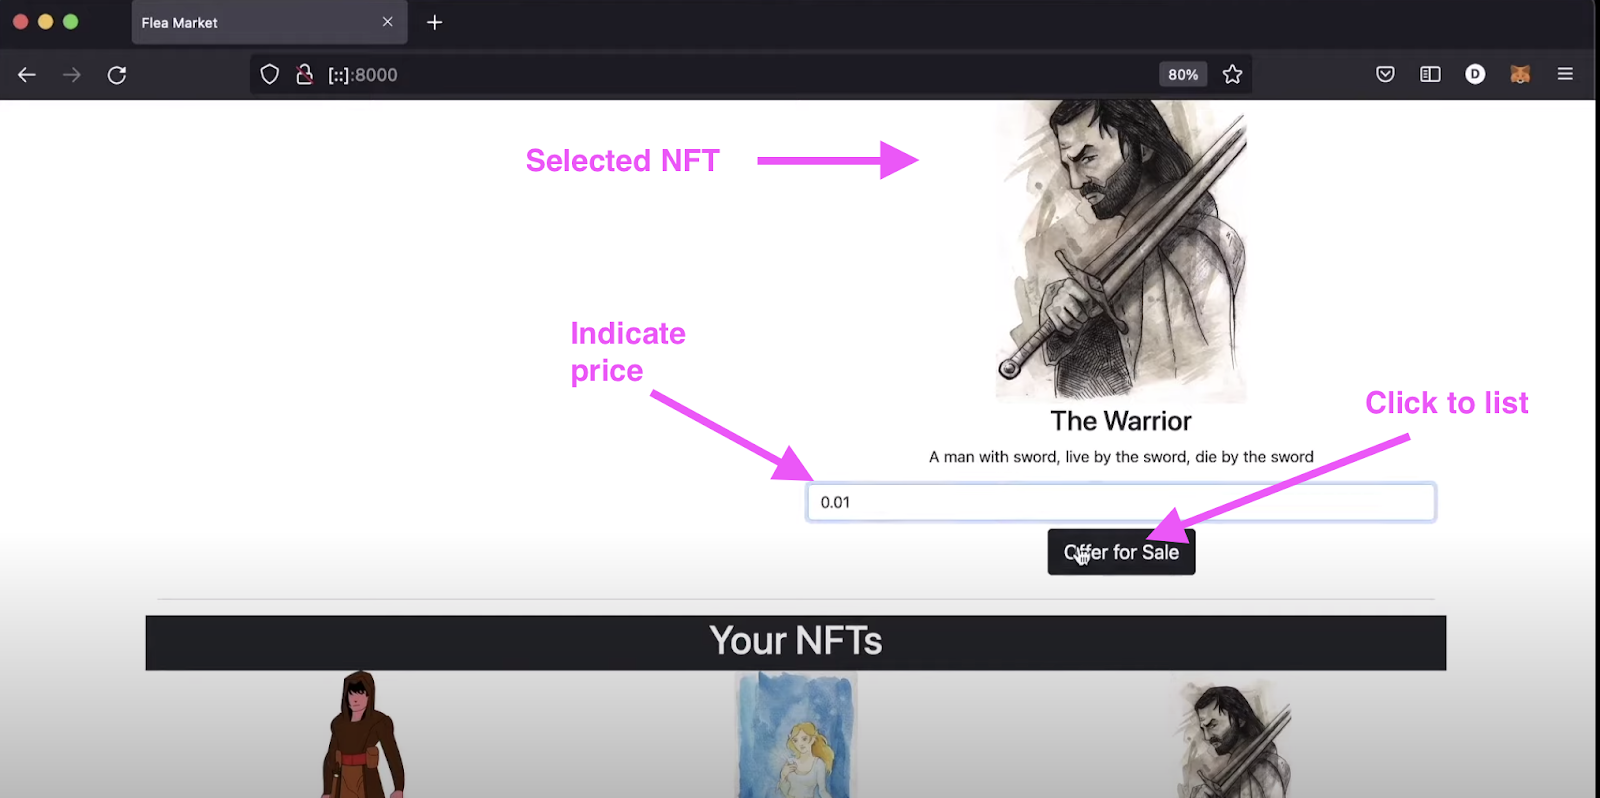
The user has the option to enter a desired NFT price. Afterward, the user clicks the “Offer for Sale” button.
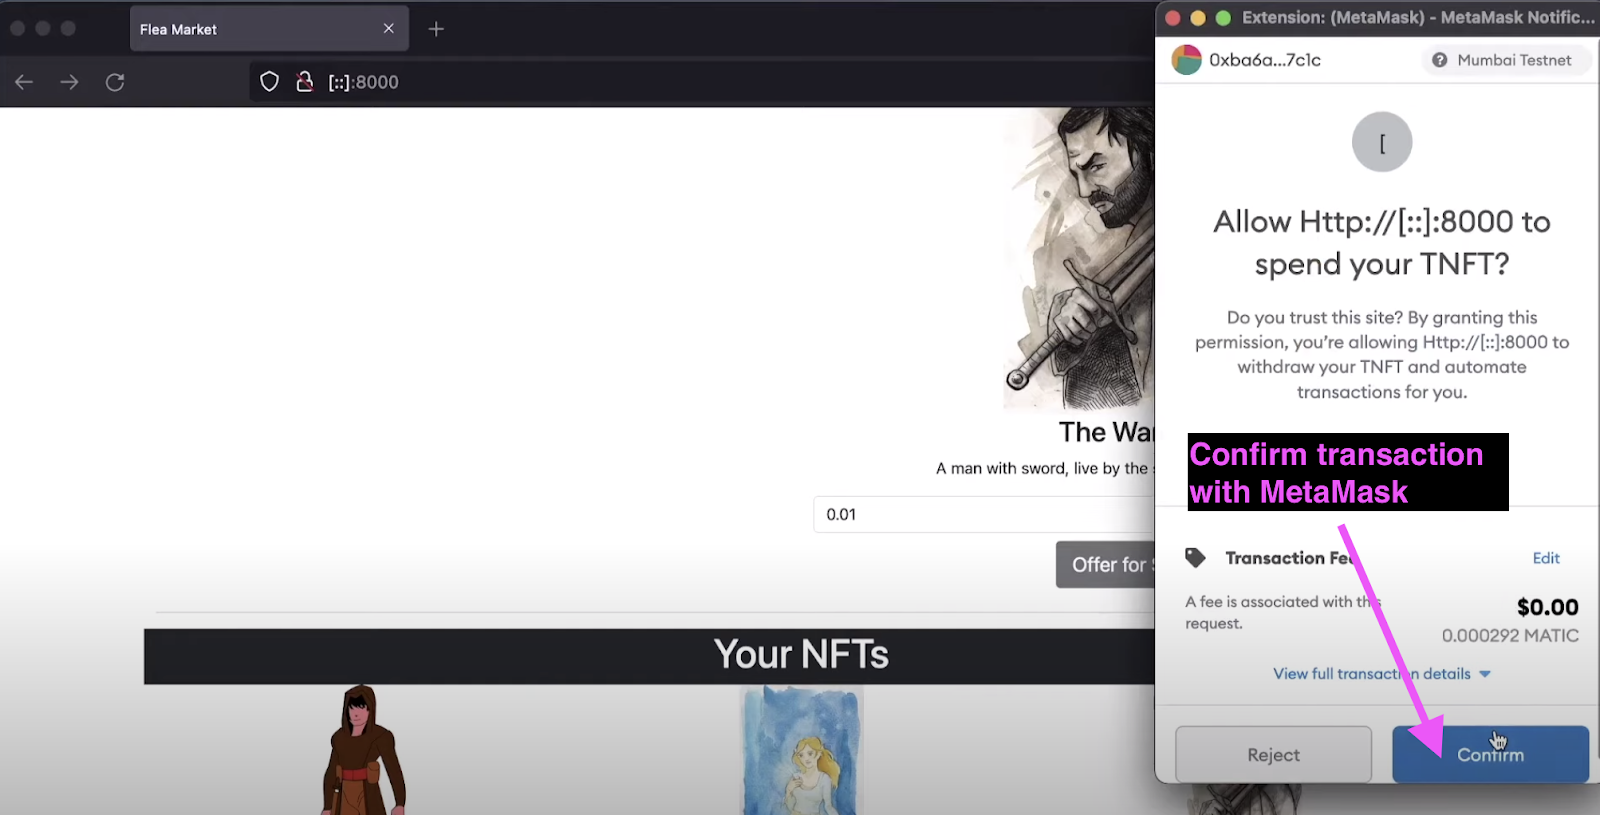
This action then prompts a MetaMask pop-up window with a button to confirm the transaction. After the confirmation, the NFT should appear in the “On Sale” section, indicating that it is now listed for sale and that others can buy or bid on it.
Buying NFTs in an NFT Store
Next, we demonstrate how someone can buy an NFT in an NFT marketplace. You’ll need another account logged in for this, as users cannot purchase their own NFTs. Using a separate account, we can see how anyone with a crypto wallet and enough currency or tokens can buy an NFT.

The separate user chooses the NFT they want to buy under the “On Sale” section by clicking the “Select” button. When decided, the user clicks “Buy”, which moves the NFT to the “Buy/Sell” section. The system prompts the user to confirm the transaction via MetaMask.
Successful Purchase of the NFT
If the purchase is successful, the NFT will turn up in the user’s collection. As the new NFT owner, the user can resell the NFT at whatever price they deem appropriate.
How to Launch an NFT Marketplace
Using Moralis, the process of building an NFT marketplace with features such as the example above becomes simplified. If you chose to build one on top of Ethereum RPC nodes, the development of the backend infrastructure would become much more complicated. However, with Moralis as your Web3 backend infrastructure platform, you can leave the heavy-lifting to a reliable IaaS or “Infrastructure as a Service” provider.
Hence, with Moralis’ fully-equipped developer toolkit, your backend is handled seamlessly, allowing you to go straight to working on the user experience.
Launch an NFT Marketplace with Moralis
To launch an NFT marketplace with Moralis, we need to keep certain backend functionalities in mind. As implied in the demo, these components are:
- A user authentication functionality that allows you to sign in to the dApp. For most dApps, the simplest way is to authenticate with MetaMask.
- Real-time tracking of user balances.
- The ability to track smart contract events as they occur in the dApp.
Remember that smart contracts form the logic of the NFT marketplace and are foundational to its design. Smart contracts are the operational backbone of the marketplace. Moreover, the NFT marketplace dApp needs to interact with numerous other contracts to manage the NFTs, depending on their origin.
Implementing the above backend functionalities using RPC nodes, as mentioned, is meticulous and time-consuming. However, Moralis relieves blockchain developers of this cumbersome process by providing a full suite of Web3 tools. The support includes extensive Moralis documentation to help you with your backend, allowing you to create most projects on Web3 with minimal effort.
Get Started on Your Backend
- Register a Free Moralis Account and Create a New Server
By registering on Moralis, you can create a new server for your project and access many excellent Web3 tools for free with the “free tier” level. With Moralis, you can create mobile Ethereum dApps quickly, use the Ethereum API to build an NFT marketplace on a solid infrastructure, and so much more!
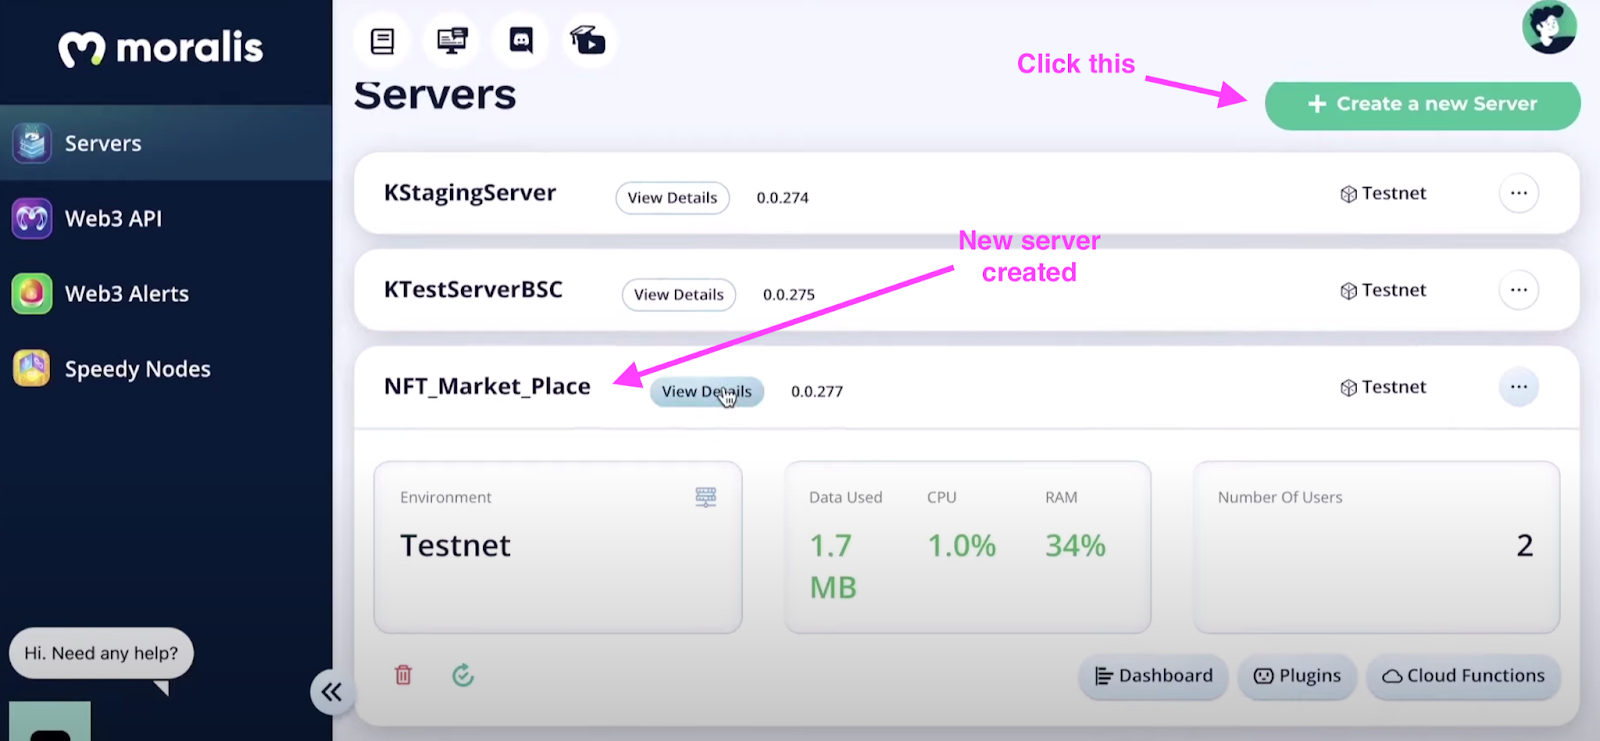
After registering, click on the upper right button to create a new server, as shown here:
- Proceed to Sync Events
As mentioned, the NFT marketplace needs the ability to track smart contract events in the dApp. In this example, we will be creating two listeners to detect the specific smart contract events we want to track. There will be two kinds of listeners: one to detect when an NFT is put up for sale (selling), and another to detect the close of an offer (buying).

Manually building such syncing events is typically a difficult process, but Moralis simplifies it significantly. With Moralis, you just need to provide the ABI of the smart contract, and it will do its job. Click “edit” to view and modify.

Database
If you check the Moralis dashboard, you will see that you are provided with a complete live database. The listeners that were created are the ones now populating the dashboard. The database contains information such as pending balances, pending NFT owners, transaction history, transfers, closed offerings, and a lot more.

With the real-time information and on-chain data at hand, you can now apply the corresponding Moralis snippets. This allows you to use the data properly.
The Contract to Launch an NFT Marketplace
The following is a screenshot of the contract used as the operator of the sample NFT marketplace or NFT store:

contract MarketPlace{

event OfferingPlaced(bytes32 indexed offeringId, address indexed hostContract, address indexed offerer,  uint tokenId, uint price, string uri);
event OfferingClosed(bytes32 indexed offeringId, address indexed buyer);
event BalanceWithdrawn (address indexed beneficiary, uint amount);
event OperatorChanged (address previousOperator, address newOperator);
The code highlighted above shows the following events:
- An event that is triggered whenever a new offering is placed.
- Another event for whenever an offering is closed.
- An event for when a balance is withdrawn.
- Another event for when the address of the operator is changed.
Get the Complete Code
To get the complete code, check the GitHub repository for this NFT marketplace project. By reviewing the entire code, you will understand how the rest of the smart contract contains the functions that support the above events. Moreover, any Solidity developer will understand how such functions preserve the integrity of NFT ownership and govern the users’ buying and selling behavior. Furthermore, the code describes how the NFT marketplace is managed on your behalf.
Launch an NFT Marketplace – Build the dApp
As we’ve finished the first half, that is, creating a simple contract to manage the marketplace on your behalf – we move on to building the dApp.
The dApp has three components, namely:
- The “index.html” file, a simple framework for the dApp.
- A “cloudCode.js” file.
- A “logic.js” file.
We will highlight some parts of the “logic.js” file because it is responsible for the main functionalities of the dApp.
Initialize Moralis
The “logic.js” file begins by initializing Moralis using the following code:
Moralis.initialize(""); // Application ID from moralis.io
Moralis.serverURL = ""; // Server URL from moralis.io
User Authentication
This part of the code contains user authentication using Moralis, illustrating the power of Moralis to perform authentication with just a single line of code.
Moralis.authenticate().then(function(){
     populateNFTs();
     populateOfferings();
     populateBalance();
     subscribeOfferings();
     subscribeBuys();
     subscribeUpdateNFTs();
});
Furthermore, this populates the NFTs of the authenticated user. It also populates the offerings that could exist, as well as the balance of the user. Moreover, it shows that you are subscribing to certain functions, such as “Offerings”, “Buys”, and “UpdateNFTs”.
You will also find that this code is intimately related to the smart contract. The smart contract and dApp relationship can be illustrated by the fact that the real-time information grabbed by your Moralis server corresponds to all the real-time offerings placed on your Moralis database or “moralisDashboard”.

Moralis Snippets
Throughout the code, you will find various Moralis snippets used such as:
- Moralis.Query(“PlacedOfferings”)
- Moralis.Query(“ClosedOfferings”)
- Moralis.Query(“PolygonNFTOwners”)
- Moralis.Cloud.run(“getBalance”, params)
- Moralis.Units.FromWei(presentBalance)
- Moralis.Cloud.run(“placeOffering”, params)
- Moralis.Units.ETH(offering.price)
This demonstrates just how powerful Moralis is. It enables you to create a full NFT marketplace dApp by doing all the backend work for you. With just a few snippets of code, you can harness the data from your Moralis database and include it in your dApp.
Launch an NFT Marketplace – Full Tutorial
For an in-depth review of everything discussed, and further explanations of the code, check out this excellent video on Moralis’ YouTube channel:
How to Launch an NFT Marketplace – Summary

Many NFT marketplaces currently exist. However, various components of building an NFT marketplace or NFT store would pose a challenge for any blockchain developer. Creating your backend from scratch, you would traditionally need to use Ethereum RPC nodes, which can be a hassle to deal with. However, Moralis solves this with its powerful Web3 solutions, letting you create “serverless” dApps and run a blockchain node in just a few minutes through Moralis Speedy Nodes. Moreover, you can build a database that supports your NFT store and use powerful Moralis snippets that help you speed up your build even further.
This demo herein uses the ERC-721 standard. However, if you want to explore how to bulk mint NFTs using the ERC-1155 standard, you can do so easily as Moralis lets you bulk mint NFTs with IPFS support using the ERC-1155 standard. What’s more, Moralis enables you to upload folders to IPFS, providing a decentralized storage solution and a batch-minting solution simultaneously.
Thus, with all these advantages, you can focus on building the frontend of your NFT store dApp to make it as user-friendly as possible. To launch an NFT marketplace and explore the unprecedented benefits that the greatest Web3 development platform can offer, just register on Moralis!
