Are you interested in creating your own NFT marketplace? If this is the case, then follow along in this tutorial, as it will show you how to create a Blur NFT marketplace clone in five steps. Thanks to the enterprise-grade NFT API from Moralis, the process is extremely straightforward. With this interface, you can effortlessly get NFT data across multiple blockchain networks with single API calls. For example, here are the three endpoints used to get the data needed for this tutorial:
getNFTTrades– Get all trades of NFTs for a provided contract:
import Moralis from 'moralis';

try {
  await Moralis.start({
    apiKey: "YOUR_API_KEY"
  });

  const response = await Moralis.EvmApi.nft.getNFTTrades({
    "chain": "0x1",
    "marketplace": "opensea",
    "address": "0xb47e3cd837dDF8e4c57F05d70Ab865de6e193BBB"
  });

  console.log(response.raw);
} catch (e) {
  console.error(e);
}
getContractNFTs– Get NFTs from a contract. This also includes metadata where available:
import Moralis from 'moralis';

try {
  await Moralis.start({
    apiKey: "YOUR_API_KEY"
  });

  const response = await Moralis.EvmApi.nft.getContractNFTs({
    "chain": "0x1",
    "format": "decimal",
    "mediaItems": false,
    "address": "0xb47e3cd837dDF8e4c57F05d70Ab865de6e193BBB"
  });

  console.log(response.raw);
} catch (e) {
  console.error(e);
}
getWalletNFTs– Get all NFTs owned by a given address:
import Moralis from 'moralis';

try {
  await Moralis.start({
    apiKey: "YOUR_API_KEY"
  });

  const response = await Moralis.EvmApi.nft.getWalletNFTs({
    "chain": "0x1",
    "format": "decimal",
    "tokenAddresses": [],
    "mediaItems": false,
    "address": "0xd8da6bf26964af9d7eed9e03e53415d37aa96045"
  });

  console.log(response.raw);
} catch (e) {
  console.error(e);
}
Acquiring on-chain data has never been easier, and by familiarizing yourself with the Moralis NFT API, you can build any NFT project in a heartbeat. So, if you are serious about becoming a Web3 developer, remember to sign up with Moralis. Creating an account is free, and you can immediately start leveraging the full power of blockchain!
Overview – Create an NFT Marketplace
In the following article, we will show you how to create an NFT marketplace in the form of a Blur clone in five straightforward steps:
- Set up the project and Moralis
- Write the smart contracts
- Create the backend
- Build the frontend
- Start the application
By completing the aforementioned steps, you will be able to build your own Blur NFT marketplace clone in no time!
When creating an NFT marketplace, one of the central components is accurate and real-time NFT data. Without the proper tools, it can be cumbersome to access this information, which is where Web3 infrastructure providers like Moralis enter the equation. In fact, in this tutorial, the main reason we are able to create the Blur NFT marketplace clone is thanks to the Moralis NFT API. This interface accumulates everything needed to build great NFT apps!

Along with the industry’s fastest NFT API, Moralis also provides other excellent Web3 development resources. A great example is the Web3 blog featuring instructive blockchain development content. For example, we have a guide explaining what an OpenSea gas fee entails or an article on the best Python API for cryptocurrency.
So, if you are interested in becoming a Web3 developer, sign up with Moralis. Creating an account is free, and you can access all of the enterprise-grade Web3 APIs from Moralis in a heartbeat!
How to Create an NFT Marketplace in 5 Steps
In the following sections, we will teach you how to create an NFT marketplace in five straightforward steps. More specifically, the project you are about to create is a replica of the Blur NFT marketplace. We will use Express for the backend and create a NextJS app for the frontend. In addition, we will cover the code for two smart contracts written in the Solidity programming language.
Through the app, users can, among other things, sell, buy, and mint tokens. The NFT marketplace will also display the one-day trading volume on OpenSea and the user’s NFT portfolio. However, to better understand what you will be working towards, we kickstart this tutorial with a brief application demo!
Blur Clone Application Demo
Before showing you how to create an NFT marketplace, let us provide a quick application demo to show you what you will be working towards. Here is the app’s landing page:
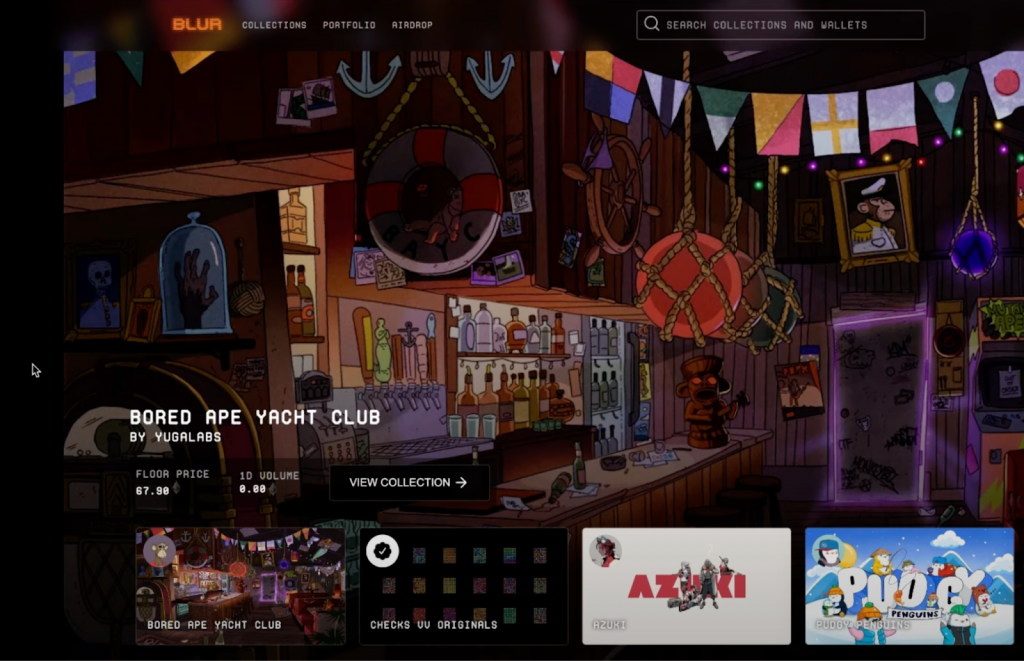
As you can see, it is a relatively close replica of the Blur NFT marketplace and has much of the same functionality. To begin with, the first thing you notice is the featured collections at the bottom of the page:

It is possible to toggle between these NFT collections to, for example, view the floor price and the one-day trading volume for each:

What’s more, by scrolling down, you can also find a ”Trending” table featuring popular NFT collections:

Buying and Selling NFTs
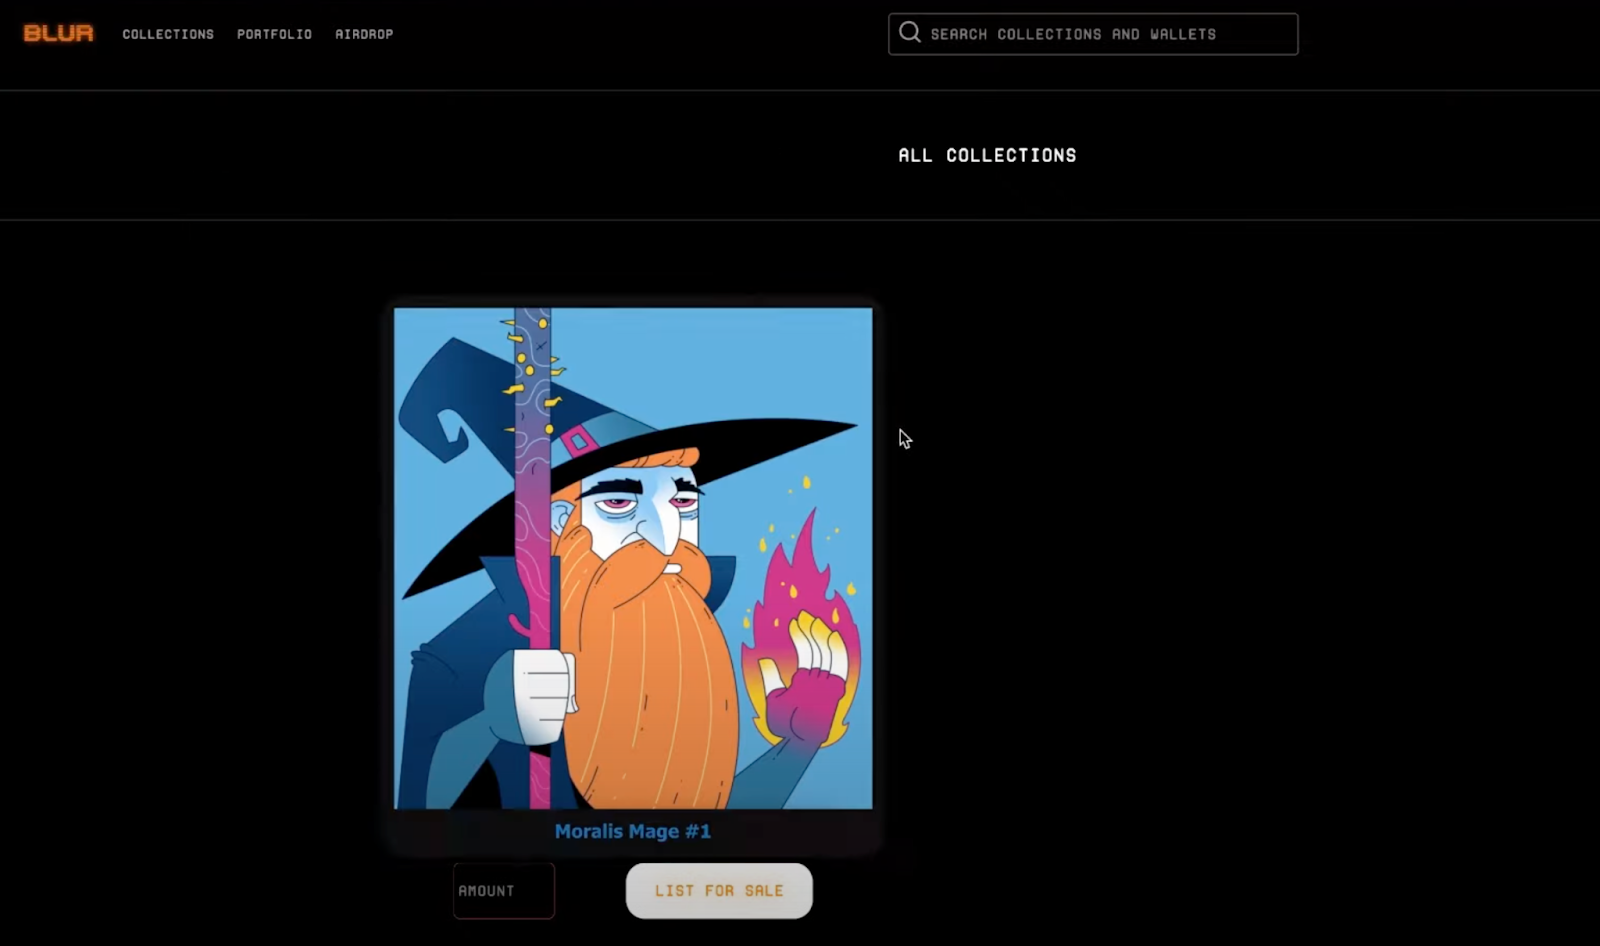
At the top of the page, you will find a navigation bar with three tabs: ”COLLECTIONS”, ”PORTFOLIO”, and ”AIRDROP”:

By clicking on the ”PORTFOLIO” tab, you can view all the NFTs in your connected wallet. It might look something like this:

Through a closer look at the image above, you will also notice that listing an NFT for sale from this page is possible. To do so, all you need to do is provide a price and hit the ”LIST FOR SALE” button:

Clicking on this button prompts your Web3 wallet, allowing you to confirm the transaction:

When the transaction finalizes, the NFT is sent to a smart contract and is removed from your wallet:

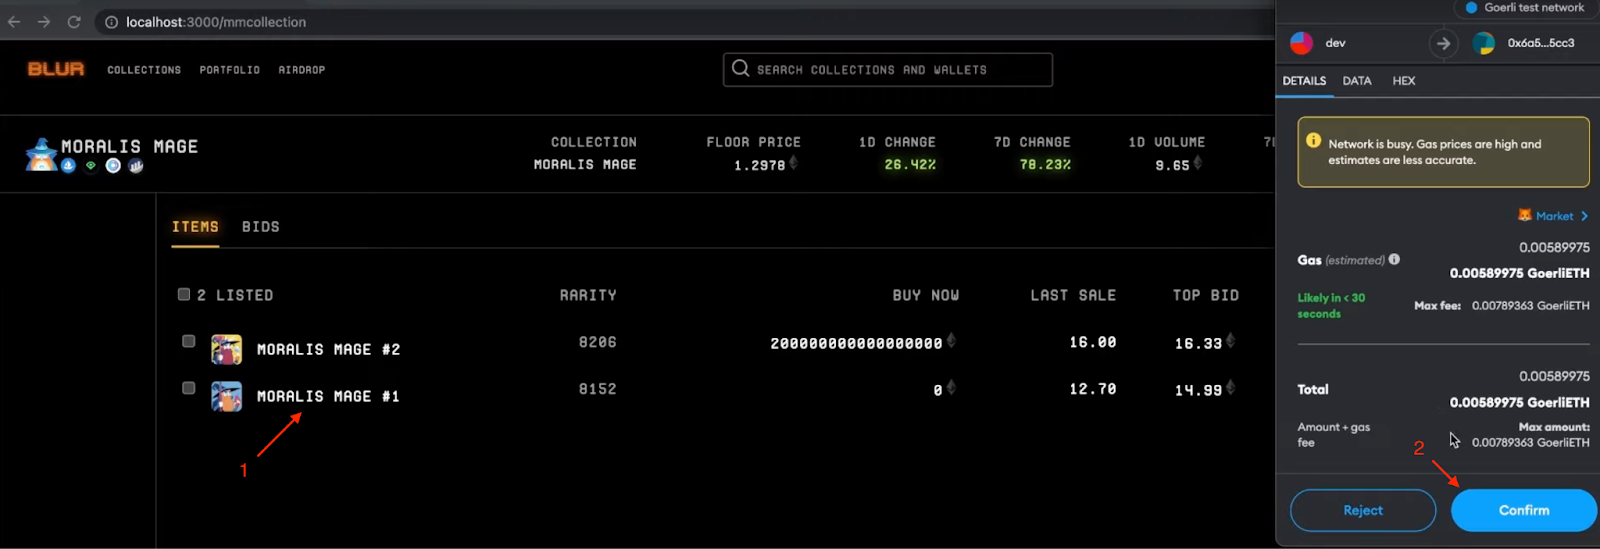
If we go back to the main page and select ”MORALIS MAGE” from the ”Trending” table, we can see that there are two NFTs for sale:

If you click on any listed item, it will again prompt your wallet, enabling you to purchase the NFT:
When the transaction is processed, the NFT has automatically been added to your portfolio once again:
That is it for this demo! If you find this exciting and want to create your own NFT marketplace as a Blur clone, join us as we show you how to set up the project and Moralis in the first step!
Step 1: Set Up the Project and Moralis
To begin with, the first thing you need to do is set up a new project directory. To do so, open a new terminal and run the following command:
mkdir blur-nft-clone
From there, cd into the project directory and create the backend folder by running this terminal input:
mkdir backend
You can then cd into the backend folder and initialize it using the command below:
npm init -y
From there, install the required dependencies with this terminal command:
npm i express dotenv cors moralis
Next, cd back to the root folder and create the frontend, which will be a NextJS application. As such, run the following command:
npx create-next-app@latest
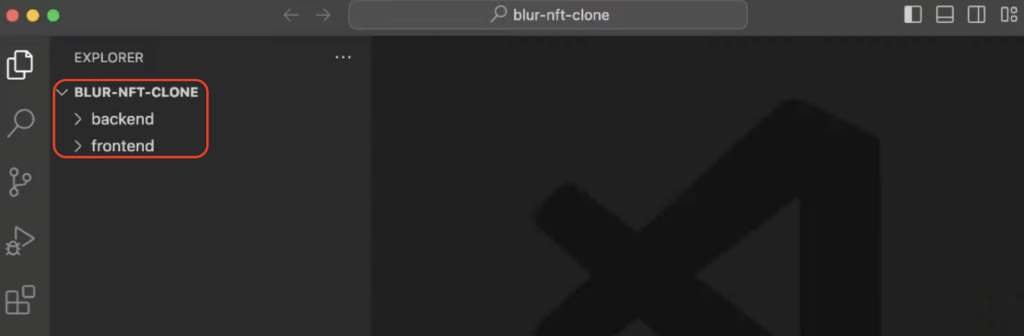
Name the project ”frontend” and select ”no” for all the terminal prompts that appear:

You can now open the project folder in your preferred integrated development environment. It should look something like this:
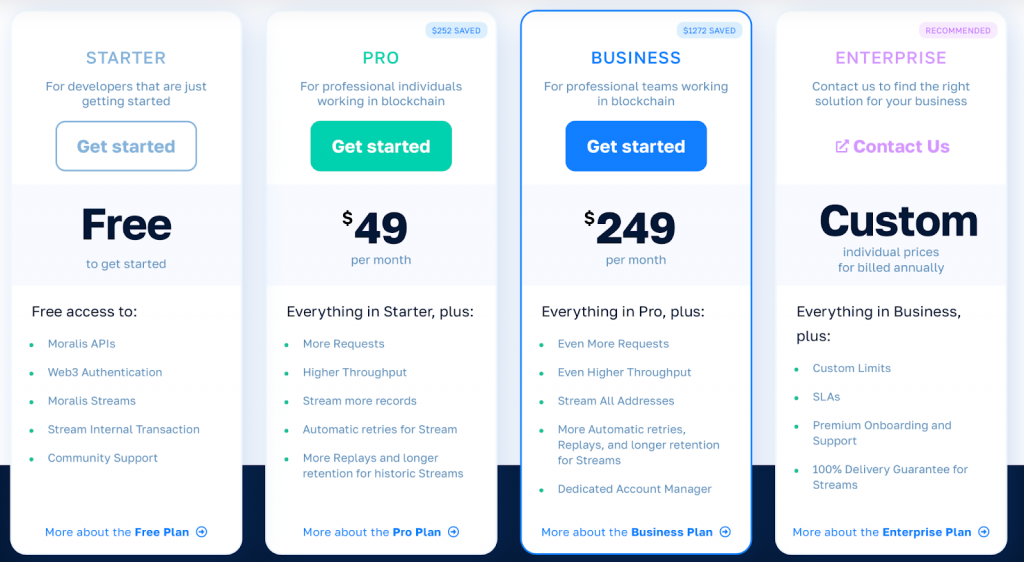
From here, you also need to set up Moralis. If you want to test the waters, you are perfectly fine using the ”Starter” plan for this tutorial. However, if you are serious about taking your projects to the next level, then we recommend you check out either of the ”Pro”, ”Business”, or ”Enterprise” plans:
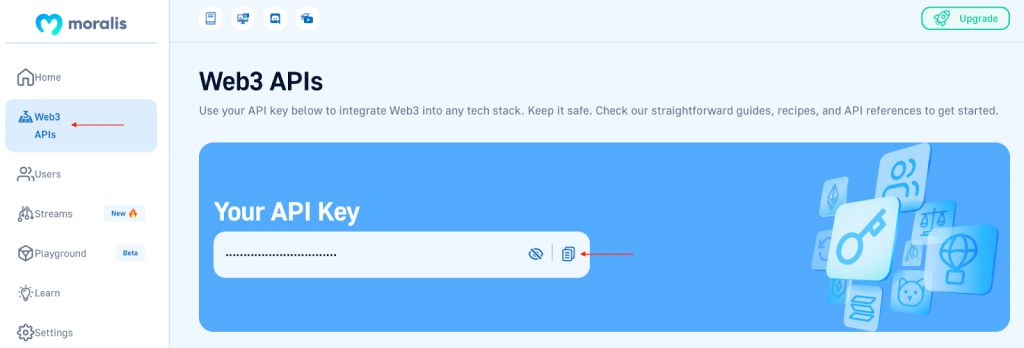
Nevertheless, once you have an account, you can log in and navigate to the Web3 APIs tab. This is where you can find your Moralis API key, which you can copy and save for now, as you will need it in a short while:
Step 2: Write the Smart Contracts
Now that you are done setting up the barebones state of the project, we will continue by covering the smart contract code. For this NFT marketplace, we will need two contracts: ”NFT.sol” and ”NFTMarketplace.sol”.
To write these contracts, we will be using Remix and Solidity. The first contract is for creating an NFT; meanwhile, the second contract handles the logic for the NFT marketplace itself. So, let us take a closer look at the code for each, starting with the former.
- ”NFT.sol” – This contract is pretty straightforward, and you can find the entirety of the code down below:
// SPDX-License-Identifier: MIT
pragma solidity ^0.8.17;

import "@openzeppelin/contracts/token/ERC721/extensions/ERC721URIStorage.sol";
import "@openzeppelin/contracts/utils/Counters.sol";
import "@openzeppelin/contracts/access/Ownable.sol";

contract messageNFT is ERC721URIStorage, Ownable {
    using Counters for Counters.Counter;
    Counters.Counter private _tokenIds;

    constructor() ERC721("Moralis Mage", "MM") {}

    function mintNFT(address recipient, string memory tokenURI)
        public
        onlyOwner
        returns (uint256)
    {
        _tokenIds.increment();

        uint256 newItemId = _tokenIds.current();
        _mint(recipient, newItemId);
        _setTokenURI(newItemId, tokenURI);

        return newItemId;
    }
}
Here, we have the mintNFT() function that takes the recipient address and token URI as arguments. From there, the contract calls the _mint() and _setTokenURI() functions while passing the recipient, newItemId, and tokenURI as parameters.
- ”NFTMarketplace.sol” – This contract is a bit more complex, but you can find all of the code in the snippet below:
// SPDX-License-Identifier: MIT
pragma solidity ^0.8.4;

import "@openzeppelin/contracts/utils/Counters.sol";
import "@openzeppelin/contracts/token/ERC721/ERC721.sol";
import "@openzeppelin/contracts/security/ReentrancyGuard.sol";

contract NFTMarketplace is ReentrancyGuard {
    using Counters for Counters.Counter;

    Counters.Counter private _itemIds;
    Counters.Counter private _itemsSold;

    address public owner;

    constructor() {
        owner == msg.sender;
    }

    struct MarketItem {
        uint256 itemId;
        address nftContract;
        uint256 tokenId;
        address payable seller;
        address payable owner;
        uint256 price;
        bool sold;
    }

    mapping(uint256 => MarketItem) private idToMarketItem;


    event MarketItemCreated(
        uint256 indexed itemId,
        address indexed nftContract,
        uint256 indexed tokenId,
        address seller,
        address owner,
        uint256 price,
        bool sold
    );

    function createMarketItem(
        address nftContract, uint256 tokenId, uint256 price
    ) public payable nonReentrant {
        require(price > 0, "Price must be greater than 0");

        _itemIds.increment();
        uint256 itemId = _itemIds.current();

        idToMarketItem[itemId] = MarketItem(
            itemId,
            nftContract,
            tokenId,
            payable(msg.sender),
            payable(address(0)),
            price,
            false
        );

        IERC721(nftContract).transferFrom(msg.sender, address(this), tokenId);

        emit MarketItemCreated(
            itemId,
            nftContract,
            tokenId,
            msg.sender,
            address(0),
            price,
            false
        );
    }

    function createMarketSale(
        address nftContract,
        uint256 itemId
    ) public payable nonReentrant {
        uint256 price = idToMarketItem[itemId].price;
        uint256 tokenId = idToMarketItem[itemId].tokenId;
        bool sold = idToMarketItem[itemId].sold;
        require(msg.value == price, "Please submit the asking price in order to complete the purchase");
        require(sold != true, "This Sale has already finished");

        idToMarketItem[itemId].seller.transfer(msg.value);
        IERC721(nftContract).transferFrom(address(this), msg.sender, tokenId);
        idToMarketItem[itemId].owner = payable(msg.sender);
        _itemsSold.increment();
        idToMarketItem[itemId].sold = true;
    }

    function fetchMarketItems() public view returns (MarketItem[] memory) {
        uint256 itemCount = _itemIds.current();
        uint256 unsoldItemCount = _itemIds.current() - _itemsSold.current();
        uint256 currentIndex = 0;

        MarketItem[] memory items = new MarketItem[](unsoldItemCount);
        for (uint256 i = 0; i < itemCount; i++) {
            if (idToMarketItem[i + 1].owner == address(0)) {
                uint256 currentId = i + 1;
                MarketItem storage currentItem = idToMarketItem[currentId];
                items[currentIndex] = currentItem;
                currentIndex += 1;
            }
        }
        return items;
    }
}
The contract handles the functionality for listing, selling, and purchasing NFTs. It has the following three functions: createMarketItem(), createMarketSale(), and fetchMarketItems().
The first function is responsible for creating a new market item using the NFT contract, token ID, and price. The second function creates a new market sale. The last function returns the items that are currently on sale.
Now that you are familiar with this tutorial’s smart contracts, you must add them to the frontend folder. As such, create a new ”contracts” folder with an ”index.js” file. From there, you can add the contracts by inputting the following:
export const abi = // Add abi here
export const NFTMarketplace_CONTRACT_ADDRESS = // Add NFT contract address here
For more information on smart contract development, check out our article on tools and best practices for smart contract security!
Step 3: Create the Backend
For the backend code, you can start by opening the ”packages.json” file and adding a new start script. It should now look something like this:
{
  "name": "backend",
  "version": "1.0.0",
  "description": "",
  "main": "index.js",
  "scripts": {
    "start": "node index.js",
    "test": "echo \"Error: no test specified\" && exit 1"
  },
  "keywords": [],
  "author": "",
  "license": "ISC",
  "dependencies": {
    "cors": "^2.8.5",
    "dotenv": "^16.0.3",
    "express": "^4.18.2",
    "moralis": "^2.16.1"
  }
}
Next, create a ”.env” file in the backend folder and add your Moralis API key as an environment variable:
MORALIS_API_KEY = “replace_me”
From there, set up an ”index.js” file. At the top of this file, you must add the dependencies and libraries we installed earlier. It should look something like this:
const express = require("express");
const app = express();
const port = 5001;
const Moralis = require("moralis").default;
const cors = require("cors");

require("dotenv").config({ path: ".env" });

app.use(cors());
app.use(express.json());

const MORALIS_API_KEY = process.env.MORALIS_API_KEY;
Next, we have three get endpoints using the Moralis NFT API to get blockchain data. The first one is called /getnftdata; when called, it fetches NFT data using the Moralis getNFTTrades endpoint. The response is saved, returned, and handled on the app’s frontend. This is what the endpoint looks like:
app.get("/getnftdata", async (req, res) => {
  try {
    const { query } = req;

    if (typeof query.contractAddress === "string") {
      const response = await Moralis.EvmApi.nft.getNFTTrades({
        address: query.contractAddress,
        chain: "0x1",
      });

      return res.status(200).json(response);
    } else {
      const nftData = [];

      for (let i = 0; i < query.contractAddress.length; i++) {
        const response = await Moralis.EvmApi.nft.getNFTTrades({
          address: query.contractAddress[i],
          chain: "0x1",
        });

        nftData.push(response);
      }

      const response = { nftData };
      return res.status(200).json(response);
    }
  } catch (e) {
    console.log(`Somthing went wrong ${e}`);
    return res.status(400).json();
  }
});
The second endpoint is called /getcontractnft, and it leverages the getContractNFTs endpoint to fetch all NFTs based on a given contract address that was initially taken from the frontend:
app.get("/getcontractnft", async (req, res) => {
  try {
    const { query } = req;
    const chain = query.chain == "0x5" ? "0x5" : "0x1";

    const response = await Moralis.EvmApi.nft.getContractNFTs({
      chain,
      format: "decimal",
      address: query.contractAddress,
    });

    return res.status(200).json(response);
  } catch (e) {
    console.log(`Something went wrong ${e}`);
    return res.status(400).json();
  }
});
Lastly, the final /getnfts endpoint fetches all NFTs owned by a wallet using the Moralis getWalletNFTs endpoint:
app.get("/getnfts", async (req, res) => {
  try {
    const { query } = req;

    const response = await Moralis.EvmApi.nft.getWalletNFTs({
      address: query.address,
      chain: query.chain,
    });

    return res.status(200).json(response);
  } catch (e) {
    console.log(`Something went wrong ${e}`);
    return res.status(400).json();
  }
});
Finally, below the three endpoints, we call the Moralis.start() function to initialize Moralis and start listening to the server at port 5001:
Moralis.start({
  apiKey: MORALIS_API_KEY,
}).then(() => {
  app.listen(port, () => {
    console.log(`Listening for API calls`);
  });
});
That illustrates how easy it is to get blockchain data when working with the Moralis NFT API!
Also, that is it for the backend and is how you get all the on-chain data needed to create an NFT marketplace. From here, let us take a closer look at the frontend code in the fourth step to see how we handle the responses from these endpoints!
Step 4: Build the Frontend
For the frontend, the first thing you need to do is install the required dependencies. As such, open a new terminal, cd into the frontend folder, and run the following command:
npm i [email protected] [email protected] axios @web3uikit/core @web3uikit/icons
Since there are quite a few frontend components you need to create, we will hand you over to our expert. In the Moralis YouTube video below, one of our talented software engineers walks you through building the Blur NFT marketplace clone from start to finish.
So far, we have covered the initial setup of the project, the smart contract code, and the backend. The breakdown of the frontend code starts at around 17:05, but we provide a list with timestamps if you struggled at any point in the previous steps or have any questions:
- Application Demo (00:00)
- Project Setup (4:06)
- Smart Contracts (6:00)
- Backend Code (9:50)
- Frontend Code (17:05)
What’s more, if you want to check out the entire code, you can find the GitHub repository for the project below:
Complete Blur Clone Repo – https://github.com/MoralisWeb3/youtube-tutorials/tree/main/blur-clone
Step 5: Start the Application
Once you are done adding the code for all the frontend components, all that remains from here is launching the applications. As such, open a new terminal in your IDE and run the development server with either of the following commands:
npm run dev
yarn dev
pnpm dev
From there, you should be able to open the application in your browser using the following URL: “http://localhost:3000“.
Now that’s it! Congratulations, you have just created your own NFT marketplace in no time!
Summary – How to Create an NFT Marketplace
In today’s tutorial, we taught you how to create an NFT marketplace in five steps:
- Set up the project and Moralis
- Write the smart contracts
- Create the backend
- Build the frontend
- Start the application
As such, if you have followed along this far, you now know how to create your own NFT marketplace in no time!
If you liked this tutorial, you can find similar guides here on the Web3 blog. For instance, explore Web3 marketplace development further or learn how to create a blockchain explorer.
In addition to amazing development content, Moralis also provides other blockchain resources that can aid in your programming endeavors. In this tutorial, to test our NFT marketplace, we utilized a testnet, and to get tokens for this network, we used a Goerli faucet. You can also build on other chains, like Polygon, with tools like a MATIC faucet!
So, if you want to continue building sophisticated Web3 projects, make sure to sign up with Moralis. By registering, you can instantly leverage the power of the Web3 industry to build dapps smarter and more efficiently!
