To generate and mint an NFT is something that many token developers experience to be a cumbersome process. In many cases, this happens due to the lack of solid APIs and tools available, making the minting and generating task for NFTs complex and time-consuming. Moreover, as the NFT market grows in popularity and NFT creators are discovering new use cases for non-fungible tokens, it’s not surprising that developers want to learn NFT token development, including the NFT generate and mint process. Therefore, this article will educate you on how to generate non-fungible tokens (NFTs) with Moralis’ Web3 platform and its various tools. As such, you’ll discover that anyone aspiring to become a blockchain developer can learn how to execute the NFT generate and mint process easily.
Developers realize that you don’t need to NFT generate and mint from scratch. Using powerful Web3 infrastructure providers such as Moralis, you only need minimal code to set up your backend. Moreover, with Moralis, you can easily figure out how to create an NFT marketplace or create mobile Ethereum dApps for your NFT build. Hence, Moralis makes the NFT generate and mint process simple, even for a novice blockchain developer.
In this tutorial, you’ll learn how easy it is to start an NFT generate and mint project. Whether you want to use the ERC721 or ERC1155 token standard, Moralis provides you with the right Web3 tools to make your production of non-fungible tokens feel like a breeze. Moreover, you’ll realize that Moralis provides 360-degree support for your NFT infrastructure and NFT dApps (decentralized applications). For instance, Moralis’ NFT API provides seamless access to NFT history, ownership data, and so much more. With Moralis, you can devote more time to your NFT dApp’s frontend while leaving your backend infrastructure in safe hands.
NFT Generate and Mint – Prerequisite
To start creating NFTs, you need to understand what an NFT is in the first place. So, what are NFTs? In short, the acronym “NFT” stands for “non-fungible token”.
If you have been building on the blockchain or trading crypto tokens, then you will understand what a fungible token is. Fungible tokens, such as those generated using the ERC-20 or BEP20 token standard, are built on a relatively simple concept. Such tokens usually take on the function of money or currency. Thus, one unit is equal to a single unit of exchange. Therefore, when used as a medium of exchange, one ERC-20 or BEP-20 token is equivalent to another. Moreover, fungible tokens can also be used to represent stocks, bonds, or other equivalent values.
On the other hand, as the name suggests, a non-fungible token (NFT) represents the opposite. Hence, rather than representing interchangeable values, NFTs represent unique values. For example, an NFT can represent a unique document, a digital work of art, a deed of real estate, etc. Thus, these items are unique, and their NFTs cannot be interchanged with other NFTs. Furthermore, NFTs contain links to information or metadata that serve as distinguishing tags or identifiers.
How to Generate an NFT
If you are a creator, blockchain developer, or simply interested in the process of generating NFTs, then you’ll be eager to learn about the quickest way in which you can start your NFT generate and mint project.
NFT Generate and Mint with an NFT Minter dApp
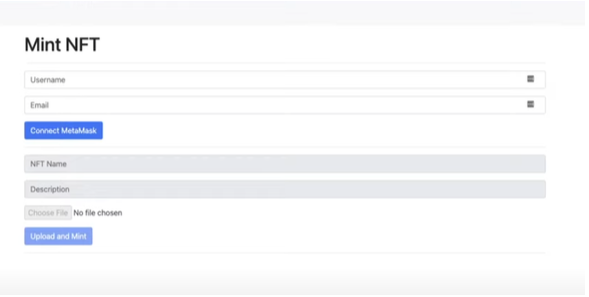
To streamline the NFT generate and mint process, you need to build an NFT minter dApp. However, you might be wondering what an NFT minter dApp is. It’s a simple UI (user interface) where you can input information about your NFT or digital creation. For example, you can add a title, description, username, email address, and other forms of data to your NFT. Furthermore, you should be able to upload or input a link to the digital file itself.
You should also be able to:
- Connect to MetaMask with your simple frontend.
- Call smart contract methods.
- Authenticate with MetaMask.
- Sign transactions with your MetaMask wallet.
All of these are essential features to get your simple NFT minter dApp working perfectly.
Moreover, the basic flask dApp we will create should look like this:
NFT Generate and Mint in a Few Easy Steps
Now that you have an idea of what you need to create, you can start by signing up with Moralis. If you don’t have a Moralis account, register a free Moralis account now!
Step 1 – Create a Server for the Minter dApp
With Moralis, you don’t have to set up a server from scratch. You can simply create a new server through Moralis’ Web3 platform.
After signing up, click on the “+ Create a new Server” button in the upper right corner of the interface. Then, a drop-down menu will appear. Select the “Testnet Server” option. For demonstration purposes, and also when you’re starting a new project, it’s best to start with this alternative.

Next, in the “Add New Testnet Server” pop-up window, you will be asked to name your project, select your region, and select the chain(s) you want to utilize.
Select Eth (Ropsten)
Since Ethereum remains the most widely-used chain, we’ll create an Ethereum-based NFT minter dApp. Therefore, select the “Eth (Ropsten)” option from the pop-up menu. Click “Add Instance” after completing all the necessary choices and information.

Obtain Server Information
Your Moralis server should be ready in a few minutes. Make sure to copy the server URL and application ID found on your server instance. You’ll need them further down the line during your “NFT generate and mint” development process.

Step 2 – Start on the NFT Minter dApp
With the server provided by Moralis ready, you can now proceed with building the NFT minter dApp. Remember that this part of the “NFT generate and mint” process requires you to have at least Python 3.0 installed.
To simplify the process even further, we’ll provide you with a pre-developed smart contract. Of course, you may also write your own smart contract if you wish. However, it’s practical to use a well-reviewed and tested contract like the one posted below or one chosen directly from GitHub.
Begin with “run.py”
We are using “run.py” for this simple flask dApp to trigger everything in the directory. Use the following code:
from app import app
if __name__ == "__main__": app.run()
Moreover, to illustrate, your screen should appear like this:

Step 3 – NFT Generate and Mint Code
To generate an NFT through an NFT minter dApp, you now need to proceed as the following subsections show.
Initialize Moralis
To initialize Moralis in your NFT project, you need the server information you got from the previous step. Input the following lines:
Moralis.initialize(""); // Application ID from moralis.io
Moralis.serverURL = ""; // Server URL from moralis.io
Get Smart Contract
Now that you’ve initialized Moralis with just a few lines of code (it’s that simple) proceed with the smart contract. Input the following:
const nft_contract_address = "" //NFT Minting Contract Use This One "Batteries Included", code of this contract is in the github repository under contract_base for your reference.
/*

Available deployed contracts
Ethereum Rinkeby 0x0Fb6EF3505b9c52Ed39595433a21aF9B5FCc4431 Polygon Mumbai 0x351bbee7C6E9268A1BF741B098448477E08A0a53

BSC Testnet 0x88624DD1c725C6A95E223170fa99ddB22E1C6DDD */
Proceed to this “NFT generate and mint” project’s GitHub for the entire contract.
Create an HTML Index File
The next step in this simple tutorial is to create an “index.html” file. This HTML index file provides you with all the elements you need to create the minter dApp. Furthermore, it creates the interaction buttons that enable MetaMask login and generates the information fields in the dApp.
Obtain Full Code
For the full code, you may refer to the GitHub repository’s HTML section. However, we will highlight some parts of the code here for your understanding.
File Selection and Upload
<div class="input-group mb-3">
            <input type="file" disabled = "true" id="file">
          </div>
        </div>
        <div>
          <button disabled = "true" class="btn btn-primary" id="upload" onclick="upload();">Upload and Mint</button>
        </div>
        <hr>
          <div class="input-group mb-3" id="resultSpace">
If you look at the NFT minter dApp sample, you’ll find a “file” selection button. This is the code that creates it. Moreover, this allows you to upload any file of your choosing. For example, you can upload a digital artwork or a photograph you took. After triggering the dApp’s logic, this file will be turned into an NFT. Furthermore, your dApp will then display the transaction results, reflecting a newly minted NFT. Thus, this completes an important part of the “NFT generate and mint” process.
Create Login Function
After completing the HTML index file, proceed to the JavaScript section. Since you’ve already initialized Moralis and the smart contract, you are now ready to write the code that connects the dApp to MetaMask.
async function login(){
  document.getElementById('submit').setAttribute("disabled", null);
  document.getElementById('username').setAttribute("disabled", null);
  document.getElementById('useremail').setAttribute("disabled", null);
  Moralis.Web3.authenticate().then(function (user) {
      user.set("name",document.getElementById('username').value);
      user.set("email",document.getElementById('useremail').value);
      user.save();
      document.getElementById("upload").removeAttribute("disabled");
      document.getElementById("file").removeAttribute("disabled");
      document.getElementById("name").removeAttribute("disabled");
      document.getElementById("description").removeAttribute("disabled");
  })
}
Add Upload Function
After you add the above code, the next step is to enable the upload function. With this function, it’s easy to save the object to IPFS or your Moralis server. It all depends on which kind of storage solution you prefer. You can do this by typing the following code:
async function upload(){
  const fileInput = document.getElementById("file");
  const data = fileInput.files[0];
  const imageFile = new Moralis.File(data.name, data);
  document.getElementById('upload').setAttribute("disabled", null);
  document.getElementById('file').setAttribute("disabled", null);
  document.getElementById('name').setAttribute("disabled", null);
  document.getElementById('description').setAttribute("disabled", null);
  await imageFile.saveIPFS();
  const imageURI = imageFile.ipfs();
  const metadata = {
    "name":document.getElementById("name").value,
    "description":document.getElementById("description").value,
    "image":imageURI
  }
  const metadataFile = new Moralis.File("metadata.json", {base64 : btoa(JSON.stringify(metadata))});
  await metadataFile.saveIPFS();
  const metadataURI = metadataFile.ipfs();
  const txt = await mintToken(metadataURI).then(notify)
}
Save to IPFS
Moralis allows you to save the file in a decentralized way using IPFS. The following command enables this:
await imageFile.saveIPFS();
Fetch URI
To fetch the URI from Moralis, type the following code:
const imageURI = imageFile.ipfs();
Create Metadata Object
Const metadata = {
	“name”: document.getElementById(“name”).value,
	“description”: document.getElementById (“description”).value,
	“Image”: imageURI
 }
The next step is to create a metadata object using the code above. NFTs’ metadata contains important information about the NFT that is not stored on the main blockchain. Thus, this code allows us to obtain the URI that leads to that information.
Store the Metadata
You can store the metadata as a JSON object or as a file in IPFS, as shown below:
const metadataFile = new Moralis.File("metadata.json", {base64 : btoa(JSON.stringify(metadata))});
  await metadataFile.saveIPFS();
  const metadataURI = metadataFile.ipfs();
  const txt = await mintToken(metadataURI).then(notify)
}
After the creation of the JSON JavaScript object, the file is serialized and then stored in IPFS. With the IPFS storage completed, you are now ready to call the “mintToken” function. This function allows you to fetch the metadata.
Create Mint Function
You are finally ready to create the mint function, which is the last step in the “NFT generate and mint” process. The following code enables it:
async function mintToken(_uri){
  const encodedFunction = web3.eth.abi.encodeFunctionCall({
    name: "mintToken",
    type: "function",
    inputs: [{
      type: 'string',
      name: 'tokenURI'
      }]
  }, [_uri]);

  const transactionParameters = {
    to: nft_contract_address,
    from: ethereum.selectedAddress,
    data: encodedFunction
  };
  const txt = await ethereum.request({
    method: 'eth_sendTransaction',
    params: [transactionParameters]
  });
  return txt
}

async function notify(_txt){
  document.getElementById("resultSpace").innerHTML =
  `<input disabled = "true" id="result" type="text" class="form-control" placeholder="Description" aria-label="URL" aria-describedby="basic-addon1" value="Your NFT was minted in transaction ${_txt}">`;
}
As you can see, this function is designed to create a new object with an encoded function call. The function call is needed to execute the transaction.
Furthermore, the code adds the function to the “transactionParameters” object along with the smart contract address referred to in the first step. Moreover, the latter part of the function sends the transaction to the blockchain. As a result, the blockchain gets back to you with a transaction hash. After all these steps are completed, the confirmed transaction ID is sent to the user.
NFT Generate and Mint – Quick Start
If you need to review the entire tutorial or want a quick start to your “NFT generate and mint” project, you should watch this excellent video. It explains how to generate an NFT using the phenomenal Web3 tools provided by Moralis:
NFT Generate and Mint – How to Generate Non-Fungible Tokens – Summary

The historical “Everydays” NFT by Beeple, which sold for a record-setting price.
Using Moralis’ Web3 platform, we’ve managed to condense the entire “NFT generate and mint” method into a few simple steps. With Moralis, you don’t need to set up your own server to start an NFT project. Simply create a new server using Moralis!
Furthermore, Moralis provides you with more tools to turn your NFT dApps or platforms into incredible experiences. Using Moralis Speedy Nodes enables you to connect to various blockchains of your choice instantly!
If you want to move on to the next part of your journey and learn how to bulk mint NFTs, Moralis provides an excellent way to make the process quicker and less costly. Moreover, Moralis provides everything from a seamless Ethereum API, Ethereum dApp boilerplate, a React dApp boilerplate, educating users on how to create a BSC token, and much more! For example, create a DeFi dashboard or create your first Ethereum dApp. Using Moralis, the ultimate Web3 development platform, it has never been easier to get into the NFT game.
