Decentralization is one of the key aspects of blockchain technology and the entire crypto realm. As such, decentralized finance (DeFi) has been one of the most popular use cases of this disruptive technology. To be able to hold, transfer, trade, lend, borrow, and stake assets without relying on central financial intermediaries such as brokerages, exchanges, or banks is incredible. However, it is important to create platforms with user-friendly dashboards that will attract the masses to this peer-to-peer approach to finance. Therefore, as a developer, you ought to learn how to create a DeFi dashboard.
If you are just starting as a blockchain developer, the task of creating a DeFi dashboard may sound extremely complicated and challenging. However, with the proper tools and expertise at hand, you can easily create a DeFi dashboard in five simple steps. By using Moralis’ ultimate Web3 development platform, you get to build a cross-chain DeFi dashboard with ease. Moreover, Moralis enables you to focus your attention and resources on the frontend, so you can create the best user experience while Moralis takes care of all your backend needs.
In this article, we’ll cover all the necessary information so you can build a cross-chain DeFi dashboard without breaking a sweat. Furthermore, we’ll take on an example project where you can follow along with our steps, which simplifies the process. Thus, make sure to create your free Moralis account now since we will be using Moralis’ excellent platform to show you how to create a DeFi dashboard effortlessly.

How to Create a DeFi Dashboard in 5 Steps Using Moralis
Those who’ve been involved in the crypto industry for some time may recognize and have maybe even used websites such as Zerion and Zapper (see image below). Those are excellent examples of DeFi dashboards since they enable you to view your various asset balances on different blockchains. Moreover, they enable you to send your assets. In addition, they offer many other UI (user interface) options. So, if you’re wondering how to build something similar, you came to the right place.


As we move on, we’ll build a simple DeFi dashboard that will include cross-chain functionality and may serve as a great starting point as you get to sharpen your frontend skills to expand the UI. However, before we take a deep dive into our example project, let’s do an overview of the steps required to build a cross-chain DeFi dashboard with Moralis. We can break things down into these five primary steps:
- Create a Moralis server.
- Build a dApp and connect it to your Moralis server.
- Use an HTML file to provide structure for your dApp (use templates to speed up the process).
- Create a JavaScript file to provide the logic for your dApp (use templates to speed up the process).
- Add Moralis authentication to onboard users to Web3 and seamlessly “import” on-chain data to the Moralis dashboard.
- Query Moralis dashboard to access all the on-chain data.
- Play around with your JavaScript skills to create the best UI using the on-chain data at hand.
Note: Technically, steps 3 – 5 are all a continuation of step 2. However, since they carry great importance and cover blockchain functionality, they deserve to be treated separately. In addition, if we break it down into more manageable tasks, we’ll simplify the process significantly.
Build a Cross-Chain DeFi Dashboard – Example Project
One of the best ways to learn something is by taking action. Therefore, we invite you to create a simple DeFi dashboard with us following the five steps above. However, before we take on each step, let’s look at the dashboard we will create.
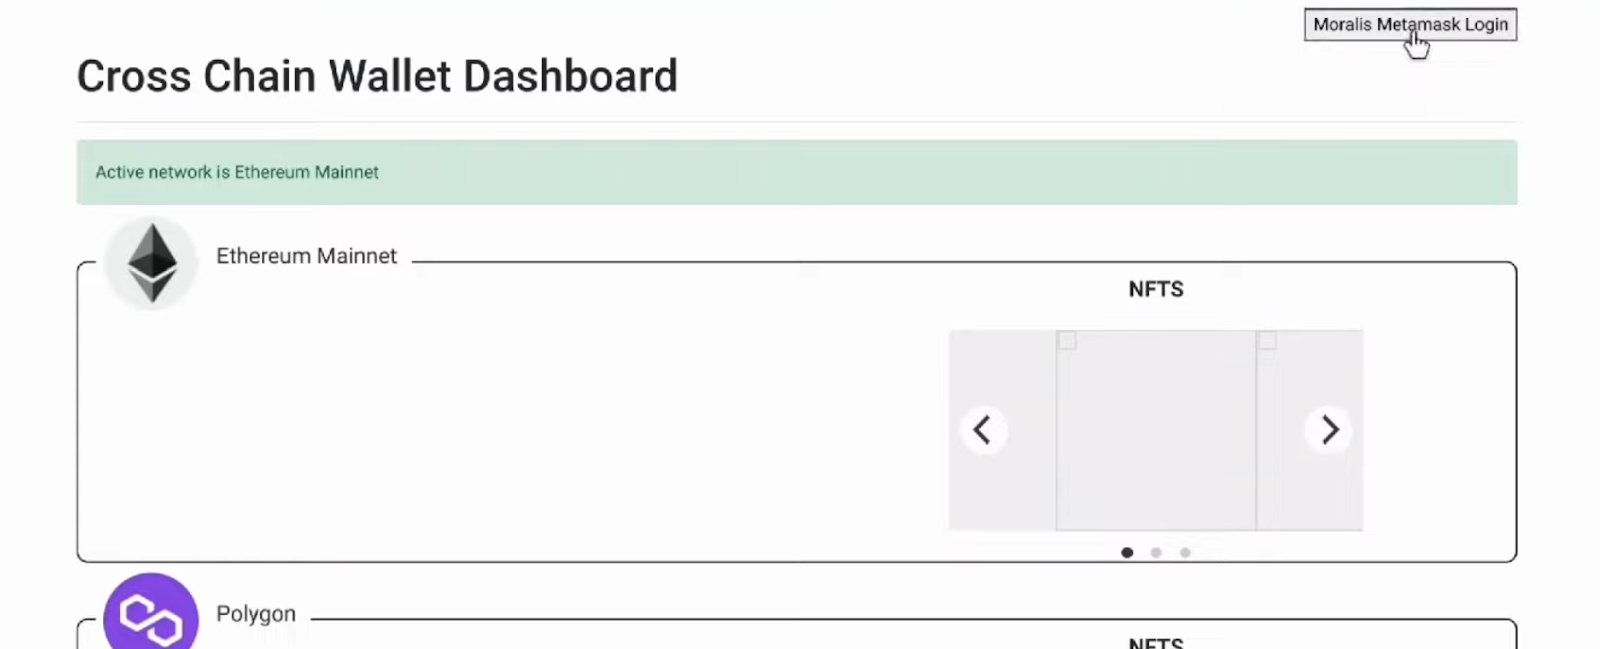

Looking at the first image above, you can see that our example Web3 application only displays the framework because we (in the role of the user) are not logged in (authenticated). However, the “Moralis MetaMask Login” button in the top-right corner enables users to log in using their MetaMask wallet. That is also a great Ethereum authentication option. Moreover, once users log in, our example dashboard will display all assets across multiple chains in a neat manner. The second image shows the balance of coins and tokens displayed on the left and NFTs displayed on the right.
Furthermore, while the above image only shows three blockchains (Ethereum, Polygon, and Binance Smart Chain [BSC]), our example DeFi dashboard also displays assets held on Avalanche’s chain. The chains stated are the blockchains that Moralis currently supports. However, full support for other reputable chains, such as Solana, Fantom, and Elrond, is already in the pipeline.
Now that you know what we’ll build, let’s look closer at the details of those five steps that will show you how to create a DeFi dashboard.
Step 1: How to Create a DeFi Dashboard – Moralis Setup
If you remember the five steps we must complete, you know that we must first create a Moralis server. To complete this task, follow these steps:
- Create Your Moralis Account – If you don’t have a Moralis account yet, make sure to create one now. To do this, click the link above, enter your email address, and create your password. Finally, you’ll need to confirm your email address (you’ll receive an email with a confirmation link). In case you already have an active Moralis account, simply log in.
- Create a New Server – Once inside your Moralis admin area, click the “+ Create a new Server” button in the top-right corner (as shown below). From the drop-down menu that appears, select the kind of network type that best suits your needs (see the image below). When example projects are in question, we recommend starting with the “Testnet Server” option.

To complete this step, enter the required server details. These include server name (it can be anything you want), select region, network, chains (for multichain purposes, click the “Select All Chains” option), and click “Add Instance”.

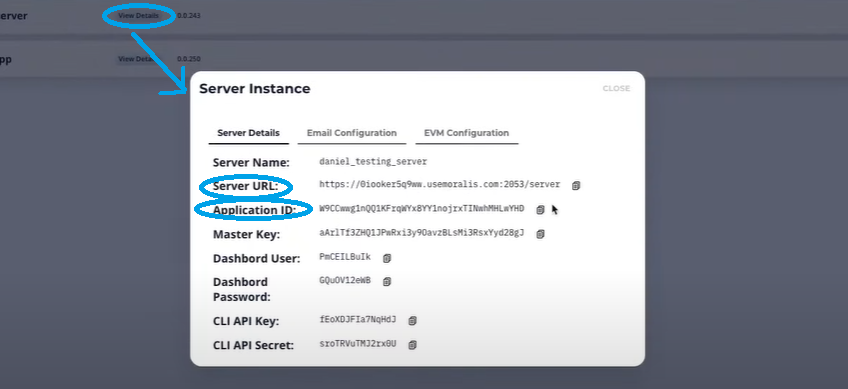
- Access Server Details – Once your server is ready, you can finally obtain the server details by clicking the “View Details” button next to your server name. Next, a pop-up window will appear containing all the information you need to copy (see the image below). In case you’ve used Moralis before, you may use one of your existing servers.
- Initialize Moralis – Now populate your “.js” or “.html” file with the Moralis server details (application ID and server URL) to obtain the required backend functionality:

Note: Make sure to use the details of your particular server and not the ones from the image above.
Step 2: How to Create a DeFi Dashboard – Create a dApp
Now that you have your Moralis server ready, it’s time to create a dApp (decentralized application). For that purpose, we will create two files: an HTML file and a JavaScript file. The “index.html” file contains the code that will take care of the structure of our example DeFi dashboard. On the other hand, the “logic.js” file contains the code that covers all of the logic we need to ensure our DeFi dashboard works properly.
The majority of the code of each file is frontend related; thus, you should not have any issues with it. As such, we will focus on parts of the code that are responsible for covering blockchain-related functionality. Moreover, we made the entire code available at GitHub. That way, you can simply use it as a template.
Note: While we use Visual Studio Code (VSC) to edit our code, you should feel free to use any other code editor of your choice.
Looking at the “index.html” file, we first need to include all packages inside the “<head> </head>” elements. This is the line of code that adds the Moralis package:
<script src="https://unpkg.com/moralis/dist/moralis.js"></script>
Another two lines of code that play a major role are where you add your server’s details obtained in the previous section:
Moralis.initialize("YOUR APP ID HERE");
Moralis.serverURL = "YOUR SERVER URL HERE";
The same goes for the top two lines of the “logic.js” file:
const serverUrl = "YOUR SERVER URL HERE";
const appId = "YOUR APP ID HERE";
While most of the HTML and JavaScript code is there to ensure that the structure of our example DeFi dashboard looks good, there are parts that play a significant role in the backend functionality of our dApp. One of those important aspects is authentication. As such, we cover it in the following step.
Step 3: Build a Cross-Chain DeFi Dashboard – Authenticating Users
With built-in MetaMask authentication, Moralis makes login functionality extremely easy. With a click of a button, followed by MetaMask confirmation, users get authenticated. Moreover, we can write the code in a way to automatically display users’ balances after their login. This is exactly what we will do for our example DeFi dashboard. Here are the lines of code from the “index.html” file covering authentication:
    async function login() {
          let user = Moralis.User.current();
          if (!user) {
            user = await Moralis.Web3.authenticate()
            .then(function (user) {
                console.log("logged in user:", user.get("ethAddress"));
                document.getElementById("num").innerHTML = user.get("ethAddress")
            })
          }
          document.getElementById("btn-logout").style = "display:inline";
          document.getElementById("btn-refresh").style = "display:inline";
          document.getElementById("btn-login").style = "display:none";


          await displayTokens("eth", "ETH", "0xc02aaa39b223fe8d0a0e5c4f27ead9083c756cc2", 18,"EthTokenBalance", "EthBalance", "ethTab");
          await displayNFTS("eth", "EthNFTOwners");

          await displayTokens("polygon", "MATIC", "0x0d500b1d8e8ef31e21c99d1db9a6444d3adf1270", 18,"PolygonTokenBalance", "PolygonBalance", "polygonTab");
          await displayNFTS("polygon", "PolygonNFTOwners");

          await displayTokens("bsc", "BNB", "0xbb4CdB9CBd36B01bD1cBaEBF2De08d9173bc095c", 18,"BscTokenBalance", "BscBalance", "bscTab");
          await displayNFTS("bsc", "BscNFTOwners");

          await displayTokens("avalanche", "AVAX", "0xB31f66AA3C1e785363F0875A1B74E27b85FD66c7", 18,"AvaxTokenBalance", "AvaxBalance", "avaxTab");


        }

        async function logOut() {
            await Moralis.User.logOut();
            location.reload();
        }

        document.getElementById("btn-login").onclick = login;
        document.getElementById("btn-refresh").onclick = login;
        document.getElementById("btn-logout").onclick = logOut;
Of course, we also want to give the users an option to log out. That is what the “logOut” function above covers.
Step 4: Build a Cross-Chain DeFi Dashboard – Query Moralis Dashboard
To access your Moralis server’s dashboard, click the three dots and then “Dashboard” on your server:

In case no users have logged in to your dApp yet, your dashboard will not contain many details:

However, as soon as the first user logs in (using the MetaMask authentication option), your dashboard will get populated with details for all supported chains:

With that, we get full access to live on-chain data for all four chains. This means that we now have details about token balances, NFT balances, and transactions on Avalanche, BSC, Ethereum, and Polygon at our disposal inside our Moralis dashboard.
To make use of this data, we use the “logic.js” file. Inside the code, we have multiple queries. For instance, we use that inside the “displayTokens” and “displayNFTS” functions. Here is a part of the “displayTokens” function:
async function displayTokens(chn, chnSymbol, nativeAdd, nativeDecimals,dbRef, dbRefNative, htmlRef){
    const query = new Moralis.Query(dbRef)
    query.equalTo("address", Moralis.User.current().get("ethAddress"))
    query.notEqualTo("balance", "0");
    const results = await query.find();

    const queryNative = new Moralis.Query(dbRefNative)
    queryNative.equalTo("address", Moralis.User.current().get("ethAddress"))
    const resultsNative = await queryNative.first();
    let nativePrice = {};
    let prices = [];

    if(chn != "avalanche"){
    nativePrice = await Moralis.Web3API.token.getTokenPrice({chain:chn, address: nativeAdd})
    prices = await Promise.all(results.map(async (e) =>
        await Moralis.Web3API.token.getTokenPrice({chain:chn, address: e.get("token_address")})
    ));}else{
    nativePrice = {usdPrice: 1};//set avax price
    prices = [{usdPrice: 1}]; //set avalanche chain token prices
    }
Moreover, here’s the code for the “displayNFTS” function:
async function displayNFTS(chn, dbRef){
    const query = new Moralis.Query(dbRef)
    query.equalTo("owner_of", Moralis.User.current().get("ethAddress"))
    const results = await query.find();

    let images = await Promise.all(results.map(async (e) =>
        await Moralis.Web3API.token.getTokenIdMetadata({ address: e.get("token_address"), token_id: e.get("token_id"), chain: chn })
    ));

    if(chn == "bsc")
        images.forEach((e,i) =>{
            document.getElementById(i+chn).src = JSON.parse(e.metadata).nft.image;
    });else{
        images.forEach((e,i) =>{
            document.getElementById(i+chn).src = JSON.parse(e.metadata).image;
        });
    }
}
Looking at the lines of code above, you can also see Moralis’ Ethereum API and NFT API in action. This makes getting token and NFT balances extremely simple. All it takes are the “Moralis.Web3API.token.getTokenPrice” and “Moralis.Web3API.token.getTokenIdMetadata” snippets of code. Moreover, the greatest thing about this ultimate Web3 API is that it is universal for all supported chains.
Step 5: Build a Cross-Chain DeFi Dashboard – The UI
Now that you know how to create a DeFi dashboard, we encourage you to take our example project to the next level by adding more advanced functionality to it. For instance, you may offer users an option to send their tokens. In the video below, starting at 6:21, one of Moralis’ experts shows you how “transfer functionality” for Ethereum and Avalanche would work. Use his guideline and build the UI around the cross-chain functionality that Moralis provides you with.
Moreover, when it comes to handling transfers in the best way possible, the Moralis database has your back. As you can see in the image below, it automatically creates a new category called “EthBalancePending” when the transaction is executed. That way, you have a way to handle instances where the latest blockchain gets properly dropped. Of course, this feature is available for all other supported chains as well.


As mentioned previously, here is the video:
How to Create a DeFi Dashboard in 5 Steps – Summary
This article is the best place to start if you want to learn how to create a DeFi dashboard. Using the details provided above, you now know how to build a cross-chain DeFi dashboard using the following five steps:
- Create a Moralis server.
- Build a dApp and connect it to your Moralis server.
- Add Moralis authentication.
- Query Moralis dashboard to access all the on-chain data.
- Use your JavaScript skills to add the best UI for additional functionality.
Using Moralis’ SDK to build a cross-chain DeFi dashboard is just one of the many excellent Web3 applications that you can create. With cross-chain interoperability at its core, Moralis enables you to deploy dApps on most of the major blockchains. Moreover, if Ethereum development is your priority, you should check out our Ethereum dApp boilerplate article, which simplifies the process of building Ethereum-based dApps. Furthermore, Moralis also has your back if you decide to create mobile Ethereum dApps.
In addition, keep in mind that Moralis’ YouTube Channel and Moralis’ blog offer a ton of valuable content that covers countless example projects on different blockchains, for everything between Ethereum dApp boilerplate to BEP20 deep-dives. For instance, since NFTs are currently all the rage, you may want to generate NFTs, create an NFT marketplace, or learn to bulk mint NFTs. So, whichever aspect of this world-chaining technology you decide to tackle, Moralis will help you reach the finish line a lot faster, with resources to spare.