Whether you’re a beginner or an experienced blockchain developer, a comprehensive guide for Binance Smart Chain development is paramount to building on BSC.. Moreover, understanding BSC development is a prerequisite to advancing your career within the space. While Ethereum and its ecosystem maintain its position as the leading environment for most dApps (decentralized applications), other blockchains are catching up fast. One chain, in particular, has been very popular – Binance Smart Chain (BSC). BSC’s main advantage over Ethereum is that whereas Ethereum’s gas fees are immensely high, BSC provides lower fees, making BSC more affordable and more attractive to the average user. As such, it makes sense to learn BSC programming and add it to your blockchain development arsenal. Moreover, there’s no better place to start than this article, where we explain Binance Smart Chain Development in just ten minutes!
Before we go further, we’d like to introduce you to Moralis that’ll speed up your Web3 development process. Whether you are creating tokens, NFTs, or dApps, Moralis has you covered. This powerful Web3 development platform enables you to devote your attention to the frontend aspect of your project while it takes care of the heavy lifting on the backend. Moralis supports multiple chains, and BSC is one of them. Thus, we’ll be using Moralis for Binance Smart Chain development in this article. What’s even better is that Moralis is entirely free. Create your account and start developing quickly and easily today!
Starting a BSC Programming Journey
As mentioned, this article is a great resource to start your journey with BSC programming. We’ll begin with the basics and slowly move on to some actual Binance Smart Chain development examples, which will show you that developing can be easy if utilizing Moralis. Moreover, this will serve you exceptionally well when you decide to take the next steps in BSC programming.
While reading this article, we recommend you to take some notes, and most importantly, take action after you finish the article. Now is the time to go full-time crypto, and you already have an edge by letting Moralis guide you through this journey. So, let’s do this!
Introduction to Binance Smart Chain Development
Binance Smart Chain was first created in 2020 and gained huge popularity right away. Of course, as it comes with backing from one of the leading centralized exchanges, Binance, this was not surprising. Nevertheless, what caught the attention of many developers was BSC’s low fees in relation to Ethereum.
The main objectives of BSC were to have markedly quicker throughput and lower fees than Ethereum, but also to make things easy to onboard new developers. Moreover, they decided to be smart about their approach, and instead of building a whole new chain from scratch, they forked the “Go Ethereum” (Geth) protocol. Therefore, BSC shares many similarities with the Ethereum blockchain. This sped up the process, as they only needed to make necessary tweaks to meet their objectives.
The decision to fork Ethereum ensured that existing tools used by developers of that chain would also be applicable to BSC programming. This includes access to the EVM (Ethereum Virtual Machine), the use of programming languages such as Solidity and Vyper, and other tools, such as MetaMask. With that move, all Ethereum developers interested in saving on fees were able to transition without any overhead.
Let’s quickly mention the blockchain trilemma that refers to security, scalability, and decentralization. Unfortunately, it’s not yet possible to have all three aspects covered in a top manner. As such, one of them must always be slightly sacrificed. In the case of BSC, Binance developers decided to focus on security and scalability by sacrificing decentralization. Moreover, they also switched from proof-of-work (PoW, also known as mining) to the proof-of-stake (PoS) authority model, in which native coins are staked to ensure security. The latter proved to be a smart move because now, Ethereum is also getting ready for that same transition.

Learning BSC Programming
Since we believe that the best way to learn any type of programming is by showing real examples as soon as possible, we’ll do exactly that with BSC programming. As mentioned previously, we’ll use Moralis to make this process as simple and as easy as possible. We recommend you to first read the article and then go for a second read, where you try implementing all the steps. That way, you’ll learn the basics of BSC programming better.
In the following subsections, we’ll cover a BSC-based project that will incorporate several of the highly important features, including onboarding, MetaMask authentication, getting user balances of fungible tokens and NFTs, and showing transaction history from users to our BSC dApp. We’ll build all of that from scratch. And while this may sound like a lot, you’ll be surprised that by using Moralis, all of the above is not a cumbersome task. Moreover, we ensured that the following examples are something that even complete beginners can do.
Please note – All of the code used and displayed via images below is accessible on GitHub.
BSC Programming – The HTML Part
HTML is the basic programming language for documents designed to be displayed in web browsers, and it’s also used (in combination with CSS and JavaScript) for Web3 applications. We’ll start with a basic HTML template that contains all the essential parts:

As we proceed, we’ll make some simple changes to the template, starting by adding the title between the <title> and </title> tags. Let’s go with the “My First BSC dApp” title and then move on to the body, where we start adding the code needed for MetaMask authentication. We begin by creating the <main> and </main> tags and then add the following code inside:
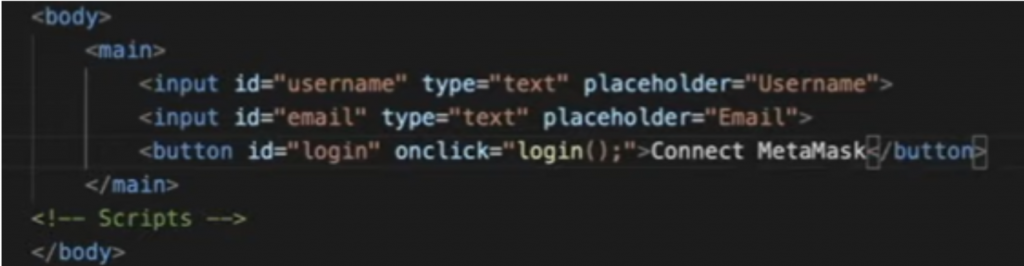
This is quite basic input, and since we want to make it look better, we add an “h1” title, multiple <div> </div> tags, and some styling. To make styling possible, we also add a line of code to import the bootstrap stylesheet. After doing the above, we have a code that looks like this:
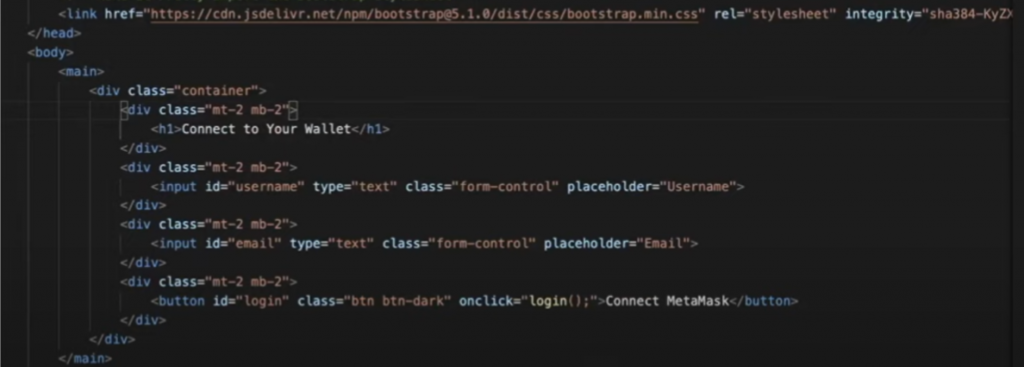
Please keep in mind that these are screenshots and that some lines may not be visible. To access the full code, use the GitHub link provided above.
For the “style” link displayed at the top of the previous image, we also need to add the “script src” line of code shown below.
![]()
BSC Programming – The Logic
With the above HTML code, we have a pretty nice website on our hands. This is the interface that users will interact with. Now it’s time to add logic to our project. For that purpose, we’ll use Moralis and JavaScript.
If you’ve already created your free Moralis account, just log in. Otherwise, head over to moralis.io and sign up. Once we’re logged in, select the “Servers” tab on the left-hand side. Next, click the “+ Create a new Server” button in the top-right corner, then select the “Testnet Server” option from the drop-down menu. A pop-up window will appear, and we need to name the server, select a region, network, and chain type. For the purpose of this article, select the “BSC (Testnet)” chain option. Then click the “Add Instance” button. Keep in mind that it may take a couple of minutes for the server to spin up.
Before we start working on our JavaScript logic.js file, we need to import some additional libraries into our index.html file:

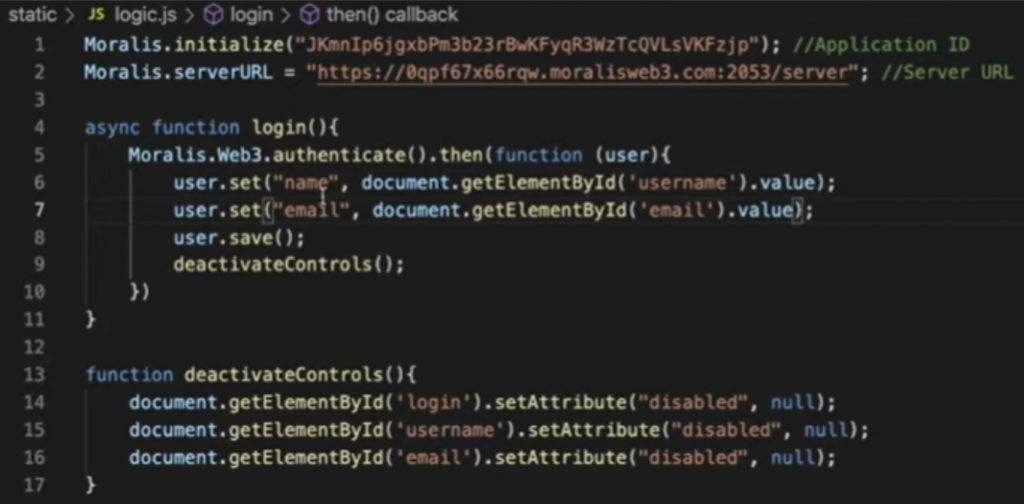
Next, we start typing (or pasting) the code below into our logic.js file. The top part shows the server URL, which we obtain from our Moralis admin panel (where we created our new server) by clicking the “View Details” button next to our “My First BSC dApp” server title. Then we just copy and paste the details. It’s important to note here that you need to use your own server created on Moralis and not use the exact same server details as in the code below:
Login Function
Looking at the code in the image above, you can see that we use a “login” function to capture users’ information, which is then stored in your Moralis database. Moreover, another function is used to deactivate controls after the details have been entered. You can see that Moralis makes it possible to get things done with simple lines of code.
At this point, we’re able to capture users’ details and get them to connect their MetaMask. Moreover, we can access their details in our Moralis dashboard. Moreover, looking at the Moralis dashboard sidebar (see image below), you can see that there are sections we’ll be using to complete our BSC programming example project. These include “BscTokenBalance”, “BscNFTTransfers”, and “BscTransactions”. To make use of these, we have to add a line of code to our index.html and logic.js files to complete the process.
Binance Smart Chain Development – BSC Token and NFT Balance
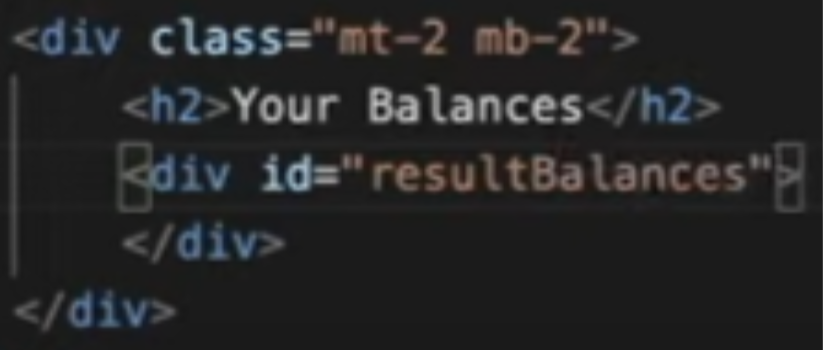
In order to ensure that users can see their balances, we need to update our HTML code. Add the following lines:
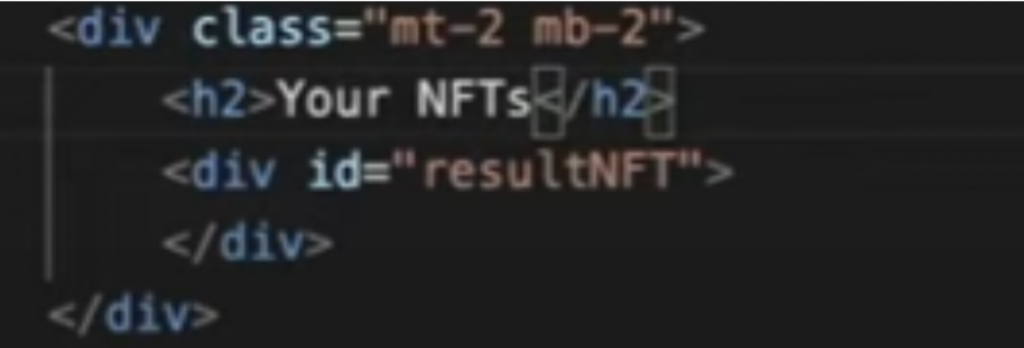
The above code is for token balances, and the code for NFT balances are shown below:
Then we move over to our logic.js file in order to add the lines of code that will create a table to display balances. Furthermore, we add the logic to build the table accordingly and then populate it using Moralis objects. The exact lines of code are the following:
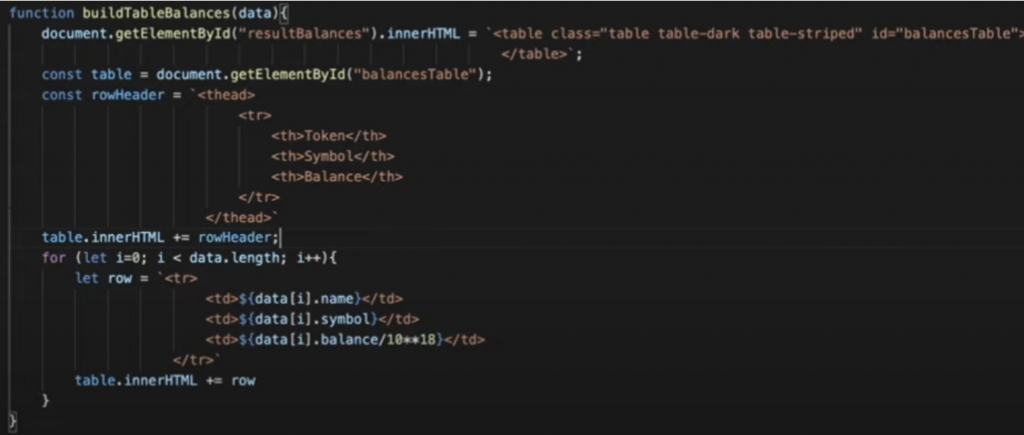
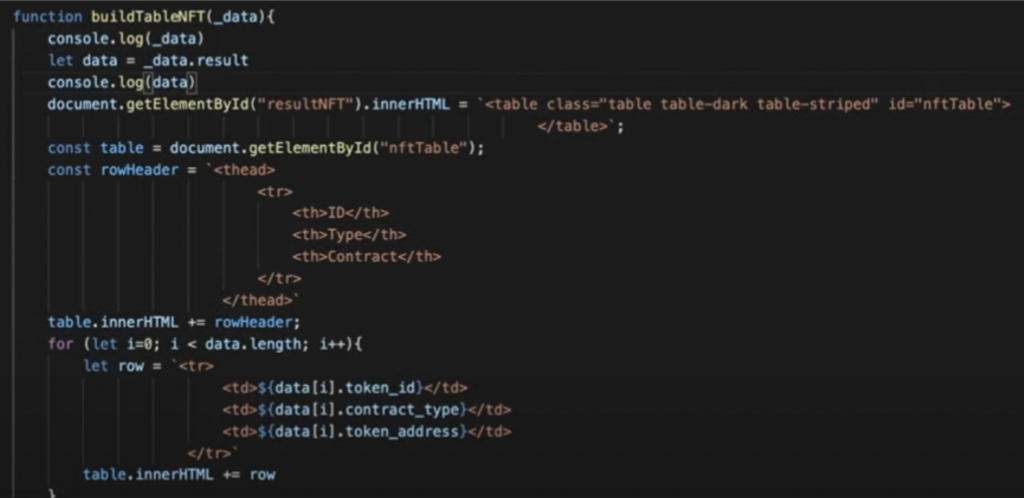
The above lines of code are for token balances. As such, we need to add the code for NFTs as well. Keep in mind that we are not displaying the graphics of the NFTs with our BSC programming example project in order to avoid adding complexity. Here’s the logic code to attaint NFT balances:
Aside from the code above, we need to ensure that table populating is executed as the users click the button on our interface page. We add “populate();” inside the login function and create an additional “populate” function. Again, this is where Moralis makes things extremely simple as it provides us with short snippets of code to use:

Binance Smart Chain Development – Show Transactions
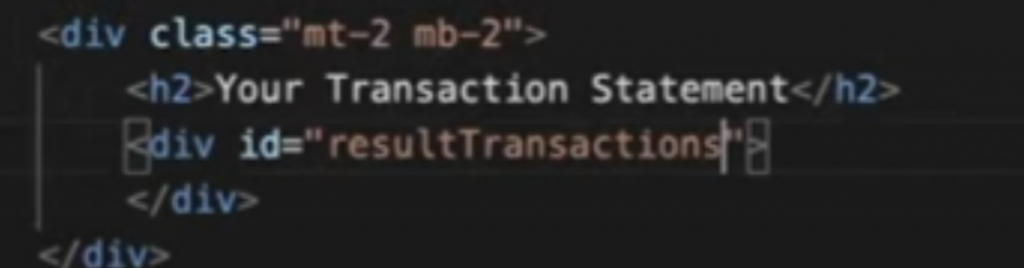
Like we did before, we must add a specific line of code to our index.html file that will ensure that transactions can be displayed. The latter is achieved with the following lines of code:
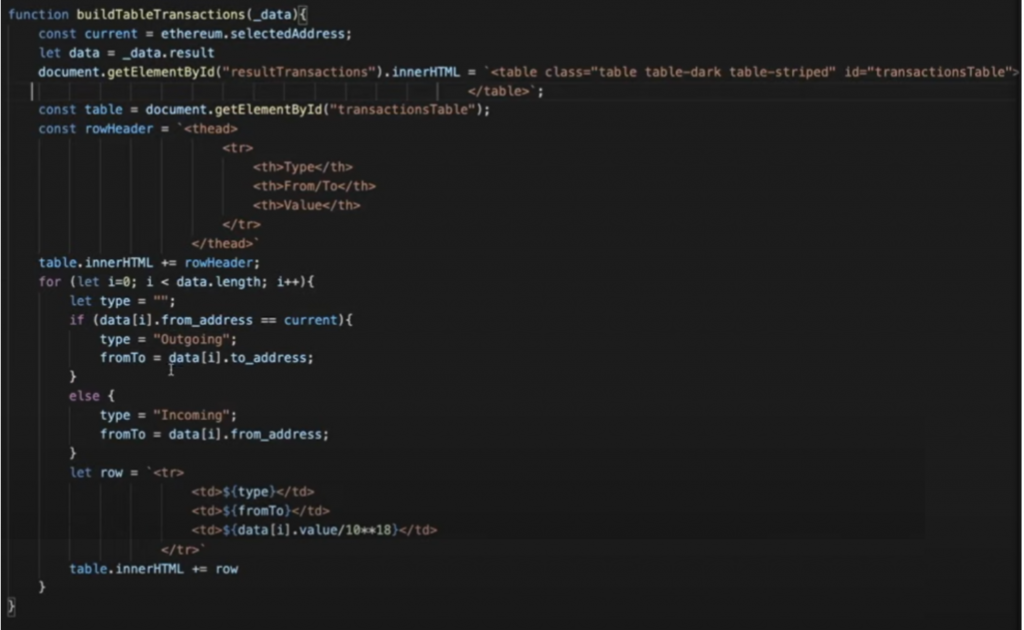
Next, we need to update our logic.js file accordingly. Again, we’ll use another “buildTable” function. Here is the code for transactions:
For the final step, we need to update the “populate” function. Here’s how the code for these functions looks like once we’ve included the line for transactions as well:

Our Binance Smart Chain Development Example Results
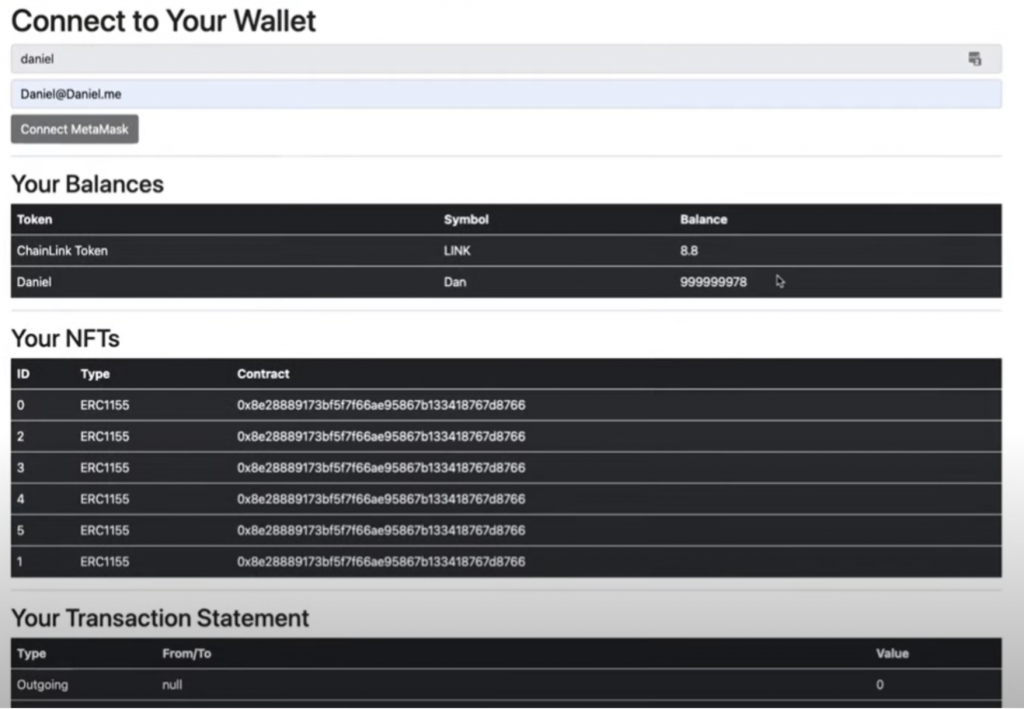
To help you see what we’ve created using the code lines presented in the above sections, let’s look at the results. In the image below, you can see a screenshot of the web browser displaying BSC token and NFT balances, as well as transactions. All of these are based on users clicking the “Connect MetaMask” button after entering their information. Pretty neat, right?
BSC Programming Guide – Intro to Binance Smart Chain Development in 10 Minutes – Summary
Let us first congratulate you on finishing this guide. If you followed all the steps above, you now know how to use the basics of HTML, JavaScript, and Moralis to create a simple yet effective Web3 application. We hope that you’ve paid close attention to details and were able to notice the power of Moralis, which enables us to use very short snippets of code to attain token and NFT balances as well as transactions. In case you’d prefer to follow each of the steps covered above by watching a video, make sure to follow this link.
As mentioned previously, these were simple and basic examples of BSC programming. However, it’s without a doubt a good place to start your journey in Binance Smart Chain development. If you’re interested in expanding your BSC programming skills and widen your horizon, make sure to check out the following articles on our blog: “How to Create a BSC NFT in Less Than 20 Minutes”, “How to Create BSC dApps Quickly”, and “How to Build BSC dApps Easily”.
Moreover, in case you haven’t created your Moralis account yet, we recommend checking out the Moralis documentation. Unlike most documentation available on the web, the Moralis documentation is neat and easy to read and use.
