NFTs, or non-fungible tokens, have taken the world by storm. They are now more popular than ever and have even gained the interest of traditional media. However, this is not strange since some of these tokens have sold for millions of dollars. NFTs provide an ownership representation of a unique item. As such, they have revolutionized the digital art space allowing artists to gain financial support like never before. However, with the increase in popularity, how these tokens are constructed and launched remains unknown to many. Because of this, we’re going to look closer at how you can create a BSC NFT in less than 20 minutes.
Build an NFT on Binance Smart Chain in less than 20 minutes? Does this sound too good to be true? Well, this is possible if we utilize Moralis. We can shorten the development timeframe significantly for all our blockchain projects with the platform from Moralis, such as creating an NFT in a few simple steps. Moralis provides users with a fully managed backend infrastructure which enables a quicker and easier development process. As such, we’ll base the process of how to create a BSC NFT on the Moralis platform.
If you’d rather watch a video explaining the process of how to build an NFT on Binance Smart Chain, we recommend checking out the following video from the Moralis YouTube channel. Here you’ll find an excellent and in-depth tutorial walking you through the complete process:
So, if you’re looking to develop dApps, tokens, or NFTs, we highly recommend signing up with Moralis right away! Joining the platform is completely free, and you’ll get access to all the valuable tools such as the NFT API, Price API, Web3 API, and much more.
How to Create a Binance Smart Chain NFT in Less Than 20 Minutes
If you’re a returning reader here at the Moralis blog, you might have stumbled upon an article explaining how to create your own NFT. As such, you might already be familiar with the power of working with Moralis and its platform. The process of how to build an NFT on Binance Smart Chain is just as simple as if you’d like to do it on any other chain. However, to simplify the process even further, we are in this article going to break it down into four easy steps:
- Create a Moralis server.
- Make a new Moralis class and cloud function.
- Create an NFT minting smart contract.
- Compile and deploy the contract to the BSC blockchain.
![]()
With Moralis, we can accomplish this in a matter of minutes, and the process is quick and easy. Let’s start by taking a closer look at how you can set up your own Moralis server.
Step 1: How to Create a BSC NFT — Create a Moralis Server
Since we’ll be utilizing Moralis in this tutorial, the first step in the process will be to sign up with the Moralis platform, which is also an essential part of setting up your own Moralis server. Furthermore, as a Moralis user, you’ll gain access to all the platform’s tools, which will benefit you significantly as a Web3 developer with any future blockchain projects.
Once you’ve created your account, we can initiate the process of creating our own Moralis server by clicking the ”+ Create a new Server” button at the top right of the Moralis interface. This will provide you with a small drop-down menu with three different alternatives. For this tutorial, we’ll choose the ”Testnet Server” option as we’re going to deploy the contract to the BSC testnet.
However, if either of the alternatives are chosen, you’ll be provided with a new window where you need to input a name, select a region, and select network(s). The Moralis platform supports cross-chain compatibility, which allows us to choose multiple networks. However, since we’re creating a BSC NFT, you should select BSC as one of the alternatives.
Once we are done with our choices, you can simply hit the ”Add Instance” button, which will spin up the server. Initiating the server might take a while. However, you don’t have to worry; the instance will be up and running shortly.
Step 2: How to Create a BSC NFT — Create a New Moralis Class and Cloud Function
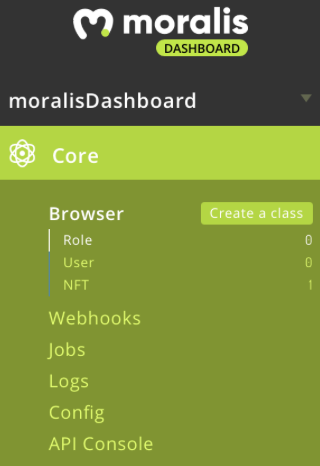
Now that we’ve gotten a Moralis server going, we can go ahead and navigate ourselves to the dashboard. We can locate the dashboard by clicking the three dots on our server, followed by clicking the ”Dashboard” button.
With the dashboard launched, we can create a new class by clicking the ”Create a class” button just beside the ”Browser” tab on the left side of the dashboard. Here we can simply create a new custom class that we will call ”NFT”.
With the class at hand, we can add a few columns. These columns will represent all the information regarding the NFT. For example, we can add one for the NFT ID, one for an image, another for a description, etc.
Once we have the columns, we can add a new row and fill in all the blank columns. If we want to add another NFT, we can simply add a new row making it easy for us to create multiple tokens. Each row will therefore be its own NFT object in our Moralis database.
With our newly created NFT object, we need a way to get a JSON link to this specific object, which we will need when creating our smart contract. To do this, we need to acquire a link which we can do by creating a Moralis cloud function.
Creating the Cloud Function
Creating a cloud function with Moralis is easy. To get going, we need to navigate ourselves back to the Moralis ”Servers” tab. Then we need to, once again, click the three dots on our server and select ”Cloud Functions” instead of ”Dashboard”.
When we click this button, a smaller window will appear where we can input the code for our function. The code in this example looks like the following:
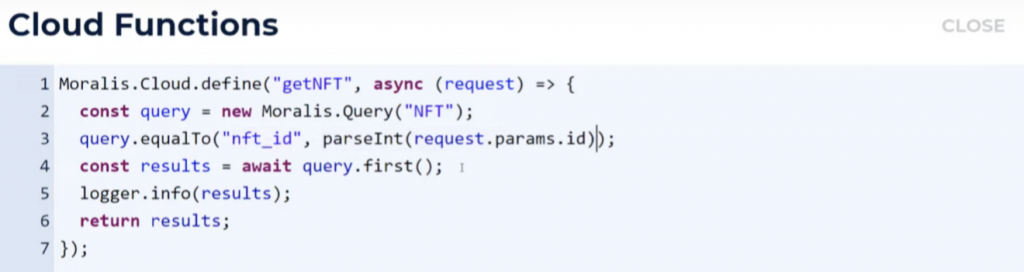
We’ve decided to call our cloud function ”getNFT”, and it’s specified as an async function. This function first selects the “NFT” class that we created in the previous step. Once we’ve chosen the class, the third function line finds the row where the ”nft_id” is equal to the parameter sent into the function.
After this, the function runs the query and logs the result to Moralis. The last line of the function returns the result variable, which is delivered in JSON format in our browser through a link. Now, all that remains is to call the cloud function in our browser.
Calling the Cloud Function
To call the function, we need two things: the “Server URL” and the “Application ID”. We can acquire these two elements by clicking the ”View Details” button on our server. With both the URL and the ID at hand, we can combine these two elements with additional parameters to create the link for calling the function.
![]()
The link will be our URI in a later step and should look something like this:
”’Your Server URL’/functions/getNFT?_Application=’Your App ID’&id=0”
As you can see, we start with the server URL followed by ”/functions/getNFT”, which is the name of the cloud function we just created. This is then followed by ”?_Application=” and the application ID. Finally, we also add the parameter ID, which is equal to 0 in this instance. As such, the function will fetch the information regarding the NFT object with the ID = 0.
Inputting this link into our browser will provide us with all the information regarding the NFT object in JSON format. As such, we can view all the information and find a URL for the token’s image if it exists.
So, with a server up and running along with the cloud function for fetching the data of our NFT object, we can move on and create the smart contract used to mint the tokens.
Step 3: How to Create a BSC NFT — Create an NFT Minting Smart Contract
Now it’s time to create the smart contract that we’ll use to mint our NFT. We’re going to develop the contract in the IDE (Integrated Development Environment) Remix. Remix is an IDE well-suited for smart contract development, and it makes it relatively easy to compile and deploy our contracts. So, the first thing we’re going to do is open up the Remix web application. If you want to learn more about creating smart contracts, Moralis offers a great guide on how to create smart contracts.
Once we have the application up and running, we can initiate the process by right-clicking the ”Contracts” folder to the left of the interface, and we can then create a new contract file. With a new file, we can go ahead and start coding the contract.
Implement the Pragma Line
The first thing we need to implement is a pragma line. This will determine which version of Solidity is to be used when compiling the smart contract. This is quite easy, and all that we need to do is implement the following line into our code:

Import the ERC-1155 OpenZeppelin Template
Since we’ll be creating an ERC-1155 token, we need to import an OpenZeppelin Solidity template. This will make the process a whole lot easier as we can use the already existing contract template. The contract we are about to implement is versatile and can be used to create fungible and non-fungible tokens. To import this template, all we need to do is implement the following URL as a string into our code:
This is the GitHub repository link for the ERC-1155 token Solidity template, and the import line looks like this when complete:
![]()
Creating the Contract
Now that we have established a pragma line and imported the ERC-1155 token template, we can go ahead and start defining the contract itself. We are going to call our contract ”NFT”, and in its entirety, the smart contract will look something like this:
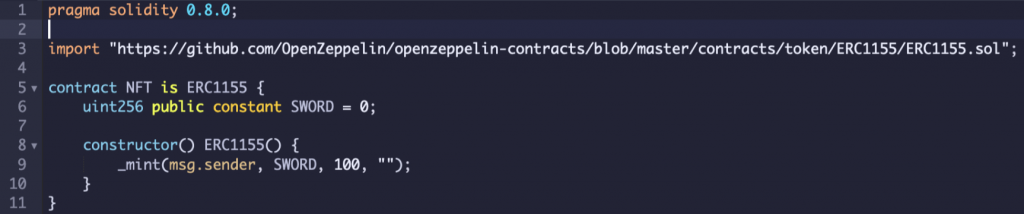
The first thing we need to do now is to create the contract and name it ”NFT”. After this, we also determine that the contract inherits from the ERC-1155 contract that we imported earlier. The first line within the curly braces defines the NFT that we’re going to mint when we deploy the contract. This is done by specifying the IDs of the token(s) that we want to create. Furthermore, we’re putting an “alias” to this so it can be more easily understood, and we do this by creating a constant integer with a name. As you can see from the code, we are naming this integer ”SWORD” and setting the ID to 0.
Once we’ve specified the ID, we create the constructor for minting the NFT, which is followed by another constructor of the OpenZeppelin contract from which our smart contract inherits. The second constructor of the code takes an argument in the form of a URI, which we’ll implement later.
Within the curly braces of our constructor, we call the ”_mint” function. This function takes a few arguments. The first defines who will get the NFT, and here we opted for ”msg.sender”, which means that the token(s) are given to the address from which they are deployed. The second argument is the ID of the NFT, and in this case, it will be ”SWORD” that we earlier tied to ID 0. Furthermore, after the ID, we can select how many NFTs we want to mint.
ERC1155 Argument
Now, only one thing remains; the argument for the ”ERC1155()” constructor. Within the parenthesis, we need to implement the token URI, which is the link we created earlier through the cloud function. This URI is a link that’s embedded into the NFT we are about to mint. However, in this case, we’re going to change the link slightly to look like this:
”’Your Server URL’/functions/getNFT?_Application=’Your App ID’&id={id}”
The difference is the {id} at the end, which is a placeholder for the ID. As such, it’s up to the deployer of the contract to specify which ID is going to get minted. By doing this, we can create more than one type of an NFT with the same contract. So, to finalize the code, all we need to do is implement this URI into the second constructor.

Now that we’re done creating our own NFT minting smart contract, all that remains is to compile and upload the contract to the blockchain.
Step 4 — Compile and Deploy the Smart Contract to the BSC Blockchain
Compiling our contract with Remix is really simple. All we need to do is click the ”Solidity Compiler” tab in the navigation bar to the left and press the ”Compile” button for the selected contract. Once we’ve compiled the contract, we can move on to deploying the contract.
![]()
However, before deploying the contract, we must first change our MetaMask network to the BSC Testnet. This blockchain won’t be among the MetaMask networks by default which means that we need to add it. To add the network, we can use Moralis Speedy Nodes.
In the Moralis interface, navigate to the ”Speedy Nodes” tab, click the ”Endpoints” button for BSC, and click the ”Add to MetaMask” button next to the URL of “Testnet”. This will automatically add the network to MetaMask, and all that remains is to select the network. To do this, click the ”Networks” tab in the MetaMask interface and select BSC Testnet.
Furthermore, we also need to add some BNB tokens to our account so that we have sufficient funds to deploy the contract. All you need to do is find a BSC faucet and input your wallet address.
With the correct network, we can go back to Remix and press the ”Deploy” tab just below the ”Solidity Compiler” tab. Here we need to specify the environment, which we’ll set to ”Injected Web3”. This will automatically choose the current network of your MetaMask account. Now, all that remains is to select the contract and hit the ”Deploy” button.
Congratulations, you have successfully completed the process of creating an NFT on Binance Smart Chain. Furthermore, what’s even more convenient is that the complete process can be used for any other EVM (Ethereum Virtual Machine) compatible chain as well!
How to Create a BSC NFT — Summary
The process of how to create a BSC NFT is easy with the right tools. With Moralis, we can build an NFT on Binance Smart Chain in less than 20 minutes which showcases the convenience of working with Moralis. Furthermore, not only can we build NFTs, but dApps and other tokens as well. If you’re interested, the Moralis blog features articles such as: “How to Create Your Own ERC-20 Token in 10 Minutes” and “How to Create BSC dApps Quickly”.
Moreover, the process of how to create a BSC NFT can be broken down into four different steps:
- Create a Moralis server.
- Make a new Moralis class and cloud function.
- Create an NFT minting smart contract.
- Compile and deploy the contract to the BSC blockchain.
Using tools such as Moralis Speedy Nodes, the development process of how to build an NFT on Binance Smart Chain becomes quite easy, and we can deploy the contract in a quick and easy way. One of the many reasons for this is that the platform provides a fully managed backend infrastructure for all users. Furthermore, Moralis also offers other great tools such as native support for MetaMask and IPFS.
So, if you want to develop NFTs, fungible tokens, or dApps, we suggest that you sign up with Moralis today! Signing up with Moralis is entirely free, and you can become an NFT developer in a matter of minutes.
