NFTs, or non-fungible tokens, have exploded in popularity recently. Moreover, NFTs have gained traction even outside the crypto realm, with the concept of NFTs increasingly entering the mainstream. Everything from art and music to memes is becoming digital assets, selling for large, and in some cases, an absurd amount of money. Using Moralis, you can even create your own NFT in five steps! This article will cover exactly what an NFT is, and how you can create one. These questions will be answered throughout this article, and we’ll show how you can create your own NFT in just five simple steps.
NFT and Web3 development might seem overly cumbersome, and has traditionally also been complicated. The reason for this is that the Web3 development domain has been incomplete as the industry has been lacking some fundamental development tools. This is no longer the case as we see new platforms and solutions developed every day. However, the premier Web3 development tool is Moralis. Moralis is the number one middleware for Web3 development, and the platform provides users with a fully managed backend infrastructure. Furthermore, Moralis also features powerful tools such as the Moralis NFT API, Price API, and Moralis Speedy Nodes.
If you are a returning reader here at Moralis, you might have stumbled upon other articles such as: “How to Create Your Own ERC-20 Token in 10 Minutes” and “How to Create a BSC Token in 5 Steps”. However, in this article, we’ll explore how easy it is to create your own NFT with Moralis. So, signing up with Moralis is an excellent way to begin your Web3 and NFT development journey. You can join for free and utilize the platform’s tools immediately!
What are NFTs (Non-Fungible Tokens)?
You’ve probably figured out by now, considering the heading of this section, that the three letters in ”NFT” are an abbreviation for “Non-Fungible Tokens”. A great place to start in order to understand what they are is to analyze the words.

The word ”non-fungible” is an economic term to describe items and goods that have unique properties. For example, common goods that are non-fungible in the blockchain industry could be original songs or a unique trading card. These are items that aren’t interchangeable as they have special properties. As such, NFTs are tokens defined by their properties and not their value.
NFTs can represent virtually anything from art to memes, and as they are non-fungible, they are entirely unique. To make this a bit clearer, we can compare an NFT with a fungible token. Some examples of fungible tokens are Bitcoins or any token using the ERC-20 standard. As such, it is possible to exchange one Bitcoin for another, and they have precisely the same properties and value.
From a traditional perspective, it has been hard to ensure scarcity and uniqueness when it comes to digital assets. However, with Web3 and blockchain technology, it’s possible to keep them distinctive. Furthermore, with blockchain, it’s also possible to ensure that only one owner of an NFT exists and supply the proof of ownership.
How to Create Your Own NFT in 5 Steps
To create an NFT, we’ll first build a dApp (decentralized application). The dApp we build will allow anyone to create their own NFT with a few simple clicks. Furthermore, the dApp will allow users to create a profile by simply inputting a name and email address. However, to add the profile, the application requires that the user authenticates with MetaMask. When the user has an account and is authenticated, they can begin to create their own NFT.
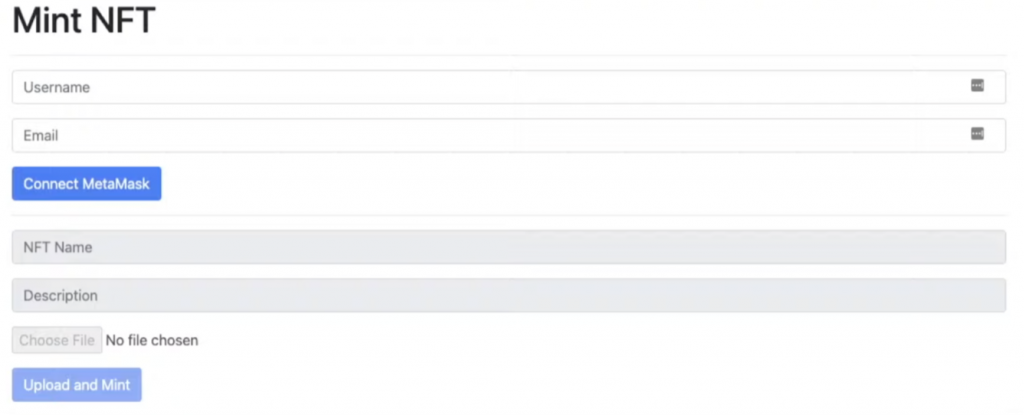
To create the NFT, users need to input a name, description and choose a file. Once they are done with their choices, all that remains is to press the ”Upload and Mint” button. This will trigger an upload function behind the scenes, which will mint and upload the NFT to the blockchain. In our case, we’ll use the Ropsten Testnet, but the same principles apply to most other blockchains.
Furthermore, once the NFT is finalized and uploaded, the dApp returns the transaction ID to the user. To view their NFT, all they need to do is log in to OpenSea to find their NFT added to their wallet. This is how the interface of the application looks:
So, how does one create such a dApp? This process can be quite onerous; however, with Moralis, many functions and neat tools are available at our fingertips that’ll make this process quick and easy. All we’ll need are about 70 lines of code.
We can accomplish this by following these five steps:
- Initialize Moralis and find a smart contract.
- Create an HTML index file.
- Make a simple login function.
- Create an upload function.
- Build a mint function.
To simplify it even further, we’ll take you along as we look closer at each step.
Step 1: How to Create Your Own NFT — Initialize Moralis and Find the Smart Contract
The first thing we need to do is initialize Moralis. To do so, we need a Moralis server which you can set up by logging in to the platform at moralis.io and clicking the ”+Create a new App” button at the top right of the interface. Select the “Testnet Server” option. Now you have to input a name, select a region and choose the Ropsten Testnet. Once completed, you need to find the “Application ID” and “Server URL” by clicking your server’s “View Details” button.
With this information at hand, we can initialize Moralis in the following way:

To enable our NFT minting dApp to function, we need a smart contract. However, in this article, we’re not going to focus on creating smart contracts. However, we’ve decided to provide you with an already developed smart contract for you to simply implement into your code. To accomplish this, you need to input the following:

If you want to take a closer look at the smart contract itself, then it’s available in the GitHub repository. Furthermore, if you want to learn more about smart contracts in general, we recommend checking out the following article from the Moralis blog explaining how to create smart contracts.
Step 2: How to Create Your Own NFT — Create an HTML Index File
Once we have initialized Moralis and implemented the smart contract into our code, we can go ahead and create an HTML index file. This file contains the code for all the fields and buttons of our webpage. An example of this would be to create an interaction button that allows users to log in with MetaMask. Furthermore, we also need to add the fields for inputting a username, email address, etc.
However, listing the entire code and all the buttons here would be unnecessary. Instead, we recommend that you take a closer look at the complete file from GitHub, which will give you a better understanding of the code. However, here is a short sample for you to look at immediately:
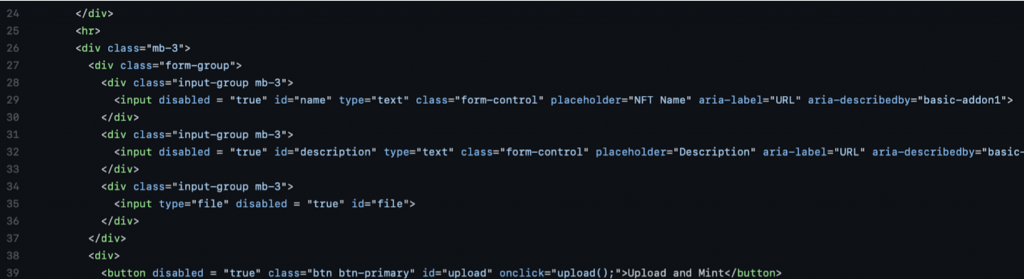
An honorable mention here is the last line of code in the image above, as it is essential for the functionality of the dApp. As you can see, the ”Upload and Mint” button triggers the ”upload()” function, which executes the logic for minting and uploading the NFT to the blockchain.
With an HTML index file complete, we can move on to take a closer look at the logic of this application to discover more about how the platform actually works.
Step 3: How to Create Your Own NFT — Login Function
For the third step in our process, we can move back to the JavaScript file where we initialized Moralis and implemented the smart contract. Here, we’ll create a function to enable our users to log in and authenticate themselves. This is a simple function that is triggered by someone clicking the “Connect MetaMask” button. Once the function is complete, it’ll look like this:
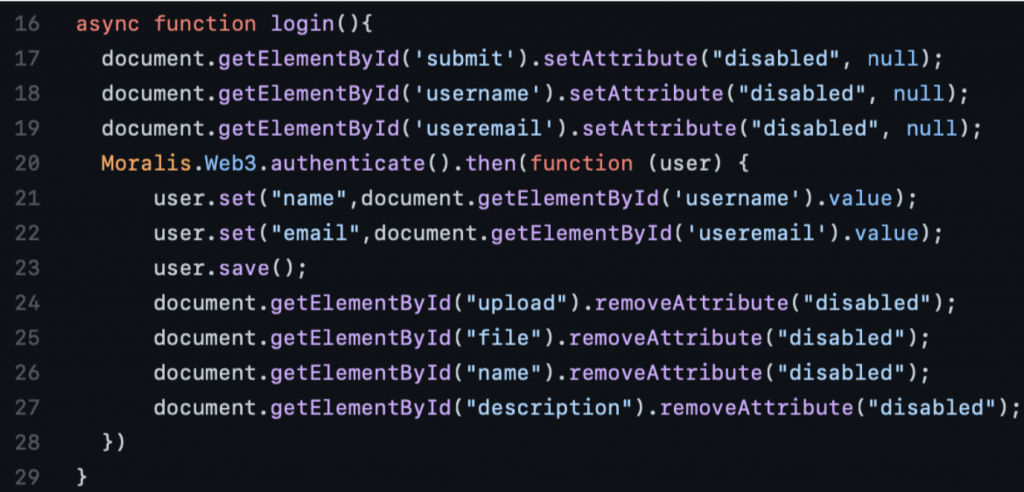
Before clicking the button in the dApp interface, users would have inputted a username and an email. As shown in the code, these two fields, along with the button itself, are disabled once the function is called. This ensures that the users can’t change the username and the email or press the button once more.
Once the fields and buttons are disabled, there is an authentication function that is triggered. This enables users to identify themselves through MetaMask, which is a function enabled by default in Moralis. When the users are authenticated, the function fetches both the name and the user to add a new user profile which is saved to the Moralis database.
Lastly, the login function also removes the ”disabled” attribute from the other elements of the page, allowing users to interact and make their own NFT.
Step 4: How to Create Your Own NFT — Upload Function
Next up, we have the upload function that we need to create. This is the function we mentioned previously, which is called when hitting the ”Upload and Mint” button of the dApp. In its entirety, the function will look like this:
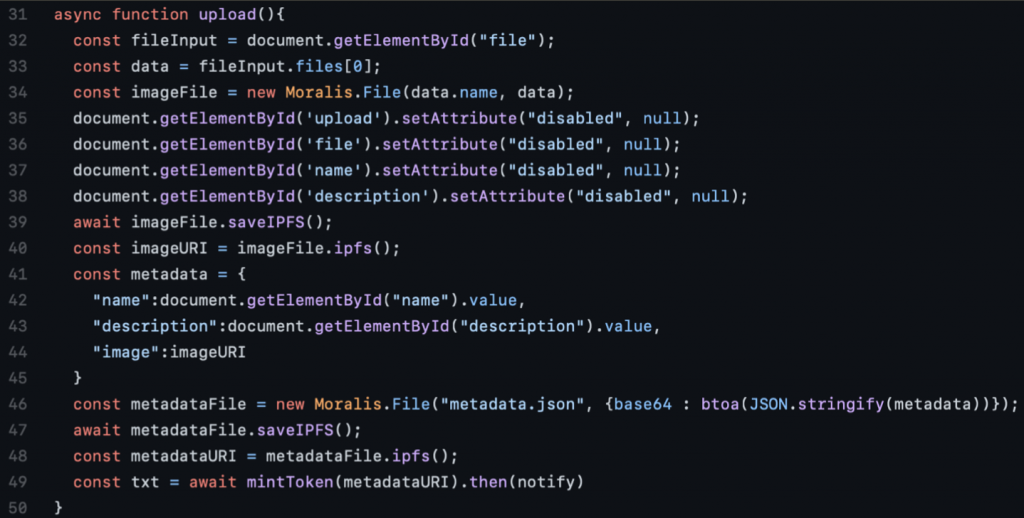
The first part of the function connects the file that the users upload and captures it in an array. For this reason, we must also refer to the first element in this array which is done with the second line of code. Finally, the third line creates a new Moralis file object necessary to execute the rest of the function.
As soon as the file is created, the user has no further need to interact with the buttons and fields on the webpage, so they are disabled through the code.
Save with IPFS
Now that the function has created a Moralis object of the file, it is possible to save it with IPFS (InterPlanetary File System). To save the file, all we need to do is use the following command, which is part of the function above:

This demonstrates the power of Moralis since only one line of code is necessary to upload a file to IPFS. If you weren’t using Moralis, uploading a file to IPFS would have been quite troublesome and a much more time-consuming process.
Once a file is saved to IPFS, Moralis will provide us with the hash and the URI address (comparable to a URL) of the file. As such, it’s possible to fetch both of these with two simple Moralis commands. In the example above, below the line for uploading to IPFS, we fetched the file’s URI.
With the URI of the file, we can create a metadata file containing the name, description, and URI, which refers to the file the users upload. With this metadata file, we can create a new Moralis object file to store in IPFS. However, in this case, we’ll save the object as a JSON file. Once it’s stored as a JSON file to IPFS, we can fetch the metadata URI and then use this when we call the ”mintToken” function.
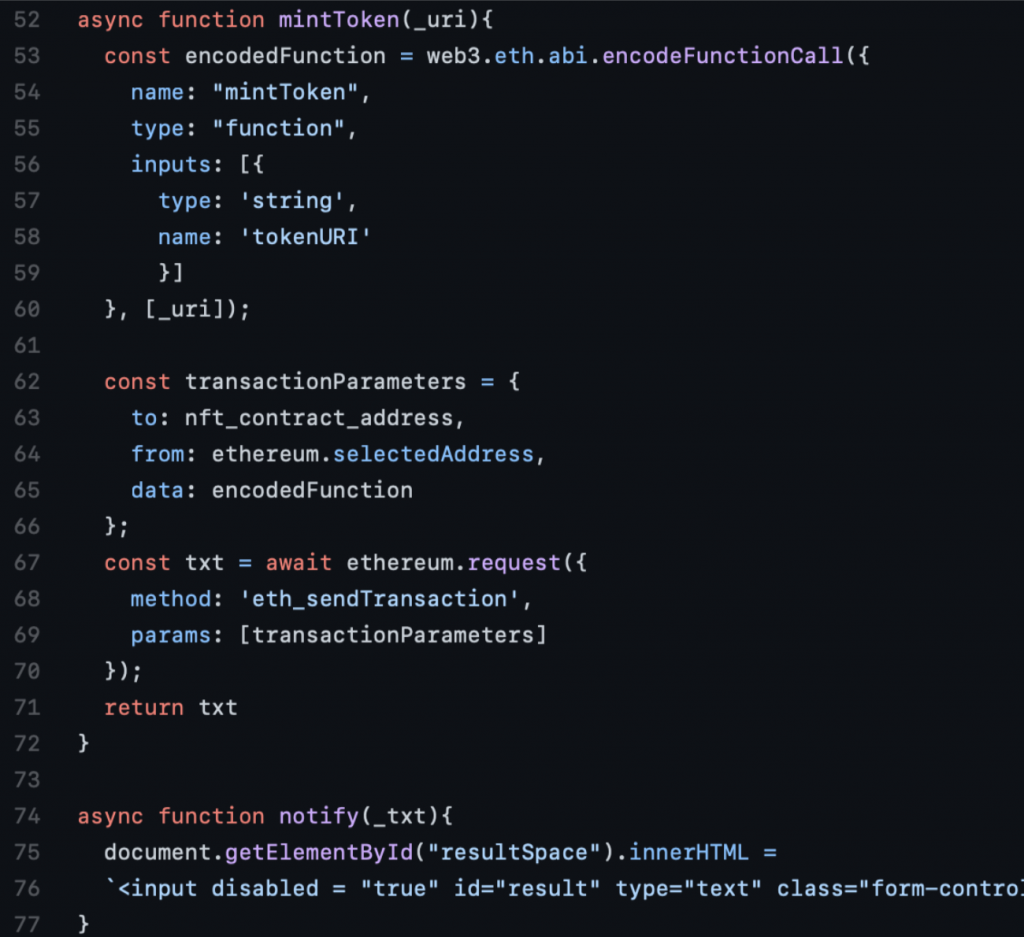
Step 5: How to Create Your Own NFT — Mint Function
The final step in creating our NFT minting dApp is to create the mint function itself. The first thing this function does is create a new object containing an encoded function call. The reason for doing so is because it’s necessary to include such a function call when we execute the transaction to the smart contract.
Once the encoded function is established, it’ll be added to the ”transactionParameters” object along with the address for the smart contract that we added in the first step.
The final part of the function sends the transaction to the blockchain, which will return a transaction hash. Furthermore, the transaction ID that confirms that the NFT has been printed is returned to the user. The complete function looks something like this:
So, by following these five simple steps, we have been able to create a dApp that can be used to create your own NFT in just a couple of seconds. However, please be aware that every time the application is used to mint an NFT, we’ll be charged a small fee to complete the transaction.
If you still have questions regarding this tutorial, we recommend checking out the following video from the Moralis YouTube channel explaining the process in further detail:
How to Create Your Own NFT — Summary
NFTs are more popular than ever, and mainstream media is taking an interest. This is not strange since some of these tokens have sold for millions of dollars. However, even with the increase in popularity, it’s still unknown to many how these NFTs are made. Furthermore, developing an NFT has been quite the hassle from a traditional perspective, but this is no longer the case.
With Moralis, the process of how to create your own NFT is extremely simple, and we can create a straightforward NFT minting dApp in just a matter of minutes. The process consists of five steps:
- Initialize Moralis and find a smart contract.
- Create an HTML index file.
- Make a login function.
- Create an upload function.
- Build your mint function.
By following these five steps, we can create a dApp to mint our own NFTs on command. The users need to authenticate themselves with MetaMask and input a name, description, and file. Once they’re done, all that remains is to upload and mint the NFT, which then can be viewed on OpenSea.
However, creating an NFT printing dApp is just one of the many use cases of Moralis. For example, if you are looking to develop other dApps, we highly recommend checking out these two articles: “How to Create Ethereum dApps” and “How to Build Polygon dApps Easily”.
Moreover, now that you know how to create your own NFTs, you might want to know how to utilize them. A great example of this is showcased in the following article regarding “NFT game development. So, it doesn’t matter if you are looking to develop NFTs, fungible tokens, or dApps. The quickest and easiest way to do so is by joining Moralis today!
