It’s impossible to talk about distributed file systems without talking about IPFS. Specifically, IPFS and its decentralized protocol allows developers to overcome obstacles and issues relating to centralization. Furthermore, to ensure complete decentralization, all files, data, and applications need to be stored in a decentralized manner, which is where IPFS’ solution has secured its position as the preferred option. When using the proper tools, developers can easily upload to IPFS and utilize its storage solution. Moreover, as projects require vast amounts of data to be stored, uploading folders to IPFS can be hugely beneficial. As such, in this article, we’ll look closer at the process of uploading folders to IPFS, and we’ll show how to upload folders to IPFS with Moralis.
Moralis is the ultimate Web3 development platform, offering native support for IPFS. Of course, it enables you to save files and objects; however, you do not want to deal with each data file individually. For such occasions, being able to perform a bulk upload is extremely useful. This means that you can create a folder containing all the files you want to store in a decentralized manner and then upload that folder to IPFS. As such, we’re going to show you how to accomplish this in the following section. Moreover, the best part is that we’ll be able to use short and simple code to get this done, thanks to Moralis’ SDK.
What is IPFS?
If this is your first time hearing about IPFS, please allow us to get you up to speed. IPFS stands for “InterPlanetary File System” and is a reliable decentralized storing solution that began its development back in 2015. The company behind IPFS is Protocol Labs, which started with a small team of developers, and is now one of the most significant protocols for storing content. The latter includes data, websites, files, and applications. Moreover, besides storing all sorts of information, IPFS also offers a way to access this data in a decentralized manner. Instead of using address-based file retrieving, it provides a content-based addressing solution. This means that by using the IPFS protocol, we can overcome censorship and the single-point of failure limitation of centralized file storing solutions.

Why Upload Folders to IPFS?
As mentioned in the beginning, many projects today require larger amounts of data and a great number of files to be stored. For those situations, uploading every file individually to IPFS would be extremely time-consuming. Fortunately, you can upload folders to IPFS without breaking a sweat, especially when using Moralis and its platform. Furthermore, when using Moralis, you’ll save a lot of time and resources. Moreover, with some simple JavaScript coding, you get to automate the process.
In case you only need to upload a couple of files, then learn how to upload files to IPFS, which we’ve covered in detail in one of our past articles.
Upload Folders to IPFS with Moralis
As mentioned, we’ll devote our attention to showing you how easy it can be to upload folders to IPFS. Moreover, to make things more interesting, we’ll take on an example project, where we will upload a folder with images and then mint NFTs in bulk. So, not only will you learn how to upload folders to IPFS, but you’ll also be able to use this information as a guide to create NFTs. Moreover, if you intend to make ERC-1155 NFTs, then this tutorial will be particularly useful since ERC-1155 NFTs require a unified URL structure. This can easily be achieved when you learn to upload folders to IPFS.
Furthermore, we’ll use Moralis and its powerful Web3 API to make the process as simple as possible. In case you don’t have a Moralis account yet, make sure to register one for free now. That way, you’ll be able to follow along every step of the way. Moreover, you’ll also see how Moralis solves otherwise tedious backend coding with single lines of code.

Upload Folders to IPFS – An Example Project
Let’s start our “upload folders to IPFS” quest with a folder of one hundred images. Our goal will be to upload the images and the NFTs metadata to IPFS. As a result, we will have access to an array full of files’ IPFS (due to the bulk upload, they’ll have the same hash), name, and description:

Note: In order to follow along, you’ll need a bunch of images. We’ll use one hundred PNGs, but you can get things done with fewer files. Of course, you could also deploy “.json” files without the images; however, since our example focuses on NFTs, it makes sense to include images as well.
For the purpose of code editing, we’ll be using Visual Studio Code (VSC). However, feel free to use any other code editor. As you can see in the image below, we’ll start with a folder containing one hundred image files:
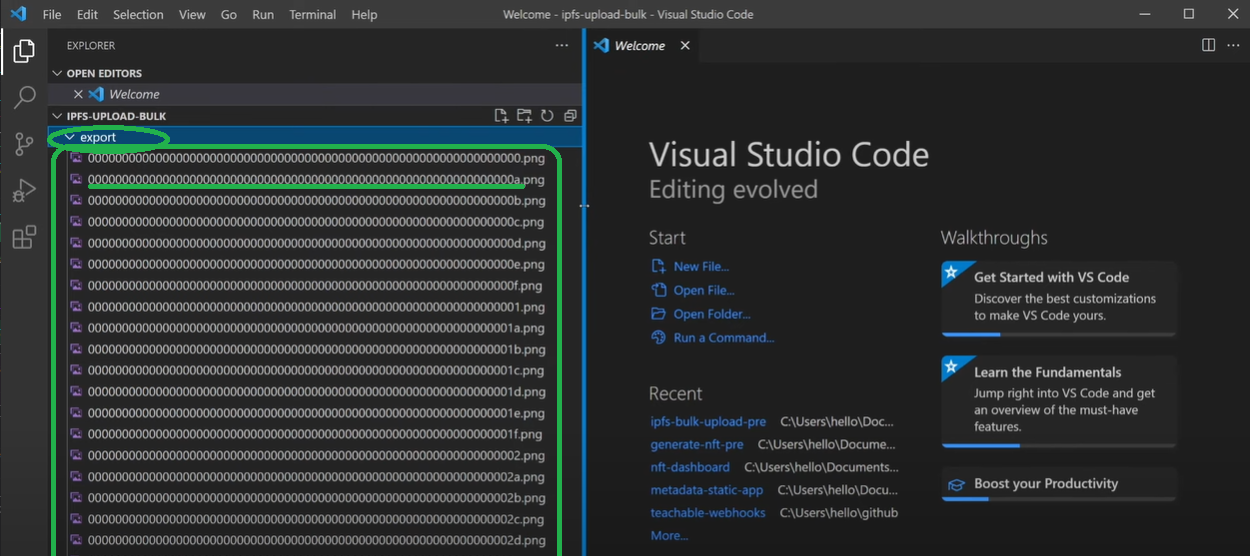
The names of the files contain 64 characters. We went down that path because this is the standard for metadata of ERC-1155 NFTs. However, our first goal is to ensure that the images we are starting out with get uploaded to IPFS. Once we have that done, we’ll cover the metadata by creating JSON files, which will contain the link to the images saved on IPFS. Moreover, the metadata will also be saved to IPFS.
Upload Folders to IPFS – Uploading Images
Using VSC, we create a new “.js” file, and we name it “images”. Before we start writing the code, we need to open the terminal (see the image below) and type “npm init” in the command line. We continue by entering “npm install fs”, which will enable us to read and write files. Next, we type “npm install axios” to ensure everything we need for our project is set in place.


We are finally ready to write the code for our “images.js” file. To make use of the “npm packages” installed above, we start by importing those two packages:
let fs = require("fs");
let axios = require("axios");
Next, we need to create a code that will look through all of our images, read them from file to JavaScript, and then upload them to IPFS. To get this done, we’ll use some simple “loops”. However, the heavy lifting will be done by Moralis, which will ensure that our folder is uploaded to IPFS. To be exact, this will be Moralis’ endpoint called “upload folder”. In order to use this shortcut offered by Moralis, we also need to have the images assigned to an array (for our example, we need to have an array inside an array). So, let’s define those two arrays:
let ipfsArray = [];
let promises = [];
Next, we create the loop that will go through the image files and export them properly. These are the lines of code serving this purpose:
for (let i = 0; i < 100; i++) {
    let paddedHex = ("0000000000000000000000000000000000000000000000000000000000000000" + i.toString(16)).substr("-64");

    promises.push(new Promise( (res, rej) => {
        fs.readFile(`${__dirname}/export/${paddedHex}.png`, (err, data) => {
            if(err) rej();
            ipfsArray.push({
                path: `images/${paddedHex}.png`,
                content: data.toString("base64")
            })
            res();
        })
    }))
}
Moralis’ Endpoint to Upload Folders to IPFS
To get the Moralis endpoint and API key, you need to access your Moralis admin panel and click the “Web3 API” option in the menu on the left-hand side.

Then scroll down until you get to the “Storage” section. At the top, you’ll see “ipfs/uploadFolder”. Click on it, and you’ll see the details (as shown below). It requests the path and the content:
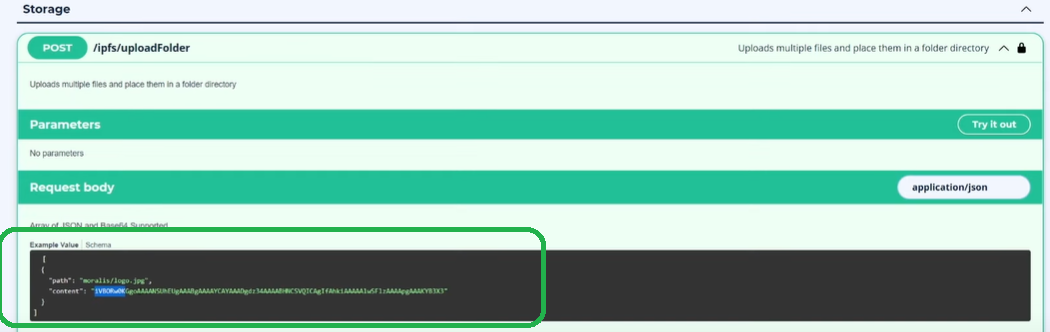
In return, it provides you with a new path, which includes the hash (it will be the same for all of the files), the folder name, and the file name:

Upload Folders to IPFS with Moralis’ API
Moving forward, we get to use the above lines of code for our example. Please, keep in mind that instead of just copying the details, make sure to visit Moralis’ documentation for more details so that you obtain the latest version in case of any updates. Here is the rest of the code inside our “image.js” file:
Promise.all(promises).then( () => {
    axios.post("https://deep-index.moralis.io/api/v2/ipfs/uploadFolder",
        ipfsArray,
        {
            headers: {
                "X-API-KEY": 'API KEY',
                "Content-Type": "application/json",
                "accept": "application/json"
            }
        }
    ).then( (res) => {
        console.log(res.data);
    })
    .catch ( (error) => {
        console.log(error)
    })
})
Looking at the code above, you need to paste your API key from Moralis and replace “API KEY” with it. Next, we use the terminal to run the code. We do this by entering “node image.js” in the terminal:

Please note that it may take a couple of minutes to get the response. However, once completed, you will be looking at something like this:

Using (copying and pasting into a browser) any of the paths (obtained in the previous step), you should be able to view your images as they have been uploaded to IPFS. In case you’re using the “Brave” browser, you get to skip the “https://ipfs.moralis.io:2053/ipfs/” part of the path and use the hash and the image file part directly after “ipfs://” (see the image below):

Upload Folders to IPFS – Uploading Metadata
We start this portion of our example project by creating a new file. Let’s call it “metadata.js”. Since we’ll use a lot of the same principles and details as we have in the “images.js” file, we can start by copying the lines of code from that file and making the necessary changes.
As mentioned above, our example project is focused on ERC-1155 NFTs. This means that we have to follow the rules of that protocol (details of the ERC-1155 protocol are available online). Following the latter, we need to include the image, name, and description. As far as the name and description go, you can use anything you want. However, we want to use the same hash to ensure that we use the images we’ve just uploaded to IPFS. Here is what the code looks like:
let fs = require("fs");
let axios = require("axios");

let ipfsArray = [];
let promises = [];

for (let i = 0; i < 100; i++) {
    let paddedHex = ("0000000000000000000000000000000000000000000000000000000000000000" + i.toString(16)).substr("-64");
    ipfsArray.push({
        path: `metadata/${paddedHex}.json`,
        content: {
            image: `ipfs://QmX1xfbKoUEHtnoiVY9uEtH3X6YuJx2yzPg6ggp3zrFUzz/images/${paddedHex}.png`,
            name: `My Youtube test NFT #${i}`,
            description: "Awesome NFT for my youtube video"
        }
    })
}
axios.post("https://deep-index.moralis.io/api/v2/ipfs/uploadFolder",
    ipfsArray,
    {
        headers: {
            "X-API-KEY": ‘API KEY',
            "Content-Type": "application/json",
            "accept": "application/json"
        }
    }
).then( (res) => {
    console.log(res.data);
})
.catch ( (error) => {
    console.log(error)
})
Just as with the “images.js” file, make sure to insert your API key in the code above. So, it’s time to run the “metadata.js” file by typing “node metadata.js” in the terminal. As with “images.js”, we get paths for metadata; however, instead of PNG files, we get JSON files:

Finalizing the “Upload Folders to IPFS” Example Project
At this point, we’ve deployed our images and corresponding metadata to IPFS. Thus, as far as “how to upload folders to IPFS” goes, we are all set. However, since our example project revolves around ERC-1155 tokens, it seems fitting that we mint the NFTs as well. As you may know, to mint NFTs, you need to use smart contracts; however, creating your own smart contract exceeds the purpose of this article. Thus, we will cover this part rather briefly.
We can use Remix and a smart contract provided by OpenZeppelin, and tweak the code a bit to end up with this:

The underlined line contains details of the metadata generated previously. Moreover, we will not be minting all of the one hundred tokens but only three for this example. Since this is an example project, we’ll be minting on the testnet. After clicking the orange button (“Deploy”), our NFTs shall be minted.
Next, we’ll list those NFTs on OpenSea. To do this, we must visit “opensea.io/get-listed/”. There we need to select the phase of our project (since we minted NFTs on a testnet, we select the “Live on a testnet” option):

In the next step, we select the testnet that we used for minting, enter our ERC-1155 contract address, and click the “Submit” button:

It may take a while, but if you’ve followed the above steps, you should now be able to view the three minted NFTs in your OpenSea dashboard.
Here’s also a video covering the same steps:
Moreover, the entire code used in our example project is available on GitHub.
How to Upload Folders to IPFS – Summary
You now know how to upload folders to IPFS with minimal effort. Thanks to Moralis’ API, you just copy and paste short snippets of code and get the coding part covered quickly. Furthermore, you’ve seen how useful it can be to upload folders to IPFS when minting NFTs in bulk. We’ve focused on the ERC-1155 standard; however, you may also apply the same principles for the ERC721 token standard.
In addition, you should keep in mind that Moralis’ IPFS integration is just a small part of this platform’s full arsenal. For instance, Moralis provides you with an ultimate NFT API that enables you to make your Web3 development revolving around non-fungible tokens all about the frontend. Whether you want to create an NFT marketplace, NFT games, or NFT minting application, Moralis makes the process feel like a breeze. Moralis also comes with React Native support.

Furthermore, Moralis also offers Speedy Nodes for more than just the Ethereum chain. This makes it the best Infura for Avalanche and Infura for BSC alternatives. Moreover, with such a powerful set of tools, you can easily overcome all the limitations of RPC nodes.
In addition, if you are looking for the simplest and quickest way to develop Ethereum dApps, Moralis’ Ethereum API is the best option, making Ethereum authentication a straightforward process. Furthermore, an excellent way to go about developing a React dApp is by using a React dApp template. Moreover, this platform has cross-chain interoperability in its DNA; thus, you can easily deploy all your Ethereum dApps on other major blockchains and thus future-proof your Web3 applications.
We encourage you to check out Moralis’ blog and Moralis’ YouTube channel for more high-quality content. There you’ll find many example projects to help advance your blockchain development skills.
