The Internet is, without doubt, one of the most significant inventions in modern-day society. A majority of the world’s population utilizes the internet daily for activities such as online banking, investing, and education. However, even though the web is crucial in our everyday lives, the current system remains troubled by flaws. Some issues of the internet originate from centralization making decentralization a hot topic. As such, decentralized Web3 systems and dApps have been developed, and one of the most exciting projects is IPFS (InterPlanetary File System). This is a distributed system for storing files based on content instead of location. However, even though IPFS has grown relatively widespread, it remains unknown to many how to store files in this system. As such, we will in this article look closer at how you can upload files to IPFS with Moralis.
Uploading files to IPFS can be a pretty arduous task without the proper underlying infrastructure. However, this is what the Moralis platform provides, making it possible to upload files to IPFS with a single line of code. This makes it possible to save valuable time and resources when you build your blockchain projects. As such, you can utilize the native support Moralis has for IPFS to store files when developing dApps.
Furthermore, Moralis also provides a selection of other tools such as Moralis Speedy Nodes, Moralis Web3 API, the NFT API, and much more. If you want to become a dApp developer, sign up with Moralis right away. The platform will significantly shorten the route to market for all your blockchain projects, making it a no-brainer!
What is IPFS (InterPlanetary File System)?
IPFS or “InterPlanetary File System” began its development in 2015 by the company Protocol Labs. IPFS is a decentralized protocol for storing data such as websites, applications, and files. The main benefit of IPFS is that it removes some of the issues with centralization, such as a single point of failure and censorship.
IPFS is able to accomplish a decentralized storing system by using a concept known as content-based addressing. Many other systems utilize location-based addressing, which means that content is found based on the location of the data. In content-based addressing, we instead find content based on the content itself. As such, we don’t need to tell our computers where the file is located but can instead query what we’re after.
This system allows us to distribute the content instead of keeping everything centralized in a server. As such, no single entity controls the data and can therefore not censor content. With the distribution, we can also eliminate the single point of failure issues associated with centralization.
However, these are just the basics of IPFS. If you’d like to learn more about how the system works, we would recommend the following article from the Moralis blog explaining the InterPlanetary File System in more detail: “What is IPFS?”.
How to Upload to IPFS in 6 Simple Steps
Since Moralis has native support for IPFS, the process of how to upload files to IPFS becomes relatively straightforward. As such, we can upload files with only a single line of code. To showcase the power of working with Moralis, we are in this article going to create a simple dApp where users can upload files such as NFTs to IPFS.
![]()
We’ll create a basic UI (User Interface) with a few input fields along with a button for executing the code. As such, the users will be able to input a name, metadata description, and image. With a single click of a button, they’re able to upload their information to IPFS. Moreover, we will be able to create this dApp within minutes, and the process can be broken down into six different steps:
- Create a Moralis server.
- Import boilerplate code from Moralis.
- Create a login function.
- Create a function for uploading an image.
- Create a function for uploading a metadata object.
- Create a function to execute the code.
Before creating the dApp, the first thing that we’ll need is a Moralis account. One of many reasons for this is that we need to initialize Moralis, and for this, we need to create our own server. So, if you don’t have an account, you can start off by signing up with Moralis. Once you have an account, we can start off with the first step to set up our own Moralis server.
Step 1: Create a Moralis Server
So, the first step in the process is to create a Moralis server. To do so, all we need to do is click ”+ Create a new Server” at the top right of the Moralis interface.
If we click this button, a small drop-down menu will appear with three different alternatives. For this tutorial, it doesn’t matter which one is chosen. However, we are going to pick the ”Mainnet Server” alternative. If either of the alternatives are picked, we’ll be provided with a new window where we need to input a name, select a region, and select network(s). As Moralis supports cross-chain compatibility, we can choose multiple networks.
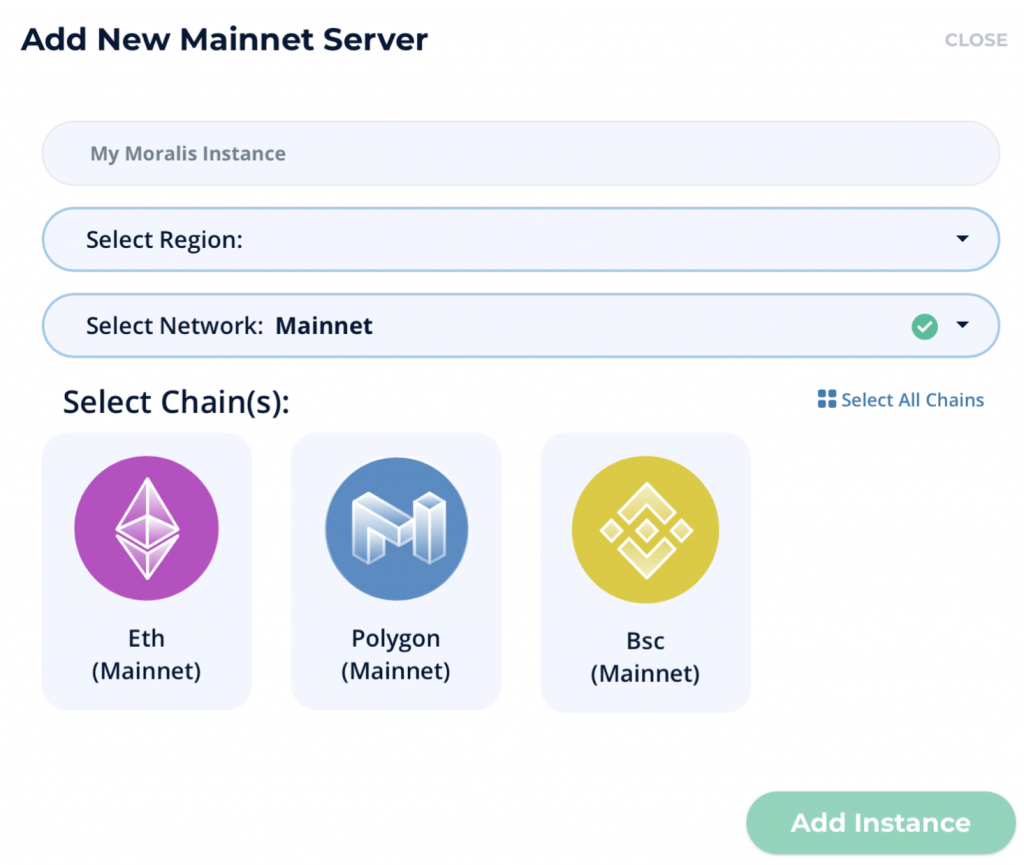
Once we are done with all our options, we can click the ”Add Instance” button to initiate the instance. This might take a while, but the server will be up and running shortly.
With a server, we can click the ”View Details” button. This will provide us with various information. From the details, we’re mainly interested in the “Server URL” and the “Application ID”. We can go ahead and copy this information since we’ll use it in the next step.
Step 2: How to Upload to IPFS — Import Boilerplate Code From Moralis
Once we have a server, the server URL, and the app ID, we can move on to create the application itself. Before we fetch the boilerplate code from Moralis, we need to create an HTML file. We’ll call the file ”ipfs.html”, but you can call it whatever you prefer.
Once we have the file ready, we can visit the Moralis documentation. All we need to do there is copy and paste the code with a few adjustments into our HTML file. This is what the code looks like unaltered directly from Moralis:
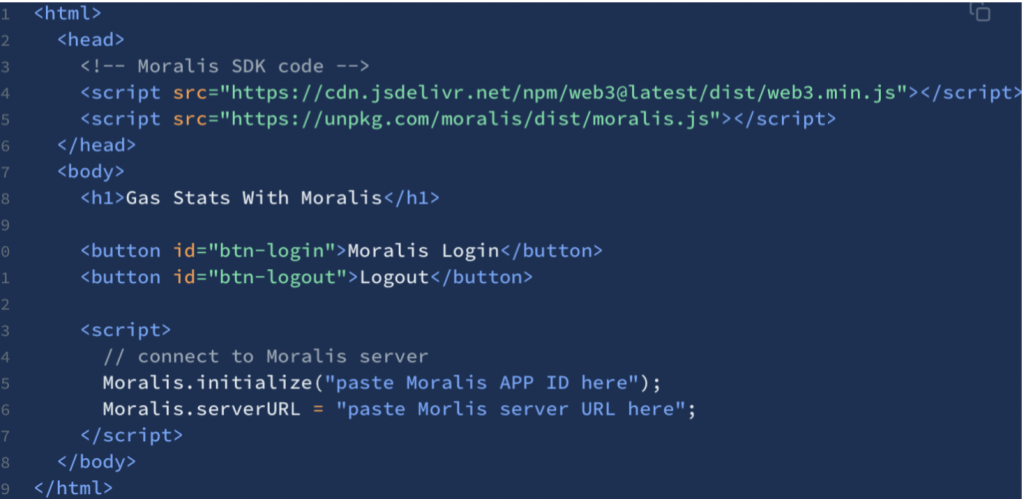
The first thing the code does is that it installs the Moralis SDK (Software Development Kit). Once the SDK is installed, we move on to writing the HTML code. Initially, the boilerplate code contains two buttons, one for logging in and one for logging out. For this demo, we’ll remove these and implement a few fields and buttons of our own.
First, we change the header to ”IPFS Demo”. After this, we add a login button followed by an input field for the metadata name. Then we add a text area for the metadata description, which is followed by an input field for a file. Finally, we have a button that hosts an ”onclick” event that triggers one of our functions. As such, this is what the edited HTML code looks like:

Now, all that remains in this step is to initialize Moralis. To do this, we need to implement the server URL and the app ID that we fetched in the previous step. We will then input these two elements in the last two lines of the boilerplate code.
Step 3: How to Upload to IPFS — Create a Login Function
Now, with both a server up and running and the boilerplate code implemented, we can move on to create the first function of the dApp. We’re going to develop a login function allowing users to authenticate themselves through MetaMask.
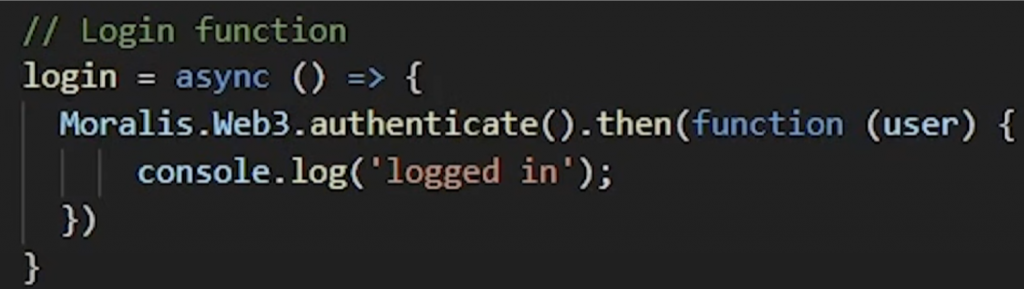
We can start by creating an asynchronous function that we’ll call ”login()”. Once again, we can fetch a template from the Moralis documentation that we can copy and paste into our function. The Moralis template looks like this:

The template’s first line of code is actually all we need, which makes the second line somewhat obsolete. However, we’ll keep it, but make sure to run “console.log(‘logged in’);” instead so that we are aware of what’s going on. As such, this is what the final result of our function looks like:
Authentication of users with Moralis occurs through MetaMask by default. So, once the function is triggered, the users’ MetaMask extension will open up, allowing them to authenticate themselves through their wallets. However, it’s also possible to authenticate with, for example, WalletConnect. If you’re interested in learning how this is done, the Moralis blog provides an excellent article on how to authenticate users with WalletConnect.
Step 4: How to Upload to IPFS — Upload Image Function
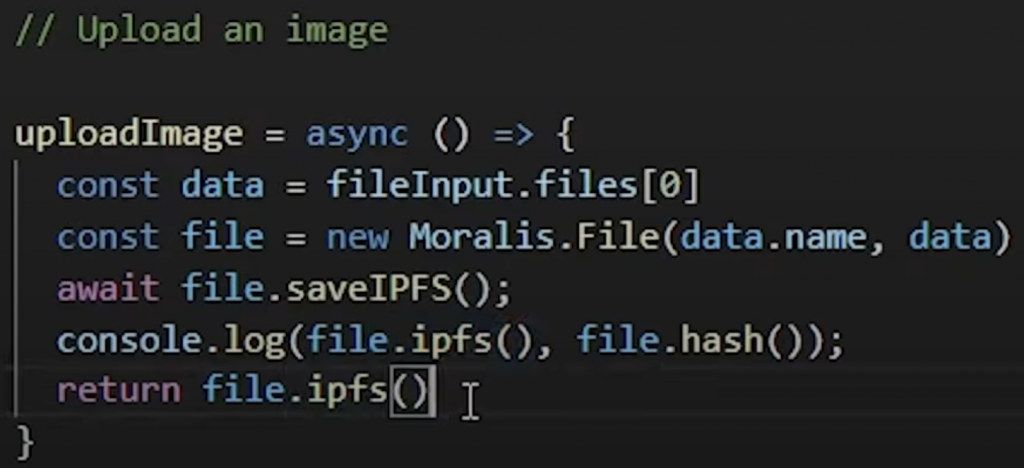
We’re going to continue with creating another asynchronous function for uploading an image to IPFS. We can call this function ”uploadImage()”, and as with the previous one, we’ll fetch the necessary code from the Moralis documentation. All we need is to copy the following code and paste it into our upload function:

The code initially creates a new variable with the first element from the file input. After this, the code creates a Moralis file with the uploaded file’s name and its data. Now, with a Moralis file at hand, the code saves the file to IPFS by calling the ”saveIPFS()” function.
With the file saved to IPFS, we can access both the file’s URL and its hash. The commands for accessing these two elements are in the line commented out in the image above. We can log either of these alternatives to the console, but it’s not a necessity. However, we’re going to make sure that the function returns ”file.IPFS”, which will return the URL of the file. As such, this is what the final function looks like:
Step 5: How to Upload to IPFS — Upload Metadata Object Function
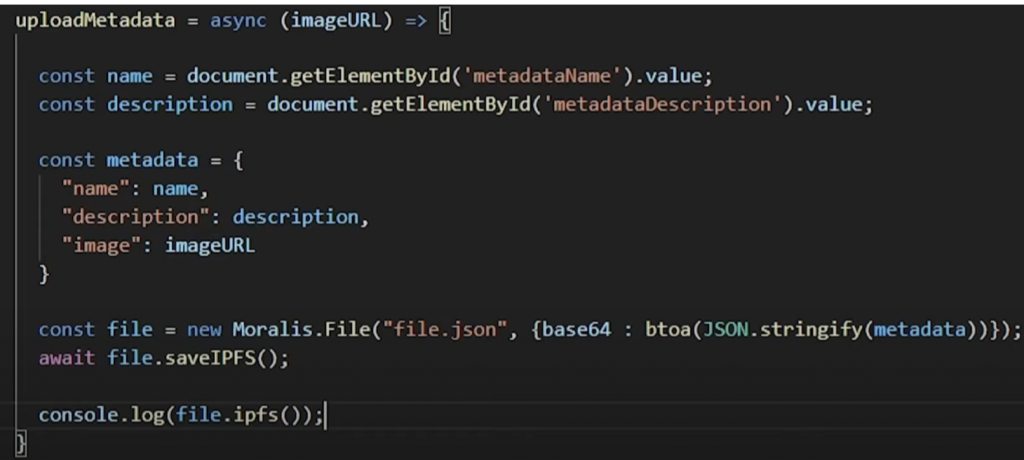
It’s quite common that tokens such as NFTs have metadata attached to them. As such, we will create a function for uploading metadata objects to IPFS. In this example, the metadata of our object will be a name, description, and image. As such, we can create a new function that we’re going to call ”uploadMetadata(imageURL)”. Once more, we can fetch all the necessary code from the same Moralis documentation page as in the previous step, and this time, we want the code for uploading objects to IPFS:

Before we create the metadata object, we need to fetch the name, the description, and the image that the users input into the UI of our dApp. To do so, we can create a variable called ”name” where we fetch the information for the HTML element. Then we can go ahead and do the exact same thing for the variable ”description”. For the image, on the other hand, we will not do the same since we’ll pass the URL of the image as the argument of the function.
After we have access to all three elements, we can create the object and add the key-value pairs using the variables. We can save JSON objects directly from JavaScript using the ”base64” string which is done after we create the metadata object. As you can see, we pass “metadata” when we create the JSON Moralis object in the third to last line of the function. Lastly, we save this file to IPFS and log the files URL to the console, and the final version of the code looks like this:
Step 6: How to Upload to IPFS — Create a Function to Execute the Code
There’s one element missing from the ”uploadMetadata()” function, and it is the URL that we want to pass as the function’s argument. So, to do this, we’ll create another function that will tie together the other functions of the dApp.
We’re going to call this function ”gogogo()”, and it will trigger once the user hits the ”gogogo” button of the UI. This is what the complete function will look like:
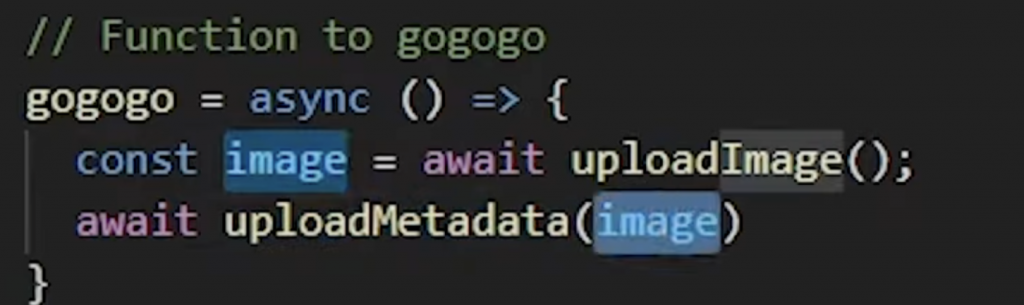
The first thing we do here is to create a variable called ”image” where we store the information returned when calling the ”uploadImage()” function. As you might recall, the information returned from this function is the URL of the user’s uploaded file.
After this, we pass the ”image” variable as the parameter when we call the ”uploadMetadata()” function. Then the ”uploadMetadata()” function creates the metadata object, uploads this to IPFS, and finally logs the URL for the object to the console.
That’s it! Now, we’ve successfully created our own dApp that we can use to upload files to IPFS. We managed to create this simple application through six steps, and the convenience of this mostly comes from using the Moralis platform. However, if you still have questions regarding the process, then we‘d like to recommend checking out the following video from the Moralis YouTube channel:
How to Upload Files to IPFS — Summary
As Moralis users, we can quickly and easily build dApps for uploading files to IPFS. We can do this as we can access already prepared boilerplate code from the Moralis documentation in combination with being provided with an already managed backend infrastructure. As such, we can create our dApp following these six simple steps:
- Create a Moralis server.
- Import boilerplate code from Moralis.
- Create a login function.
- Create a function for uploading an image.
- Create a function for uploading a metadata object.
- Create a function to execute the code.
Following these six steps allows us to create this dApp that we can use to upload files to IPFS in a matter of minutes and with ease. However, this is not the limit of the Moralis platform, and the opportunities are endless. If you’re a frequent reader of our blog, you’ll know that we have excellent guides and tutorials showcasing the platform’s potential. For example, there are guides on how to build Polygon dApps and a tutorial on how to create your own NFT.
So, if you want to become a blockchain developer, sign up with Moralis today! The opportunities of working with the platform are limitless, and you can significantly shorten the time to market for all your future blockchain projects.
