It doesn’t matter if you are new to Web3 development or have previous experience within the industry; everyone should know that the fastest way to build a Web3 app is with Moralis. If you want to learn more about this, join us as we show you how to build a Web3 app in minutes! Moreover, you also have the option to skip the tutorial and jump straight into the code. You will find the entire code for the dapp we are about to create below:
Complete Boilerplate Repository – https://github.com/ethereum-boilerplate/ethereum-boilerplate
The repository above provides the leading Ethereum boilerplate from Moralis, one of the tools contributing to a more seamless developer experience. Further, this template makes it possible to build a Web3 app much quicker than usual! Moreover, even though the name contains “Ethereum”, the boilerplate is compatible with any EVM chain and even Solana. As such, you can also use the Ethereum boilerplate to, for example, build a Polygon dapp. Those familiar with Moralis will already know that it is the fastest way to build on Web3.
The boilerplate – in combination with tools such as Moralis’ Web3 Authentication API – contributes to the accessibility that Moralis supplies. For example, the Auth API makes Web3 authentication seamless, allowing you to implement several EIP-4361-compatible authentication mechanisms.
So, if you want to build a Web3 app quickly and seamlessly, make sure to sign up with Moralis immediately. Creating an account is free of charge, and you can start building exciting blockchain projects in a matter of minutes!
What is a Web3 App? – Web3 Apps Explained
Before we show you how to build a Web3 app, it might – at least for the uninitiated – be beneficial to return to basics and explore what a Web3 app is. However, if you are already familiar with these types of applications, feel free to skip this initial part and immediately dive into the process of building a Web3 app in the section below!
Web3 apps, or as they are often referred to, dapps (decentralized applications), are much like traditional applications. However, the primary difference is that dapps have Web3 and blockchain functionality. This is an immediate effect of developers building dapps on P2P (peer-to-peer) networks like Ethereum. In addition, Web3 apps use smart contracts, which opens up an abundance of opportunities for innovative new solutions to emerge and revolutionize several sectors of the economy.
A central characteristic that the name “decentralized applications” reveal is decentralization. This means that Web3 apps generally are outside the control of a single authority or entity. Furthermore, the decentralized nature of this new generation of applications ensures, among other things, that no single point of failure exists. Accordingly, this increases security for users and makes dapps less prone to censorship.
What’s more, in combination with being censorship-resistant and more secure, there are other benefits to dapps. For example, since Web3 apps are blockchain-based and utilize smart contacts, it becomes easy to integrate cryptocurrencies into a dapps’ functionality. Moreover, it is not uncommon for Web3 apps to be open-source. This positively influences the whole community as it is a driver of innovation.
Nevertheless, with a basic understanding of blockchain apps, it is time to move on to the central part, where we will illustrate how to build a Web3 app!
How to Build a Web3 App with Moralis
With a more profound understanding of Web3 apps, it is now time for the central topic, where we will show you how to build a Web3 app. The Web3 app you are about to build will allow users to log in using their Web3 wallets. Once authenticated, they can view their transaction history, balances, and more. However, more on this later.

To initiate, we will explore Moralis’ Ethereum boilerplate. This will illustrate what you are working towards and what the final product will look like. Moreover, thanks to the Ethereum boilerplate, you will be able to build a Web3 app in only three steps:
- Clone the Boilerplate
- Configure Environment Variables
- Start the Web3 App
The steps above make it possible to build a Web3 app in minutes! However, before we get going with the tutorial, the first thing you will need to do is create a Moralis account. To sign up with Moralis, you need to click on the “Start for Free” button at the top of the Moralis website:

From there, you need to fill in the necessary information and hit ”Sign Up”:

Now, with a Moralis account at your disposal, we can progress with this ”how to build a Web3 app” tutorial by exploring Moralis’ Ethereum boilerplate!
Build a Web3 App – Moralis’ Ethereum Boilerplate
To start, we will explore Moralis’ Ethereum boilerplate in further detail, enabling you to build a Web3 app! Also, this will illustrate what you are working towards. Nevertheless, when someone launches your dapp, they will arrive at the following landing page:
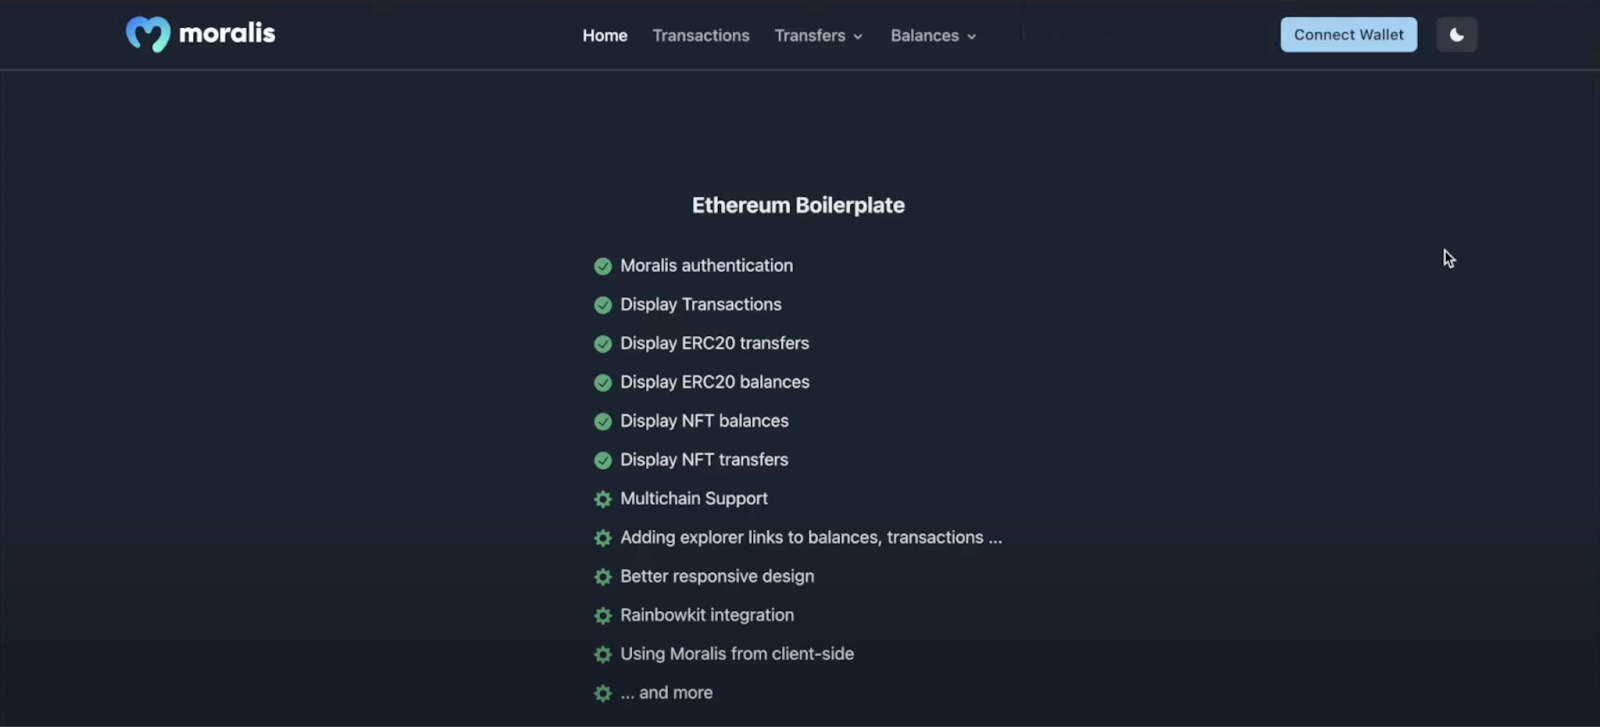
As the image above illustrates, there is a navigation bar at the top of the Web3 app. Also, you have four options to choose from: “Home”, “Transactions”, “Transfers”, and “Balances”. However, these will not provide much information before identifying your Web3 identity with a wallet. To authenticate yourself, you will need to click on the “Connect Wallet” button:

As soon as you press this button, it will trigger your MetaMask wallet. From there, you will be able to sign a message. When authenticated, the Web3 application will populate with information related to your wallet. So, if you now were to click on the “Transactions” tab, it should display your transaction history in a table:

In addition to transactions, you can click on either “Transfers” or “Balances”. Both these tabs feature a drop-down menu allowing you to choose between “ERC-20” and “NFTs”. For example, this is what it should look like if you click on “Balances”:

If you were to opt for the “NFTs” option in the “Balances” tab, it should display your NFTs in a neat table:

The same principles apply to the “ERC-20” alternative and the “Transfers” tab alike. Moreover, the boilerplate additionally features a dark and light mode. As such, you will have the option to switch between these using the button at the far right:

Now that you know what we are aiming toward, we will illustrate how to quickly build this Web3 app. So, with no further delay, let’s jump straight into the first step and discover how to clone the Ethereum boilerplate!
First Step: Clone the Boilerplate
The first thing you will need to do to build a Web3 app is open your favorite IDE or integrated development environment. We will use VSC (Visual Studio Code). The process might differ somewhat if you are using another environment. However, worry not; there will most likely not be any major differences anyhow.
Once you launch your IDE, you must create a new folder. You can call this folder whatever you would like, and in our case, we will name it “BOILERPLATE”. With the folder at your disposal, you will need to navigate to the GitHub repo, which you can find in the introduction or outset of this article. From there, you can click on the “Code” button to the right and copy the repo URL:

Once you have copied the URL, you can navigate to your IDE and open a new terminal. To do so (if you are using VSC), you can click on the “Terminal” tab at the top and hit “New Terminal”:

Now, with a new terminal open and the repo URL at your disposal, you can clone the project using the following command (make sure to run the command in the location of the folder you created earlier):
git clone “BOILERPLATE_URL”
After running the command above using the Ethereum boilerplate code, you can navigate to the correct folder through this command:
cd ethereum-boilerplate
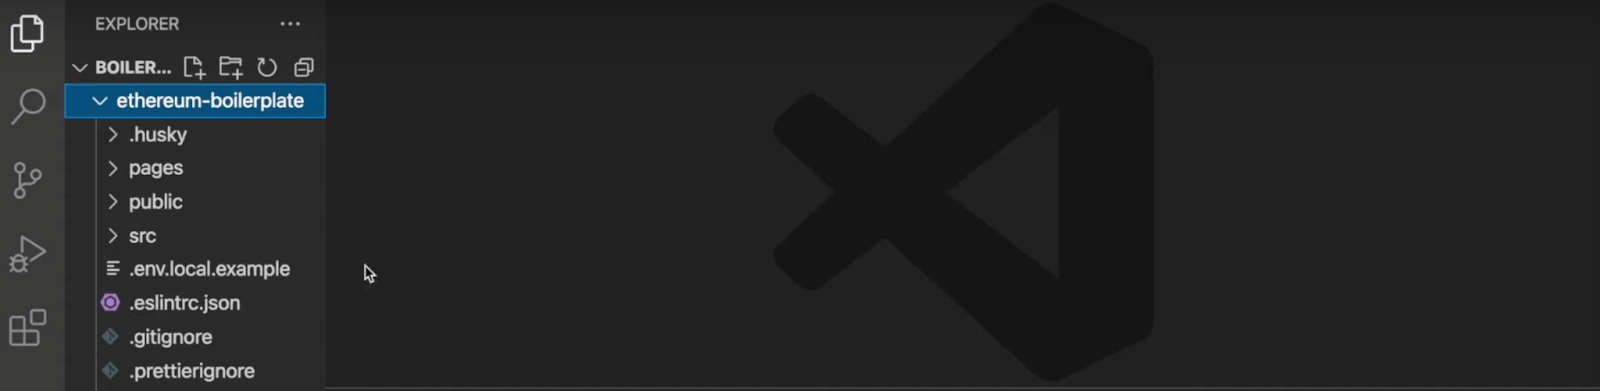
If you followed along and inputted the correct commands in the right location, you should have a structure that looks something like this:
Second Step: Environment Variable Configuration
With the project available in your local directory, it is now time to make a few configurations for the environment variables. As such, you can go ahead and open the ”.env.local.example” file:

As you can see above, you will need to configure some variables. Let’s start at the top with the “APP_CHAIN_ID” variable. Initially, it’s set to “0x1“, which corresponds to the Ethereum mainnet. If you want to create dapps for Ethereum, you can leave this one as is. However, Moralis is cross-chain compatible. This means you can develop dapps for other chains alike. You will find all supported chains here if you want more information.
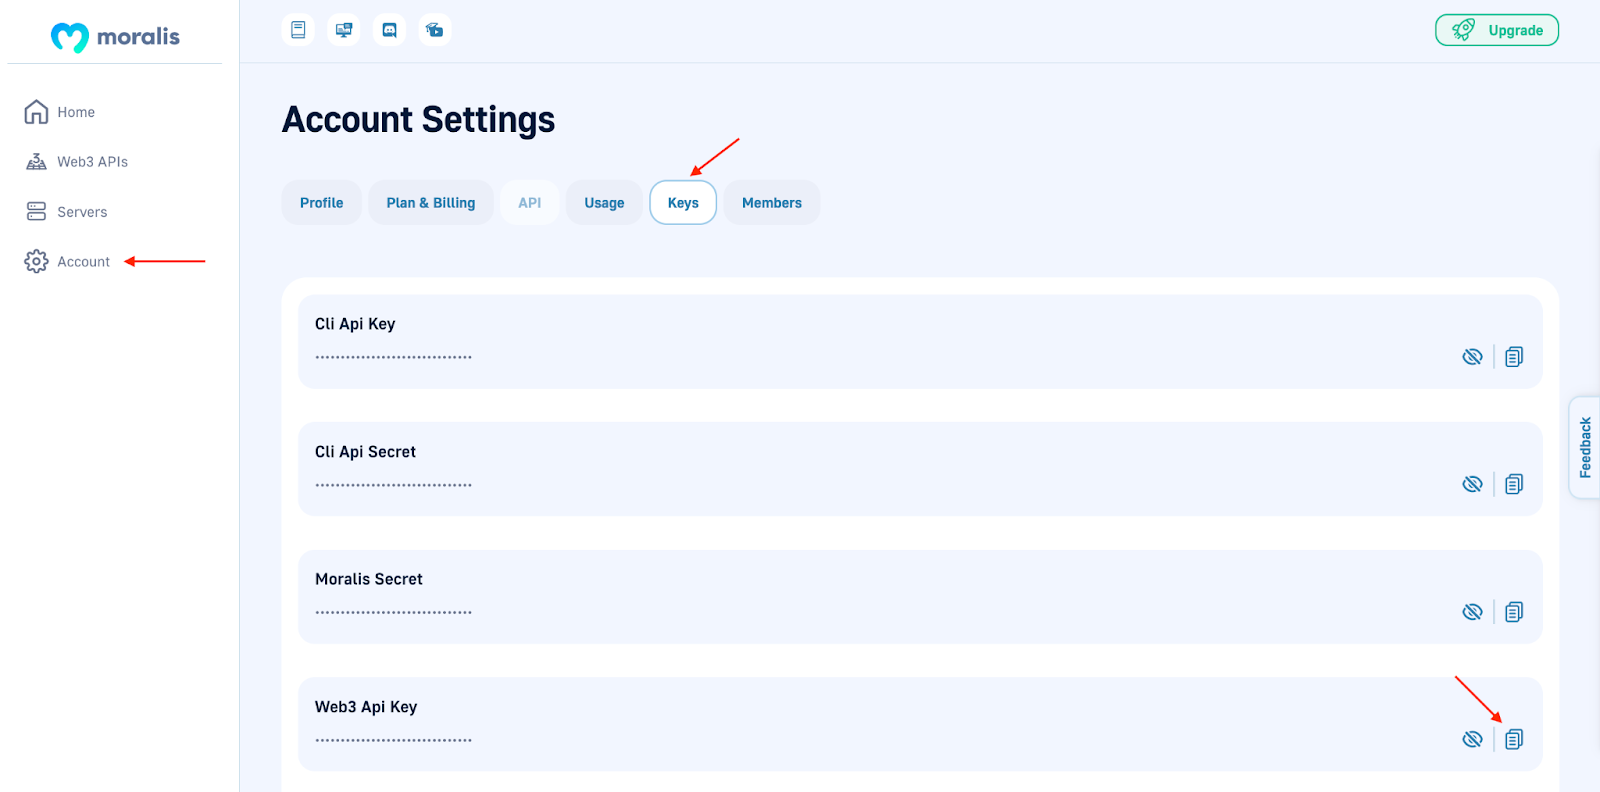
The following variable you must configure is “MORALIS_API_KEY“. To acquire your API key, log in to your Moralis account and navigate to the admin panel. From there, you can click on “Account” to the left, press the “Keys” tab, and copy “Web3 Api Key”:
With the key at your disposal, you can simply set the “MORALIS_API_KEY” variable to equal this value. Next, you need to add a value to “NEXTAUTH_SECRET“. If you need help with this, you can use the following link to create a new secret: https://generate-secret.now.sh/32.
Lastly, “NEXTAUTH_URL” is currently set to “http://localhost:3000“. At the moment, it is fine to leave it as is. Accordingly, it will allow you to test the application on a local host. However, when you plan on launching the dapp, it needs to be changed to the dapp’s URL.
Moreover, before we show you how to start the dapp, you must change the file’s name to ”.env.local”. The final code of your ”.env.local” file should look something like this:
APP_CHAIN_ID=0x1
APP_DOMAIN=ethereum.boilerplate
MORALIS_API_KEY= "YOUR_API_KEY"
NEXTAUTH_SECRET= b8e786967d7bcbc0f920d35bcc3f891c
NEXTAUTH_URL=http://localhost:3000
Third Step: Start the Web3 App
With the configuration completed, the next step is to start the dapp. However, before launching the dapp, you will need to install dependencies. Moreover, depending on if you are using “yarn” or “npm“, you can input either of the following into the terminal:
npm i
yarn
From there, all that remains is to execute this command to run the application on a local host:
npm run dev
yarn run dev
If you want to access the Web3 application and ensure everything functions, you can launch the dapp through the URL you previously specified: http://localhost:3000.
That’s it! You now know how to build a Web3 application using Moralis in three simple steps. It is now up to you to tailor this template by adding or removing features your potential customers want/do not want. Nevertheless, using the Ethereum boilerplate allows you to launch an application quickly, and it might provide a first-mover advantage!
If you experienced trouble during this tutorial or want to watch a video explaining the process instead, make sure to check out the following clip from Moralis’ YouTube channel:
How to Build a Web3 App – Summary
If you followed along throughout this article, you now know how to build a Web3 app. Thanks to Moralis and the Ethereum boilerplate, you were able to create the dapp in a matter of moments. In fact, you could do so in record time by utilizing the following steps:
- Clone the Boilerplate
- Configure Environment Variables
- Start the Web3 App
If you found this guide interesting and want more exciting content, check out Moralis’ Web3 blog. The blog features fresh and engaging content that is updated daily. For example, you can learn about different types of DAOs or how to build a decentralized social media profile!
Furthermore, you should check out the official Moralis documentation. There, you will find more tutorials on how Moralis works. For example, you can explore the Solana API, which allows you to build unique projects for the Solana network. You can also explore the Moralis Web3 Streams API, enabling you to receive webhooks on any network.
Moreover, if you are new to the industry, you can learn the basics of Web3 development at Moralis Academy. The academy supplies fantastic blockchain courses for both beginners and more experienced developers. For example, enroll in the “Blockchain & Bitcoin Fundamentals” course to get going!

If this article piqued your interest in exploring the Web3 development sector further, sign up with Moralis! Creating an account will provide immediate access to the platform’s tools, making your future development endeavors significantly more seamless.
