Even if you’re not deeply involved in the crypto space, you’ve surely noticed that NFTs (non-fungible tokens) are one of the most popular blockchain technology use cases. Specifically, NFTs are all the rage today, with exorbitant NFT marketplace valuations. What’s more, non-fungible tokens are just beginning to find their utility. This includes both digital realms well as real-life niches, such as certifications, real estate, and other types of ownership. As such, this is without a doubt the best time to learn how to create NFTs. Moreover, while new reputable chains and NFT marketplaces are emerging daily, the Ethereum chain and the OpenSea marketplace remain the most popular option. Thus, you also ought to know how to upload NFTs to OpenSea, where you can display, auction, or sell them with ease.
As the title suggests, you’ll be able to learn how to create NFTs and upload them to OpenSea. While there are multiple ways to do this (especially if you look beyond Ethereum’s blockchain), we’ll take on a special example project and build a Web3 application that can generate an NFT. Moreover, we’ll be using Moralis to make the entire process as simple as possible. With full access to Moralis’ ultimate Web3 SDK, we’ll be able to focus entirely on the frontend part of our dApp, while letting Moralis take care of the backend.
If you haven’t already, make sure to create a free Moralis account now. That way, you’ll be able to follow along easily once we get to our example project. Moreover, while OpenSea may have its flaws and lacks decentralization, it remains the most popular NFT marketplace. As such, we’ll upload NFTs to OpenSea to present that aspect as well. Of course, this uses Moralis’ best-in-class NFT API.

What are NFTs?
Non-fungible tokens, or NFTs, are one of the most popular use cases of blockchain. As the word “non-fungible” suggests, non-fungible tokens have unique characteristics, which means that no two or more NFTs are the same. This makes NFTs great for digital art and collectibles. Moreover, it offers a way to assign ownership to digital files that already exist or even to actual real-life assets (such as ownership papers, certificates, agreements, etc.). Basically, any type of file (MP3, MP4, JPEG, PDF, etc.) can be converted into an NFT; as such, we can assign unique properties to them that’ll get stored on the blockchain. This means that they can’t be tampered with. If you’d like to dive deeper and find out more information regarding NFTs, then check out our detailed guide on that subject in the following article: “Non-Fungible Tokens Explained – What are NFTs?”.
How to Create NFTs
When you hear people talk about creating NFTs, it can mean various things. For one, it can refer to the entire process starting from scratch. This includes creating an actual digital file, let’s say a JPEG, and then minting that file to create an NFT. However, it can also refer to the minting process alone. This means that we already have the digital file created, and we just want to assign certain properties to them and then store them on the blockchain by completing a transaction (known as “minting”).

Since most NFTs available are digital art pieces, the creation process of such NFTs often concerns the actual artist. Therefore, we as developers primarily focus on the minting part when discussing how to create NFTs. As such, you will basically learn how to mint NFTs by completing the example project below. Fortunately, Moralis offers the best API to mint NFTs.
Furthermore, you need to be aware that some NFTs even have the file part created by computer code. In the case of JPEGs, the code can take in various PNGs (images with transparent background) to generate different combinations of characters (such as CryptoPunks). As such, an additional factor of randomness can be incorporated into NFT collections. Moreover, we will incorporate a certain aspect of this type of NFT creation; instead of images, we’ll be assigning different characteristics. The latter can be useful if we want to use those NFTs in NFT games or other types of dApps built using NFT programming.
How to Create NFTs in a Decentralized Way
Before we go any further, you need to know that there are various ways to create NFTs. It all depends on the type of NFTs you’re interested in creating and how much you value decentralization. For instance, you may use one of the popular platforms, such as OpenSea, to mint an NFT. As a matter of fact, this is the simplest and quickest way. However, it is not a decentralized way. In addition, NFT platforms or marketplaces come with limited options and features regarding what you can assign to your NFTs. As such, they may not offer you an option to assign specific properties to your NFTs that you’d like.

With that said, building your own Web3 application that will enable you to create NFTs in a decentralized manner, completely aligned with your vision, is what we want to focus on. While this may sound like a difficult task, we assure you that by using Moralis’ ultimate Web3 development platform, it’s something we can accomplish much quicker than you’d expect.
Furthermore, keep in mind that you do not have to mint NFTs using OpenSea to display them there. You can create NFTs in a decentralized way and then still upload NFTs to OpenSea, which is exactly what we will do.
How to Create NFTs and Upload to OpenSea – An Example Project
This section will provide you with detailed instructions that you can implement on your own and thus learn how to create NFTs and upload them to OpenSea easily and quickly. We also have a video available on Moralis’ YouTube channel for those who prefer watching video instructions. In this video, you can look over the shoulders of one of Moralis’ experts as he takes on the same example project:
Note: Since the video above will make some parts of the programming task much easier for you to understand, we will refer to specific times in the video throughout the instructions provided below.
Moreover, as we proceed, we’ll only provide you with the most significant code snippets. To access the complete code related to this example project, visit the related GitHub page.
Before we take a closer look at the detailed steps of how to create NFTs, we need to set up a Moralis server. Moreover, we also need to ensure that you have a relatively clear vision of what we’re going to build. As such, envisioning how our Web3 application will look when finished will make things easier.
How to Create NFTs Using Moralis
There is a set of simple steps that you need to complete in order to use Moralis to learn how to create NFTs and then upload NFTs to OpenSea. This is essentially Moralis’ initial setup, and it contains crucial steps for basically every project when you want to use Moralis’ Web3 API.
Moralis Setup
- Create Your Moralis Account – In case you don’t have a Moralis account yet, make sure to create one now. It doesn’t cost you anything and takes no more than a minute to do. Just visit Moralis’ free account registration page, enter your email address and create your password. Next, confirm your email address (Moralis’ system will send you an email with a confirmation link). On the other hand, if you already have an active Moralis account, just log in.
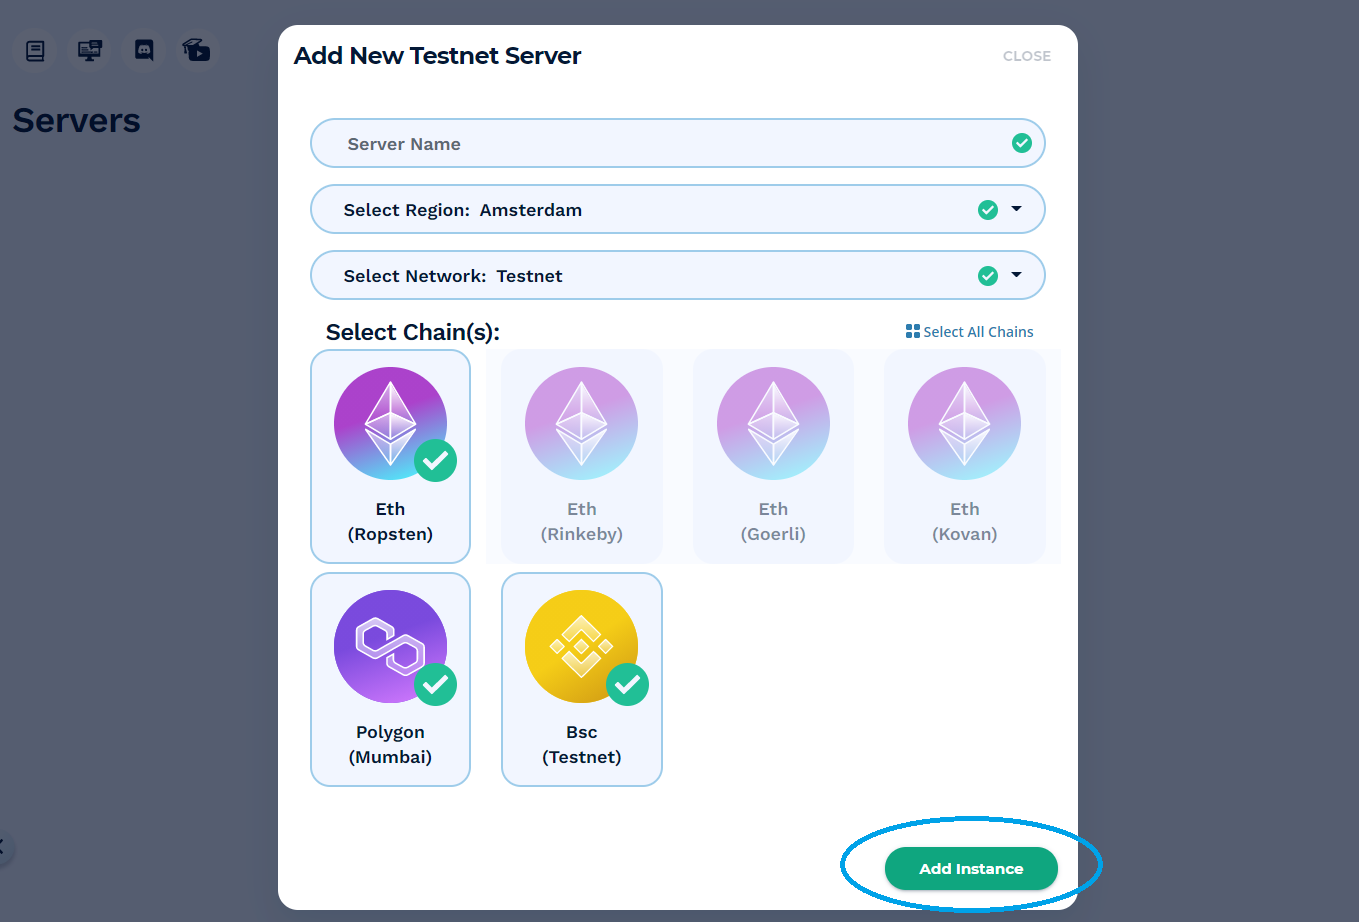
- Create a New Server – Once inside your Moralis dashboard, click the “Server” tab in the menu on the left-hand side. Then create a new server by clicking the “+ Create a new Server” button in the top-right corner. Next, a drop-down menu will appear offering different types of servers (see the image below). We recommend starting with the “Testnet Server” option.

Then, a pop-up window will be displayed, in which you need to enter the required details. These include server name (it can be anything you want), select region, network, chain(s) (you can select one or multiple chains), and click the “Add Instance” button. If you’ve used Moralis before, you can use any of your existing servers.
- Accessing Server Details – After successfully creating a server, you can finally obtain the server’s details (to be used inside your “.html” or “.js” file) by clicking “View Details” next to your server name. In the pop-up window, you will be able to see your server’s URL and ID.
- Initialize Moralis – Copy and paste the details obtained in the previous step into your project’s “.html” or “.js” file to gain the required backend functionality, as seen in the following image:


Note: Make sure to use the details of your particular server and not copy the server details from the image above.
How to Create NFTs – Begin with the End in Mind
The project that we’ll take on herein to help us learn how to create NFTs will result in a dApp that will generate a character. That character will represent an NFT incorporating some unique characteristics. Here is an image of our finished Web3 application interface:

As you can see, looking at the image above, a user will get to enter his character’s name and then click the “Get a Character” button. After clicking the button, the user will have to confirm the transaction using MetaMask. This action will initiate the code that will mint an NFT based on a set of properties (characteristics) that we will determine in our code (see the image below). The character and the set of particular characteristics will be randomly selected using JavaScript’s random number generator.

Moreover, after the NFT is generated, you will also be able to upload the NFT to OpenSea:


How to Create NFTs and Upload to OpenSea – The Actual Steps
Now that you’ve set up Moralis and know what we’re going to build, you are ready to look at the exact steps required to end up with the NFT generating dApp presented above.
Step 1: Uploading the Images
We will start by uploading the images that will serve as the visual part of our NFTs and then do the coding required to ensure things run smoothly.
To upload our image files, we’ll be using a special Web3 application that we will also create in the following steps. Here’s how it will look:

By clicking “Choose Files”, we select the images we want to use. We complete the upload process by clicking the “Upload Collection” button. Of course, this means that you have to have your collection (images) ready.
If you still remember, we’re creating NFTs in a decentralized way; as such, the “upload” portion of our dApp needs to upload the images to IPFS, which is a leading decentralized storage solution. Fortunately, Moralis offers full compatibility with IPFS.
Moreover, using the console view, we will gather the details provided by the “collection load” page. We will copy those details into the “ipfsCollection.json” file. This is how we will refer to those images when using our random NFT generator. These steps are covered in the video provided above, starting at 2:09.
Creating the Image Upload Page
To create the page that will enable us to upload images (as done in the previous step), we’ll use simple HTML and JavaScript (JS) coding. To make the page look pretty, we’ll use Bootstrap. Moreover, we’ll be using Moralis to cover the backend aspect on our behalf. Go to the 4:06 timestamp in the video above for more details.
The “script” part of our HTML code (“config.html” file) is one of the key aspects:
 <!-- Scripts -->
        <script src="https://cdn.jsdelivr.net/npm/[email protected]/dist/js/bootstrap.bundle.min.js" integrity="sha384-U1DAWAznBHeqEIlVSCgzq+c9gqGAJn5c/t99JyeKa9xxaYpSvHU5awsuZVVFIhvj" crossorigin="anonymous"></script>
        <script src="https://cdn.jsdelivr.net/npm/web3@latest/dist/web3.min.js"></script>
        <script src="https://unpkg.com/moralis/dist/moralis.js"></script>
        <script src="static/uploadCollection.js"></script>
    </body>
As far as the JavaScript code goes, we’ll create “uploadCollection.js”, which will be initiated once the “Upload Collection” button is clicked. This is also where we will use our Moralis server details:
Moralis.initialize("JzMDtI9JeuUMAtiJalAqQbenxGpU5QVH6dCUaxK6"); // Application ID from moralis.io
Moralis.serverURL = "https://axsxr6qx1ncv.moralishost.com:2053/server"; // Server URL from moralis.io
Moralis.authenticate()
Moreover, this is the part of the code where we use the power of Moralis to create new files on IPFS (which simplifies the process a lot):
let imageFile = new Moralis.File(data.name, data);
Note: Keep in mind that with large collections, uploading the images may take a while.

Step 2: Creating the NFTs
This is the part of our project that directly addresses the “how to create NFTs” aspect. It takes the collection files that we’ve uploaded in the previous step and generates random NFTs. Aside from using the images as an entry value, it also incorporates randomly selected characteristics (based on the set we provide). Watch the video above for more details, starting at 7:55.
Following the same path as in the previous step, we use an HTML file (“index.html”) to create a web page (an interface) for our users and a JavaScript file (“logic.js”) to add functionality.
The “script” part of the HTML code (“index.html”) again plays an essential role as it imports all we need to get the job done:
    <!-- Scripts -->
        <script src="https://cdn.jsdelivr.net/npm/[email protected]/dist/js/bootstrap.bundle.min.js" integrity="sha384-U1DAWAznBHeqEIlVSCgzq+c9gqGAJn5c/t99JyeKa9xxaYpSvHU5awsuZVVFIhvj" crossorigin="anonymous"></script>
        <script src="https://cdn.jsdelivr.net/npm/web3@latest/dist/web3.min.js"></script>
        <script src="https://unpkg.com/moralis/dist/moralis.js"></script>
        <script src="static/logic.js"></script>
The Logic Part of Our dApp
As far as the logic part of our dApp goes, we divide it into three parts:
- Initialize Web3 – (Shown in the video starting at 9:57.) We use Moralis to get this done.
- Generate the Character – (Shown in the video starting at 11:00.) Here we use a set of simple functions, including “getRandomValues()” and collection images that we’ve uploaded previously (we have the “ipfsCollections.json” file ready).
- Mint the Generated Character as an NFT – (Shown in the video starting at 19:54.) In order to mint NFTs, we need a smart contract and a function that we create for the purpose.

In order to access Moralis’ power, we again use the server details. Moreover, as mentioned above, to mint NFTs, we need to use a smart contract. Creating a smart contract would exceed the scope of this example project, so we’ve provided you with a smart contract that you may use (a line of code from “logic.js”):
const nft_contract_address = “0x0Fb6EF3505b9c52Ed39595433a21aF9B5FCc4431” // NFT minting contract use this one: “Batteries Included”, code of this contract is in the GitHub repository under “contract_base” for your reference.
Moreover, this is the code of our mint function:
async function mintToken(_uri){
  const encodedFunction = web3.eth.abi.encodeFunctionCall({
    name: "mintToken",
    type: "function",
    inputs: [{
      type: 'string',
      name: 'tokenURI'
      }]
  }, [_uri]);

  const transactionParameters = {
    to: nft_contract_address,
    from: ethereum.selectedAddress,
    data: encodedFunction
  };
  const txt = await ethereum.request({
    method: 'eth_sendTransaction',
    params: [transactionParameters]
  });
  return txt
}
Step 3: Upload NFTs to OpenSea
After the NFTs are minted, they will be added to the address provided in the code. If you have that same address connected to your OpenSea account, the NFTs will automatically be uploaded there (you will not need to upload NFTs to OpenSea manually).
Moreover, please be mindful of the network you use. In case you mint your NFTs on the testnet, you’ll need to connect and upload NFTs to OpenSea’s testnet (https://testnets.opensea.io/). As with the mainnet, the upload process will automatically be performed if you create your account and use the same addresses.

Upload NFTs to OpenSea
When it comes to using OpenSea, keep in mind that this is not a completely decentralized platform. Moreover, there have even been reports of an OpenSea employee exploiting the platform for some sort of insider trading. With that said, we recommend minting NFTs in a decentralized manner (one of such ways has been covered herein).
However, since OpenSea still offers one of the most popular NFT marketplaces, you may still want to upload NFTs to OpenSea. Keep in mind that your OpenSea account is only a window into your crypto wallet, showing all the NFTs inside. As such, if you are not seeing your NFTs, your MetaMask wallet is most likely not connected properly to OpenSea. Here are the two most common reasons provided by OpenSea’s help center:

How to Create NFTs and Upload to OpenSea – Summary
If you are serious about blockchain development, learning how to create NFTs is a highly recommended skill to master. Why? As things currently stand, NFTs are here to stay, and demand for anyone who knows how to create NFTs in a decentralized manner expects to rise over the upcoming years.
As such, we hope you’ll put the valuable knowledge obtained herein to good use. You now know that with the help of Moralis, you can rather easily code a simple dApp that can generate random NFTs. You’ve also learned that displaying or listing the NFTs you create on your OpenSea account is simple. As long as you are connected to the same wallet, you do not have to upload NFTs to OpenSea manually. However, you do need to ensure that you are on the same network (the mainnet or testnet).
With proper guidance and a powerful tool such as Moralis on your side, you have all it takes to level up your blockchain development game. In case you need additional inspiration, make sure to check out our rich content on Moralis’ YouTube channel and Moralis’ blog. For example, Moralis’ blog goes over NFT token development, how to become a blockchain developer, and building Ethereum dApps.

