More than a decade ago, people with a clearer vision for the future saw the massive potential for Web3 and blockchain’s disruptive technology. Thanks to numerous use cases and various areas of this technology, such as NFTs, play-to-earn games, collectibles, digital art, and decentralized social media, more and more people are starting to transition from Web2 to Web3. Therefore, now is the time for developers to learn how to create Web3 applications, especially when platforms such as Moralis provide a Web3 boilerplate (among many other tools), which simplifies the process significantly. As such, if you are one of those aspiring to become a blockchain developer and want to expand your knowledge surrounding this topic, then this beginner’s guide to Web3 will prove to be highly beneficial.
While many blockchain developers still create dApps by building directly on top of RPC nodes, there’s a much simpler and far more advanced way available. Thanks to the ultimate Web3 development platform – Moralis (Firebase for crypto), you get to overcome all of the limitations of RPC nodes. Moralis provides you with free access to its Speedy Nodes service (node provider), servers, database, the ultimate Web3 SDK, Ethereum API, including the ultimate NFT API, a set of powerful Ethereum authentication integrations, and decentralized storage solution (IPFS integration). Moreover, we’ve also created the best Web3 boilerplate (a.k.a. the ultimate Ethereum dApp boilerplate), enabling you to put all of the previously listed features to use in minutes. Essentially, by using this Web3 boilerplate, you can have a relatively advanced dApp up and running in minutes. In addition, Moralis also incorporates cross-chain interoperability to future-proof all of your Web3 development endeavors.
Web3 Boilerplate Basics
Before we show you how easy it is to set things up and create your first dApp using this Web3 boilerplate, we need to make sure that we are all on the same page. Suppose you are already able to answer the questions of “what is Web3?”, “what’s a boilerplate?” and “what are the differences between a template and a boilerplate?”. Then feel free to jump to the “How to Make the Most out of Our Web3 Boilerplate” section.
What is Web3?
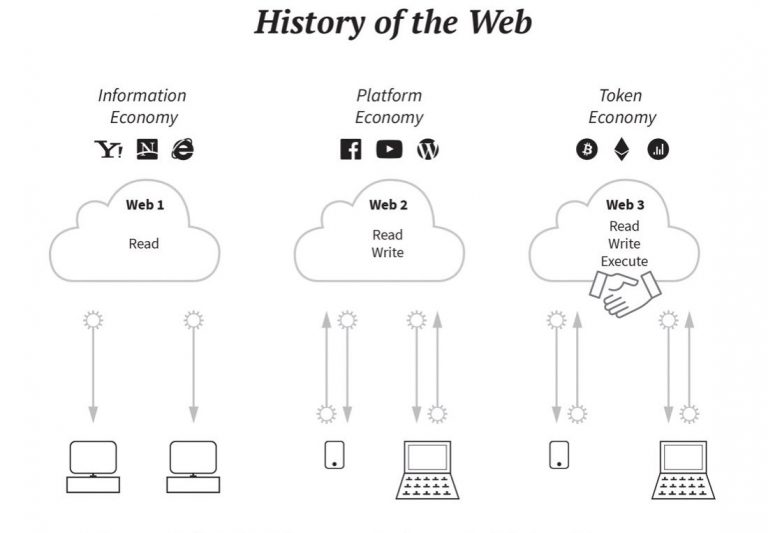
As far as the web goes, the majority of websites nowadays represent Web2. This means that they are dynamic and interactive but hosted in a centralized manner and in no way related to any blockchain. As such, they are not resistant to censorship and users’ data exploitation. Moreover, the major representatives of the Web2 revolution were social media platforms. Going even further back, before Web2, we had Web1, which was static. There were no ways for users to interact with the website, and there were also no dynamic parts. So, what is Web3? Well, it is a natural next step that became possible with the birth of blockchain technology, which introduced the concept of decentralization. In addition, it also incorporates digital money, peer-to-peer transactions, conditional automation (via smart contracts), and much more.
Thanks to programmable blockchains (Ethereum, BSC, Avalanche, Polygon, etc.), various types of dApps (decentralized applications), or Web3 apps, have emerged. Moreover, it’s important to note that there are many “Web2-Web3 hybrid” applications available at this time. These have a way to authenticate users and enable them to interact with supported blockchains; however, certain parts of their file-storing and hosting may still be off-chain. Of course, there are parts for which storing them on a blockchain may not be required. As such, this sort of mixture of Web2 and Web3 is most likely to be the new norm in the upcoming years.
What is a Boilerplate and How is it Different from a Template?
In case you’re just getting started with development, you may not be familiar with the “boilerplate” term. On the other hand, you’ve surely heard of “templates” before. Well, boilerplates are similar to templates since they also provide the structure and layout for an application (in our case). However, boilerplates also provide the actual content. So, when you use a template, you need to add your own content, while a boilerplate provides a complete package. Essentially, a boilerplate normally contains more systematic functions or rules.
How to Make the Most out of Our Web3 Boilerplate
While our Web3 boilerplate is designed in a way that even complete beginners can have a functional decentralized application up and running in minutes, it is recommended to be JavaScript proficient to get the most out of it. With your JavaScript skills, you’ll be able to tweak the components and expand the functionality of your boilerplate dApp by using various hooks. The latter requires you to build your own user interface, which is where JavaScript works best.
With that said, in case you don’t know JavaScript yet, we recommend enrolling in Moralis Academy’s 2021 JavaScript Programming for Blockchain Developers course. That way, you’ll learn this universal and easy-to-use programming language in the best way possible to use it in blockchain development. Moreover, if you are serious about going full-time crypto, we encourage you to check out other high-quality courses at Moralis Academy.
Web3 Boilerplate – Beginner’s Guide to Web3 Development with Moralis
This is the part where we roll up our sleeves and actually put our Web3 boilerplate to use. The setup steps are simple and quick; it shouldn’t take you more than 15 minutes to have the Web3 boilerplate dApp up and running. If you want to actually use the best Ethereum dApp boilerplate, follow these steps:
- Visit https://github.com/ethereum-boilerplate/ethereum-boilerplate (the ultimate Ethereum dApp boilerplate webpage on GitHub).
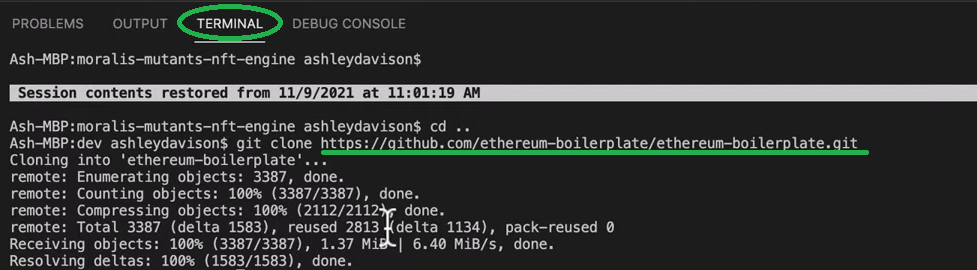
- Fork or clone the “ethereum-boilerplate” depository using “git clone https://github.com/ethereum-boilerplate/ethereum-boilerplate.git”. Just use the copy button, as shown here:

Next, move over to your code editor (we use Visual Studio Code [VSC]) and paste the above address in VSC’s terminal:
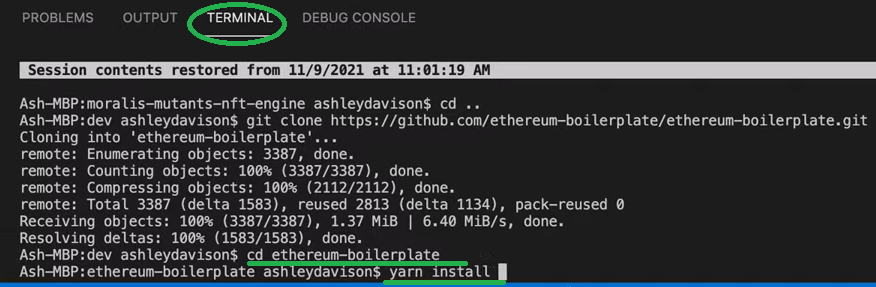
- Moving on, you need to install all dependencies (use your code editor’s terminal):
- cd ethereum-boilerplate
- yarn install
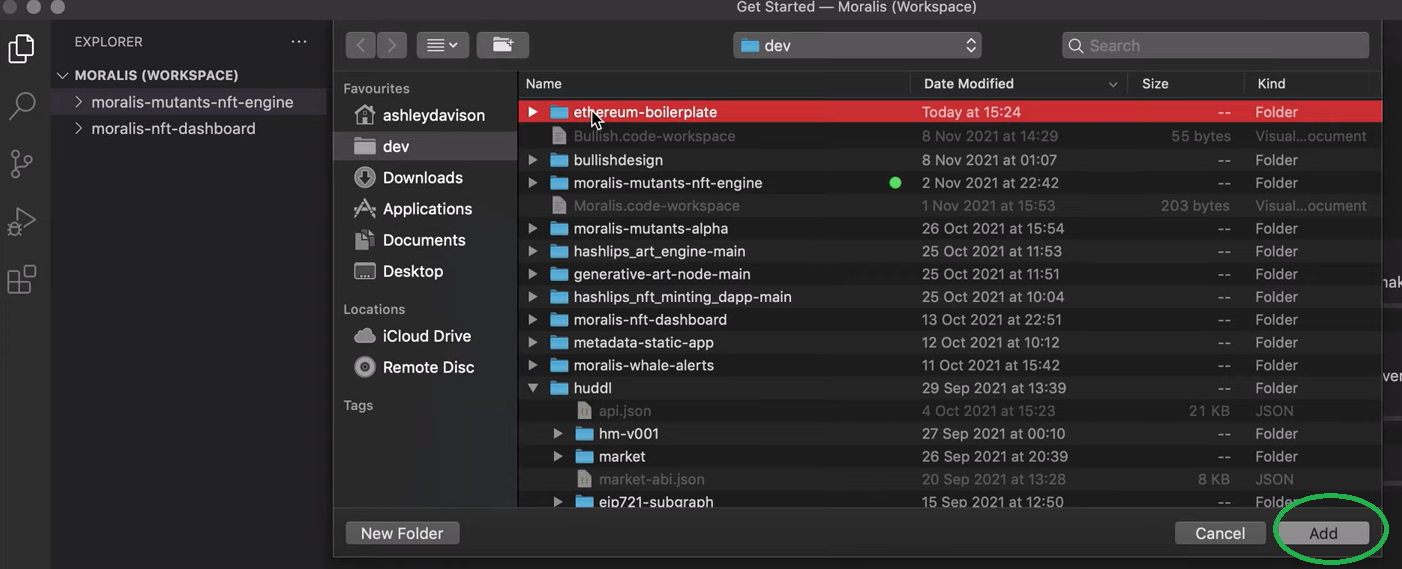
- Then, add the “Ethereum-boilerplate” folder to your code editor:
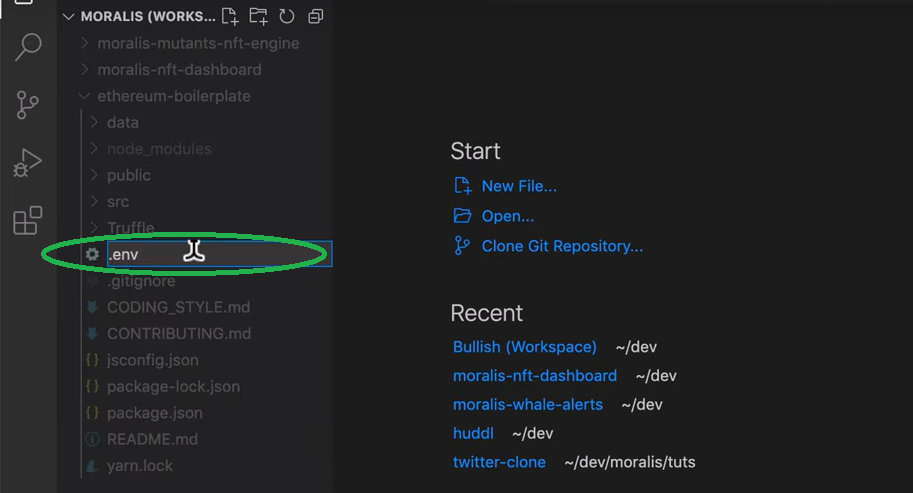
- Next, rename the “.env.example” file to “.env”:
- Now, use your Moralis server’s “appId” and “serverUrl” inside the file you’ve just renamed above (“.env”):
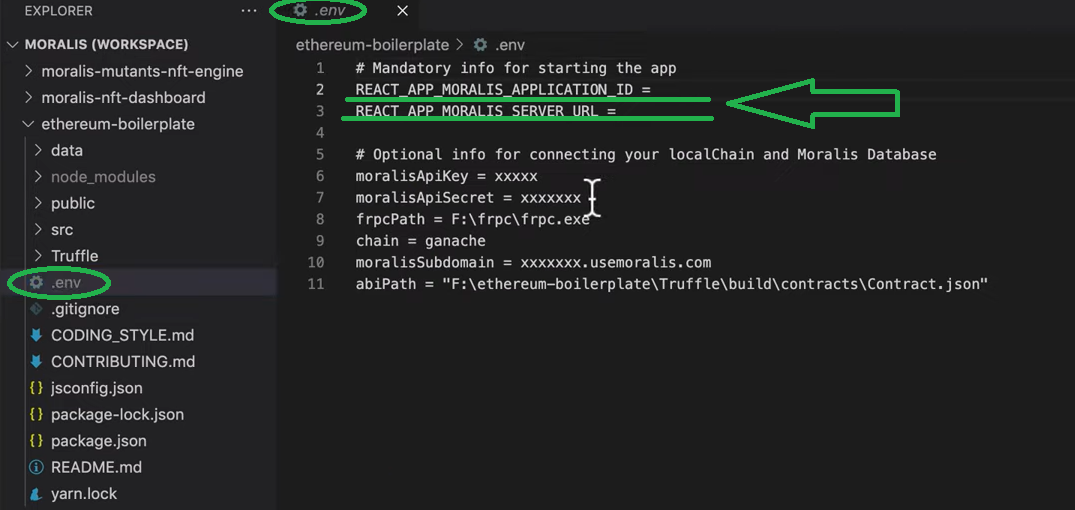
Note: Use the instructions in the “Moralis Server Details” section below to obtain these details. Once obtained, copy and paste them to the “.env” file:
- Finally, use “yarn start” inside your code editor’s terminal to run your dApp:


Note: You may also use the “npm” package manager instead of “yarn”.
At this point, you should now have a functional dApp available. This also means that you’ve just seen how fast you can create a dApp with all the basic features. However, please keep in mind that this is a generic dApp, which anyone following the same steps can create. As such, it is best to treat it as a starting point for applying tweaks and adding features to make your dApp unique.
Moralis Server Details
Whether you want to use the ultimate Web3 boilerplate or build your completely unique dApp using Moralis’ Web3 API, you need to create your Moralis server. Here’s how you do this:
- Log In to Your Moralis Account – Just log in to your Moralis account to access your admin area. In case you haven’t created your free Moralis account yet, make sure to do so now.
Create a New Server – Inside your Moralis admin area, select the “Servers” option on the left-hand side in the navigation tab. Next, click the “+ Create a new Server” button in the top-right corner, which will activate a drop-down menu. From there, you need to select the network type that best suits your needs (see the image below). Selecting the “Testnet Server” option (connect to Ethereum testnets) tends to be the best option when creating and working on new projects.

Once a pop-up window appears, enter the server name (this can be anything you want), select region, network, and chain(s):
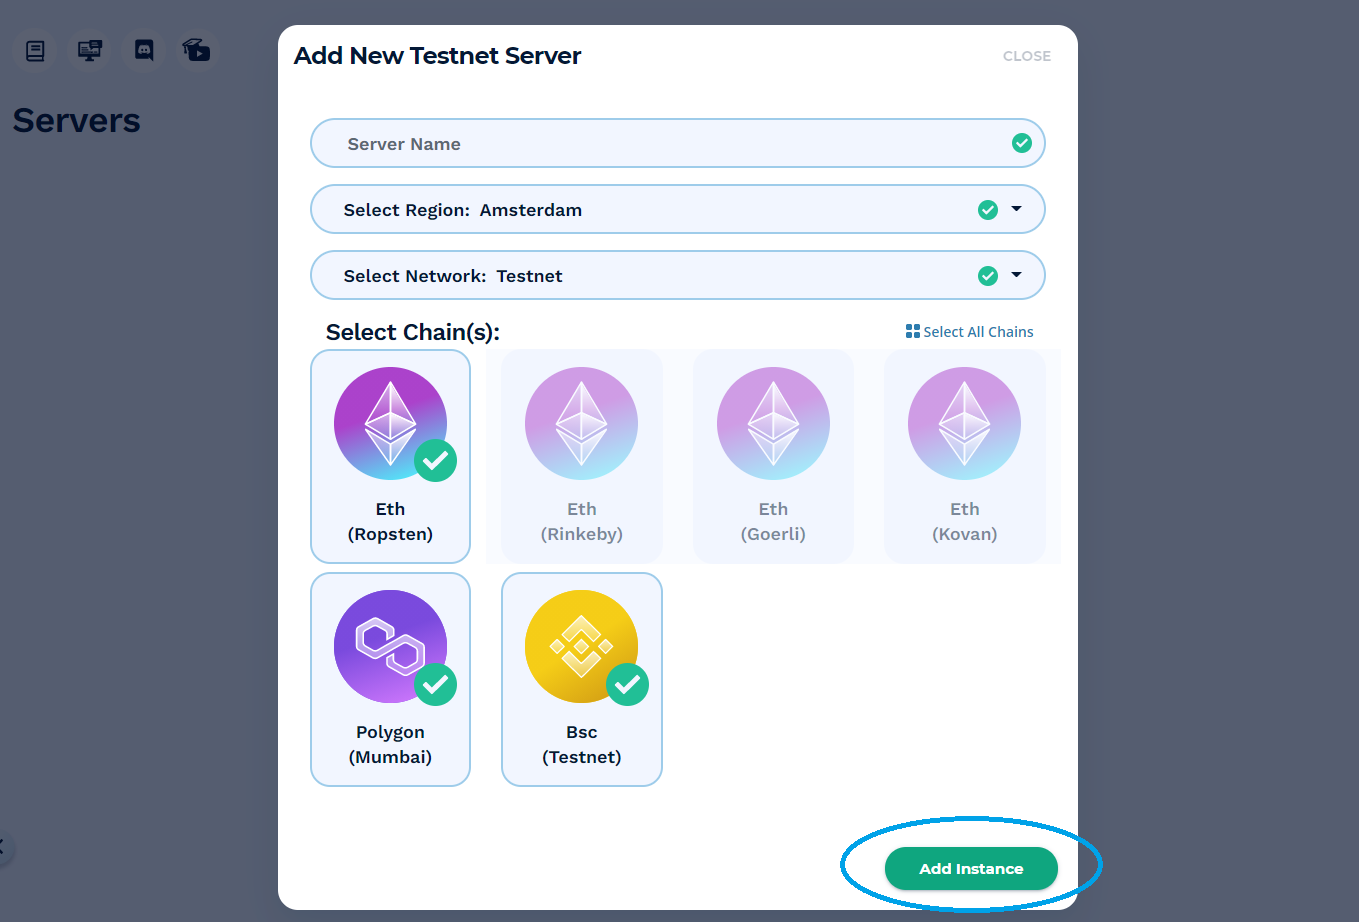
Next, create your server by clicking “Add Instance”. It may take some time for the server to spin up, so please be patient.
- Access Server Details – With your server up and running, you get to access its details. Just click the “View Details” button next to your server name:
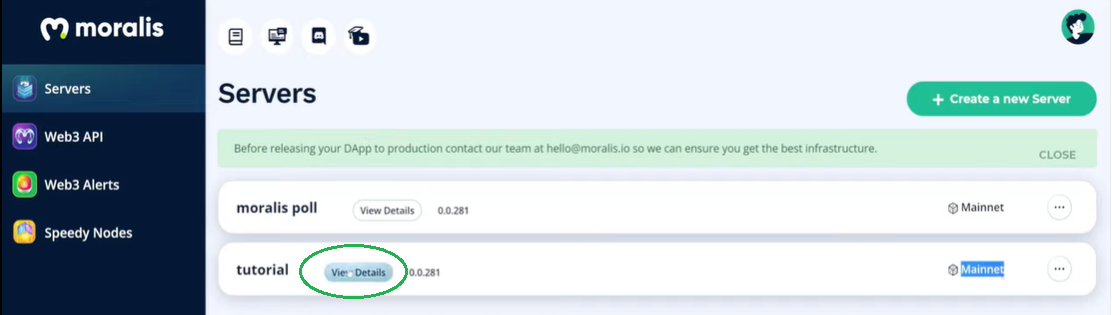
In the pop-up window, you’ll see all the information you need. By clicking the copy icon, you get to copy the details:
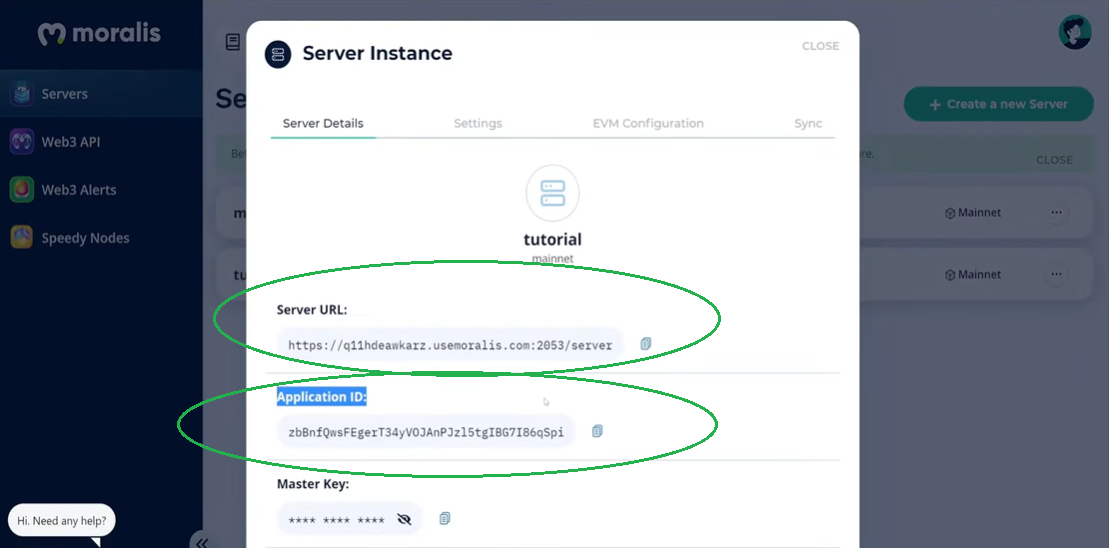
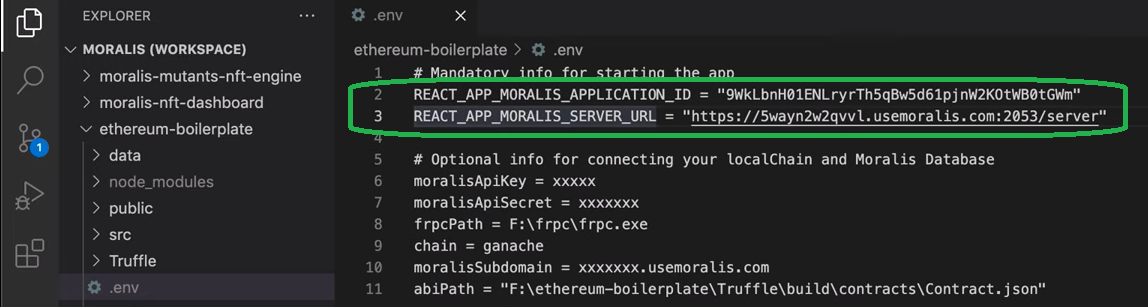
- Initialize Moralis – Populate your “.env” file with the Moralis server details (application ID and server URL) to obtain the required backend functionality covered by Moralis (step six from the previous section):

Note: Use the details of your particular server and NOT the details from the image above.
Use the Web3 Boilerplate and Make it Unique
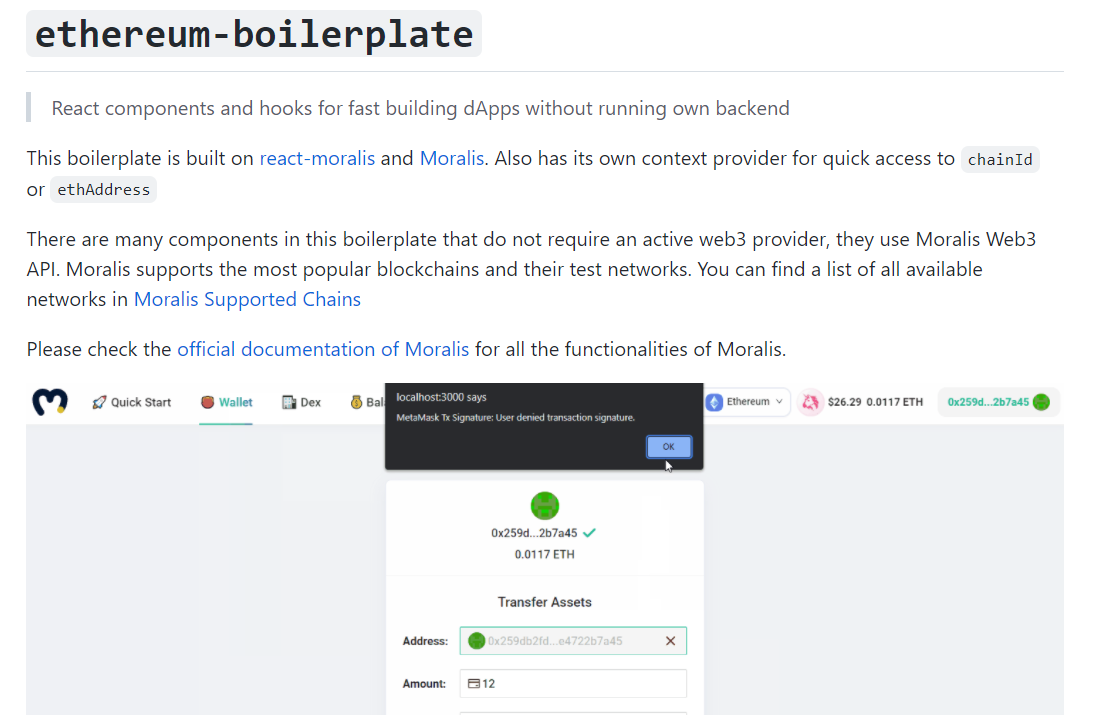
As we pointed out earlier, you should view your Web3 boilerplate dApp as a starting point for your project. Then, apply the necessary tweaks and additions to best suit your project’s goals. For that purpose, let’s take a closer look at what functionalities you get from the gate when using the ultimate Web3 boilerplate. The image below shows you that your boilerplate dApp also contains quite an impressive selection of features. Moreover, it also comes with a “Quick Start” section to provide you with a clear insight into your setup progress (covered above):
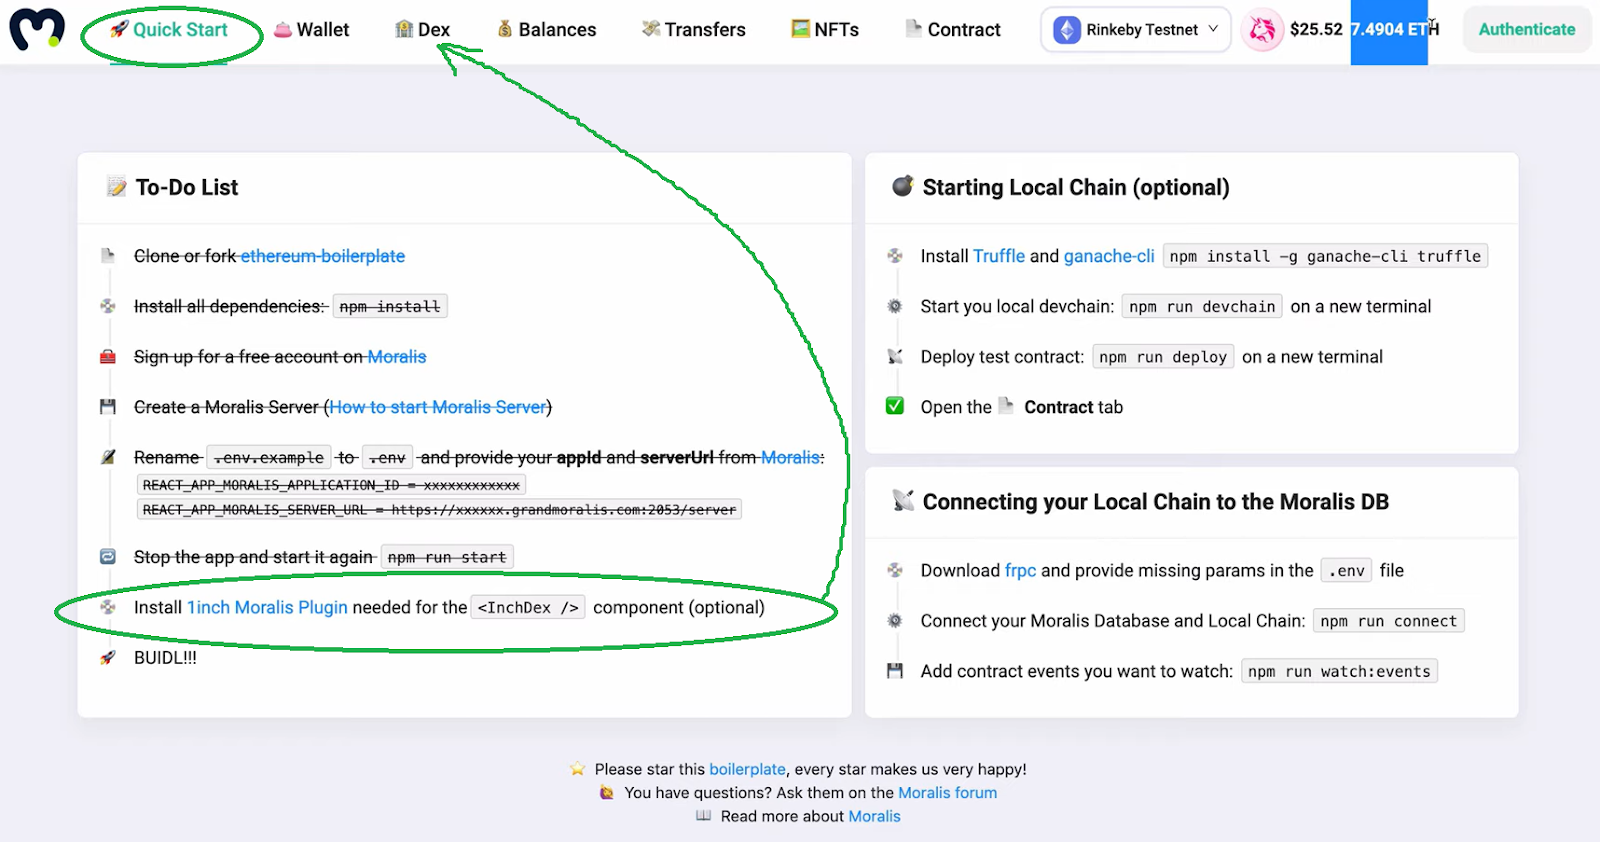
Furthermore, the boilerplate dApp also automatically connects to your MetaMask. The latter is another essential tool when developing with Moralis; it serves as an authentication solution to onboard users into the crypto realm. If you’re not familiar with this popular crypto wallet, make sure to learn how building dApps with MetaMask simplifies things.
Moreover, looking at the menu in the image above, you can see that the Web3 boilerplate provides you with a quite impressive dApp. It includes a wallet, the ability to display users’ balances, past transfers, NFTs and native coin balances in US dollar and native currency, a chain-selection option, and the “Authenticate” button. In addition, there’s also a DEX (decentralized exchange) tab. However, the DEX functionality is not available without the 1inch plugin (instructions are available in the next section).
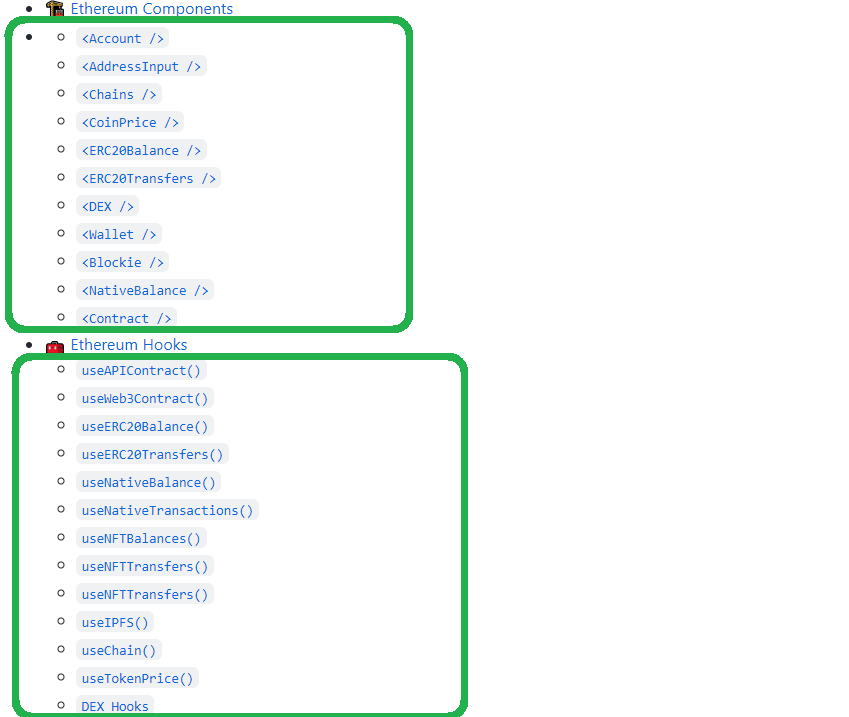
Taking things further, you have two options:
- To get the fastest results, you should focus on using the boilerplate components.
- In case you want to build your unique UI, you need to explore the boilerplate’s hooks.
Create an Ethereum dApp Instantly – Include the DEX Functionality
All of the components presented above are automatically fully functional, aside from “<DEX />”. To make the latter component work as well, you need to install the 1inch plugin. This will enable you to program token swaps in your dApp. Fortunately, it takes no more than a few clicks to set this up.
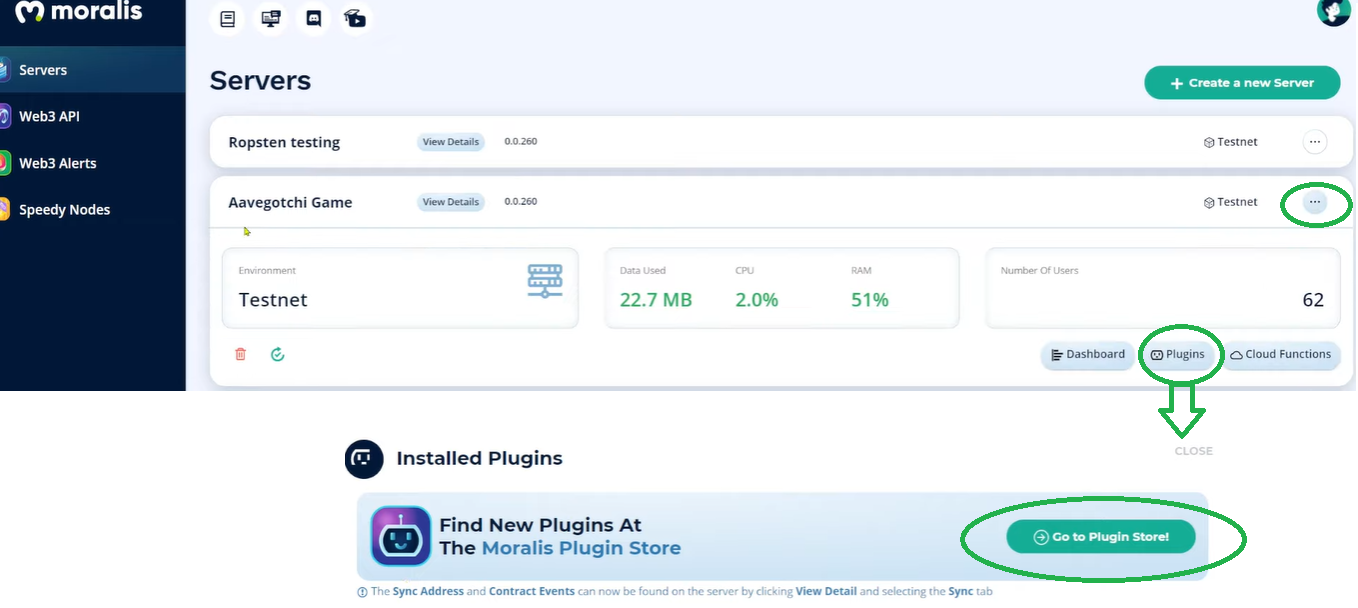
To start with the 1inch plugin setup, navigate to the “Servers” tab of your Moralis admin area. Once there, click on the three dots next to your server’s name. Once more options are shown, you’ll see the “Plugins” button. Now, click on it. Next, a pop-up window will appear. There you need to click the “Go to Plugin Store!” button (see the image below).
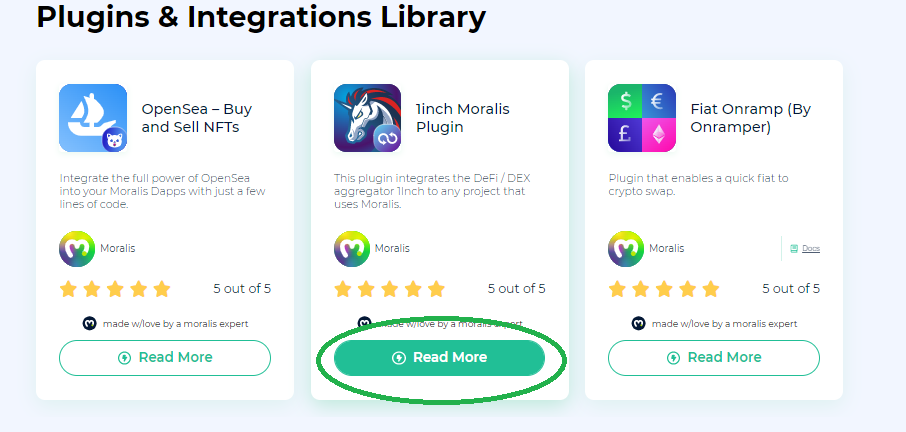
Enter the final stage of the process by selecting the 1inch plugin (click the “Read More” button under Moralis’ 1inch plugin):
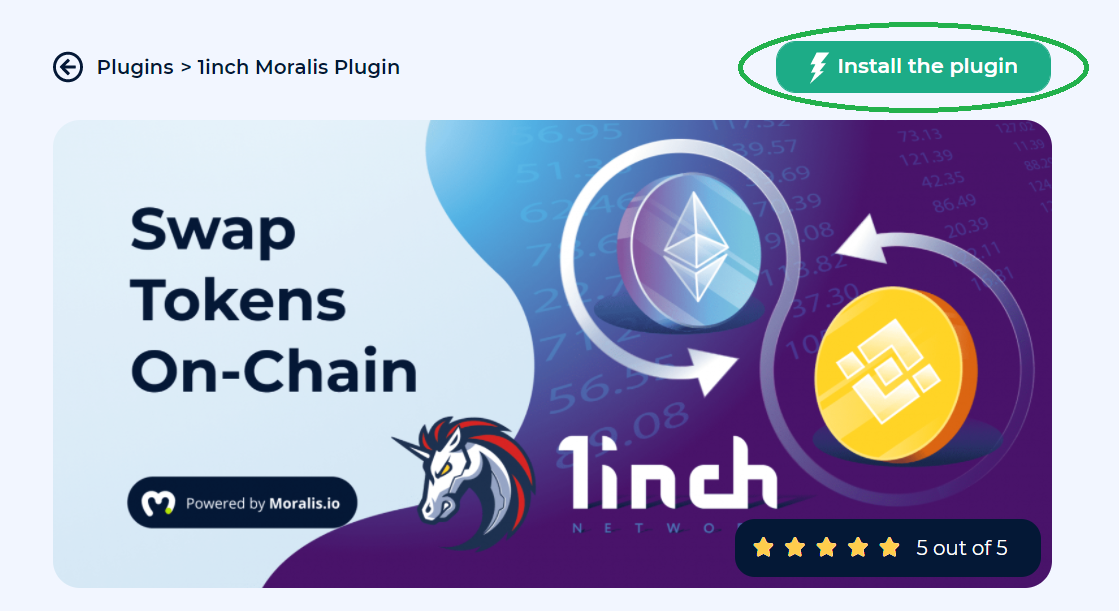
Next, you’ll transfer to the next page, where you’ll have an option to finally install the plugin. All that’s left to do now is for you to click on the “Install the plugin” button:
Once you’ve completed the installation, you should be able to see the 1inch plugin listed inside the “Plugins” option:
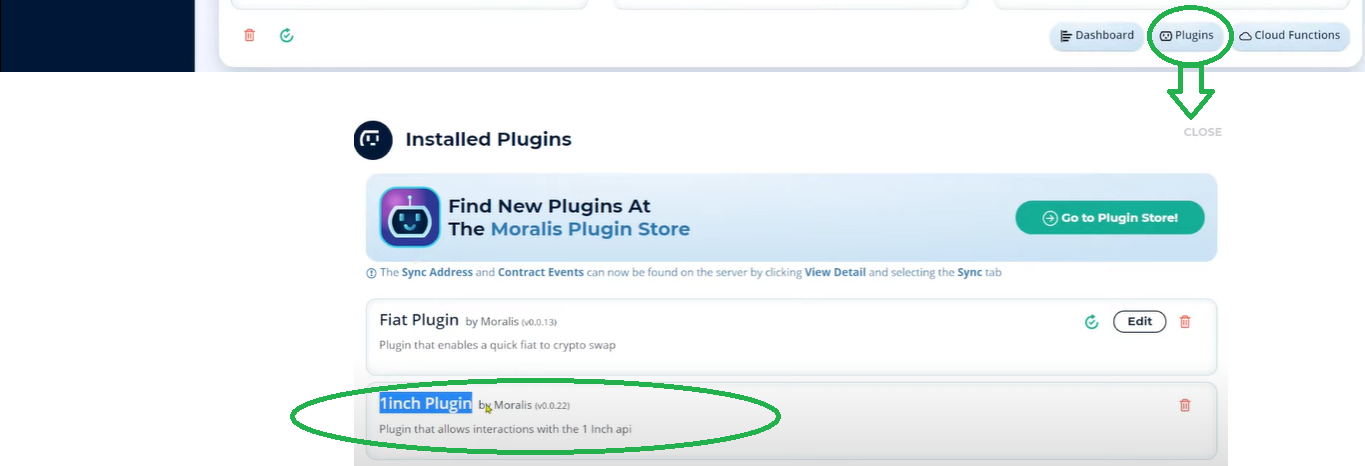
Your dApp now has the DEX functionality enabled.
A Beginner’s Guide to the Web3 Boilerplate – Video
If you are more of a video person, then make sure to watch the following video. In that video, Ash from Moralis explains how to utilize the Web3 boilerplate (a.k.a. Ethereum boilerplate) when developing dApps with Moralis. As such, you’ll get to explore the boilerplate in more in-depth detail so you can utilize the Web3 boilerplate easily and quickly.
Web3 Boilerplate – Beginner’s Guide to Web3 – Summary
We’ve covered quite a lot of ground, and if you’ve followed our lead, you now know how to create quite an impressive dApp using our Web3 boilerplate. All it takes is to create a local copy of the boilerplate’s GitHub address and initiate instances using a code editor. In addition, you need to create a Moralis server, which provides your dApp with all of the backend functionality. All in all, by using this guide, even a complete beginner should have a fully functional dApp up and running in record time.
Moreover, in case you’ve used any Web3 application before, you must agree that the set of functionalities offered by the Web3 boilerplate dApp is quite extensive. It covers all aspects that most dApps should include without any coding. Plus, the incredible part is that instead of spending weeks or months building the backend to include all of that, you get to the same point in under 15 minutes.
Moving forward, it is up to you to think of ways to make your Web3 boilerplate dApp unique. To give you some ideas, we recommend visiting the Moralis YouTube channel and the Moralis blog. There you’ll find many different example projects, including how to build an Ethereum social network, how to lazy mint NFTs, how to create thousands of NFTs, how to use an Ethereum mobile boilerplate, and many others. Furthermore, these are also excellent spots to learn about other useful tools such as OpenZeppelin, WalletConnect, and Remix.

