Thanks to Ethereum, the first programmable blockchain that remains the leading one, we see numerous Web3 applications launched daily on Ethereum’s blockchain. However, a mobile-first approach is uncommon among dApp (decentralized application) developers. This is unfortunate since most users these days tend to use their mobile devices rather than their computers. As such, a blockchain developer should seize the opportunity and focus on building user-friendly dApps with a mobile-first intent. Therefore, to simplify and shorten the development process of creating Ethereum dApps for smartphones, Moralis created the ultimate Ethereum mobile boilerplate. This full guide to Ethereum for mobile will explore this phenomenal boilerplate and its components to see how it works so you can create and launch your mobile dApp for Ethereum in record time.
Ethereum Mobile Boilerplate GitHub w/ Full Code and Info – https://github.com/ethereum-boilerplate/ethereum-react-native-boilerplate
Moralis’ ultimate Web3 development platform equips frontend developers with a full-stack Web3 SDK to cover all their blockchain-related backend needs. Furthermore, the entire platform was developed with cross-chain interoperability in mind. That way, you can create Ethereum dApps first and then easily deploy them to other reputable chains. However, in our quest to further simplify the development process of creating Web3 applications, we recently created a straightforward Ethereum dApp boilerplate. Moreover, we’ve also been working on an Ethereum mobile boilerplate to help developers onboard mobile users into the crypto realm with maximum ease as well. We’re excited to announce that the latter is now ready. As such, we’d like to invite you to take a deep dive into the Ethereum mobile boilerplate as we show you its main features, functionalities, and how to get started. Also, make sure to create your free Moralis account so that you’ll be able to follow along as we create an example mobile dApp.
Prerequisites
We created this Ethereum mobile boilerplate in a way that even complete beginners can have a working mobile dApp up and running in minutes. However, to make the most out of it and Moralis, it is recommended that you are JavaScript proficient. Moreover, being able to answer “what is WalletConnect” and knowing how to use it is also a plus. In addition, being used to working with a code editor will also make things simpler for you. We use Visual Studio Code (VSC); however, feel free to use a code editor of your choice.
This Ethereum mobile boilerplate is based on React Native templates. Therefore, being familiar with React Native may help you get started with greater confidence. However, even if you’ve only worked with React before, you should be good to go. In addition to Moralis, WalletConnect, MetaMask, and code editors, there are other useful open-source websites where you can obtain free code templates to further speed up the process when you decide to move beyond Ethereum mobile boilerplate functionalities. One of such sites is OpenZeppelin. Also, in case you are interested in creating web applications, we can lead you on the path of building dApps with MetaMask.
Nonetheless, in case you do not know JavaScript yet, we recommend enrolling in the 2021 JavaScript Programming for Blockchain Developers course at Moralis Academy. Also, make sure to explore other high-quality courses offered by Moralis Academy. Moreover, if you’d like to take a small step before enrolling in a course, we encourage you to check out our article informing you about the best way in how to become a blockchain developer.
Ethereum Mobile Boilerplate Walkthrough
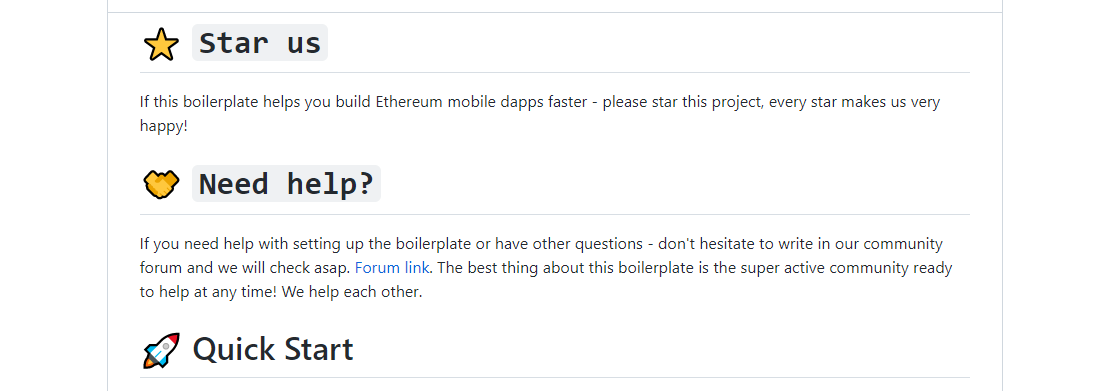
Once you land on the GitHub page for the best Ethereum mobile boilerplate (provided at the top of the article), you will get some useful information about the boilerplate. After inviting you to start the project and join the community, you will see the quick start section. We will cover the details of that section later in this article, as we’ll create an example mobile dApp. So, for now, let’s focus on Ethereum components and hooks that the ultimate Ethereum mobile boilerplate provides you with.
Components of the Ethereum Mobile Boilerplate
The Ethereum components that we provide you within this boilerplate include numerous functionalities as well as a user interface (UI). As such, they are the way to go if you are looking to have a fully functional mobile dApp ready in minutes. Moreover, since this Ethereum mobile boilerplate is a live project, new components will be added constantly; however, at the moment, you have access to the following:
- <CryptoAuth /> – This component offers a simple and easy way for Web3 authentication or Ethereum authentication via WalletConnect.
- <NativeBalance /> – This component makes displaying native balances as straightforward as possible. Moreover, it comes with an option to define a chain (the default chain is Ethereum).
- <ERC20Balance /> – This component covers displaying balances of all ERC-20 tokens. Just like “<NativeBalance />”, it also comes with the “chain” option to determine a particular chain.
- <Assets /> – This component provides your mobile dApp with a screen that displays all of the chain’s ERC-20 and native assets with prices.
- <RecentTransactions /> – This component provides your mobile dApp with all ERC-20 chain transactions.
- <TransactionDetails /> – By using this component, you get to access a modal that displays all ERC-20 transaction-related details.
- <Address /> – This component displays the user’s address in a copyable manner.

Another excellent thing about the components presented above is that they can be used anywhere in your mobile dApp. All you need to do is use one of the commands listed above. Moreover, as you can see, some of the components come with additional options. Furthermore, you will see how easy it is to use the components of our Ethereum mobile boilerplate as we’ll go through the example project below.
How to Use Hooks
Unlike the components, hooks do not include a UI. Yet, they enable you to use Moralis’ Web3 API, which will cover the blockchain-related backend functionality with simple and short snippets of code. As such, you are given additional options when it comes to functionality. Moreover, you get to put your frontend skills to use and create the best possible UI according to your users’ needs and wants.
Furthermore, just like with the components, we plan on adding more hooks over time to provide you with additional options. However, these are the hooks currently available in the most practical Ethereum mobile boilerplate:
- useERC20balance()
- useERC20Transfers()
- useNativeTransactions()
- useTokenPrice()
- useNFTTransfers()
- useNFTBalance()
The best way to learn all the details about the above hooks is to check out Moralis’ documentation. It is one of the best documentation in the industry and includes example projects, video explanations, and much more.
Ethereum Mobile Boilerplate in Action – Example Project
As mentioned previously, we will take on an example project where we’ll create a fully functional mobile dApp in minutes using the Ethereum mobile boilerplate. We invite you to follow along with every step to make the most out of this section. That way, you will learn how to set things up properly for your future dApp endeavors.
Mobile dApp Demo
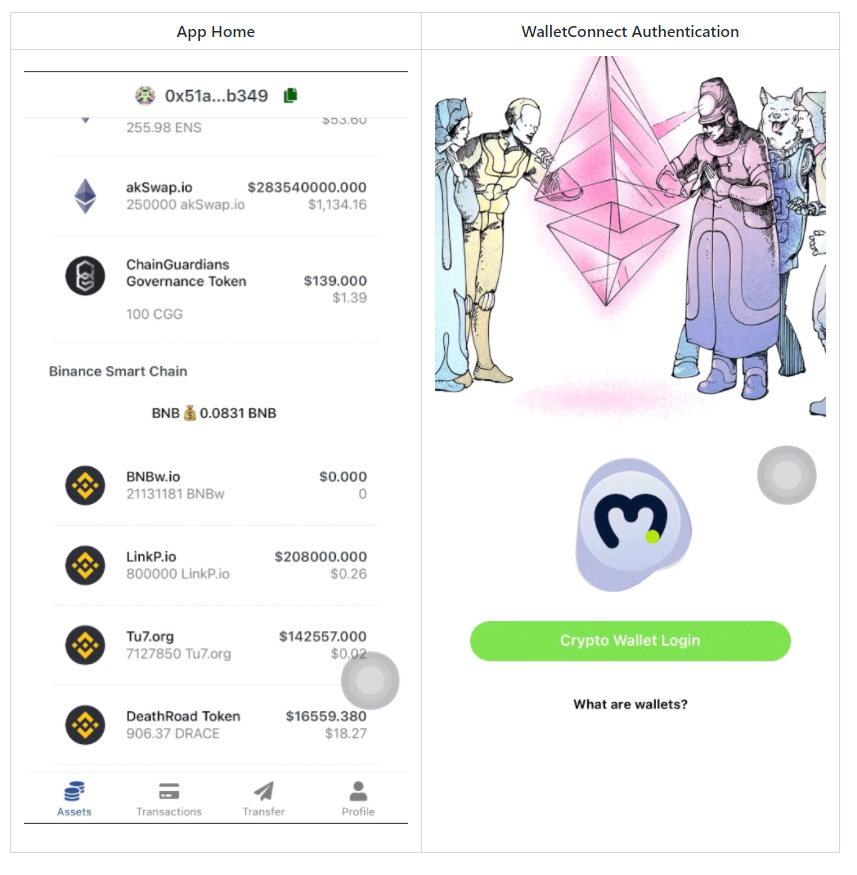
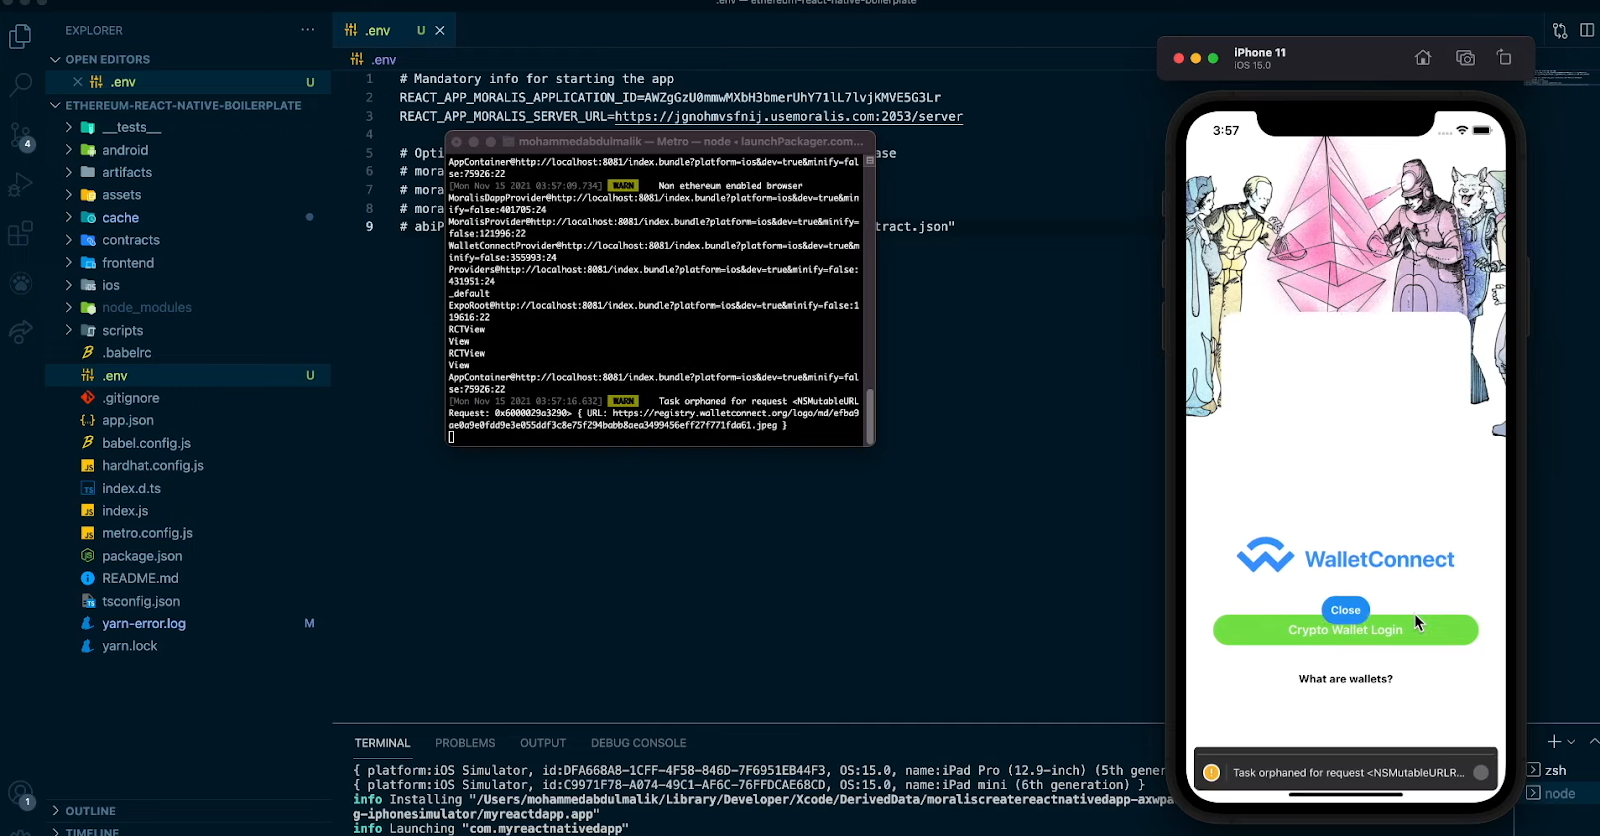
Before we move on any further, we want you to have a solid sense of what we will be creating. As such, let’s take a look at our finished mobile dApp. So, this is how the login page looks like:
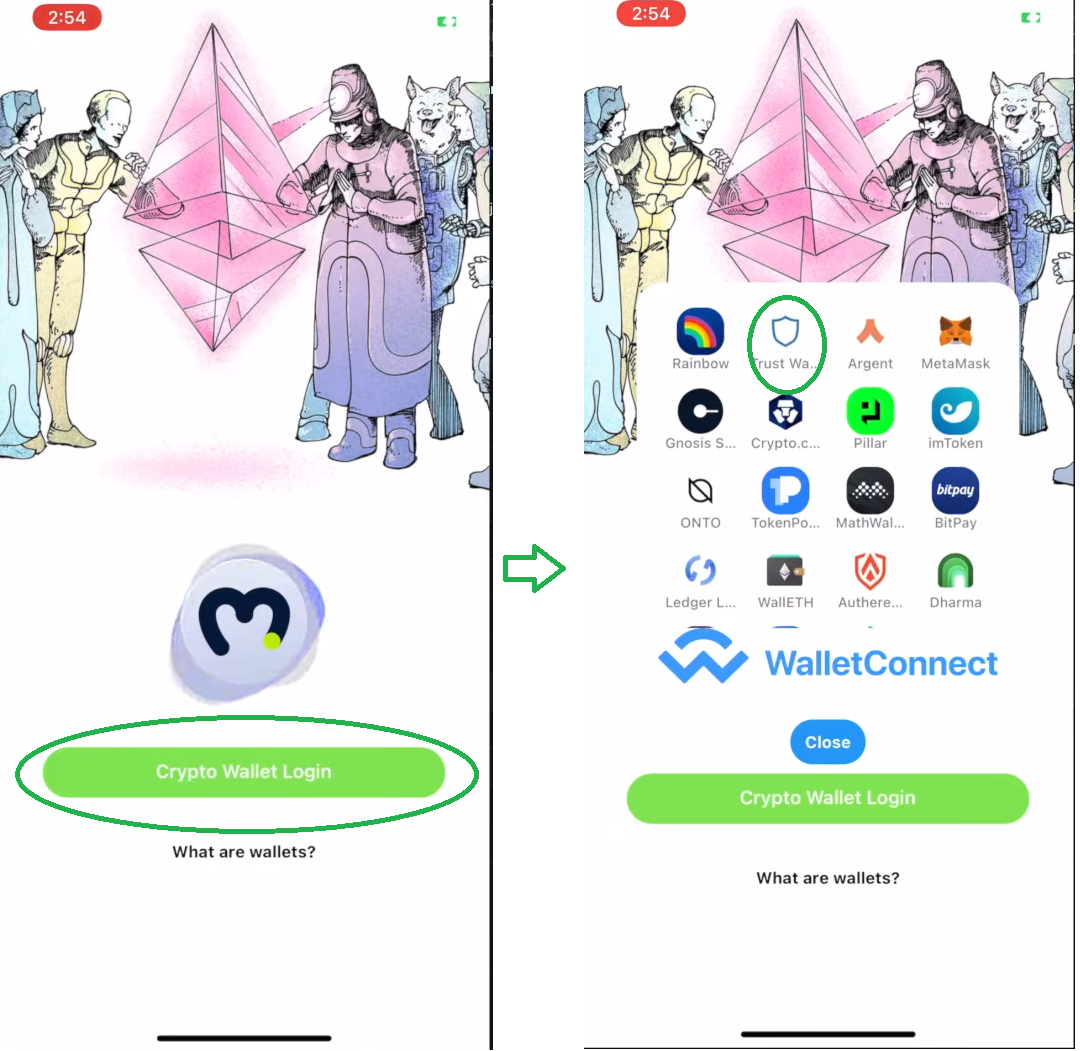
As you can see, looking at the image above, we provide users with a login option via WalletConnect. As soon as the users tap the “Crypto Wallet Login” button, WalletConnect offers them to choose the wallet they want to use to log in. For this demonstration, we went with Trust Wallet.
Once you authenticate the users, users can log in and able to access the dApp’s functionalities. These include viewing assets and balances across multiple chains (supported chains are currently: Ethereum, Binance Smart Chain, Avalanche, and Polygon).
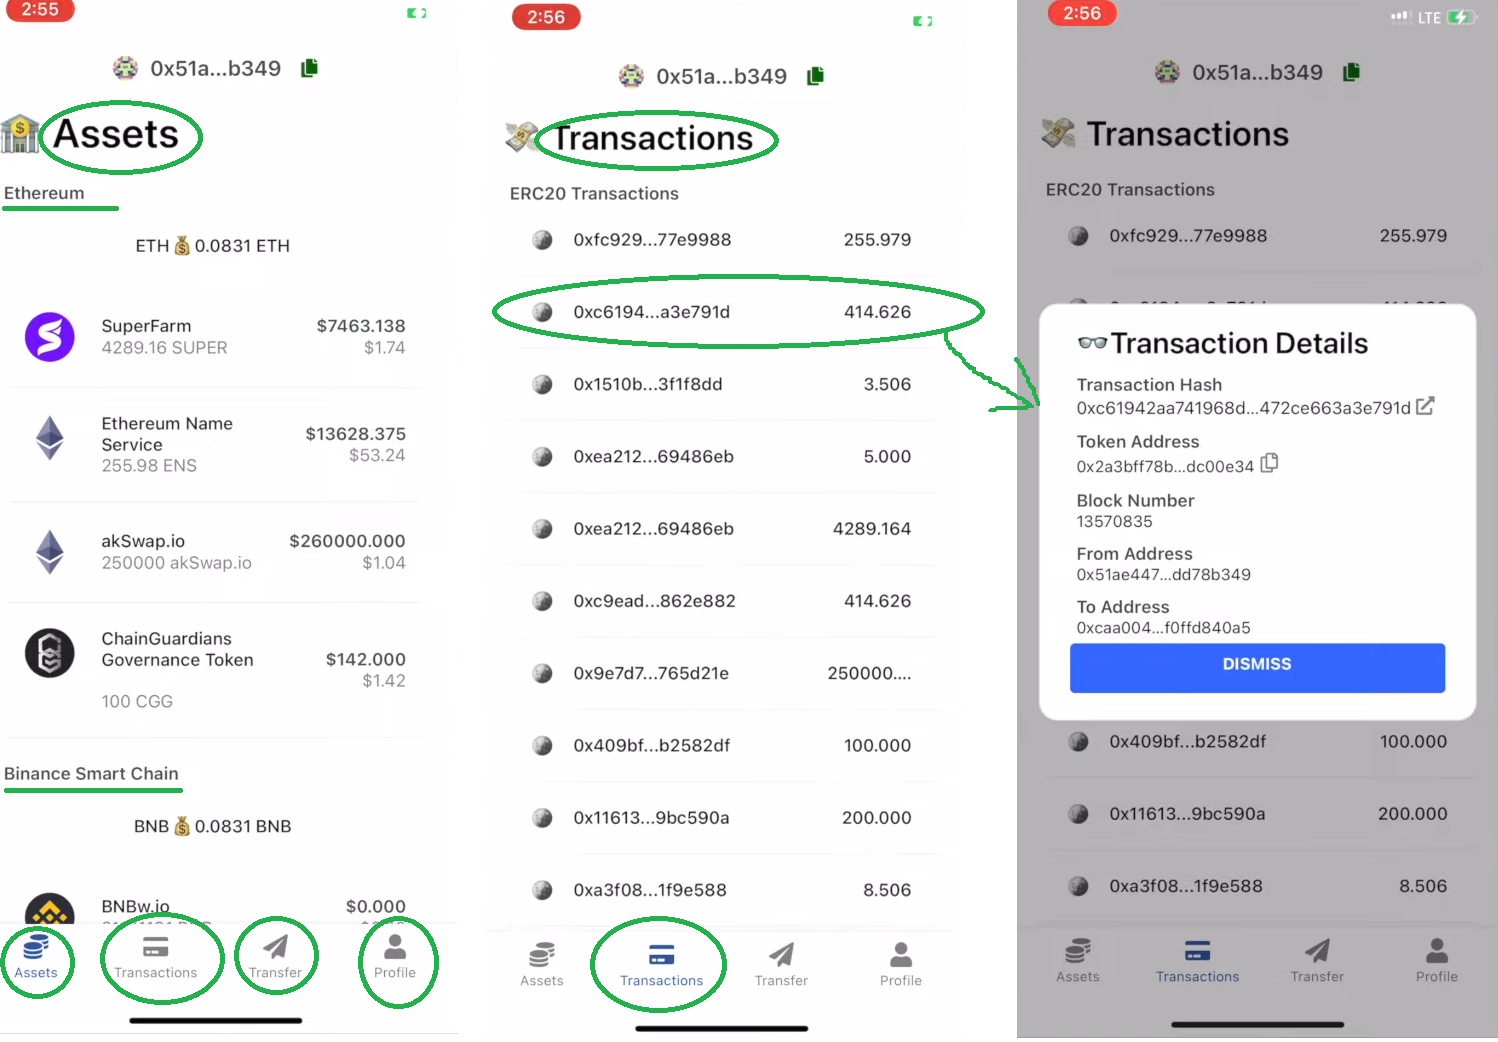
The second tab shows transactions. Users can easily access the details of any of the transactions by tapping on it. This prompts a pop-up window with details and a link to the transaction explorer. Next, we have the “Transfer” tab, where your users can send assets. They just need to enter the address of the recipient, select the asset that they want to send, enter the amount, and tap the “Transfer” button (it becomes active after all of the previous details have been entered):
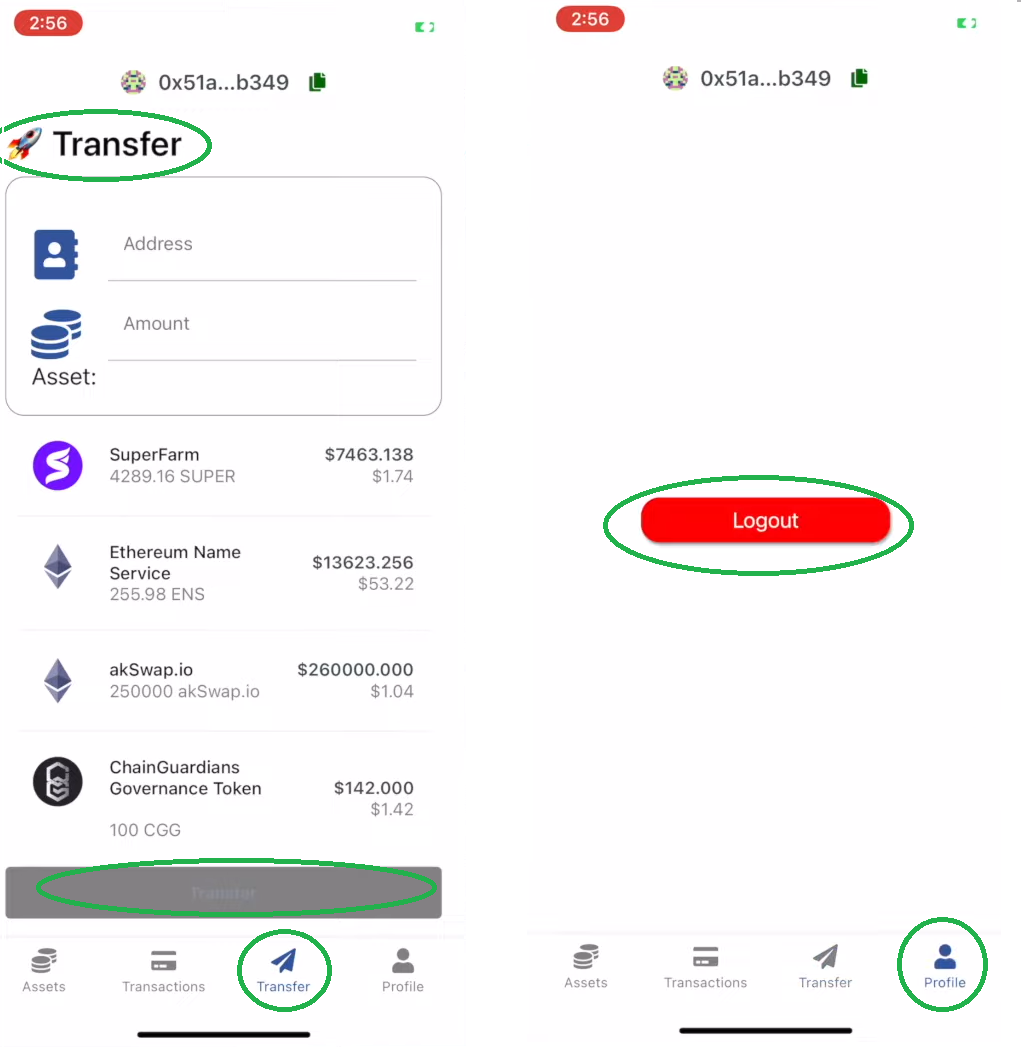
Finally, we have the “Profile” tab, where users get to log out. By doing so, the dApp again displays the initial login screen.
If you know a thing or two about Web3 applications, you can see that the above mobile dApp includes all of the basic functionalities. It also looks neat and clean. Moreover, the best thing is that you can create it in a matter of minutes using the ultimate Ethereum mobile boilerplate.
Getting Started
To get started with the Ethereum mobile boilerplate is extremely simple. Essentially, you need to complete the following five steps as shown in the following image:
However, some of the steps above require some additional sub-steps to get things ready. As such, let’s go through each step together.
First, we need to clone or fork the Ethereum mobile boilerplate. You do this by clicking the copy icon next to the GitHub URL:

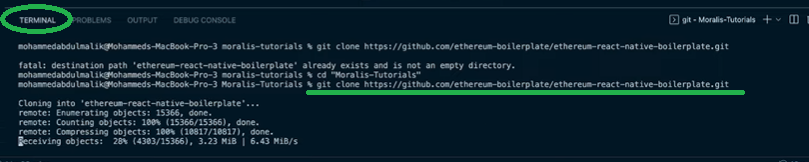
Then you go to your code editor (VSC in our case) and paste the copied URL in the VSC’s terminal:
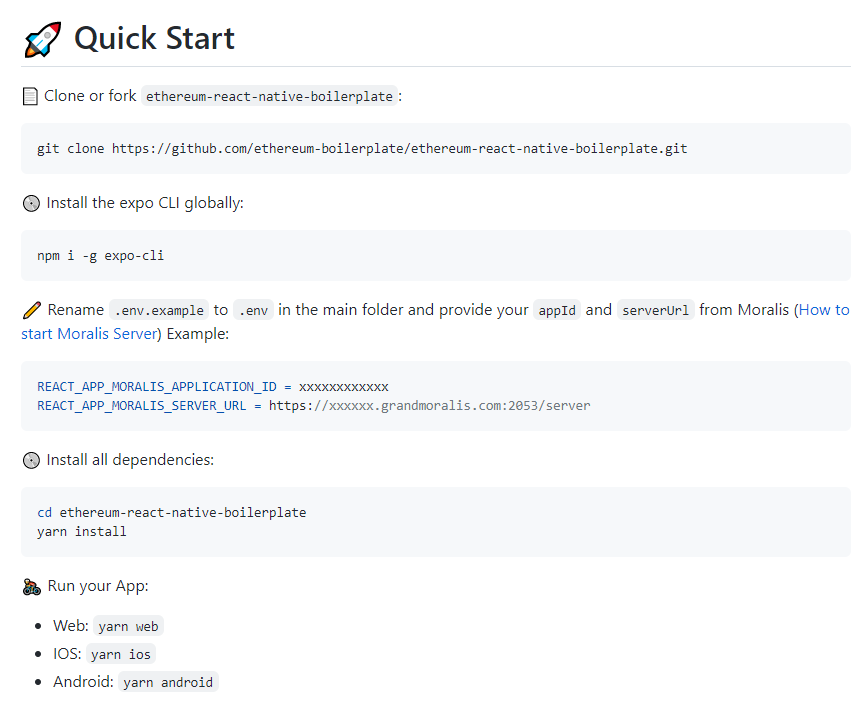
Moving forward, we need to install the “expo CLI” globally. We do this by copying the code from the Ethereum mobile boilerplate’s GitHub page into the code editor’s terminal:

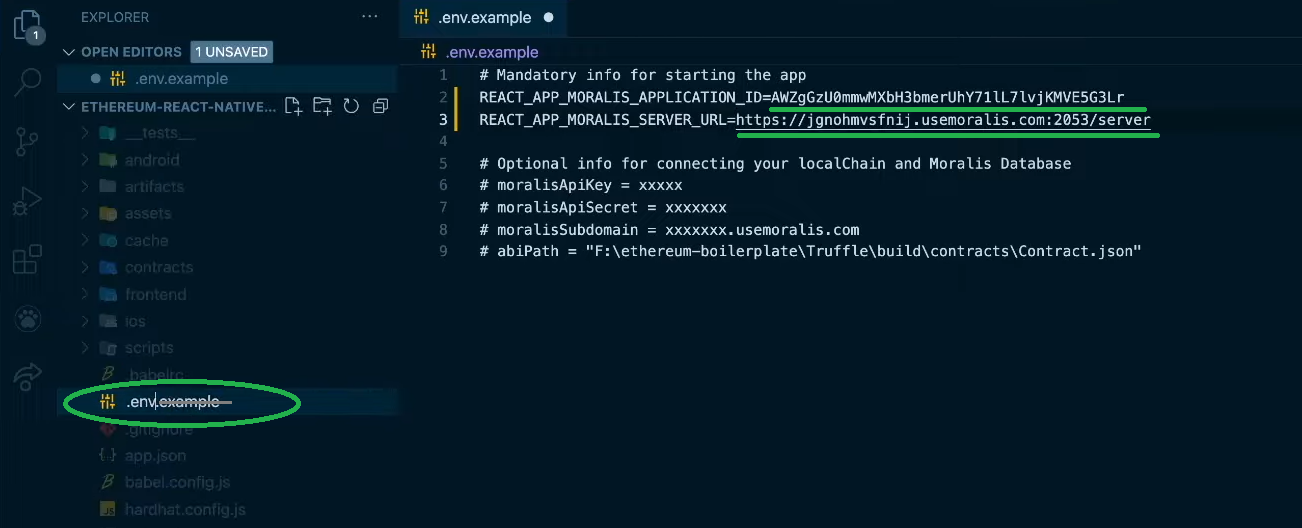
Next, we need to rename the “.env.example” file to “.env” and insert your Moralis server URL and application ID (follow the instruction in the subsection below to set up your server and obtain its details):
Then we need to install all the dependencies. However, since we are already in the folder, we can skip the “cd ethereum-react-native-boilerplate” command and move on to the next command. So, type or paste “yarn install” in the terminal:

All that is left to do now is to run your dApp. The command you need to use for this depends on the operating system you are working with:
- Web: yarn web
- iOS: yarn ios
- Android: yarn android
Since we are using iOS, we go with the “yarn ios” command, which will also automatically initiate the mobile app simulator:
Moralis Server Setup
In order to make use of the Ethereum mobile boilerplate, complete the following steps:
- Log In to Your Moralis Account – At this point, you probably already have your Moralis account ready. So, just log in to access your admin area. However, if you haven’t created your free Moralis account yet, make sure to do so now by registering for free.
Create a New Server – Once you’re inside your Moralis admin area (as shown in the image below), click the “+ Create a new Server” button in the top-right corner. This will cause a drop-down menu to appear. Then select the network type that best suits your needs. For example projects, you can go with the “Testnet Server” option (check out our Ethereum testnet guide); however, once you’ll want to get your dApps live, you’ll want to select the “Mainnet Server” option.

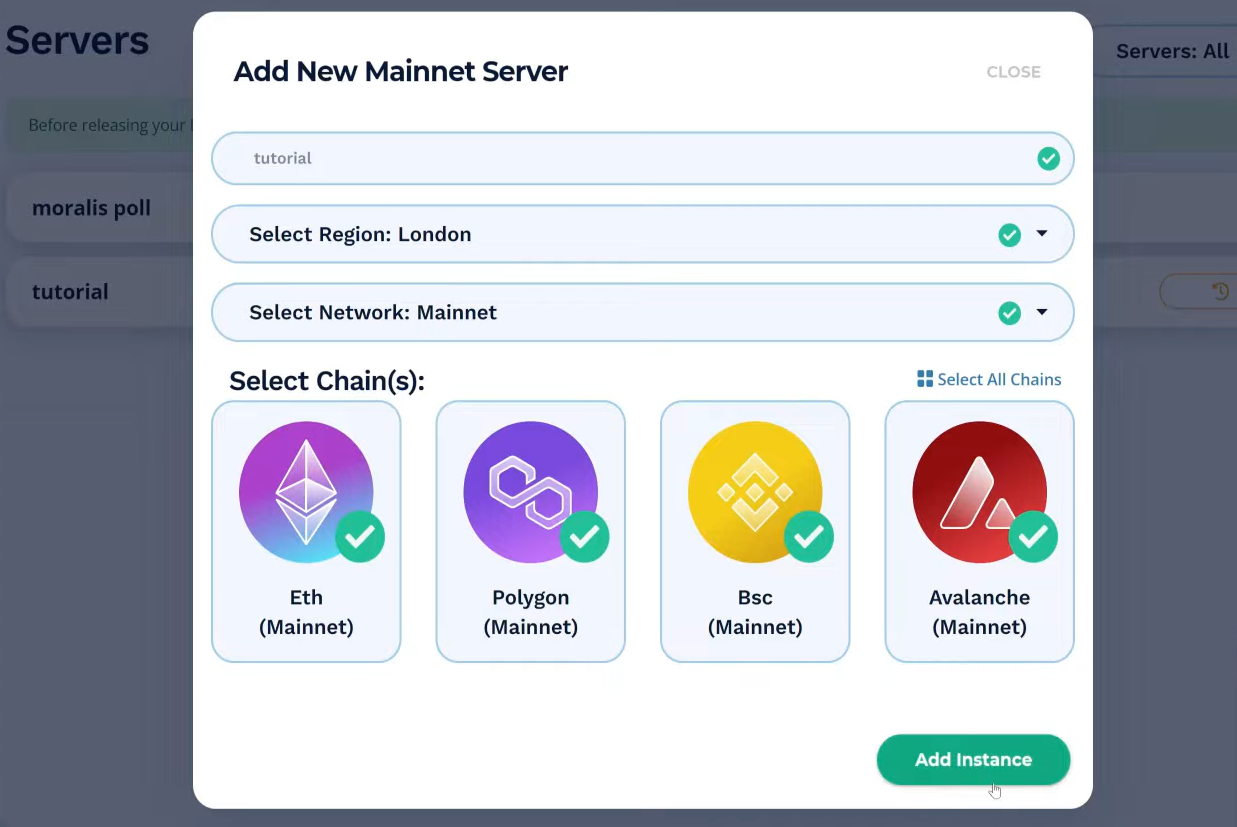
Next, you’ll see a pop-up window asking for the server name (this can be anything you want), region, network, and chain(s). Enter this information and click “Add Instance”. It may take some time for the server to spin up, so please be patient.
- Access Server Details – As soon as your server is ready, you get to access its details by clicking the “View Details” button next to your server name.

After clicking the “View Details” button, another pop-up window will display. There you’ll find your server URL and application ID:
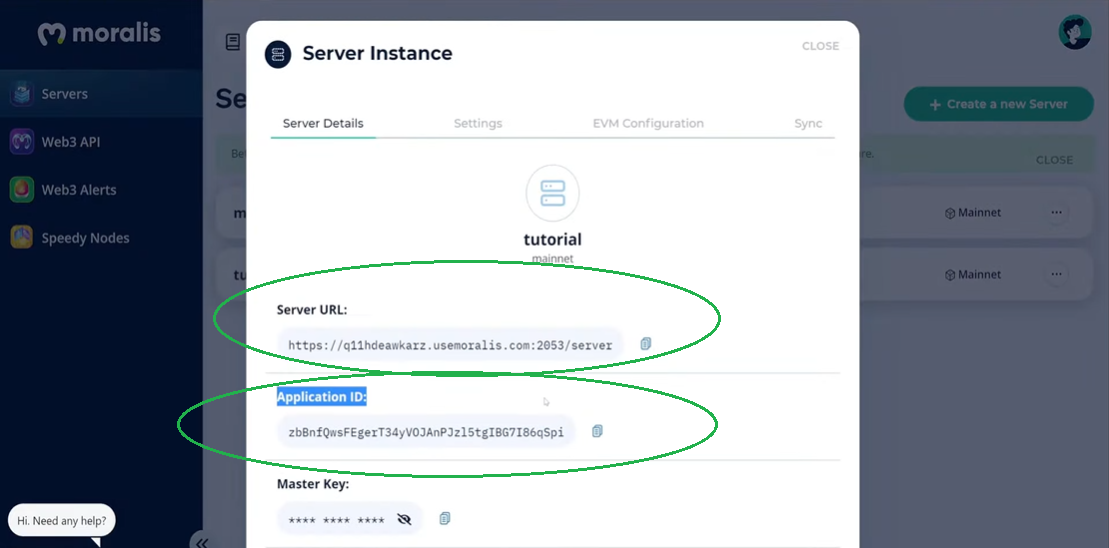
- Initialize Moralis – Now, you need to populate your “.env” file with the Moralis server details (application ID and server URL) to obtain the required backend functionality covered by Moralis. Simply copy and paste each of the above two details:

Note: Do NOT use the details from the image above. Instead, you need to make sure to use the details of your particular server.
Make Your Unique Tweaks
By completing the steps from the previous section, you already have a fully functional dApp on your hands (as presented in the “Ethereum Mobile Boilerplate in Action – Mobile dApp Demo” section above). Now it is up to you to make the necessary tweaks to make your mobile dApp unique. Remember, aside from using the components, you may step things up by using the hooks of the Ethereum mobile boilerplate.
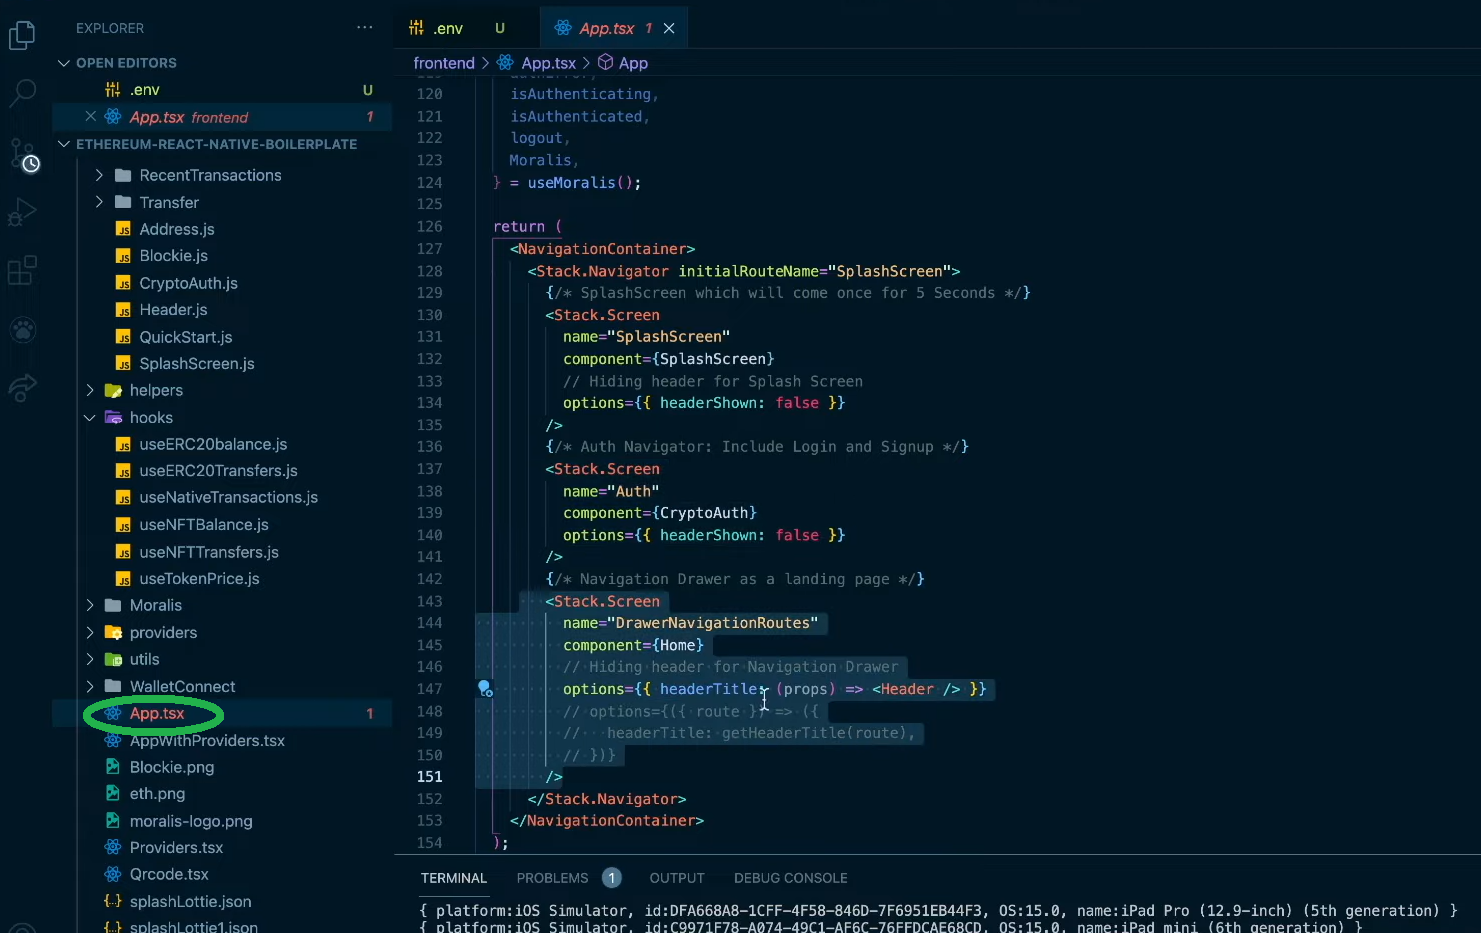
The code for your decentralized application is in the “App.jsx” file. Looking at the image above, you can see that the code ensures that we have proper navigation and all of the images as the “Ethereum Mobile Boilerplate in Action – Mobile dApp Demo” section shows. Also, remember to use additional options that Moralis has to offer. The latter include smart contract events, address casing, creating live queries, various triggers, and much more.
Furthermore, in case you are more of a video person and would prefer to learn about the Ethereum mobile boilerplate by watching a Moralis expert cover the details, make sure to check out this video:
Ethereum Mobile Boilerplate – Full Guide to Ethereum for Mobile – Summary
If you are serious about blockchain development, then you’ll take the knowledge obtained herein and create some phenomenal mobile dApps. Especially since you know that most people spend way more time on mobile phones than they do on their computers. Therefore, creating quality mobile Web3 applications is surely the way to go in order to achieve mainstream adoption of this disruptive technology.
Throughout this article, you’ve learned about the components and hooks that the ultimate Ethereum mobile boilerplate provides you with. Moreover, we’ve shown you how to set things up and get started with mobile dApp development the easy way. Also, if you’ve followed our steps, you’ve created your own mobile dApp containing all of the basic and necessary features.
We hope that the example project has inspired you and that you already have some nice ideas of what to create. As such, you’ll put this Ethereum mobile boilerplate to use and deliver unique mobile dApps in no time. In case you need additional inspiration or guidance, make sure to visit the Moralis YouTube channel and the Moralis blog.