Non-fungible tokens, metaverse, and play-to-earn games, these three specific use cases of blockchain technology on networks such as Ethereum, have the greatest potential to onboard the masses to Web3. Moreover, there is another area that has huge potential – decentralized social media. In 2021, we all know what power and popularity social media have; however, we’re also aware of centralized giants who have misused their power. As such, we should all aim to ensure that the future of social media is decentralized. Thus, learning how to create an Ethereum social network should be on your radar. While building such an advanced social Web3 network for Ethereum might seem cumbersome, there are powerful tools available that can simplify the process. As such, with Moralis, you can create a censorship-resistant Ethereum social media platform in record time.
In this article, we’ll show you how to use Moralis’ ultimate Web3 development platform in combination with the best Ethereum dApp boilerplate so you can create an Ethereum social network easily. Moreover, while Ethereum’s programmable blockchain remains the most popular one, other reputable chains are also gaining popularity. Furthermore, thanks to Moralis’ cross-chain interoperability, you get to build an Ethereum social media platform and then easily deploy it on other supported chains. The latter include Polygon, Binance Smart Chain (BSC), and Avalanche, with several other chains already in the pipeline. With that in mind, be rest assured that your project will be future-proof. As we go further into this article, we’ll cover an example project where we’ll use the above-mentioned tools to create an Ethereum social network.

Ethereum Social Network – Example Project
There are many social media platforms out there, but many of them are in control of big corporations primarily interested in profits, unfortunately. However, there’s one platform that’s managed to focus on users’ best interest above all – Reddit. As such, we decided to take on a project where we create some sort of decentralized clone of this popular platform and name it “Decentradit”.
We invite you to take on this example project yourself by following our lead. Unlike most of our other projects, such as “create an Ethereum dApp instantly” or “building dApps with MetaMask”, which we usually manage to complete in minutes, it will take us slightly longer to finish this challenge. However, we believe it’s still quite impressive to build an entire Ethereum social media platform in a couple of hours.
If we were to go about creating an Ethereum social network by building directly on top of an RPC node, it would take us weeks, if not months. However, by using Moralis and its ultimate Web3 SDK and Ethereum API, we will fast forward our progress multi-fold and overcome all of the limitations of RPC nodes. That’s possible because Moralis takes full care of the blockchain-related backend, which means we get to fully focus on the frontend. Moreover, this also enables JavaScript proficient developers with no blockchain knowledge to develop even the most advanced dApps (decentralized applications), such as an Ethereum social network.

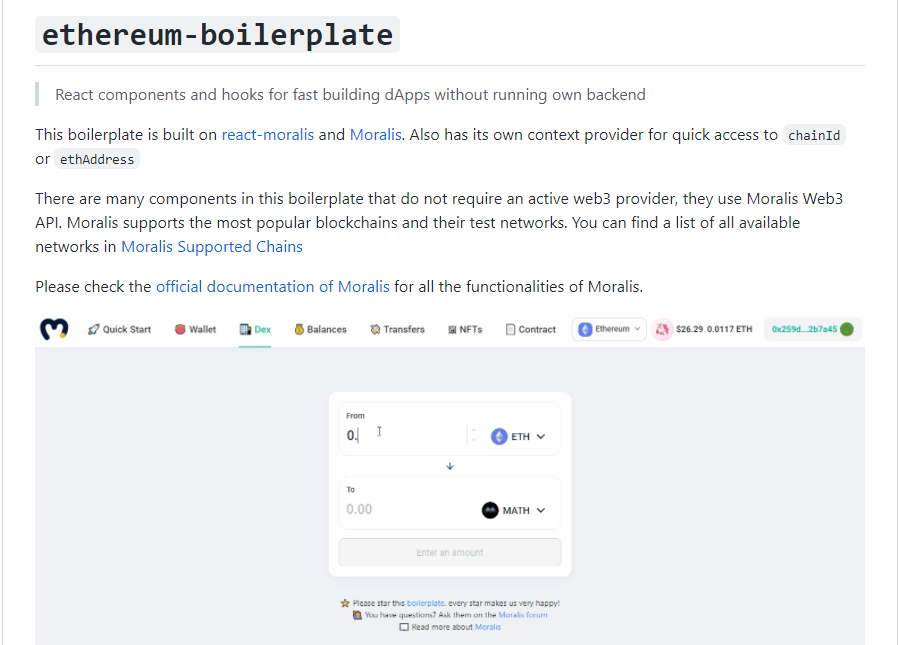
Furthermore, we will additionally speed up the development of our Ethereum social media platform by using the ultimate Ethereum dApp boilerplate, which we made publicly available at GitHub. In addition to a wide range of useful hooks, the boilerplate also includes several components that incorporate a fantastic UI, saving us a lot of time.
Ethereum Social Media Platform – Preview
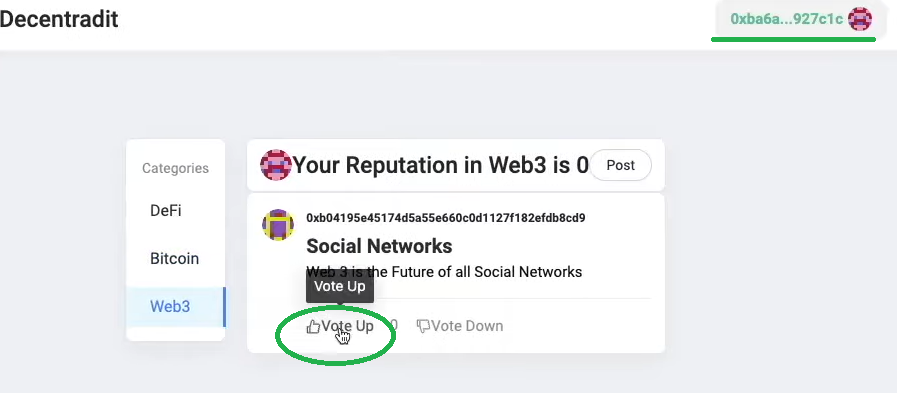
Before we start setting up all the tools and then actually take on the coding process, we want to show you what kind of Ethereum social network we will create. Those of you who are familiar with Reddit will most likely spot the similarities right away. So, here is an image of our Ethereum social media platform:

Looking at the image above, you can see the name (Decentradit) of our Ethereum social network in the top-left corner. On the other side (top-right corner), you can see a logged-in user’s address. On the other hand, if a user was not logged in, the “Authenticate” button would be displayed. That button utilizes MetaMask as one of the most popular Ethereum authentication tools.
Furthermore, looking at the core of our Ethereum social media platform, you can see that it incorporates users’ reputations and posts in different categories. Once inside a certain category, users can post by clicking the “Post” button. Moreover, each post has the creator’s address on top, followed by a title and then the content. In addition, each post can be up-voted or down-voted, and it is based on these up-votes and down-votes that users get to build up their reputation. This is an area where you can create specific rules to ensure more credibility. For instance, you can add a rule that will multiply votes made by users with a greater amount of votes.
Ethereum Social Media Platform – Preview – Creating a New Post
Here’s an example of us creating a new post inside the “Web3” category:

We start by selecting the “Web3” category and then click the “Post” button. Next, we add the title and the content. We complete the process by clicking the “Submit” button, which triggers our MetaMask. Since we have created an Ethereum social network, it means it needs to interact with a blockchain. As such, our “Submit” action needs to be treated as an on-chain transaction, which we verify with the help of MetaMask:

If a transaction goes through, which it did in our case, the new post goes live:

Once a post is live, other users can vote it up or down. Let’s take a look at how we do this by logging in with another address.
Ethereum Social Media Platform – Preview – Voting
Once we log in with another address (this represents another user), we are able to vote for the post we’ve created above by clicking the “Vote Up” button:
As with the “Submit” button in the previous section, we need to confirm our action with MetaMask, which is prompted automatically:

After confirming, we can see that the transaction has gone through since the “Vote Up” button is now “grayed”, which means that we’ve already voted:

Moreover, if we log in again with the account that created the post, we can see that that user’s reputation in the “Web3” category now is “1”:

The images and explanations above cover the gist of our Ethereum social network. If you enjoy this social media platform and would like to learn how to build your own Ethereum social network, then move on to the next section. There, we will first focus on helping you to set up the tools. Then, we’ll let one of Moralis’ experts take over and guide you through the details with a video tutorial. Moreover, since we’ll now start using the ultimate Web3 development platform (a.k.a. Firebase for crypto), make sure to create your free Moralis account before moving on.

Creating an Ethereum Social Network with Moralis
The fastest way to create any kind of Web3 application is basically by using the best Ethereum dApp boilerplate, which is extremely easy to use, combined with the power of Moralis. Moreover, we will be using this powerful duo to create our Ethereum social network. However, before we hand you over to a Moralis expert, who will show you how to make the necessary tweaks to create an Ethereum social media platform as presented in the previous sections, let’s help you set things up.
Creating an Ethereum Social Network with Moralis – Boilerplate Setup
In order to use the best Ethereum dApp boilerplate, you need to set it up properly by following these steps:
- Start by visiting the ultimate Ethereum dApp boilerplate webpage on GitHub: https://github.com/ethereum-boilerplate/ethereum-boilerplate.
- Next, fork or clone the “ethereum-boilerplate” depository using “git clone https://github.com/ethereum-boilerplate/ethereum-boilerplate.git”. Feel free to use the copy button on the page linked above:

With the address copied, move over to your code editor (we usually use Visual Studio Code [VSC]) and paste it in VSC’s terminal:

- Then, it’s time to install all dependencies using your code editor’s terminal:
- cd ethereum-boilerplate
- yarn install

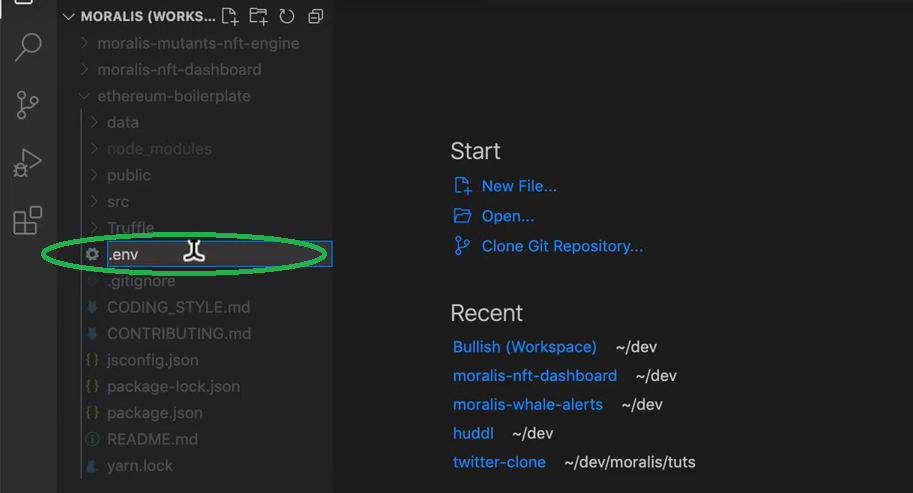
- Next, add the “Ethereum-boilerplate” folder to your code editor:

- Now, rename the “.env.example” file to “.env”:
- In order to access Moralis’ backend functionality, you are required to provide your Moralis server’s “appId” and “serverUrl” inside the file you’ve just renamed (“.env”):

In order to get your server details, follow a separate set of instructions in the “Setting Up Your Moralis Server” sub-section below. With the Moralis server’s details at your disposal, copy and paste them to the “.env” file:

- Finally, you get to run your app by typing or pasting “yarn start” inside your code editor’s terminal:


Note: While we used “yarn”, you may also use “npm package manager”.
After completing all of the seven steps above, you should have a functional dApp working. However, we are still quite a long, long way from having created our Ethereum social network. Fortunately, using the boilerplate saves us a lot of time as we can use many of the components by applying rather simple tweaks.
Setting Up Your Moralis Server
Creating your own Moralis server is essential when developing with Moralis. By creating your Moralis server and obtaining its details, you get to equip your dApps with backend functionality with simple snippets of code. Here are the steps you need to take to complete your Moralis server setup:
- Log In to Your Moralis Account – By now, you should already have created your Moralis account. As such, just log in to access your admin area.
- Create a New Server – Inside the “Servers” tab within your Moralis admin area, click the “+ Create a new Server” button. That will prompt a drop-down menu where you should select the network that matches your needs (see the image below). Selecting the “Testnet Server” option tends to be the best way to go when programming example projects (connect to Ethereum testnets).

Next, enter the server name (this can be anything you want). Following this, you can select region, network, and chain(s) in the pop-up window that appears:

Complete the server creation process by clicking “Add Instance”. Note that it can take some time for the server to spin up, so be patient.
- Access Server Details – Once your server is ready, you get to access its details by clicking the “View Details” button next to your server name:

The details will be displayed in a pop-up window:

To copy the details of your server, just click the copy icon next to the server URL and application ID.
- Initialize Moralis – Finally, populate your “.env” file with the Moralis server details. You can obtained these above, to gain the required backend functionality covered by Moralis:

Note: Make sure to use the details of your particular server and NOT the details from the image above.
Creating Ethereum Social Network with Moralis – Programming
If you’ve done the setup properly, you’re all set to apply your tweaks to create an actual Ethereum social network. As mentioned, an experienced Moralis developer will guide you through that process in the video below.
To simplify things for you even further, we made all of the files (containing the complete code) for this particular project available at GitHub. One of the most important parts of your Ethereum social media platform is a smart contract (decentradit.sol). The latter ensures all transactions relate to proper posting and voting (as you can see in the “Ethereum Social Media Platform – Preview” section). Moreover, in case you want a smart contract walkthrough, jump to 3:13 in the video below.
At 14:08 into the video, you get to learn how to set up event listeners for your Moralis server. After setting up event listeners, the Moralis expert will go through the Ethereum dApp boilerplate setup (21:58 – 24:50). This is something we’ve already covered above. Starting at 24:50, you’ll see what tweaks to apply and what files to add. After doing this, you’ll end up with an Ethereum social network that will look and function as presented previously. As far as the functionality goes, it’s vital to connect the application with the “decentradit.sol” smart contract (1:04:25). In order to obtain the highest level of decentralization, you’ll also learn how to make use of Moralis’ IPFS integration. The latter will enable you to store your Ethereum social network’s posts as content in a decentralized way.
Ethereum Social Network – How to Build an Ethereum Social Media Platform – Summary
Any JavaScript developer can create an Ethereum social network in less than two hours by using the above instructions. Of course, using the ultimate Ethereum dApp boilerplate gives you a noticeable head start. Moreover, by adding Moralis to the mix, you get to cover all of the backend aspects with single snippets of code. Of course, it takes relatively advanced JavaScript programing to end up with an impressive Ethereum social media platform. However, by looking over the shoulder of one of Moralis’ experts, the latter shouldn’t be an issue.
If you feel like this project was too advanced, we encourage you to consider taking on some other (beginner-friendly) projects available at Moralis’ YouTube channel and Moralis’ blog. For instance, you can learn how to launch an NFT marketplace or generate thousands of NFTs. You can also learn how to create mobile dApps with an Ethereum mobile boilerplate quickly and easily. Moreover, both of these outlets cover other powerful tools, such as WalletConnect and OpenZeppelin.
If you don’t know JavaScript or Solidity yet but are interested in becoming a blockchain developer, we recommend enrolling in the 2021 JavaScript Programming for Blockchain Developers course at Moralis Academy. Moreover, there are many other high-quality courses that can help you go full-time crypto quickly available at Moralis Academy.