Ethereum development is currently one of the most sought-after professions amongst programmers. Moreover, as programmers want to build dApps on Ethereum, they want to develop Web3 applications fast or, even more so, instantly. However, as there seems to be an “ocean” of niches and so many areas in the blockchain industry to focus on, such as DeFi, NFT games, digital art, etc., one might believe that creating a dApp instantly on Ethereum is a near-impossible task. Furthermore, some might even believe that cross-chain interoperability would be an issue as they would like to develop various dApps on multiple blockchains. In turn, this hinders many from even starting the development process.
Fortunately, using Moralis’ ultimate Web3 development platform with cross-chain functionality built-in, both new and experienced developers can undergo an easy and quick development process. As such, in this article, we’ll explore how to create an Ethereum dApp instantly with Moralis. You’ll then discover how its platform makes blockchain development feel like a breeze!
While developing new blockchains may be an extremely challenging task, creating cross-chain interoperable Web3 applications doesn’t have to be. Of course, you can make your life difficult by building directly on top of RPC nodes. However, there’s a way to overcome all of the limitations of RPC nodes by using Moralis. This ultimate Web3 development platform enables you to create an Ethereum dApp in an instant, with minimum effort. Furthermore, Moralis lets you expand your reach by building decentralized applications (dApps) on other supported chains, including Binance Smart Chain (BSC), Avalanche, Polygon, Arbitrum, and Fantom. Moreover, there are other reputable chains, such as Solana and Elrond, already in the pipeline. With that in mind, we hope that you are excited and ready to learn how to create an Ethereum dApp instantly.
Create an Ethereum dApp Instantly Using the Ultimate dApp Boilerplate
We spent quite some time and energy searching for a reliable Ethereum dApp boilerplate just to learn that there was none. As such, we rolled up our sleeves and created one ourselves. Moreover, in line with our mission to make as many developers’ tools available for free, we made our boilerplate available on GitHub. As such, in combination with Moralis, this is the tool that enables you to create an Ethereum dApp instantly. In fact, Moralis even offers a Ethereum mobile boilerplate, for React Native-driven “Etheum for mobile” development.
Furthermore, to offer you as much guidance as possible, we will go through all of the steps from start to finish and create an Ethereum dApp together. We invite you to implement the same steps as we move along to get the most out of this guide. Moreover, since we will be using Moralis, a.k.a. Firebase for crypto, to cover all of our blockchain-related backend needs, we recommend that you create your free Moralis account before moving on.

How to Create an Ethereum dApp Instantly – Boilerplate Setup
If you want to use the best Ethereum dApp boilerplate, you need to follow these simple steps:
- Visit the ultimate Ethereum dApp boilerplate webpage on GitHub: https://github.com/ethereum-boilerplate/ethereum-boilerplate.
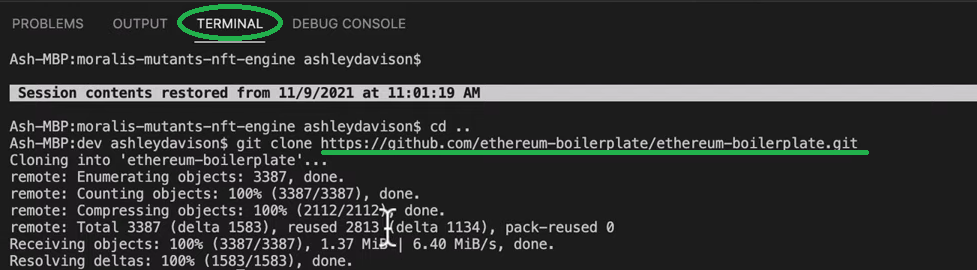
- Clone or fork the “ethereum-boilerplate” depository using “git clone https://github.com/ethereum-boilerplate/ethereum-boilerplate.git”. Of course, you can use the copy button, as shown here:

Then, move over to your code editor (we use Visual Studio Code [VSC]) and paste the above address in VSC’s terminal:
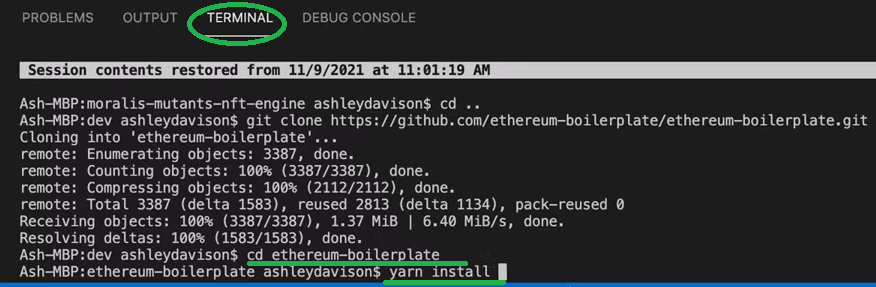
- Next, you need to install all dependencies using your code editor’s terminal:
- cd ethereum-boilerplate
- yarn install
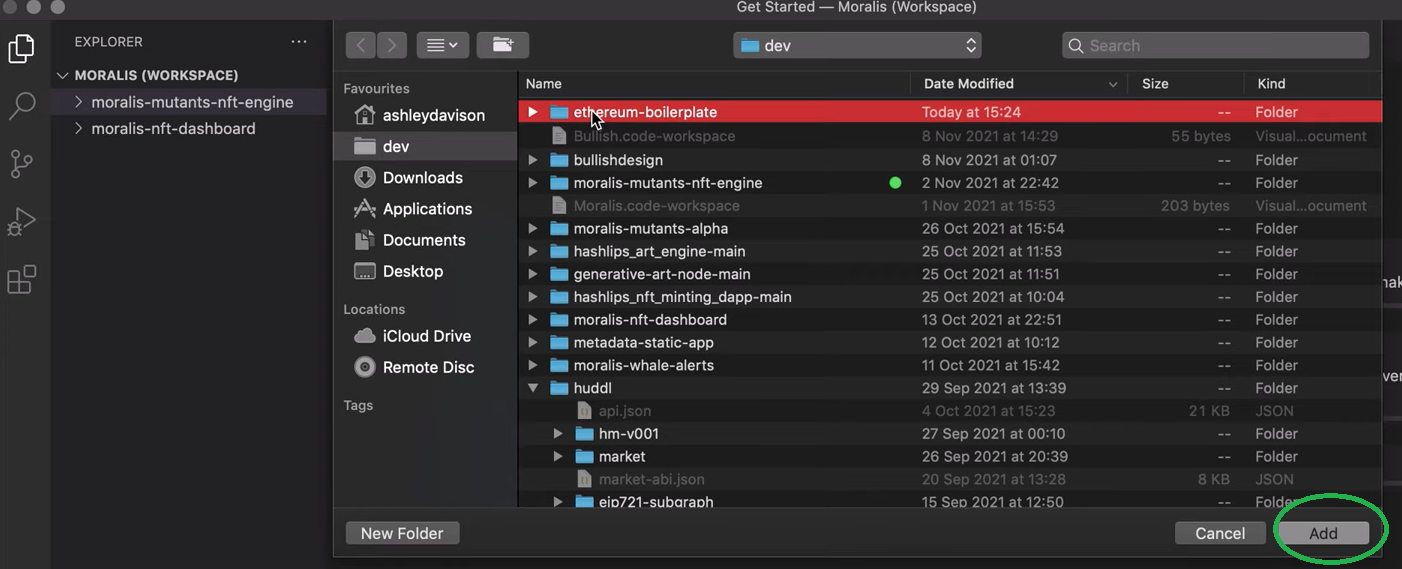
- Add the “Ethereum-boilerplate” folder to your code editor:
- Rename the “.env.example” file to “.env”:
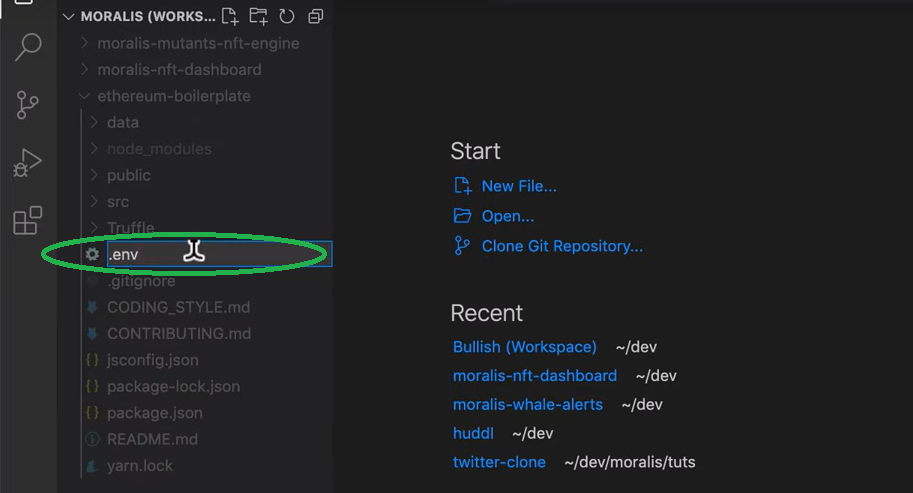
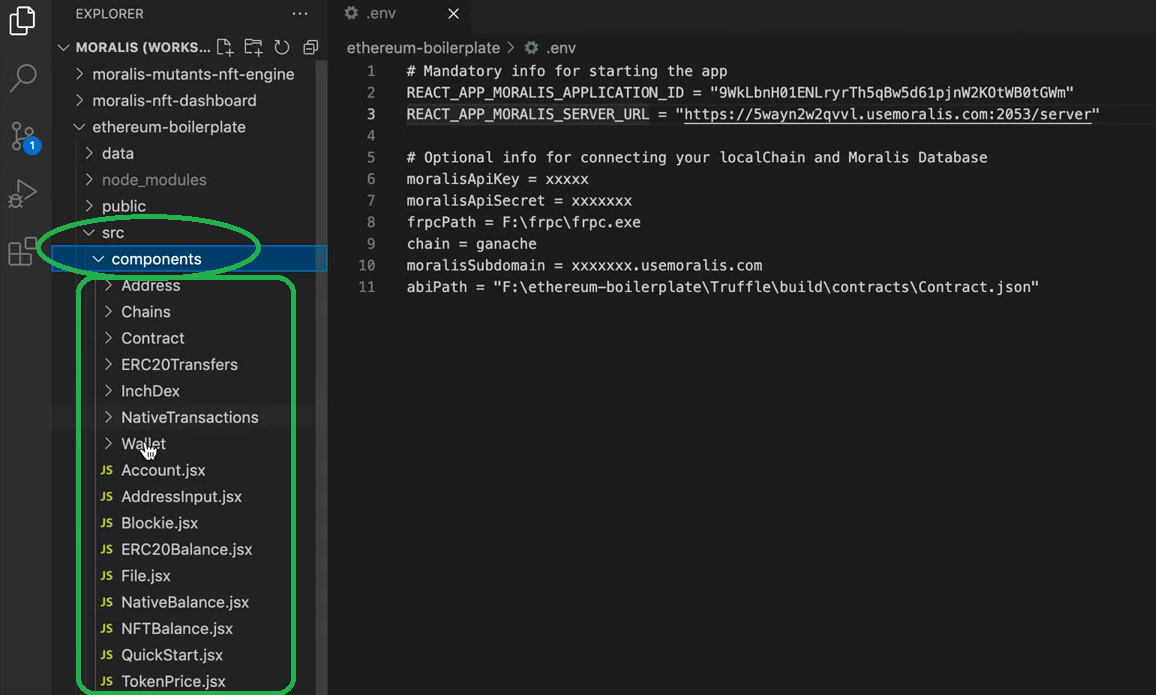
- To access Moralis’ full functionality, you need to provide your Moralis server’s “appId” and “serverUrl” inside the file you’ve just renamed above (“.env”):
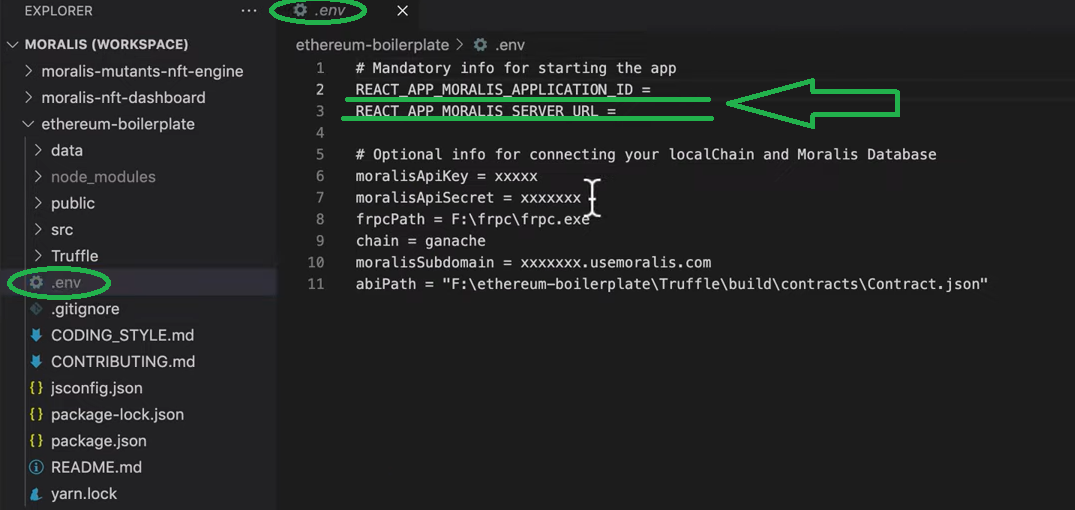
To obtain these details, we’ve prepared a separate set of instructions in the “Moralis Server Setup” section below. Once you have access to your Moralis server’s details, copy and paste them to the “.env” file:
- Finally, run your app by typing or pasting “yarn start” inside your code editor’s terminal:


Note: Instead of using “yarn”, you may also use the “npm package manager”.
If you’ve completed all of the steps above successfully, you should now have a functional dApp available. As such, you’ve realized that you can easily create an Ethereum dApp instantly. Of course, you need to keep in mind that this is a generic dApp. Thus, it is best to treat it as an excellent starting point. Then make unique dApps by applying some simple tweaks. However, the Ethereum dApp boilerplate already provides you with quite an impressive set of functionalities.
Moralis Server Setup
Whether you want to create an Ethereum dApp instantly or use Moralis’ power to create any other project, you must always complete the following steps:
- Log In to Your Moralis Account – At this point, you most likely already have your Moralis account ready. Thus, just log in to access your admin area. However, in case you haven’t created your free Moralis account yet, make sure to do so now.
Create a New Server – Once inside your Moralis admin area, click on the “Servers” option on the left-hand side in the navigation tab. Then, click the “+ Create a new Server” button in the top-right corner. A drop-down menu will appear where you should select the network type that best suits your needs (see the image below). Going with the “Testnet Server” option is the best option when creating example projects (connect to Ethereum testnets).

Next, a pop-up window will appear asking for the server name (this can be anything you want), region, network, and chain(s):
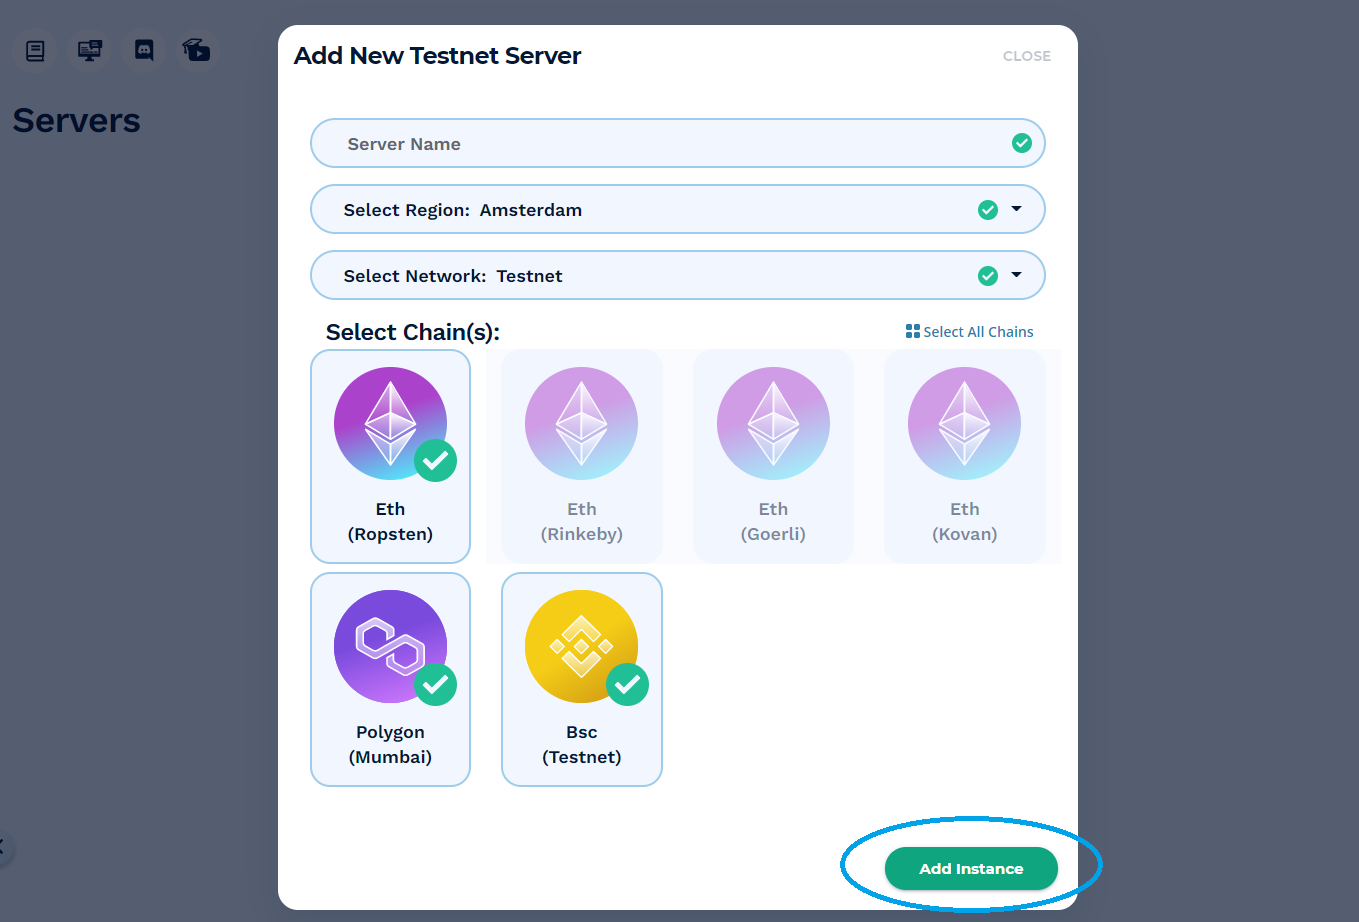
By entering these pieces of information and clicking “Add Instance”, you will create your server. It can take some time for the server to spin up, so please be patient.
- Access Server Details – After you’ve created your server, you get to access its details via the “View Details” button next to your server name:
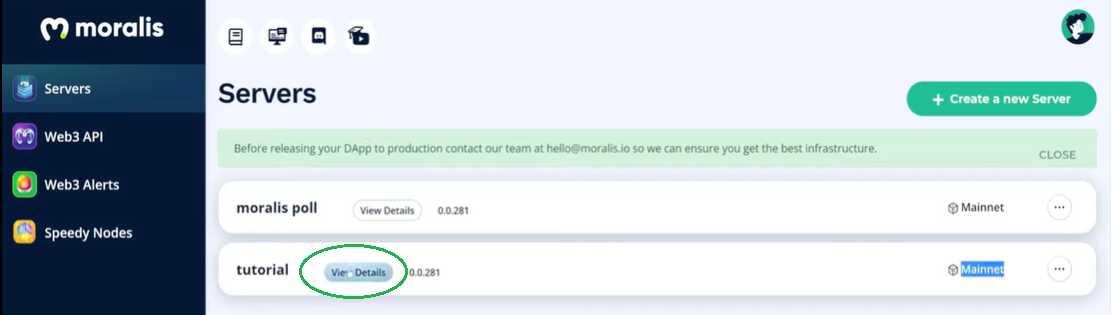
After you click the “View Details” button, a pop-up window containing all the information you need will appear:
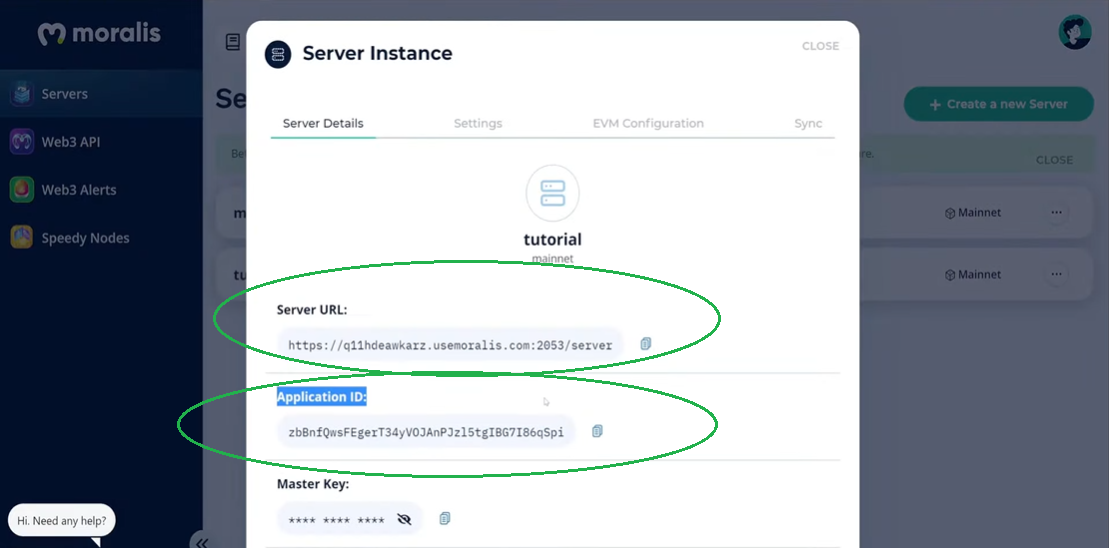
You can copy the details by clicking the copy icon.
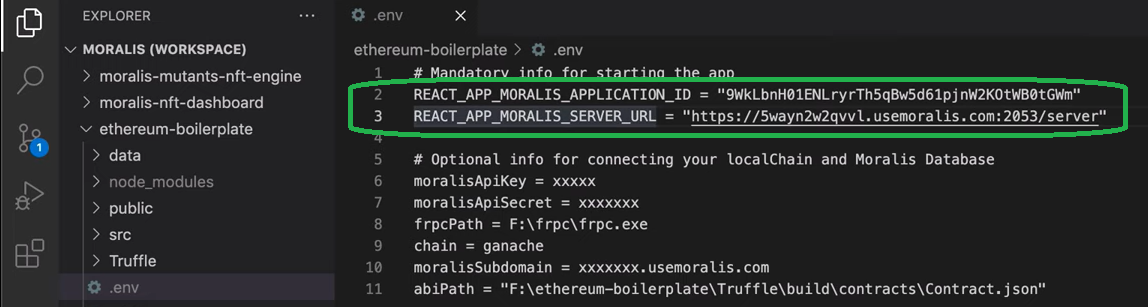
- Initialize Moralis – All that’s left is to populate your “.env” file with the Moralis server details (application ID and server URL) to obtain the required backend functionality covered by Moralis:

Note: Do NOT use the server details from the image above. Instead, make sure to use the details of your particular server.
Create an Ethereum dApp Instantly – An Excellent Starting Point
A great way to view a dApp that you get to create instantly using the Ethereum dApp boilerplate is seeing it as a block of clay that you want to mold to best suit your needs and goals. As such, let’s take a closer look at what functionalities you get when using Moralis. Looking at the image below, you see that your dApp also contains a “Quick Start” section:
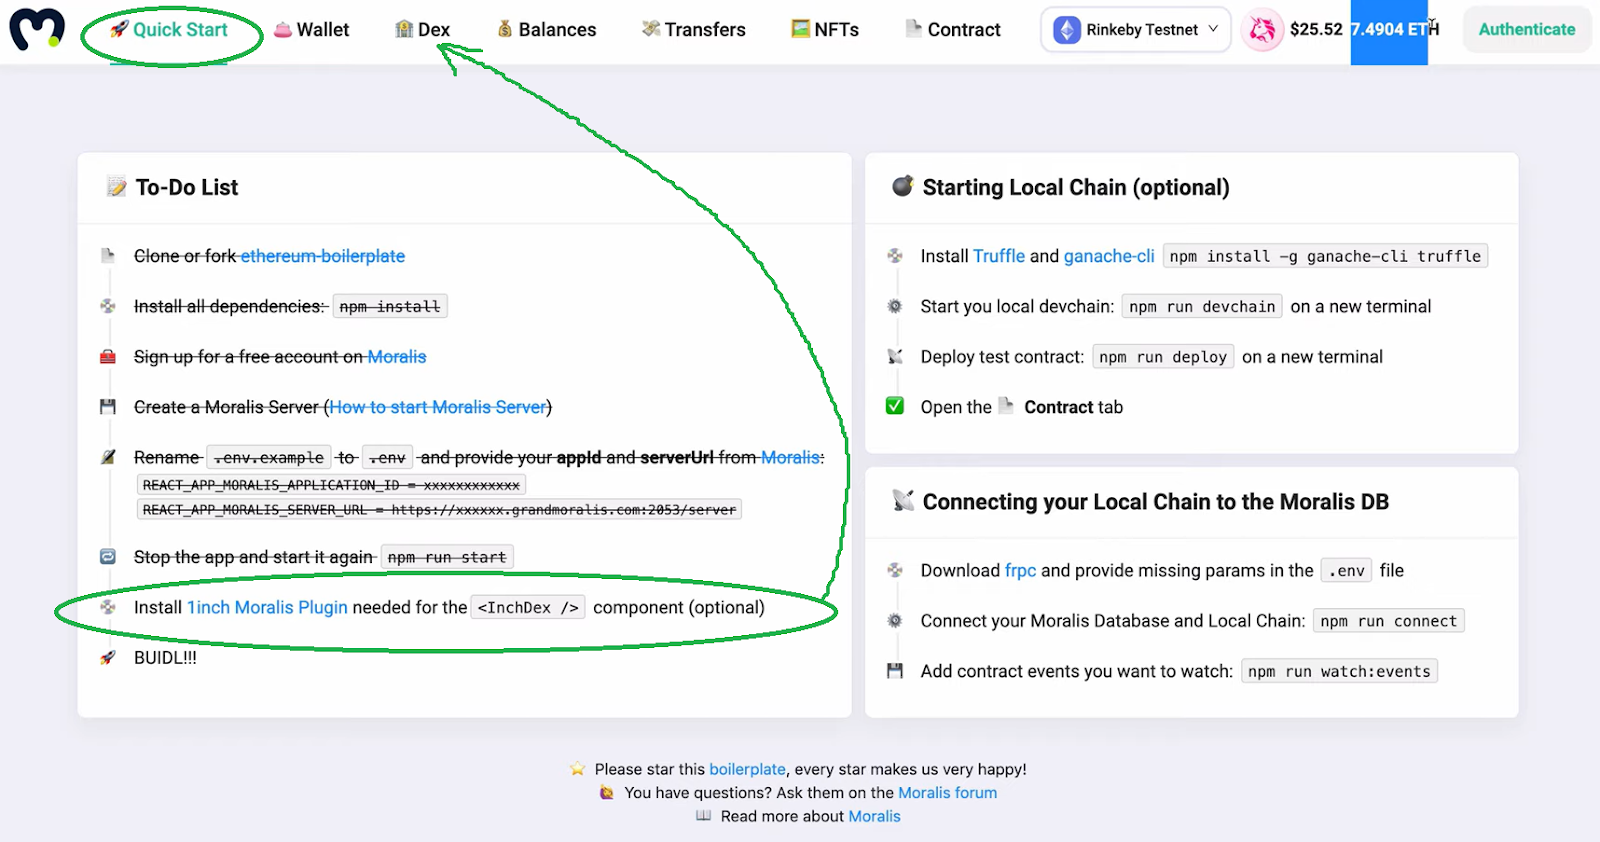
Moreover, it automatically connects to your MetaMask, which is another essential tool when working with Moralis. In case you’re not familiar with this popular crypto wallet, check out how building dApps with MetaMask simplifies things.
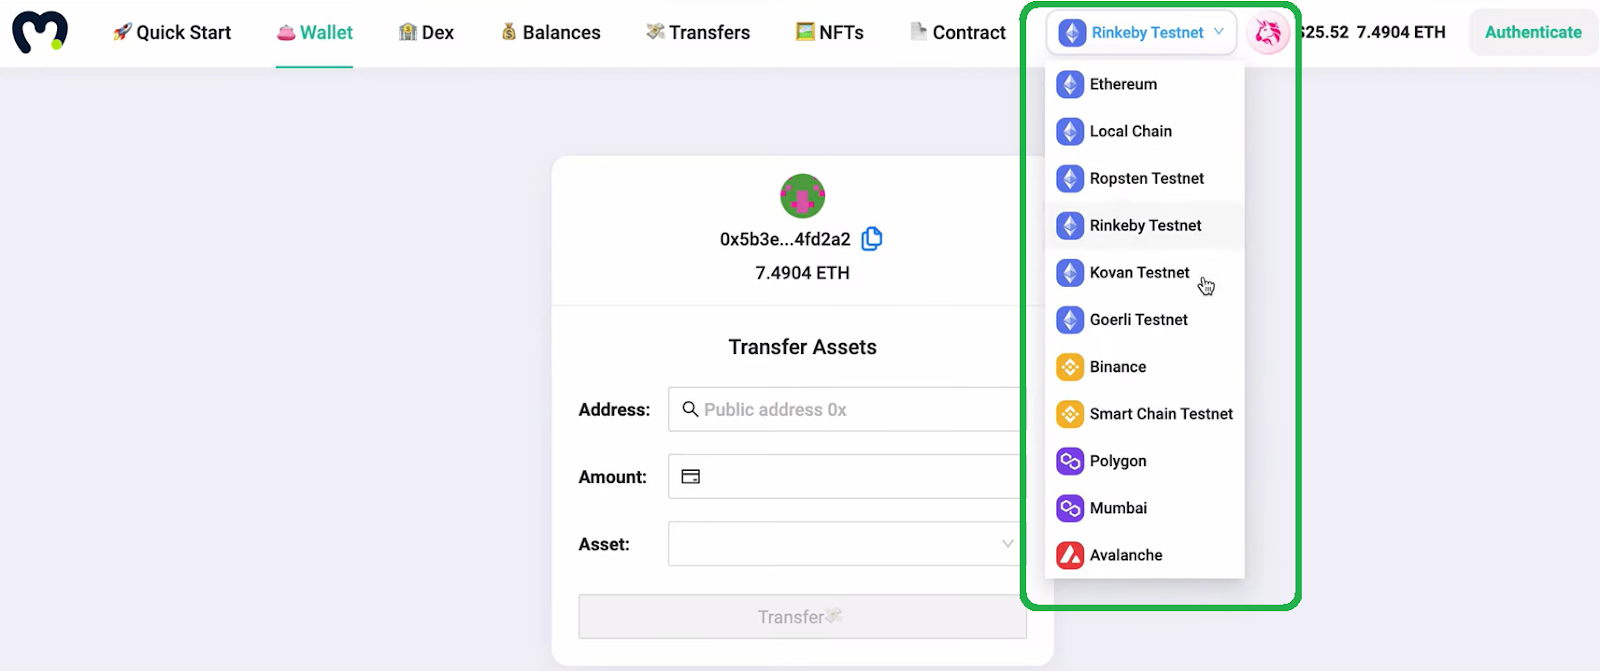
Furthermore, you can see that the boilerplate provides you with a dApp containing a lot of functionality (look at the menu bar in the image above). The latter includes a wallet, displaying users’ balances, past transfers, NFTs, an option to select multiple chains, display native coin balances in US dollar and native currency, and the “Authenticate” button, which enables you to log in users via their crypto wallets’ addresses. Moreover, there’s also a DEX (decentralized exchange) tab, which requires an installation of the 1inch plugin (you can find instructions below).
This set of functionalities is quite extensive and covers all aspects that most dApps should include. However, instead of spending weeks or months building the backend to include all of that, you get it right out of the box in minutes.
Moving forward, you have two options:
- For the fastest results, play around with the boilerplate’s components.
- On the other hand, if you want to build your unique UI, make sure to explore the boilerplate’s hooks in more depth.
Create an Ethereum dApp Instantly – Include the DEX Functionality
By following the steps in the first two sections, all of the components presented above are automatically fully functional. However, to also make the “<DEX />” component work, you also need to install the 1inch plugin from Moralis to program token swaps. Fortunately, this can be done with just a few clicks, especially now that you already have your Moralis server ready.
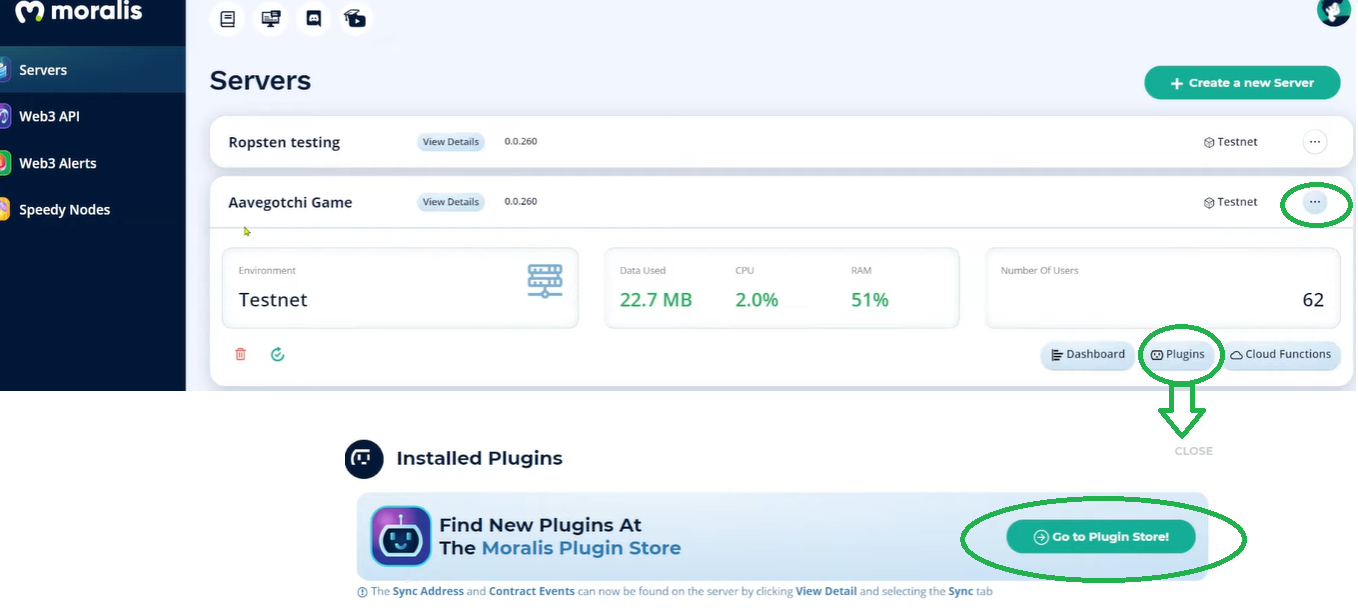
Start by navigating to the “Servers” tab in your Moralis admin area. Next, click the three dots next to your server’s name to view more options. You’ll see the “Plugins” option, which you should click. From the pop-up window that comes up, click the “Go to Plugin Store!” button.
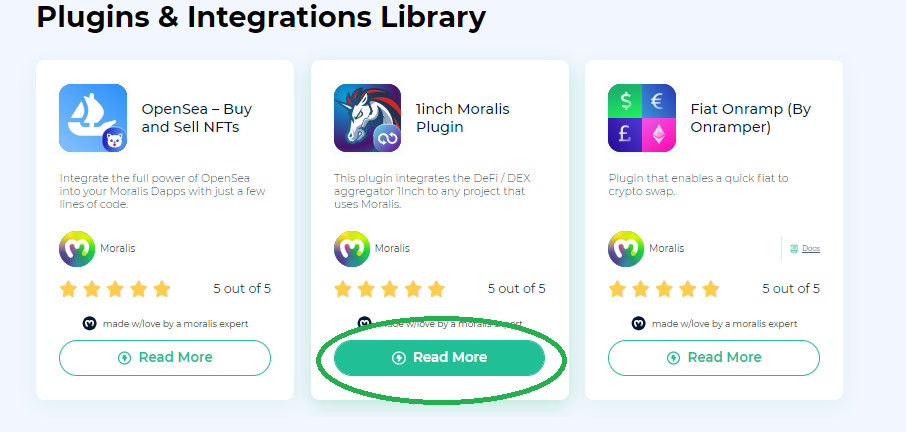
To finally install the 1inch plugin, first, select that plugin by clicking the “Read More” button on Moralis’ 1inch plugin:
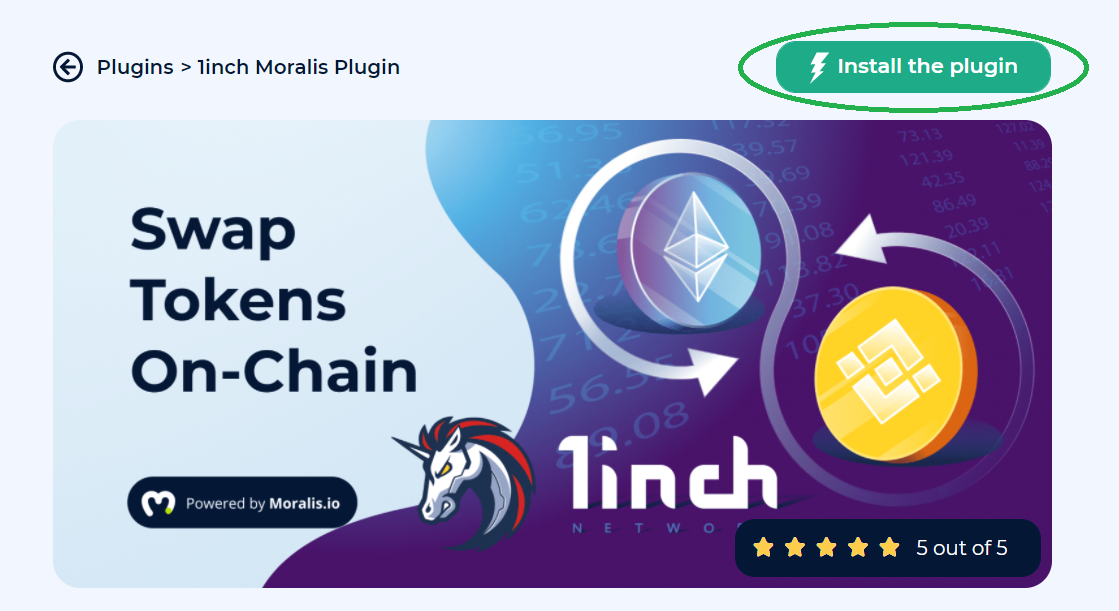
This will take you to the next page, where you’ll have an option to install the plugin by clicking the “Install the plugin” button:
After completing the installation, you should be able to see the 1inch plugin listed inside the “Plugins” option:
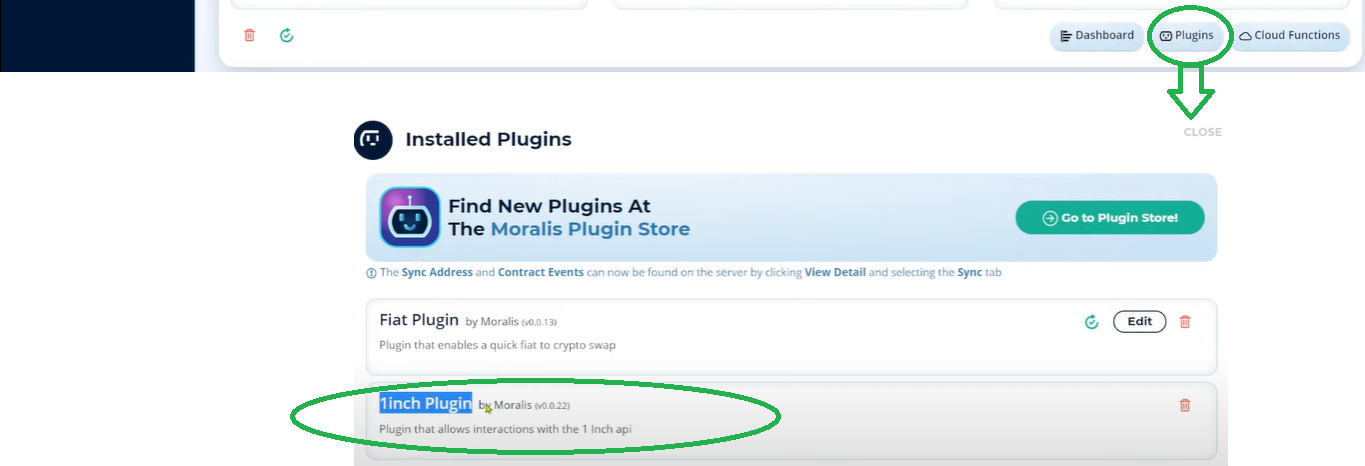
The latter also means that your dApp now has the DEX functionality enabled.
Applying Tweaks
We will leave it to your imagination, wants, and needs of your users or your clients (for whom you’ll be building dApps) to mold this “block of clay” to get a unique dApp. However, just to give you an idea of how to go about it, let us take one existing component (<AddressInput />) and use it in a manner that will take us one step closer to adding a “whale-watching” function.
All of the boilerplate’s components (we are adding new ones constantly) are currently available in the “src” folder:
Moreover, “App.jsx” is the main app file. It is where you can see the menu and all default components:

For instance, you can see that it’s quite incredible that just by using a single snippet of code, “<Chains />”, we get to include a multi-chain selection option in our dApp:
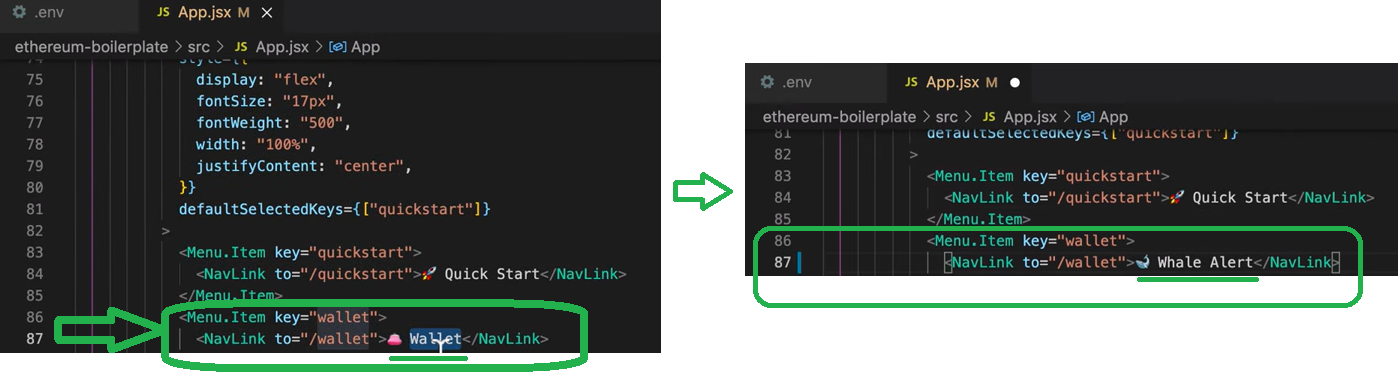
So, if we get practical and want to use the available components for a whale-watching option, the most suitable starting point would be the “wallet” component. Thus, let’s change the menu (inside the “App.jsx” file) accordingly to suit our particular tweak:
Next, we need to go to the “Wallet.jsx” file and make the necessary adjustments there:
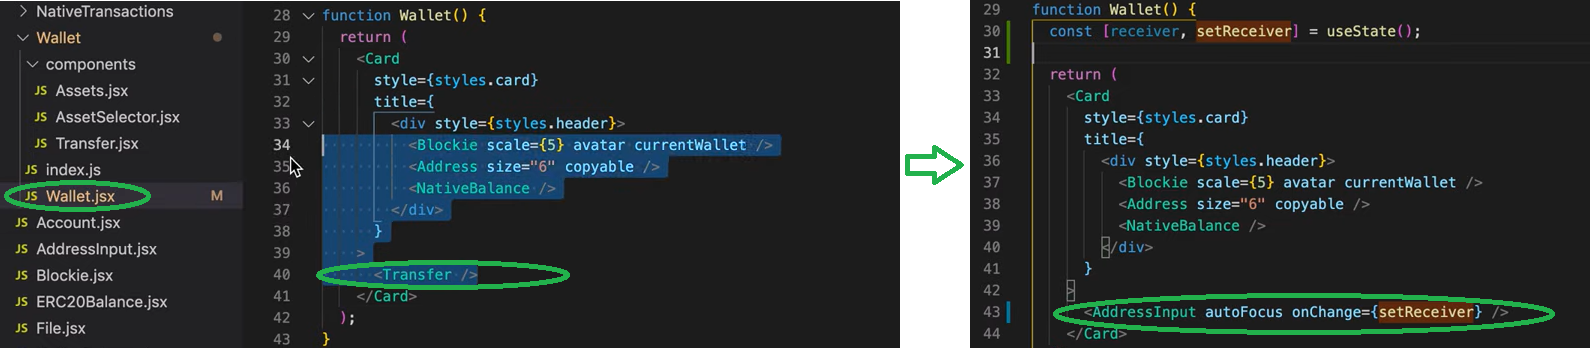
Then, this is what we get:
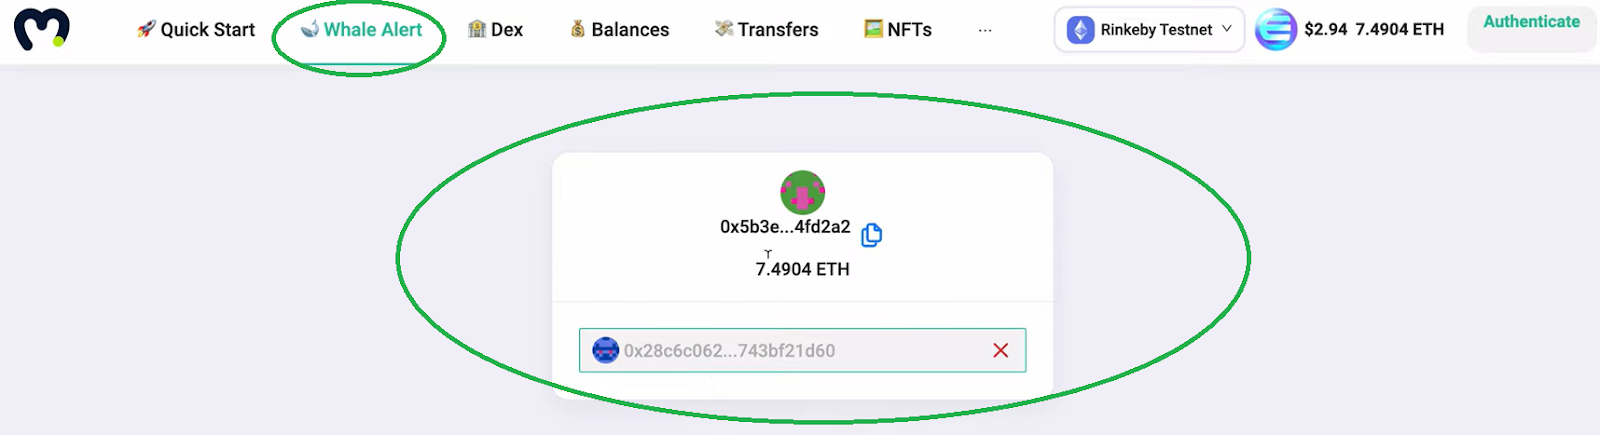
In the spot where we had the “Wallet” option before, we now have the “Whale Alert” option. Moreover, instead of showing the connected wallet’s asset, we now have an address-capturing option instead of the wallet’s functionality.
Give your dApp a Unique UI
The example above should give you an idea of how to tweak the boilerplate to add your unique features. Furthermore, if you are JavaScript proficient, you can take things to the next level by using “hooks”. Specifically, you can build your unique UI around them. The best way to explore a full range of hooks is to dive deeper into Moralis’ documentation.

In case you’re more of a video person, we recommend checking out the video below. Specifically, this shows one of our Moralis experts cover all of the previous steps:
How to Create an Ethereum dApp Instantly – Summary
How to create an Ethereum dApp instantly? Use the ultimate Ethereum dApp boilerplate and the power of Moralis. As such, you can have quite an impressive dApp up and running in a matter of minutes. Moreover, these are the steps you need to complete:
- Visit the Etherreum dApp boilerplate page at GitHub.
- Clone or fork the boilerplate using a code editor of your choice.
- Create your Moralis server and copy its details inside the “env.” file to gain full backend functionality.
- Run your dApp.
Of course, we recommend taking things further by tweaking the boilerplate and thus adding more unique features. Moreover, in case you want to create a unique user interface, make sure to explore the boilerplate’s hooks.
We encourage you to use your momentum gained so far by taking on other interesting example projects that we cover on Moralis’ YouTube channel and Moralis’ blog. For instance, learn how to launch an NFT marketplace, create thousands of NFTs, or learn to use the Ethereum mobile boilerplate to best serve mobile users. In addition, make sure to expand your knowledge base by exploring the use cases for Solidity smart contracts, checking out the ultimate WalletConnect guide, and exploring the answer to “what is OpenZeppelin?” and how it can make your programming process markedly quicker.
In case you don’t know JavaScript yet, we recommend that you enroll in the 2021 JavaScript Programming for Blockchain Developers course. Moreover, if you are serious about becoming a blockchain developer and going full-time crypto, make sure to check out the other incredible courses at Moralis Academy.