Did you know that since 2020, blockchain development has been one of the most sought-after professions? On top of that, Ethereum remains the leading blockchain for Web3 development. As such, it’s not a surprise that salaries for developers with Ethereum programming skills continue to climb. Thus, learning how to build dApps on Ethereum is one of the best decisions you can make on your Web3 journey. Some might think that developing dApps is relatively difficult. However, with Moralis, building Web3 applications is an easy and simple process. Therefore, we’re going to show you how to build dApps on Ethereum with the help of Moralis’ platform.
An excellent foundation for blockchain development is by having some type of knowledge with JavaScript, HTML, and CSS. Even though it’s recommended to possess some of these skills mentioned, beginners with little or none of these skills can still explore and learn how to build dApps on Ethereum. While a standard blockchain development path includes rather complicated and time-consuming backend programming, there’s a shortcut available called Moralis. This ultimate Web3 development platform takes care of the backend infrastructure on your behalf. By utilizing Moralis’ platform, you can overcome potential obstacles on your way to fully understand how to build dApps on Ethereum. Create your account and begin your blockchain journey today!

How to Build dApps on Ethereum – Prerequisites
Before we take on the actual example that will show you how to build dApps on Ethereum, you need to get familiar with specific tools and set up things such as a local blockchain and test funds. Also, do not forget to sign up with Moralis since we’ll be using this powerful tool extensively, saving us a lot of time.
Using Basic Tools
When learning how to build dApps on Ethereum, it’s quite important to equip yourself with the right tools. Of course, Moralis will be the “ace in your sleeve”, but there are four other highly useful tools that you should download and install on your computer. We’ve covered these four tools (MetaMask, Visual Studio Code, Node.js, and Ganache) and how to obtain them in a separate article called “Ethereum Development for Beginners”.
How to Build dApps on Ethereum – Creating a Local Blockchain and Sending Transactions
Our objectives for this section are as follows:
- Explaining why you need a local blockchain for Ethereum dApp development.
- Create a local blockchain.
- Import accounts into MetaMask.
- Send multiple test transactions on the blockchain.
- Add loads of ETH to your test wallets.
Why do you need a local blockchain? This is the best way to create an environment in which you can immediately test your dApps. That way, all transactions and communication with smart contracts can be tested promptly and at no cost.
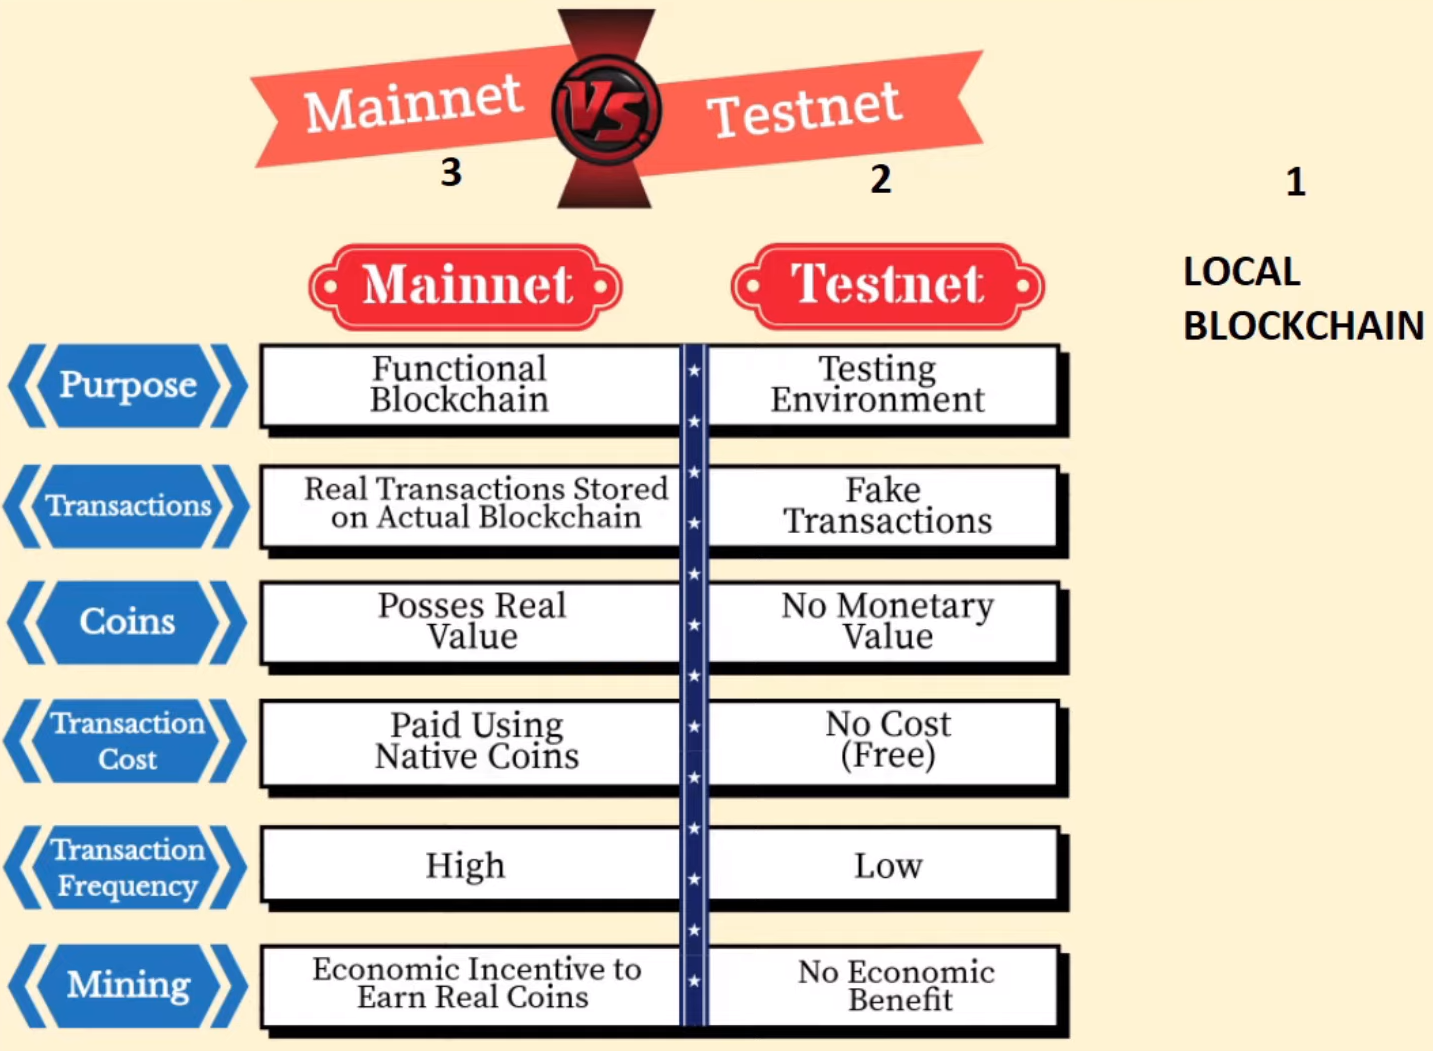
The image below shows a local blockchain as the first step in your dApp development process. Once you complete your dApp on your local blockchain, you should put it on a testnet (step two in the image below) to see its performance and pinpoint any potential bugs and errors. Only after doing so, your decentralized application is ready to be published on the mainnet (step three in the image below).
Using Ganache to Create a Local Blockchain
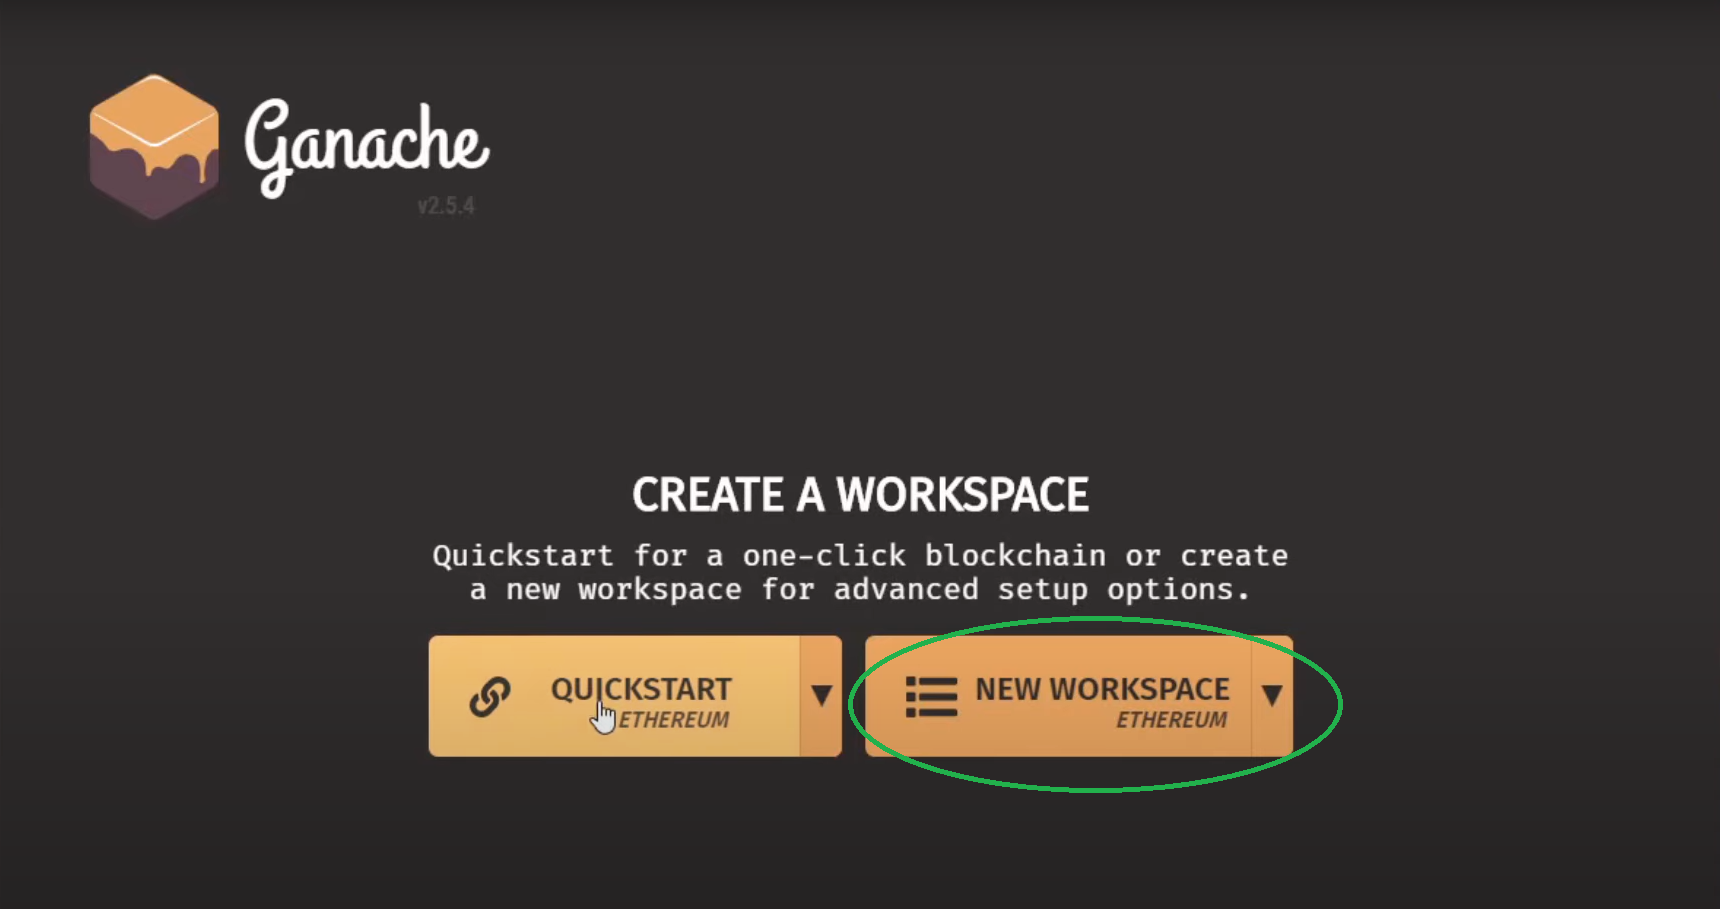
To create a local blockchain, we will be using Ganache which is one of the four basic tools. As such, you should already have it installed on your computer. Once you launch this tool, you’ll have Ganache’s workspace window in front of you, which offers the “QUICKSTART” and the “NEW WORKSPACE” options (see the image below). We will go with the latter.
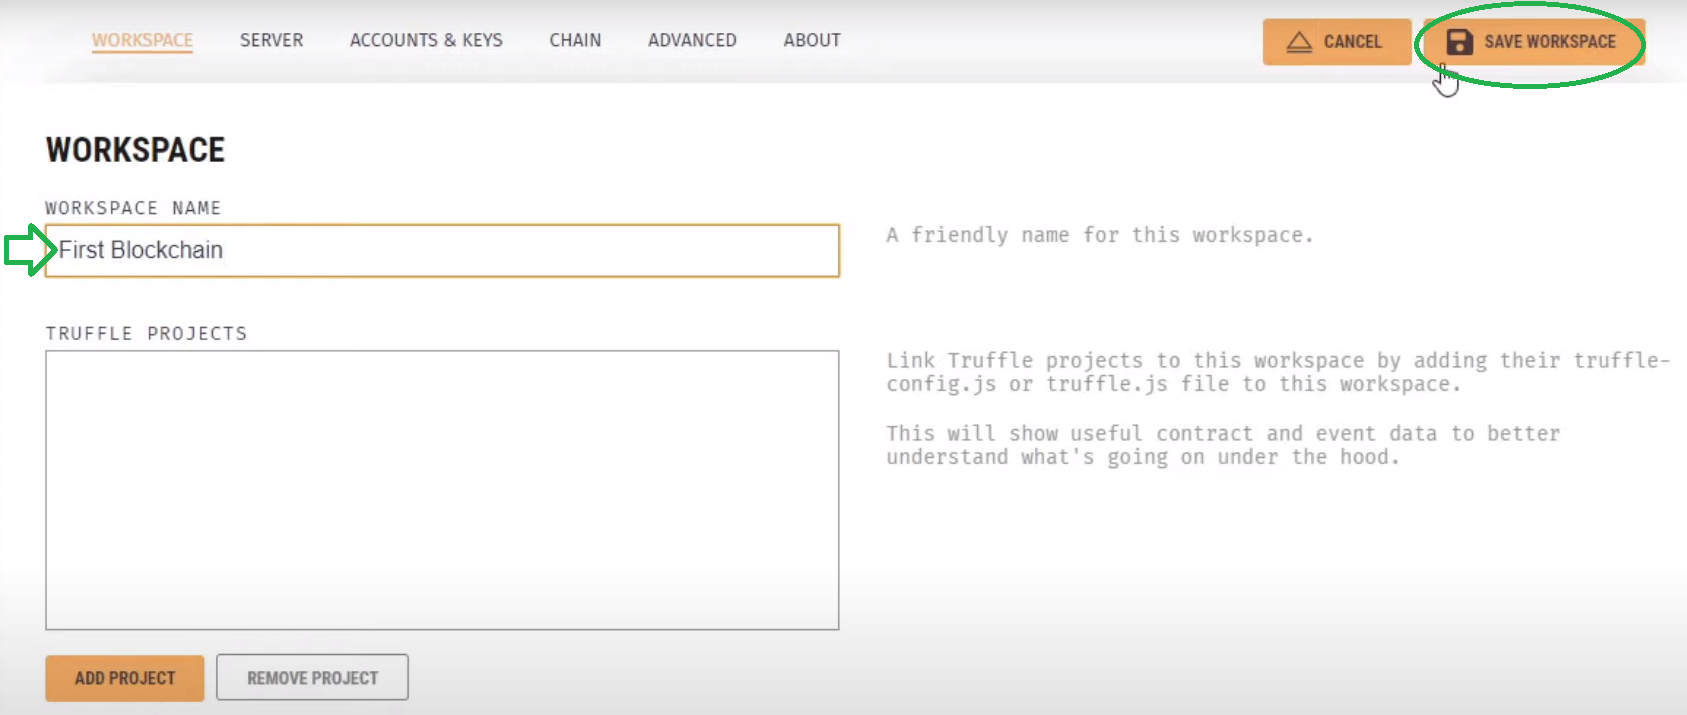
In the next step, we need to name our workspace. You may name it “First Blockchain”, but this can be anything you like. Moreover, you can ignore the “TRUFFLE PROJECTS” option for now and make sure to save your workspace.
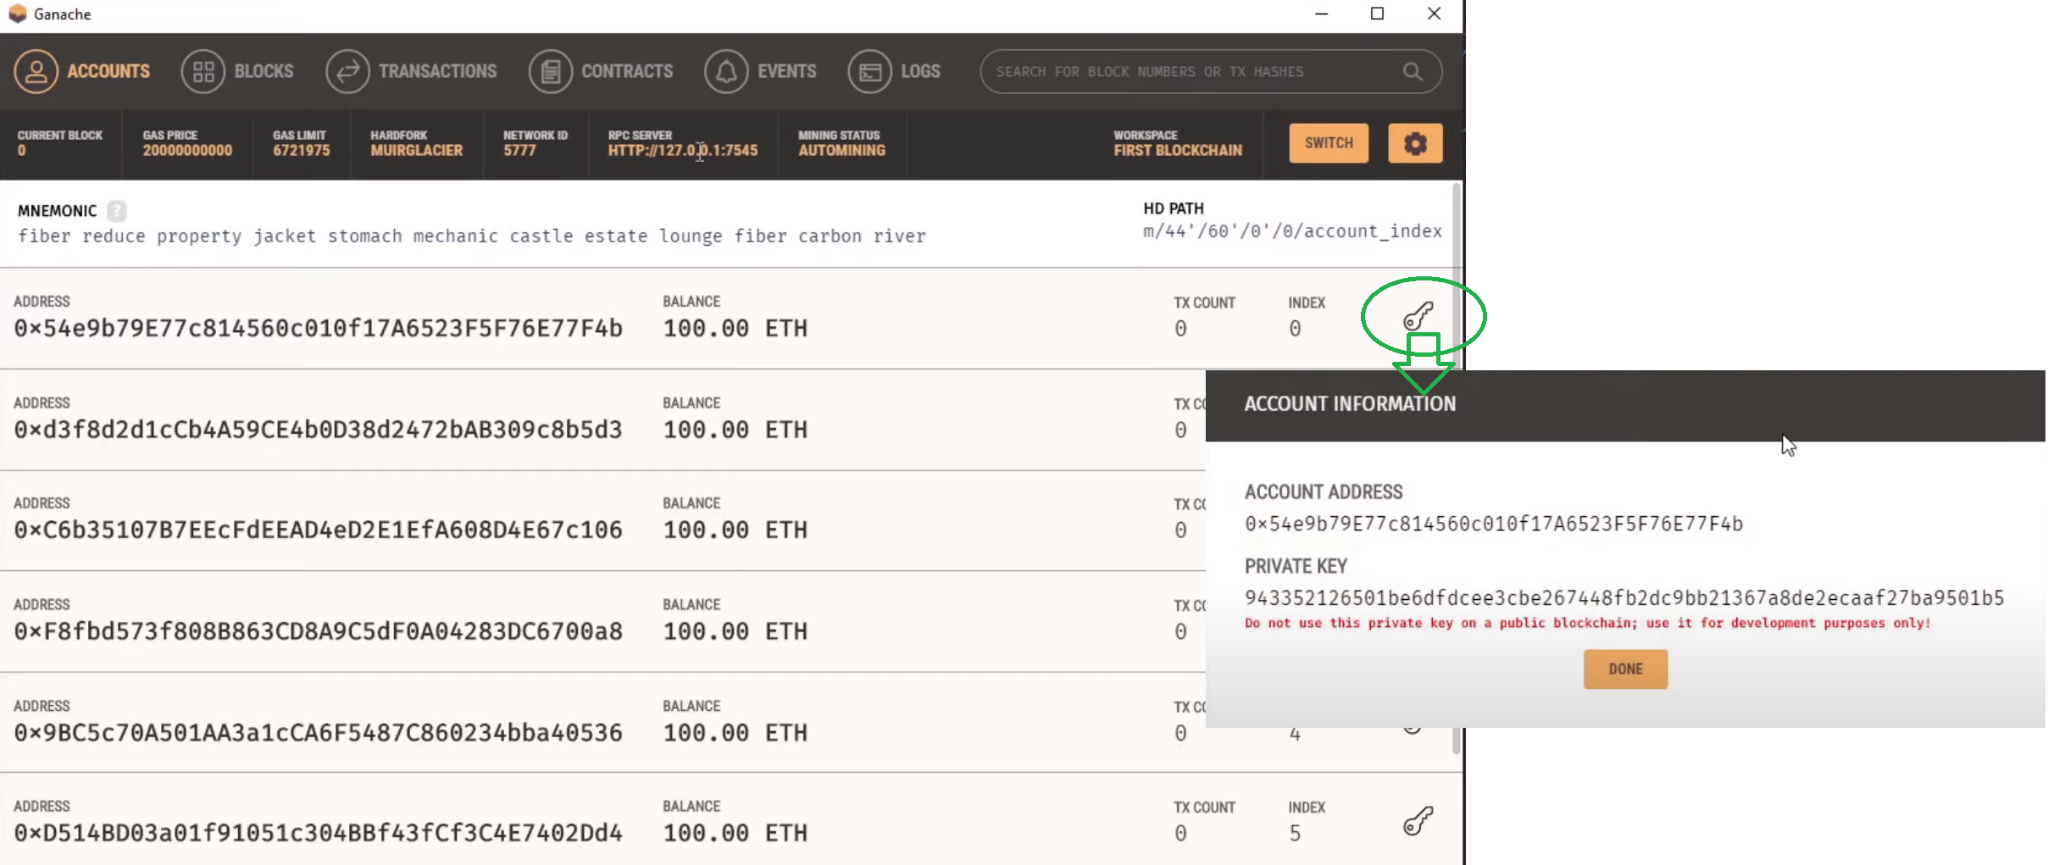
Once you save your workspace, you’ll get a “sandbox” environment with multiple ETH addresses, each with a decent amount of funds to play with. We’ll be using one of these addresses to test our dApp. Furthermore, there is also a key icon next to each address; by clicking it, we access that account’s private key:
Importing Our Test Network to MetaMask
Next on our to-do list is getting our play accounts connected with MetaMask, which is also one of the four basic tools that you should have prepared. So, use your MetaMask browser extension and log into it.
Before we can import an account to our MetaMask, we need to connect it to our local blockchain. As such, we’ll be connecting it to a custom RPC for the purpose of learning how to build dApps on Ethereum. To do this, you need to click the “Network” tab at the top, which will display a drop-down menu. Then select the “Custom RPC” option as displayed below.
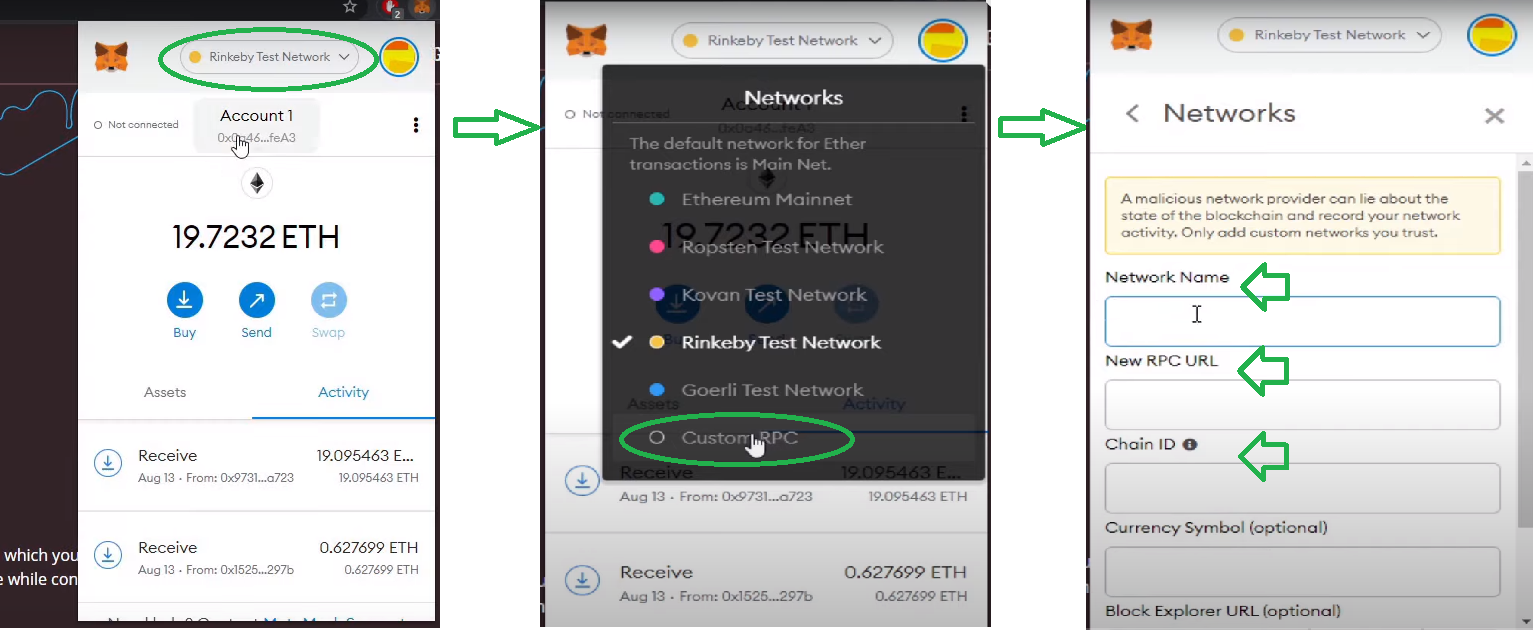
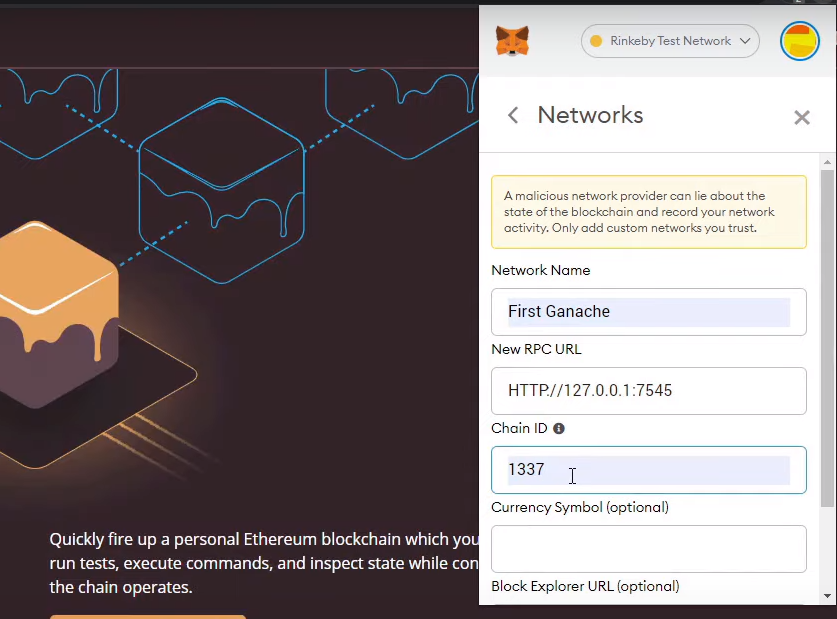
Next, we must enter three pieces of information: network name, new RPC URL, and chain ID. The first one can be anything you want (we named it “First Ganache”), you can copy the RPC URL from your Ganache workspace (RPC server), you can enter “1337” as the chain ID. Leave the rest blank and click save.
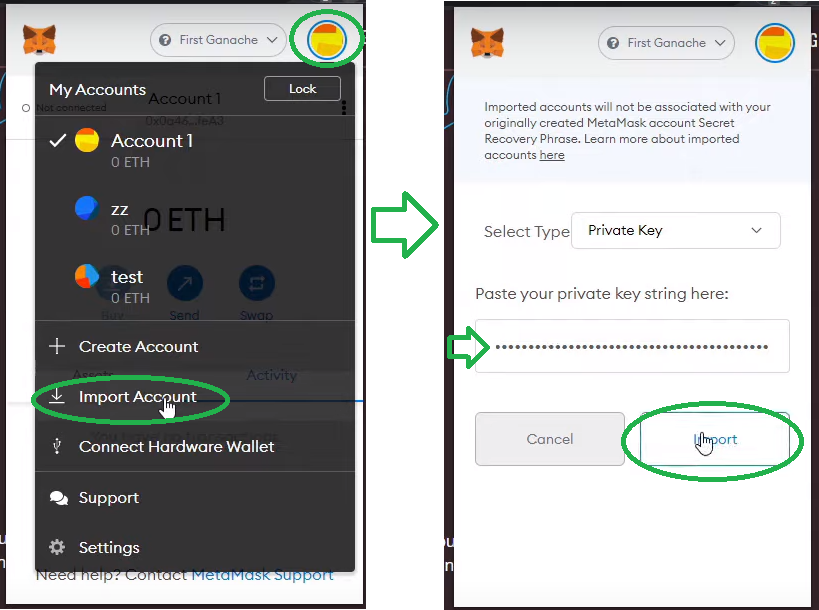
Since the imported network is empty, we must now add one of the play accounts provided by our Ganache workspace. You do this by clicking the top-right icon in your MetaMask, and then the “Import Account” option from the drop-down menu:
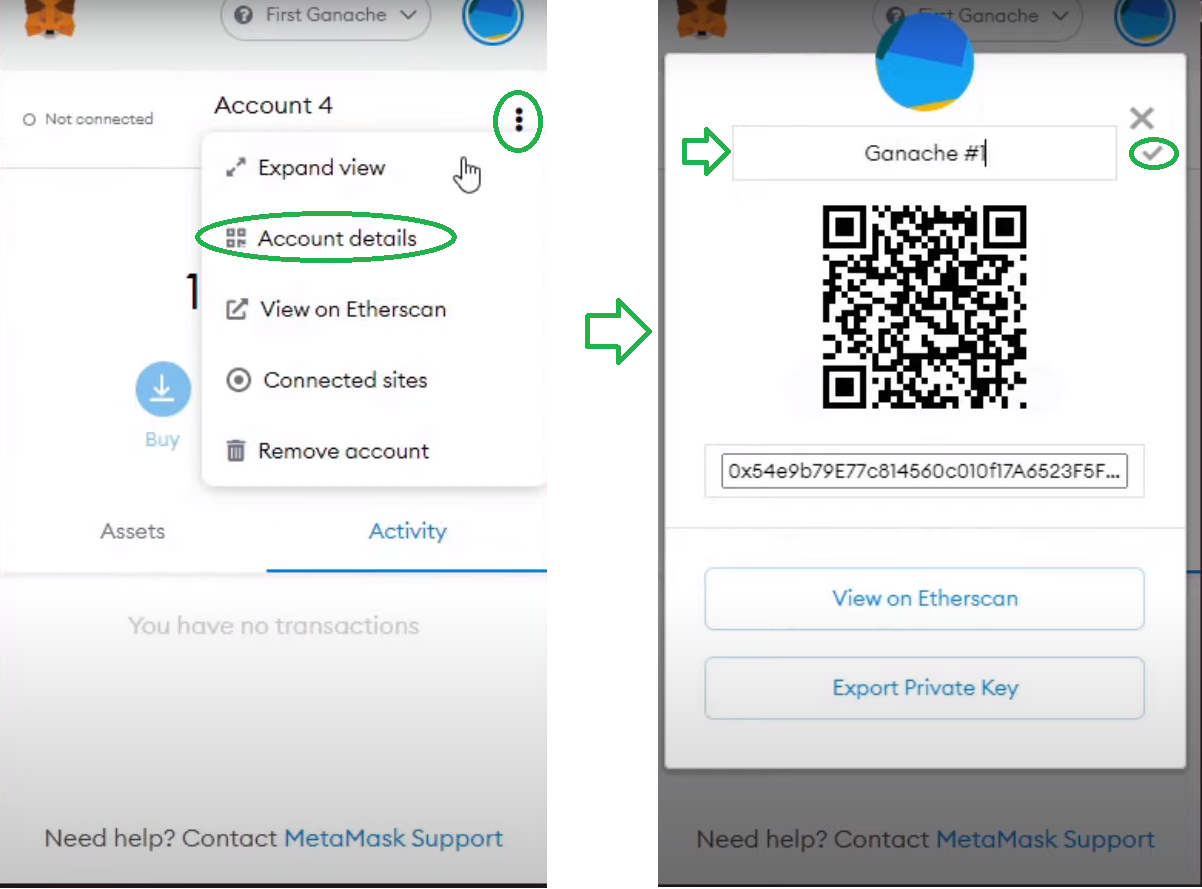
To make things clearer, we also recommend you rename the account that we just imported. To do this, click the three vertical dots in the top-right part of your MetaMask, which will display a drop-down menu, as you can see in the image below. Then select the “Account details” option. Next, click the pencil icon and type in the name you want (we went with “Ganache #1”). To complete the renaming process, click the tick and then the cross.
Again, as our aim is to learn how to build dApps on Ethereum, we also want to be able to test some transactions between various accounts. Thus, make sure to repeat the above “account import” steps for another of the test accounts provided by the Ganache workspace. Let’s name that one “Ganache #2”.
Send Test Transactions
Now that we have two accounts imported into our MetaMask, we’re ready to send some test transactions between the two. For instance, we can send some ETH from Ganache #2 to Ganache #1. Here are the exact steps you must take to complete the test transaction:
- Copy Ganache #1’s Address – Just click the name.
- Switch to Ganache #2 – Click the icon in the top-right corner and then “Ganache #2”.
- Initiate Sending – Click the “Send” button.
- Enter “Send” Details – Paste in the Ganache #1’s address at the top, then enter the amount you want to send (we went with 12.78 ETH of the 100 ETH we started out with) and click next.
- Confirm the Transaction – Click the “Confirm” button.
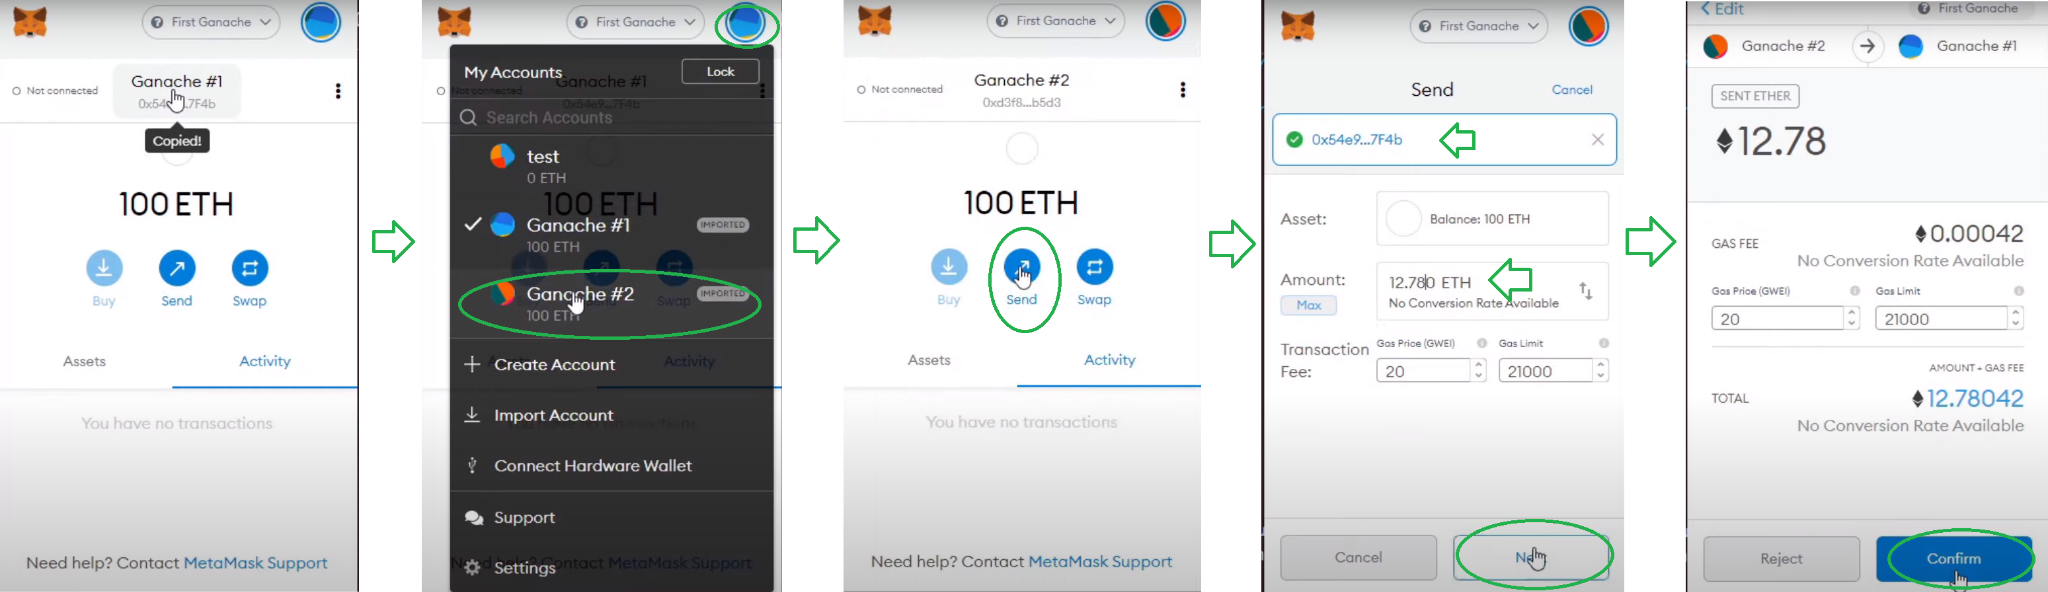
To make sure that your transactions went through, check both accounts’ balances. If you went with the same amount as we did, there should now be 112.78 ETH in Ganache #1 and 87.22 ETH in Ganache #2. You can see the latter in your MetaMask and also inside your Ganache workspace. Moreover, you can also try sending some ETH from one of the two accounts imported in MetaMask to any other account within your Ganache workspace using the steps above (just replace the address accordingly). Again, your Ganache workspace should reflect all transactions by showing the updated balances and indicating transaction count (“TX COUNT”).
How to Build dApps on Ethereum – Using Testnets
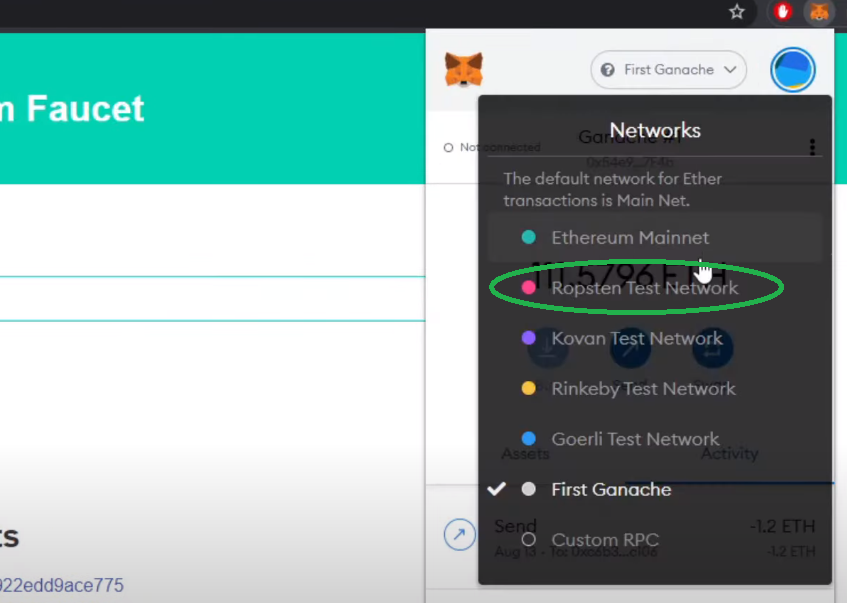
When we were importing our local blockchain into MetaMask, you probably noticed that there were several public testnets offered. These testnets are Ropsten, Kovan, Rinkeby, and Goerly. We’ll focus on the Ropsten Testnet in this section.
When learning how to build dApps on Ethereum, a lot of test ETH may often be spent. Therefore, we want to show you how to add loads of funds to your testnet wallet for free. There are several so-called “faucets” you can use. Two solid examples are the Ropsten Ethereum faucet and the Ropsten Ethereum (rETH) faucet. The first one is supposed to drop 0.3 ETH every ten seconds, while the second one sends five ETH per request. They both work by simply pasting in your test account’s address in the designated field (remember to switch to the “Ropsten Test Network” inside your MetaMask [see the image below]). Moreover, keep in mind that transactions on the Ropsten Testnet need to be mined, so it takes slightly longer for them to go through compared to using a local network.
If you decide to use other testnets, make sure to use your favorite search engine to find free ETH faucets to fund your account on those testnets.
How to Build dApps on Ethereum – An Example Project
In this part of the article, you’ll be able to follow along with the provided steps and build a simple dApp on Ethereum yourself. We believe that the best way to learn is to build an example project. As such, we’ll do some HTML, CSS, and JavaScript coding herein.
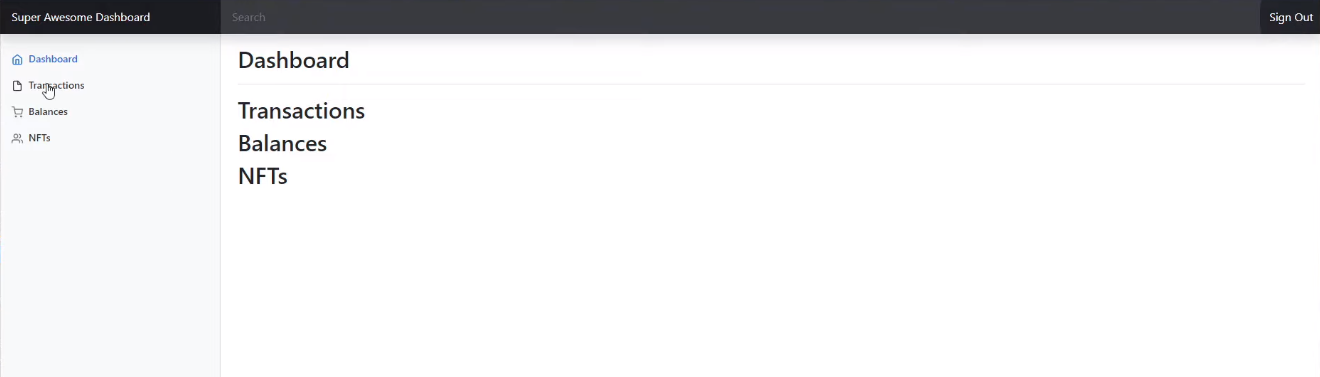
Essentially, we’ll be building a basic Web3 site (the final dashboard is shown in the image below) that enables users to first sign in and authenticate themselves using MetaMask. Once signed in, users will be able to check transactions, coin/token balances, and NFTs on their accounts. In case you are a total beginner, this may sound rather complicated; however, this process will feel like a breeze, thanks to Moralis. So, are you ready to roll up your sleeves and tackle this interesting task? Let’s do this.
How to Build dApps on Ethereum – Building the Login Page
We’ll make use of another tool called “Bootstrap”, where we’ll get codes for components required for our project’s frontend. Once on the website, download examples and source code. Then use the “dashboard” and the “sign-in” folders by importing them into our Visual Studio Code project’s folder. These template files will serve as a great starting point. In case you’re not experienced with Visual Studio Code, make sure to follow the instruction in the video at the end of this article right before the “Summary” section, starting at 27:18.
Using JavaScript to Add Functionality
Once you’ve made proper changes to the “index.html” file, it’s time to add functionalities to our login page. We start by creating the “main.js” file in Visual Studio Code and then connect that file with “index.html” by using the following code:

Connecting a Moralis Server
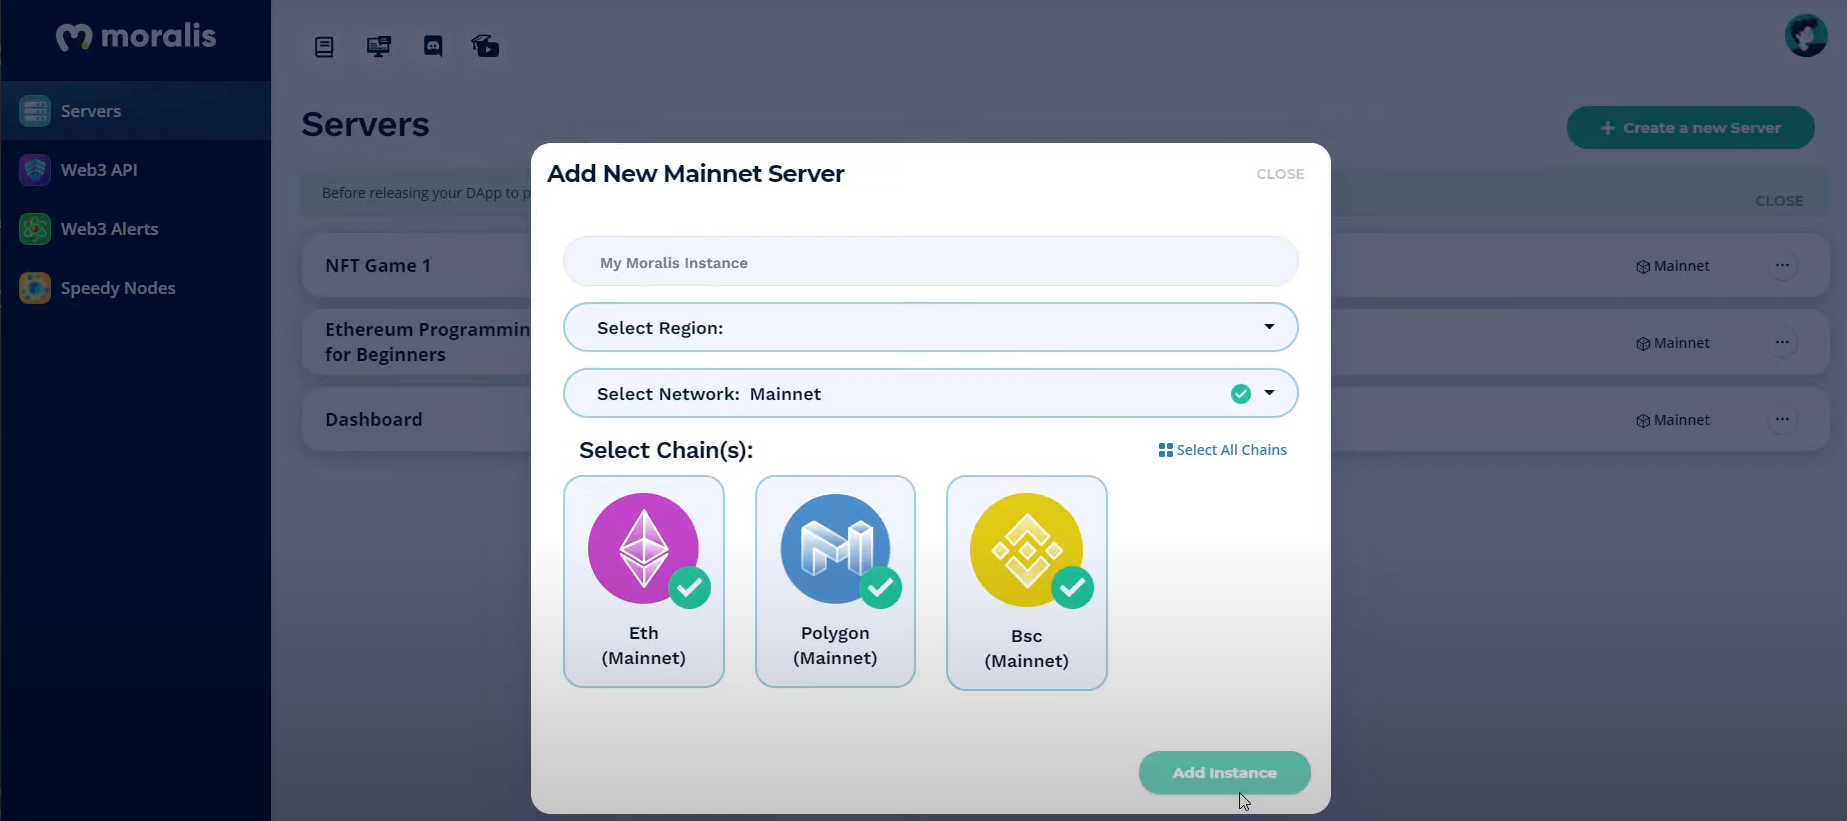
By now, you should’ve already created your Moralis account. Start by logging in and accessing the “Servers” tab. Then click the “+ Create a new Server” button and then the “Mainnet Server” option from the drop-down menu.
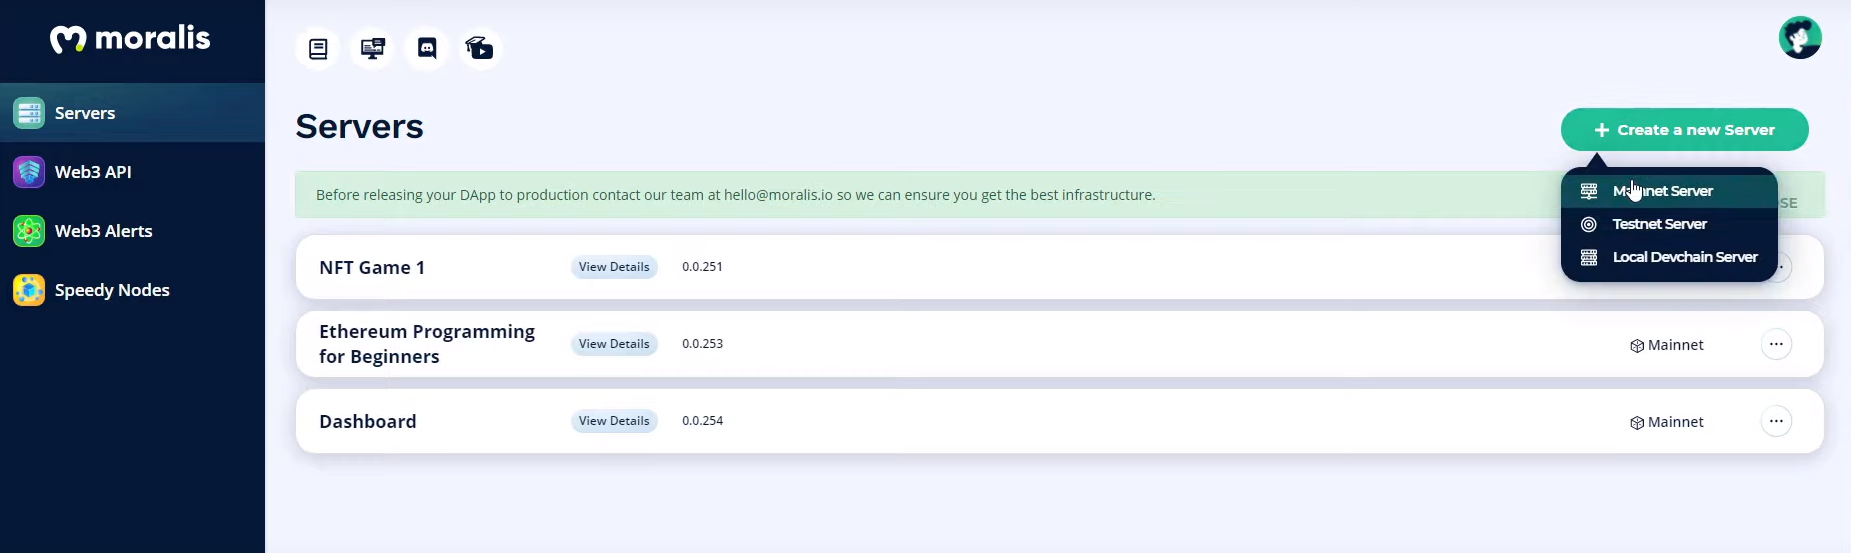
Complete the steps by naming your server, selecting your region, mainnet, and all chains. Finally, click the “Add Instance” button.
Once your server is created, you’ll be able to obtain its details by clicking the “View Details” button next to the server’s name. Here you can see an example of server details:
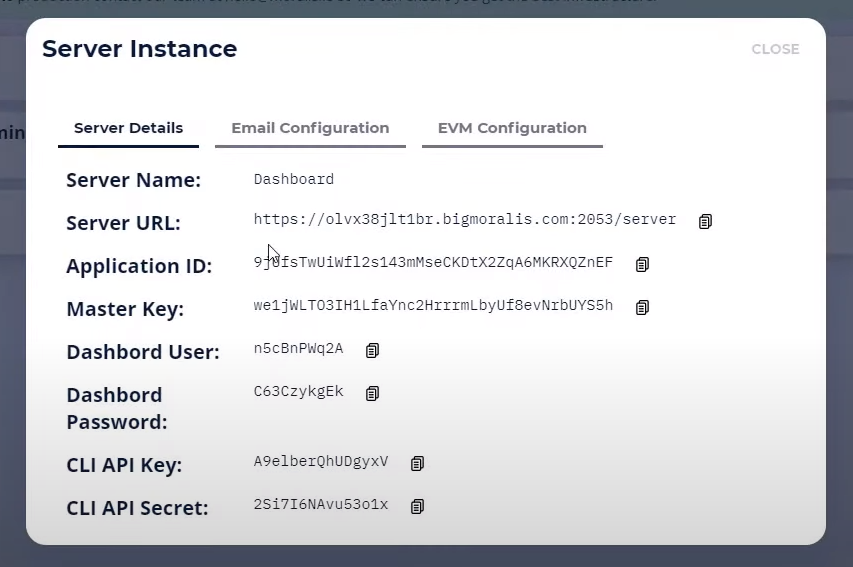
We’ll be using the server URL and the application ID in the “main.js” file:

How to Build dApps – Finalizing the Login Page
Moralis also comes with clean, detailed, and highly practical documentation, which makes using this ultimate Web3 development platform easy. It’s the place from where you get to copy all those single lines of code that will speed up the process immensely. Below is the code we use to include Moralis in the HTML page (our login page: “index.html”):
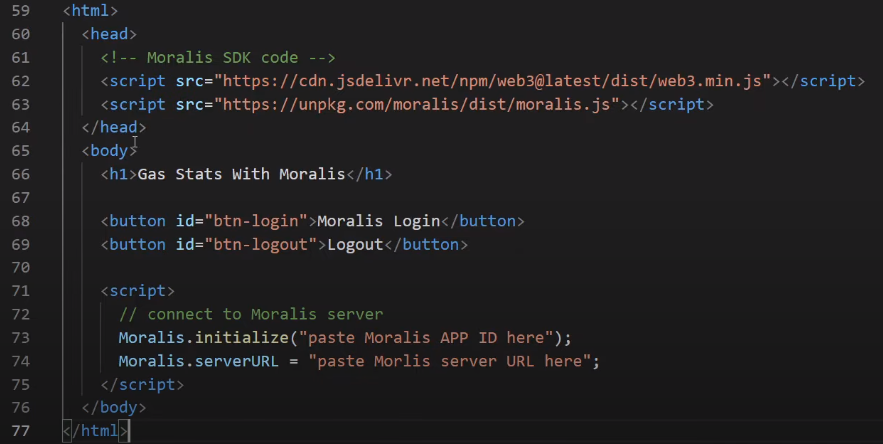
Feel free to arrange the code to best suit your coding style, or follow the steps in the video below, starting at 36:10.
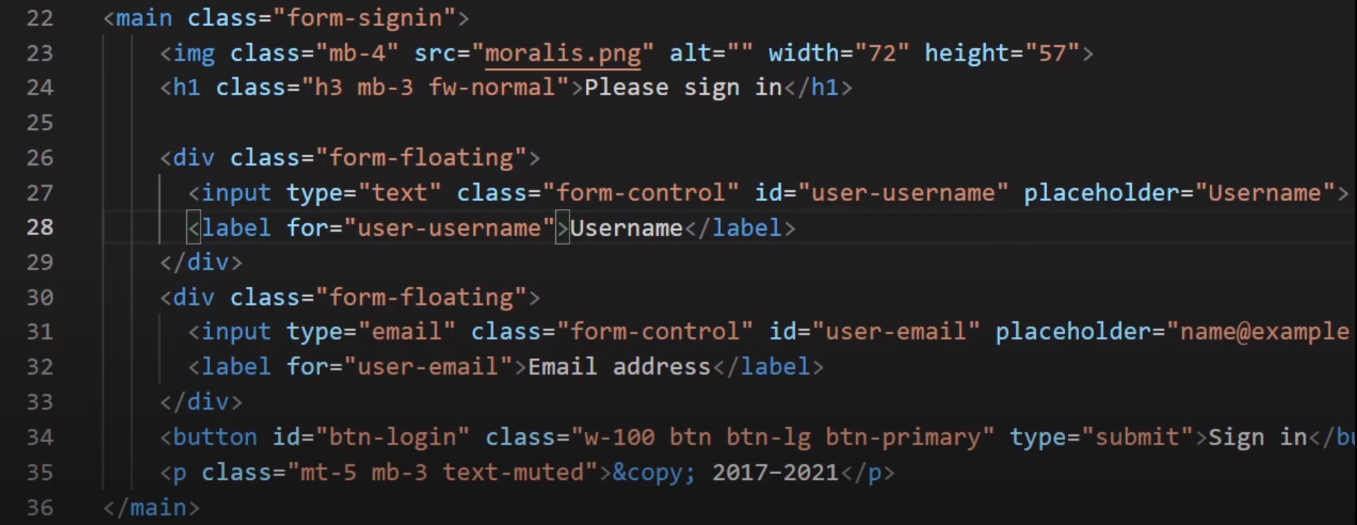
After applying the necessary changes, this is how the “<main>” part of our HTML code will look like for our login portion of our dApp:
Furthermore, the rest (the majority) of the functionality of our dApp will be established within the “main.js” file. For instance, here’s the code we’ll use to authenticate and collect users’ details, including their ETH addresses, on our login page of our dApp when the button is clicked. This code will do all of that and also move users to the second page of our dApp:
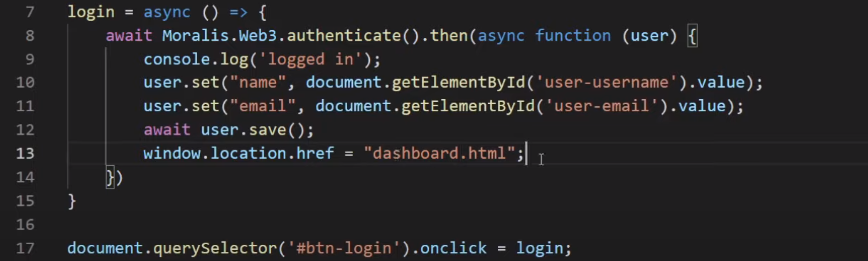
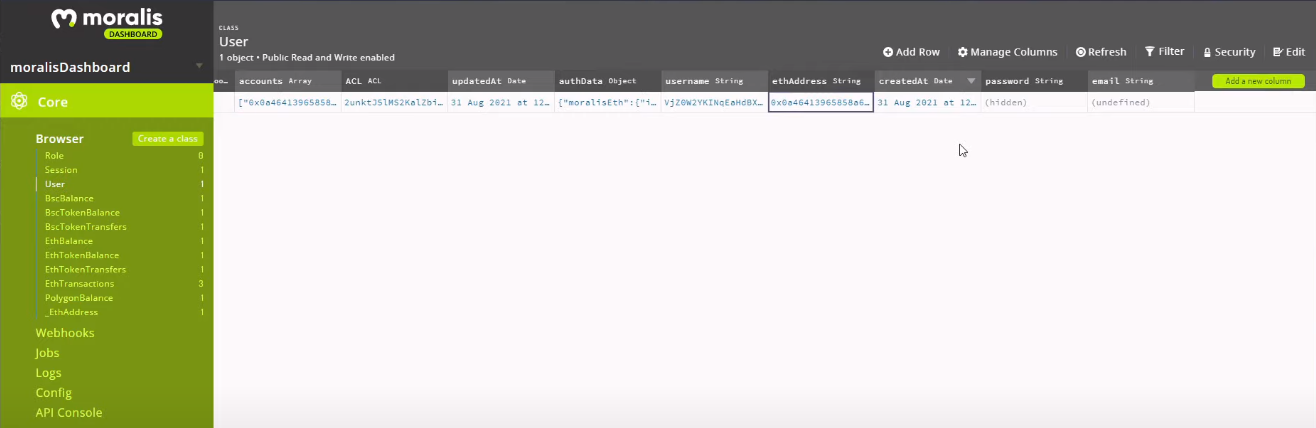
Moreover, the above code will also add users to our Moralis dashboard:
How to Build dApps on Ethereum – Building the Dashboard
We’ve now set up the basics, tweaking template code accordingly to have a functioning login page for our dApp. Now, let’s focus on building our dashboard (“dashboard.html” file). First, we need to make several tweaks to the initial file obtained from Bootstrap. To follow along with one of our expert developers as he performs a code cleanup, make use of the video below, starting at 51:06.
After you’ve completed the cleanup, you may start adding some functionality to your dashboard. For instance, let’s make the “sign out” button work by updating the “main.js” file with this code:

Looking at the code above, you can see that Moralis again helps us out by using short lines of code. Furthermore, we want to ensure that only logged-in users have access to the dashboard, while those not logged in are redirected to the login page. We achieve the latter with this code:

How to Build dApps on Ethereum – Get Transactions, Token Balance, and NFTs
Finally, we’ve reached the point of this “How to Build dApps on Ethereum” article where you’re going to see why Moralis is the ultimate Web3 development platform. Moralis’ Web3 API will make things simple as we go about implementing our example dashboard’s functionality – getting token balances, getting transaction history, and displaying NFTs. Essentially, we’ll be fetching the information from the blockchain and displaying it within our dApp.
Moreover, as previously, we will again set up the majority of the functionality of our dashboard via the “main.js” file. The three powerful snippets of code that Moralis’ documentation offers are “getTransactions”, “getBalances”, and “getNFTs”. Keep in mind that these snippets of code need to be adjusted to match your particular project. Moreover, specific JavaScript code must be added to achieve our goal.
Get Transactions
When it comes to getting transactions, Moralis offers two options. The first one (the simplest method) applies if we’re interested in transactions on the Ethereum Mainnet. However, when we want to consider other chains (this is also applicable for testnets), we need to use the code below:
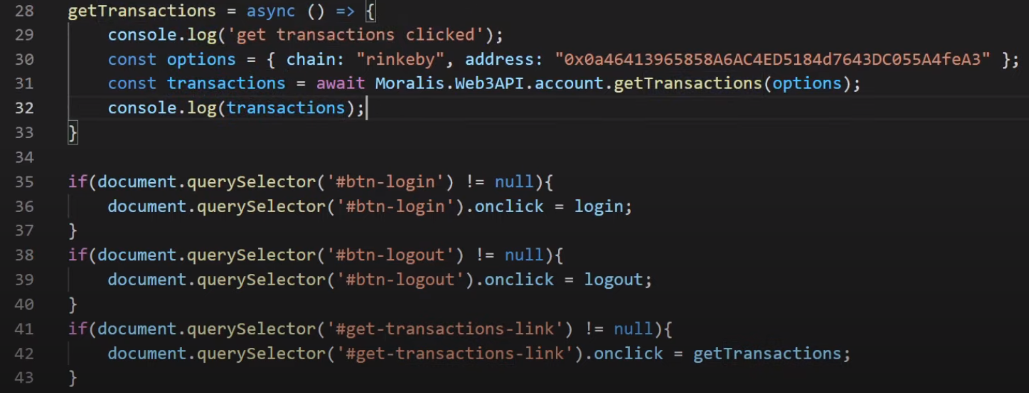
The “getTransactions” function displayed above has already been updated to match our address and the Rinkeby Testnet. The few lines of code above take care of all the heavy lifting on the backend that would require hundreds of lines of code without the use of Moralis. Pretty awesome, right?
To further polish the way our example dApp displays transactions, some JavaScript coding is required. For details, refer to the video below, starting at 1:08:35.
Get Token Balances
Just as with transactions, for getting token balances, Moralis also offers two options. The first one is for native balance and the second one for other chains. For our example dApp, we use the second one:
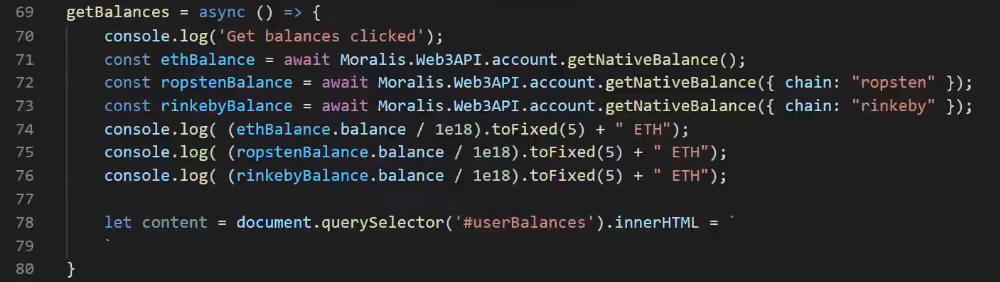
Again, you need to keep in mind that we’ve already applied some adjustments to the template code from Moralis’ documentation to get the above lines of code. That way, the code matches our example project’s needs. For instance, it displays token balances on the Ethereum Mainnet, Ropsten Testnet, as well as Rinkeby Testnet. Of course, to properly display token balances, you need to add certain JavaScript code to the “main.js” file (see video below, starting at 1:48:00).
Get NFTs
This part of our example project will look for NFT balances in our users’ wallets and display them. Just as with both previous two functionalities, we make Moralis’ Web3 API work for us. Also, just like previously, things are made easy and simple with the “getNFTs” function. Moreover, “getNFTs” also have two options. We’re using the one that lets us choose a chain. Here is the code for our example dApp:

We’ve marked the line that actually does all of the backend work. Yes, it’s a single line of code.
Furthermore, we strongly encourage you to complete all the coding steps needed to get the NFTs displayed properly (follow along with the instruction in the video, starting at 1:59:00).
Here is the video that we’ve been referencing and providing time stamps for throughout the article:
How to Build dApps on Ethereum – Summary
Now that you’ve seen how little backend coding you need to create a relatively useful dApp, you surely want to take your Ethereum development to the next stage. Moreover, throughout the article, we’ve provided you with all the information needed to start your path towards becoming a successful dApp developer. You now know all the essential tools that make programming on Ethereum a lot simpler. Since the backend portion of Ethereum development tends to be the most time-consuming and difficult part, learning about Moralis adds quite an amazing value to your Web3 development path.
Furthermore, you must have noticed that knowing JavaScript (JS) is essential if you want to make the most of Moralis. So, in case you don’t know this practical coding language yet, we recommend enrolling in the “JavaScript Programming for Blockchain Developers” course. This way, you’ll learn JavaScript and be prepared to best use it in blockchain development.
