Seamless communication functionalities are critical elements regardless of whether it’s a Web2 or Web3 application we’re using. However, we’ve raised our awareness regarding users’ data exploitation on centralized social media applications and messaging apps over the past few years. Moreover, until 2015, we did not have the proper tools to create a decent decentralized messaging app that could alleviate users’ concerns regarding privacy issues. Fortunately, the birth of the first programmable blockchain – Ethereum, opened up opportunities for developers to solve this issue. Fast-forward six years, we now have several reliable programmable chains on which blockchain developers can build decentralized messaging apps. In this article, we’ll take a closer look at this process and show you how to build a decentralized messaging app in five steps with Moralis.
Furthermore, not long ago, the only way to build decentralized applications (dApps) was to deal directly with RPC nodes. However, things have progressed noticeably, and we now have phenomenal tools that help developers overcome all of the limitations of RPC nodes. As such, with the help of the ultimate Web3 development platform – Moralis, you can now create both web dApps and mobile dApps in minutes. That is possible thanks to Moralis’ SDK and two incredible boilerplates: the ultimate Web3 boilerplate and the Ethereum mobile boilerplate. Moreover, we’ll be using one of them shortly in order to build a decentralized messaging app. In addition, Moralis (a.k.a. Firebase for crypto) was designed with cross-chain interoperability; thus, it enables you to deploy dApps across multiple chains and, therefore, future-proof your developments. So, if you are ready to learn how to make the most out of Moralis and create your own decentralized messaging app, let’s dive straight into the following sections.
Decentralized Messaging App Preview
Before we start with our “build your own decentralized messaging app” quest, we want to present you with the finished version of our decentralized messaging app. Moreover, since this is an example project intended for even complete beginners to blockchain development, we kept things as simple as possible. However, despite the simplicity, we ensured that our decentralized messaging app incorporates all essential features and also looks pretty neat.
User Login
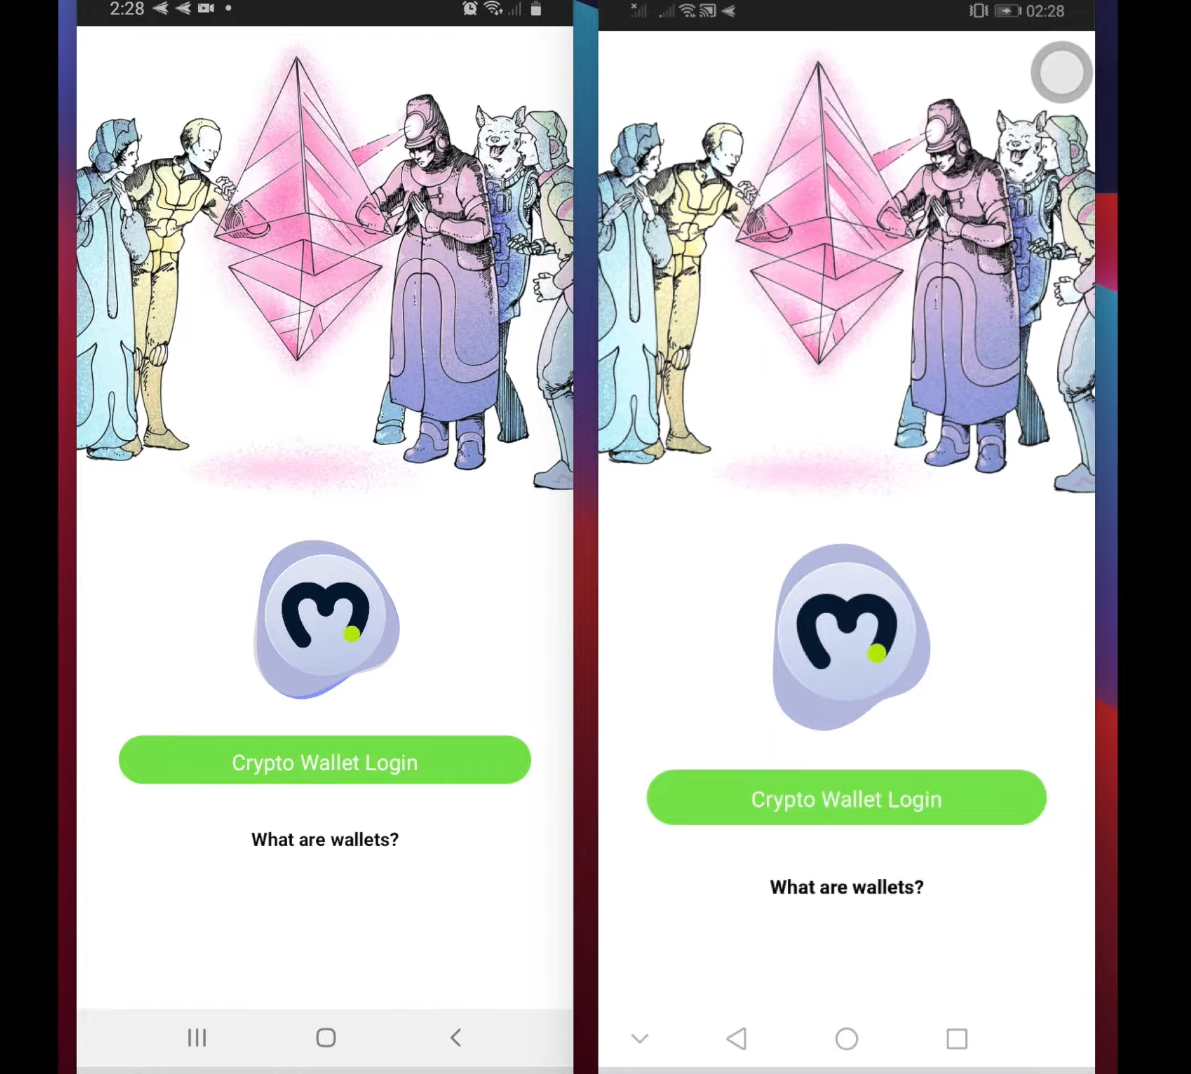
Like most centralized applications, the ability to “log in” is also normal for decentralized apps. However, instead of using emails and passwords, we can use a crypto wallet (such as MetaMask). Our decentralized messaging app covers this feature with one of the best mobile Ethereum authentication solutions – WalletConnect. By clicking the “Crypto Wallet Login” button of our messaging app (see screenshot below), users are prompted by their wallet app to confirm the authentication.
Features of Our Decentralized Messaging App
After successfully logging in, users are immediately directed to the chat window. There, they can read and send text and emojis. We use an emoji and a paper plane icon for the respective button to indicate these actions. Once the users tap the paper plane icon, they send the text and emojis entered on their devices. Moreover, the screenshots from two mobile devices below also show you the “typing” feature. That means we ensured that our decentralized messaging app also detects when other users are typing. It simulates that with three asynchronously blinking dots. In addition, you can also see users’ names and their wallet addresses (those used to authenticate) next to the sent messages. However, if a message is sent by the current user, the messages have a different color and no name or address above them.

The above explanation, combined with the screenshots, paints a clear picture of what we will create. Moreover, you can see that the dApp is rather simple (as mentioned); however, it also incorporates all of the core functionalities of most messaging applications today. With the end in mind, it is time to take on the five steps required to build your own version of this decentralized messaging app.
Build a Decentralized Messaging App in 5 Steps with Moralis
As mentioned earlier, it’s time to take on an example project, which will enable you to build your own decentralized messaging app in five steps. Of course, to break things down for you, we divided each of these five major steps into easy substeps, which you can complete as we move along. By doing so, you will learn how to take the Ethereum mobile boilerplate and add the necessary functionality to end up with a decentralized messaging app. These are the five steps that we need to complete:
- Moralis setup
- Ethereum mobile boilerplate quick start and initial code tweaks
- Adding send functionality
- Enabling displaying of sent messages
- Adding “typing” functionality
The first two steps will guide you through the process of setting things up so that Moralis will be able to cover your backend needs and that you will not have to start building your dApp from scratch. Rather, you’ll be able to use the boilerplate’s mobile dApp that will already provide a clean interface and authentication functionality. Before we tackle the first step, let’s also mention that Moralis and the Ethereum mobile boilerplate combined enable you to create both Android and iOS applications simultaneously. The latter makes this powerful duo the ultimate Ethereum iOS dev kit.

Step 1: Creating a Moralis Server
By creating a Moralis server, you obtain its full backend functionality. Moreover, this step is also essential to use the Ethereum mobile boilerplate. Here are the steps you need to follow:
- Create a Free Moralis Account – By following the link, you’ll get to create your free account by entering your email and creating your password. You’ll also need to confirm your account by clicking the confirmation link in the email sent to you. However, just log in if you’ve already created your Moralis account.
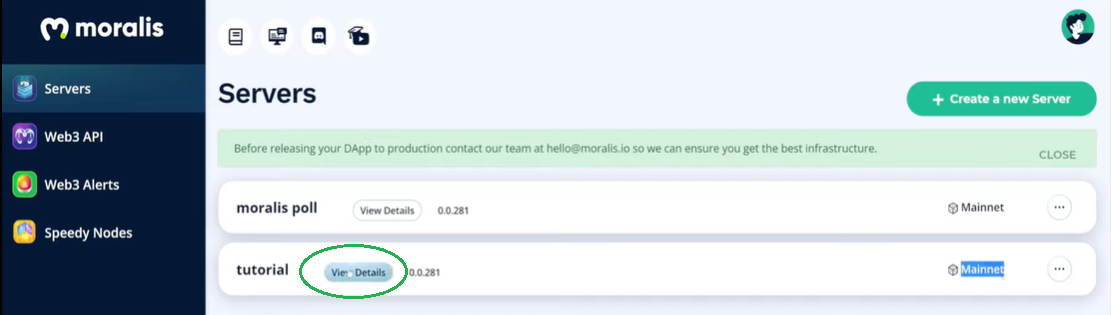
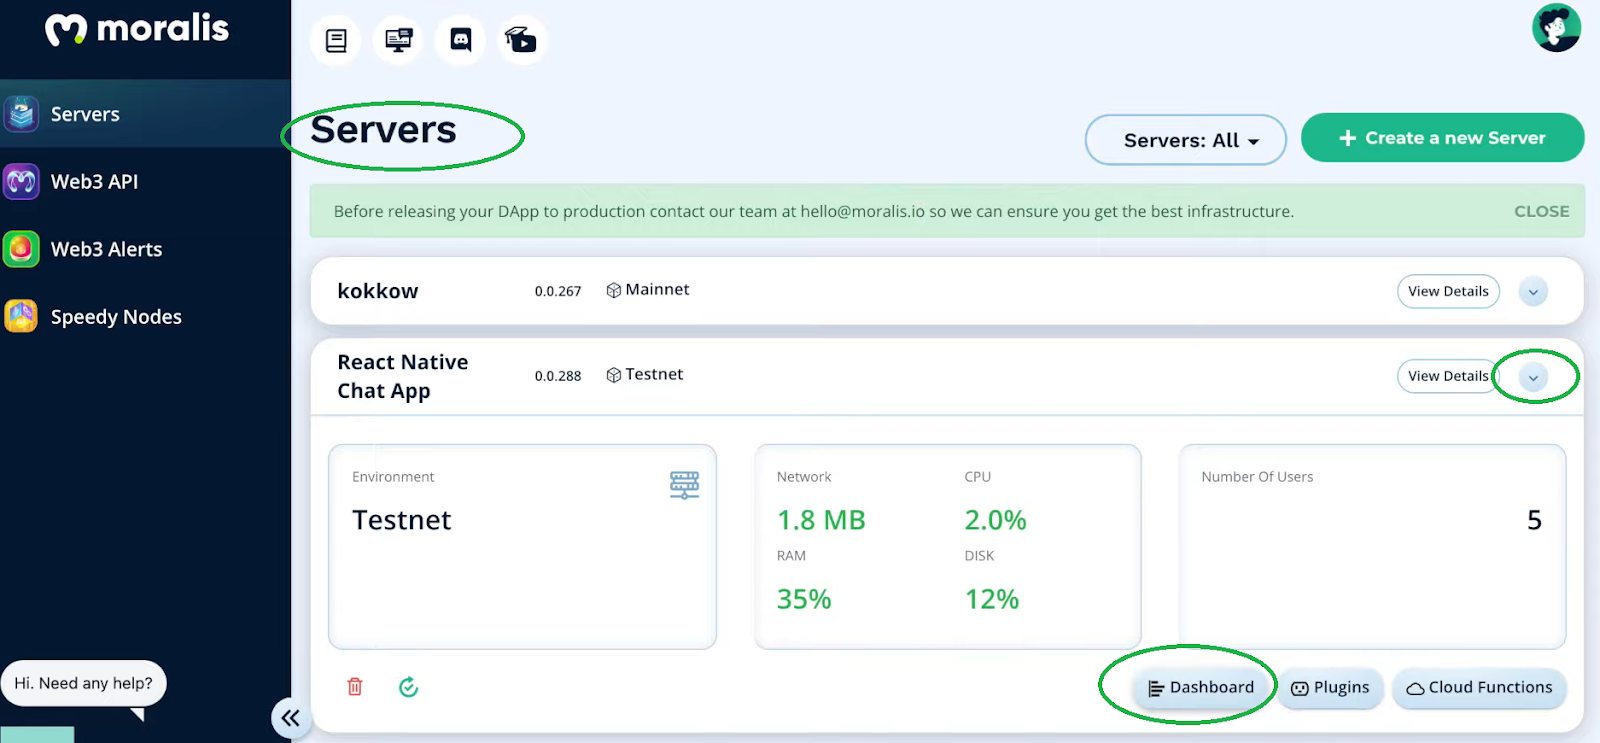
Create a Moralis Server – Once inside your Moralis admin area, select the “Servers” tab (as shown in the image below). Next, click on the “+ Create a new Server” button in the top-right corner and select the network type from the drop-down menu. When working on example projects, we recommend selecting the “Testnet Server” option (check out our Ethereum testnet guide). However, when you want your Web3 apps to go live, you need to select “Mainnet Server”.

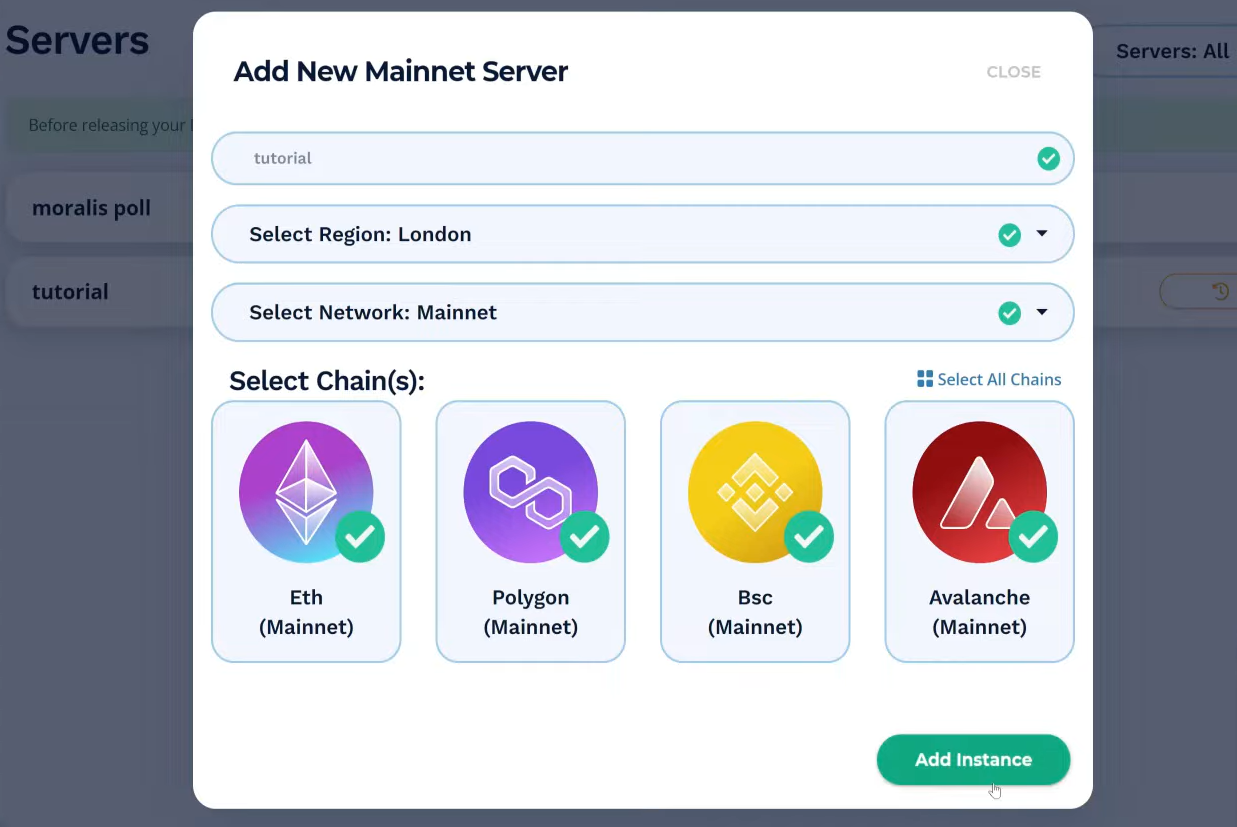
After selecting the network type, another pop-up window will appear. There, you need to enter your server’s name, select region, network, and chain(s). Then, click “Add Instance” to spin up your server.
- Access Server Details – Now that your server is up, you get to access its details via the “View Details” button next to your server’s name:
Then copy your application ID and server URL:
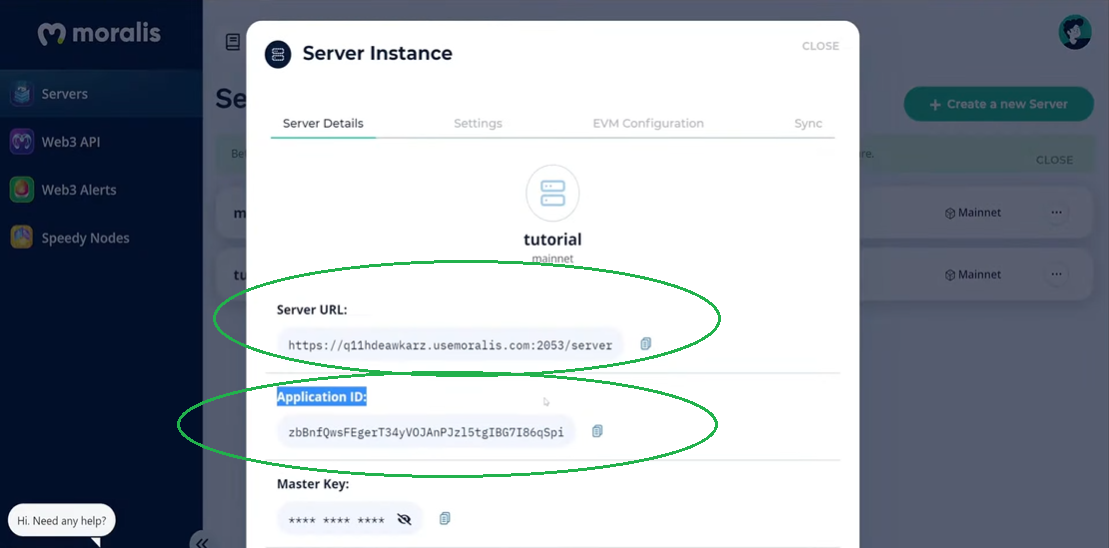
Initialize Moralis – Note: Move on to the next step and complete this step later on. Once you’ve cloned the Ethereum mobile boilerplate, you will populate the “.env” file with your server’s details to obtain the entire backend functionality offered by Moralis’ SDK.

Note: Do NOT use the details from the image above; paste the details of your particular server instead.
Step 2: Mobile Boilerplate Quick Start
As mentioned previously, Moralis and our mobile dApp boilerplate are all about simplicity and speed. As such, getting started with both tools is extremely straightforward. Moreover, now that you have your Moralis server ready, it’s time to complete the following quick-start section:
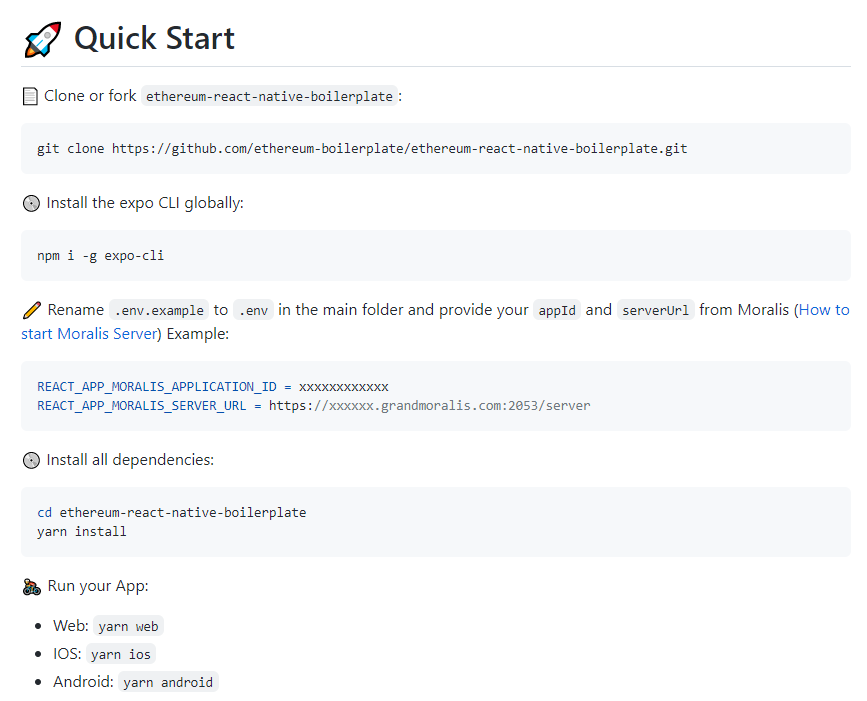
Boilerplate Quick Start Walkthrough
Most of you will find it simple to complete the steps displayed above on your own; however, to avoid any unnecessary confusion, let us guide you through the process.
- Clone or fork the Ethereum mobile boilerplate. You can just click the copy icon next to the GitHub URL on the GitHub page of the boilerplate:

- Next, open your code editor (we normally use Visual Studio Code [VSC]). Then, open a new terminal and paste the copied URL in the terminal’s command line:

- Now it’s time to install “expo CLI” globally. You do this by typing “npm i -g expo-cli” into the terminal. Again, you copy the code from GitHub and then paste it into the terminal:

- Locate the “.env.example” file inside your code editor and rename it to “.env”. Then, populate this file with your Moralis server’s URL and application ID (the fourth substep of the first step):

- Once you paste your Moralis server’s details in the designated area, you need to install all dependencies. Although, since you’re most likely already in the folder, you may skip the “cd ethereum-react-native-boilerplate” command. Thus, move on to the following command – type or paste “yarn install” in the terminal:

- At this point, you have everything ready to run the boilerplate dApp. Since the actual command you need to use for this purpose depends on the operating system you are working with, make sure to choose accordingly:
- Web: yarn web
- iOS: yarn ios
- Android: yarn android
For the purpose of this “build a decentralized messaging app in five steps” project, we will focus on Android. Therefore, run your dApp with the “yarn android” command.

Apply Tweaks to the Boilerplate Code
The “App.tsx” file is where the code for our application’s structure is written. As such, we need to create a proper navigation container in this file:
function App(): JSX.Element {
  const connector = useWalletConnect();
  const {
    authenticate,
    authError,
    isAuthenticating,
    isAuthenticated,
    logout,
    Moralis,
  } = useMoralis();

  return (
    <NavigationContainer>
      <Stack.Navigator initialRouteName="SplashScreen">
        {/* SplashScreen which will come once for 5 Seconds */}
        <Stack.Screen
          name="SplashScreen"
          component={SplashScreen}
          // Hiding header for Splash Screen
          options={{ headerShown: false }}
        />
          <Stack.Screen
            name="Auth"
            component={CryptoAuth}
            options={{ headerShown: false }}
          />
          <Stack.Screen
            name="Home"
            component={Home}
            options={{ headerTitle: (props) => <Header /> }}
          />
      </Stack.Navigator>
    </NavigationContainer>
  );
}
Another mention-worthy file is “CryptoAuth.js”. Among other details, it contains the “handleCryptoLogin” function. This is where we need to apply various tweaks so that the chat window will be displayed after users log in. This is the part of the code you need to focus on:
  const handleCryptoLogin = () => {
    authenticate({ connector })
      .then(() => {
        if (authError) {
          setErrortext(authError.message);
          setVisible(true);
        } else {
          if (isAuthenticated) {
            navigation.replace("Home");
          }
        }
      })
      .catch(() => {});
  };

  useEffect(() => {
    isAuthenticated && navigation.replace("Home");
  },[isAuthenticated])
Building a Decentralized Messaging App with Moralis – Steps 3, 4, and 5
By completing the first two steps, you’re all set up to take on the actual coding required to build a decentralized messaging app. Moreover, please keep in mind that while creating your own Moralis server is an essential part of creating dApps with Moralis, using the boilerplate is not. So, if you are a skilled React Native developer and prefer to build your decentralized messaging app from scratch, feel free to do so.
However, since our Ethereum mobile boilerplate dApp serves as a noticeable shortcut, we recommend you to use it as a starting point. Then, apply tweaks and add the extra code to get the desired outcome – this is the approach we took.
Nonetheless, to further simplify this example project for you, we made the entire code for the finished decentralized messaging app available at GitHub. Thus, use this code to follow along as we take on steps three through five. Of course, feel free to explore the details and the changes applied to the boilerplate dApp by comparing the boilerplate code and the finished one in detail. However, we will focus on the lines of code required for our finished decentralized messaging app moving forward.
Step 3: Adding the Send Functionality
The “Chat.js” file is where we cover all of the above-covered functionalities of our decentralized messaging app. Moreover, in order to properly handle the messages, we will use Moralis’ database, which comes with every Moralis server. Here’s how you access it:
Once inside your dashboard, create a new class called “Messages” for the purpose of storing messages:
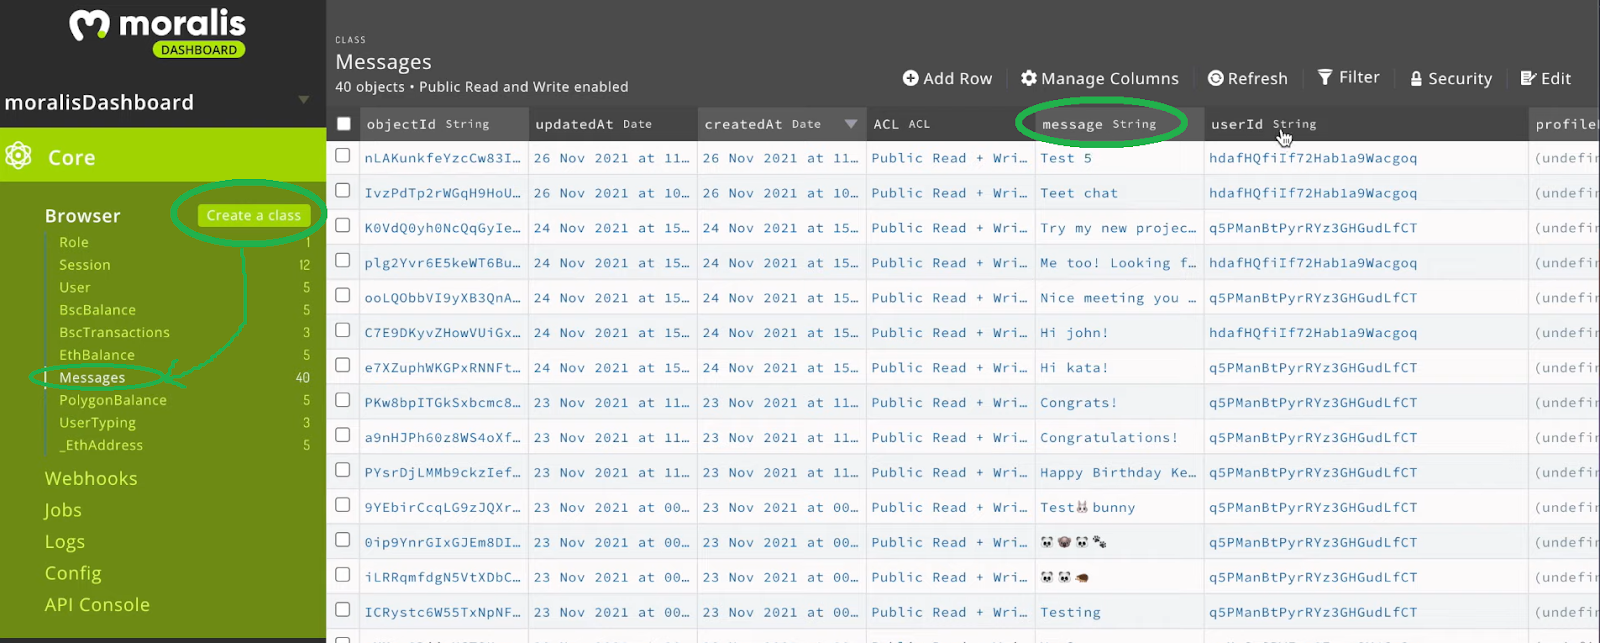
With this particular class ready inside your Moralis dashboard, you get to handle messages properly with the following lines of code:
  const newMessage = new Moralis.Object("Messages");
  const newUserTyping = new Moralis.Object("UserTyping");
The two lines of code above are used with the “sendMessage” function. The latter ensures that the messages are saved in the right column of the “Messages” class:
  const sendMessage = () => {
    newMessage.set('userId', currentUserId);
    newMessage.set('message', message);
    newMessage.save();
  }
This means that we’ve now ensured that all sent messages (by all users) are stored inside your dashboard.
Step 4: Enabling Displaying of Sent Messages
Moving forward, we need to add the code to cover displaying messages in our decentralized messaging app. For that purpose, we use Moralis’ cloud functions option, which is also available for every Moralis server:

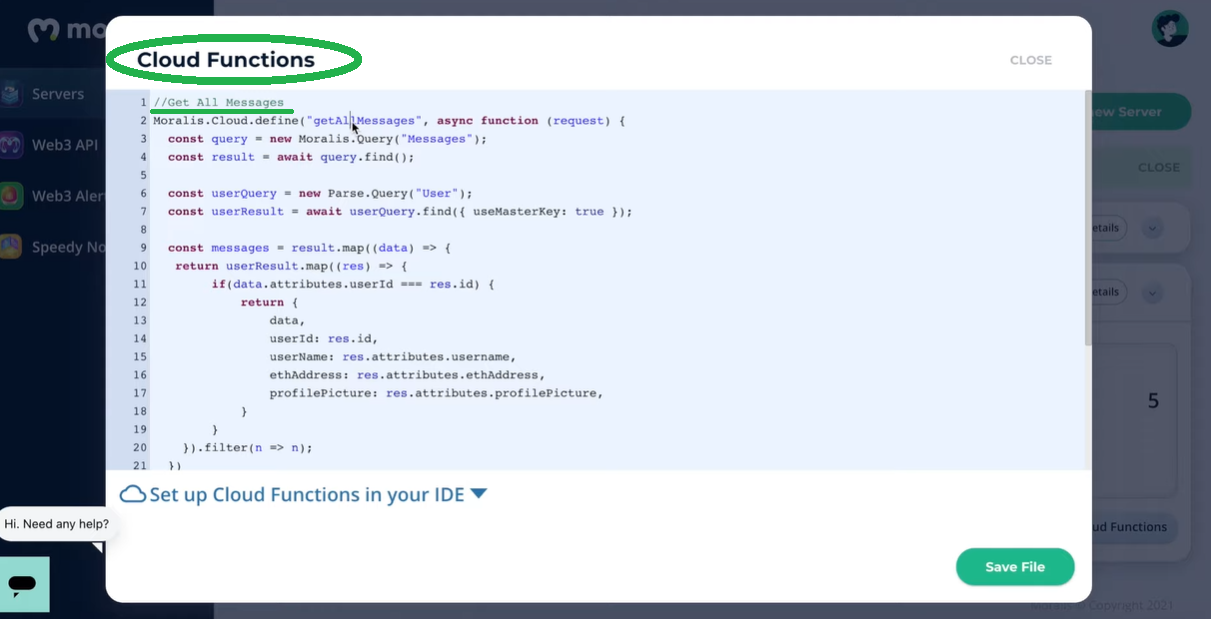
The cloud function shown in the image above enables us to display messages in our messaging application by using the “getAllMessages” function:
  const getAllMessages = async () => {
    const result = await Moralis.Cloud.run("getAllMessages");
    setMessages(result)
  }
In addition, we use the “subscribeToMessages” function to ensure that all messages displayed in the app update in real-time:
  const subscribeToMessages = async () => {
    let query = new Moralis.Query('Messages');
    let subscription = await query.subscribe();
    subscription.on('create', notifyOnCreate);
  }

  const notifyOnCreate = (result) => {
    setUpdated(result)
  }
Essentially, the function above subscribes users to the “Messages” class inside our Moralis database (created previously).
Step 5: Adding the “Typing” Functionality
The “typing” functionality is by no means essential; however, it provides a nice touch since it’s nice to know when other users are typing. As such, we need to track users’ typing and animate it in the chat. In order to set in place this functionality, we use the same Moralis tools as in the previous two steps. First, you need to create a new class called “UserTyping”:

Next, go ahead and create another cloud function that will help us to populate the database:

Furthermore, following the “subscribeToMessages” example, we create the “subscribeToTyping” function. The latter will ensure that typing is detected and properly marked inside the designated column of our database:
const subscribeToTyping = async () => {
    let query = new Moralis.Query('UserTyping');
    let subscription = await query.subscribe();
    subscription.on('create', notifyOnType);
    subscription.on('update', notifyOnType);
  }

  const notifyOnType = async (result) => {
    setOtherUserTyping(result)
  }
Moreover, we also need two additional functions to gain the functionality we are after – the “onChangeText” and “Type” functions:
  const onChangeText = (message) => {
    setMessage(message);
    Type(currentUserId);
  }

  const Type = async (userId) => {
    const params = { userId: userId };
    const result = await Moralis.Cloud.run("getTypingUser", params);

    if (result.length > 0) {
      result[0].set('isTyping', true);
      result[0].save();
    } else {
      newUserTyping.set('userId', userId);
      newUserTyping.set('isTyping', true);
      newUserTyping.save();
    }
  }
In addition, our code needs to be able to detect when a user stops typing. For this, we use the “stopTyping” function:
  const stopTyping = () => {
    if (otherUserTyping && otherUserTyping.attributes.isTyping) {
      otherUserTyping.set('isTyping', false);
      otherUserTyping.save();
    }
  }

  useEffect(() => {
    setTimeout(() => {
      stopTyping();
    }, 5000)
  }, [otherUserTyping]);
Note: It may be challenging to understand the functions presented above properly. As such, we encourage you to view the entire code of the “Chat.js” file.
Moreover, if you prefer to watch videos, we recommend looking over one of Moralis’ expert’s shoulders as he takes on the steps covered throughout this article:
Build a Decentralized Messaging App in 5 Steps – Summary
If you’ve followed the instructions provided above properly, you now have your own decentralized messaging app available. By completing the following five steps, you’ve not only created a useful example dApp but also learned how Moralis makes things simple and easy for JavaScript-proficient developers.
These are the five steps one must complete to build a decentralized messaging app:
- Moralis setup.
- Ethereum mobile boilerplate quick start and initial code tweaks.
- Adding the send functionality.
- Enabling displaying of sent messages.
- Adding the “typing” functionality.
In case you found the example project herein interesting, we encourage you to visit the Moralis YouTube channel and the Moralis blog. The latter is also a great place to learn more about various concepts of blockchain development. For instance, some of our latest articles show you how to create an OpenSea clone, how to mint NFTs without gas fees, how to create a Reddit clone for Web3, how to send Ethereum transactions with one line of code, how to lazy mint NFTs, and much more.
On the other hand, in case you don’t know JavaScript yet, we recommend enrolling in the 2021 JavaScript Programming for Blockchain Developers course from Moralis Academy. That way, you’ll learn this practical universal language and how to best use it within the crypto realm. Moreover, make sure to check out other valuable courses at Moralis Academy. They’ll provide you with the knowledge you need to go full-time crypto.

