Most games today offer an in-game marketplace where players can purchase items. With the rise of blockchain gaming, incorporating an in-game NFT marketplace where players can buy non-fungible tokens to use within a game and store them in a Web3 wallet would be highly beneficial. But how can we build a marketplace to buy NFTs in-game? This article examines how to accomplish this quickly and easily using specific tools. If you follow our guide and the listed steps below, you can take your GameFi or play-to-earn (P2E) project to the next level. So, are you ready to build a marketplace where you can offer players to purchase NFTs in-game? Let’s begin!
Moving forward, we will go through the following stages:
- Project Structure Overview – We will first cover the project’s structure so that you’ll be able to properly understand every aspect of our example game.
- Initial Moralis Setup – You’ll learn how easy it is to create your own server and use the ultimate Web3 backend platform, Moralis, for Unity Web3 development.
- Preparing NFTs – We will show you how to use the Moralis dashboard to index the blockchain and store off-chain data.
- Deploy Our Web3 Contract – You’ll get to see how to deploy a smart contract that will ensure in-game items are minted and converted into NFTs. Without smart contracts (Web3 contracts), it wouldn’t be possible to buy NFTs in-game.
- Minting NFTs – We will also show you how to interact with the deployed smart contract from Unity.
- Get Minted NFTs – Nonetheless, you’ll also learn how players will be able to get minted NFTs and even view them on OpenSea.
Note: We will do a brief overview of the stages listed above. If you’d like a more in-depth walkthrough, please watch the article’s video linked at the end.
Buy NFTs In-Game – Demo of Our Example Web3 Game
Before we tackle the above-listed stages of our example project, let’s do a quick demo of our game. That way, you’ll be able to decide if you want to roll up your sleeves moving forward. Although, we are sure you are eager to create your own instance of an excellent Unity dapp (decentralized application). After all, this is the fastest way to implement the “buy NFTs in-game” feature.
So, here’s the initial screen of our example game:
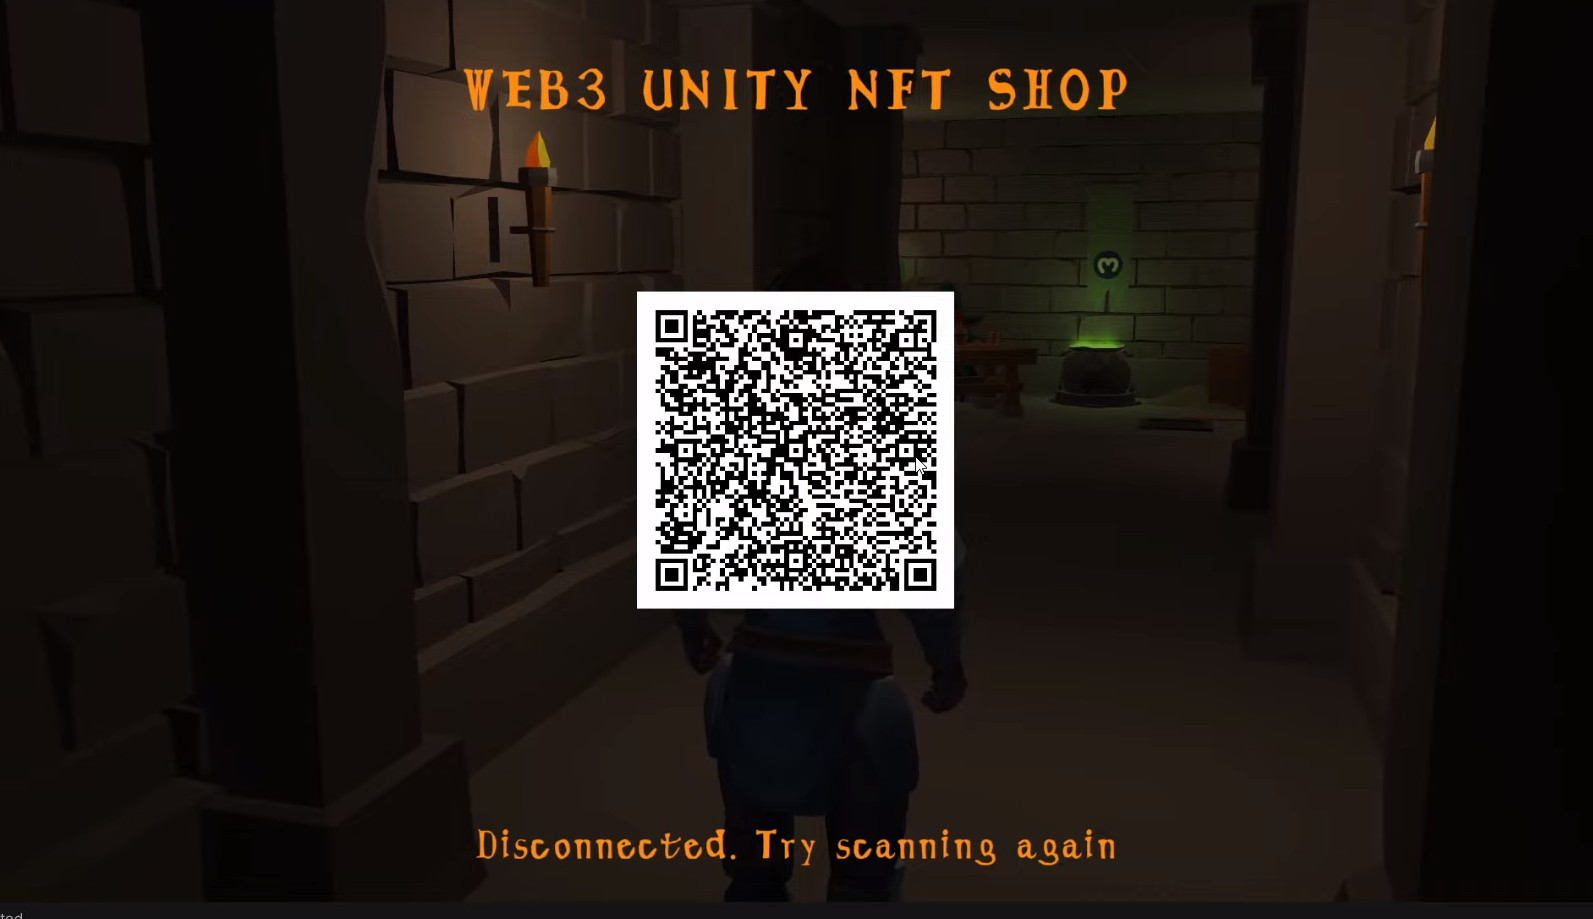
As the above QR code suggests, players need to scan it using their Web3 wallets. For the purpose of our demo, an example user is using MetaMask (authenticate with MetaMask). So, after scanning the code, the player needs to confirm their Web3 login inside their crypto wallet:
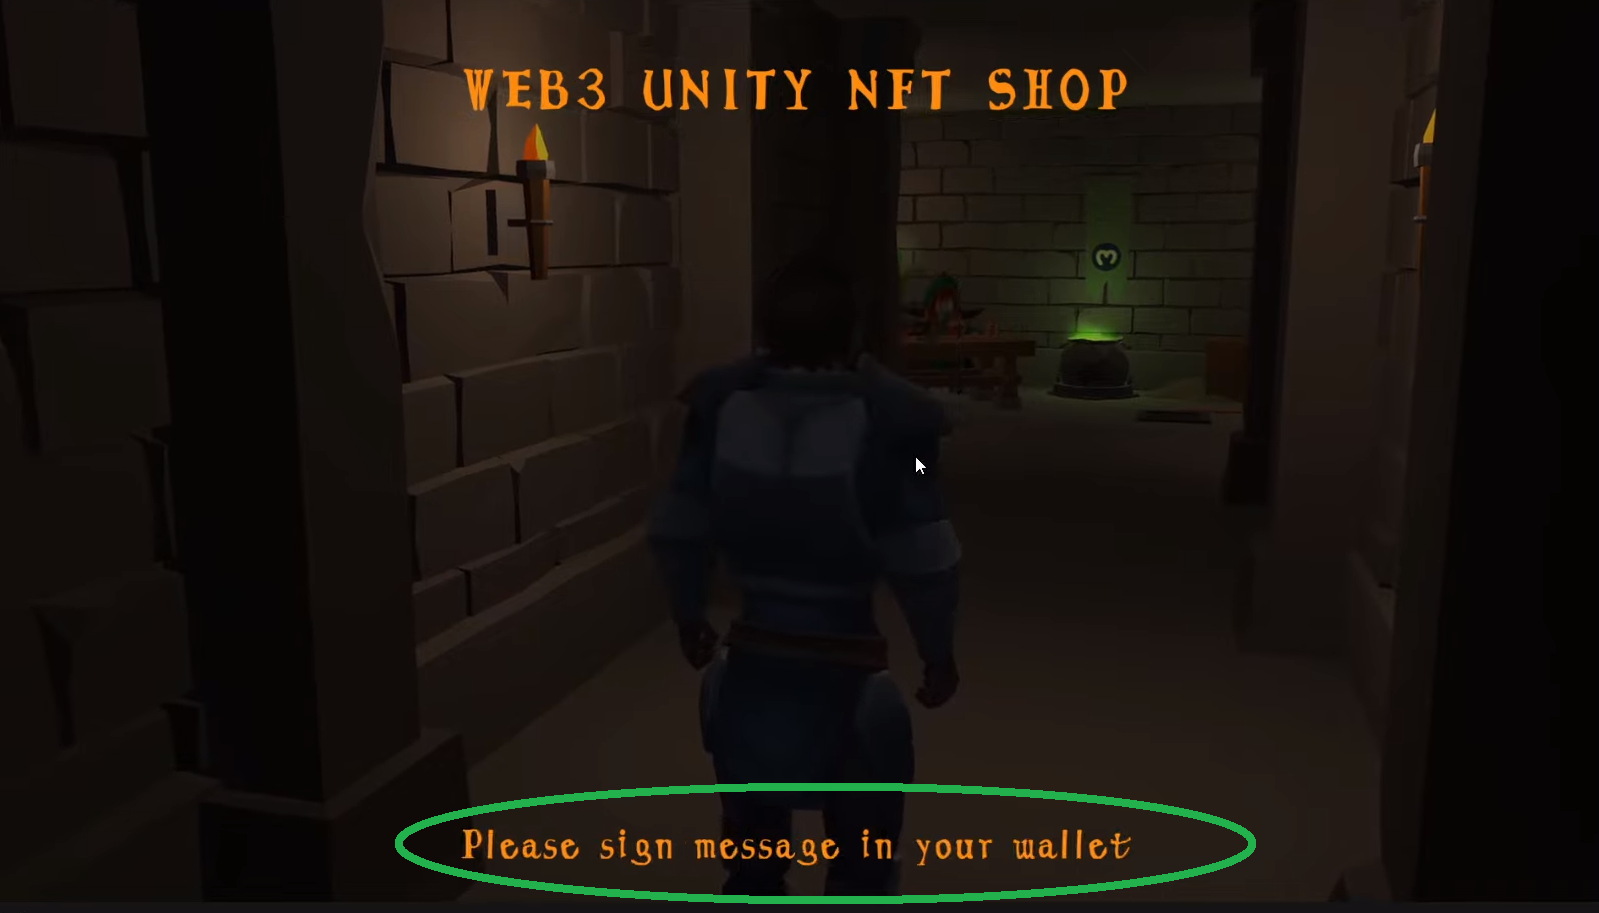
Once the player has completed their Web3 authentication, the user can move their avatar. As such, they can go to the area of the game where they can buy NFTs in-game:
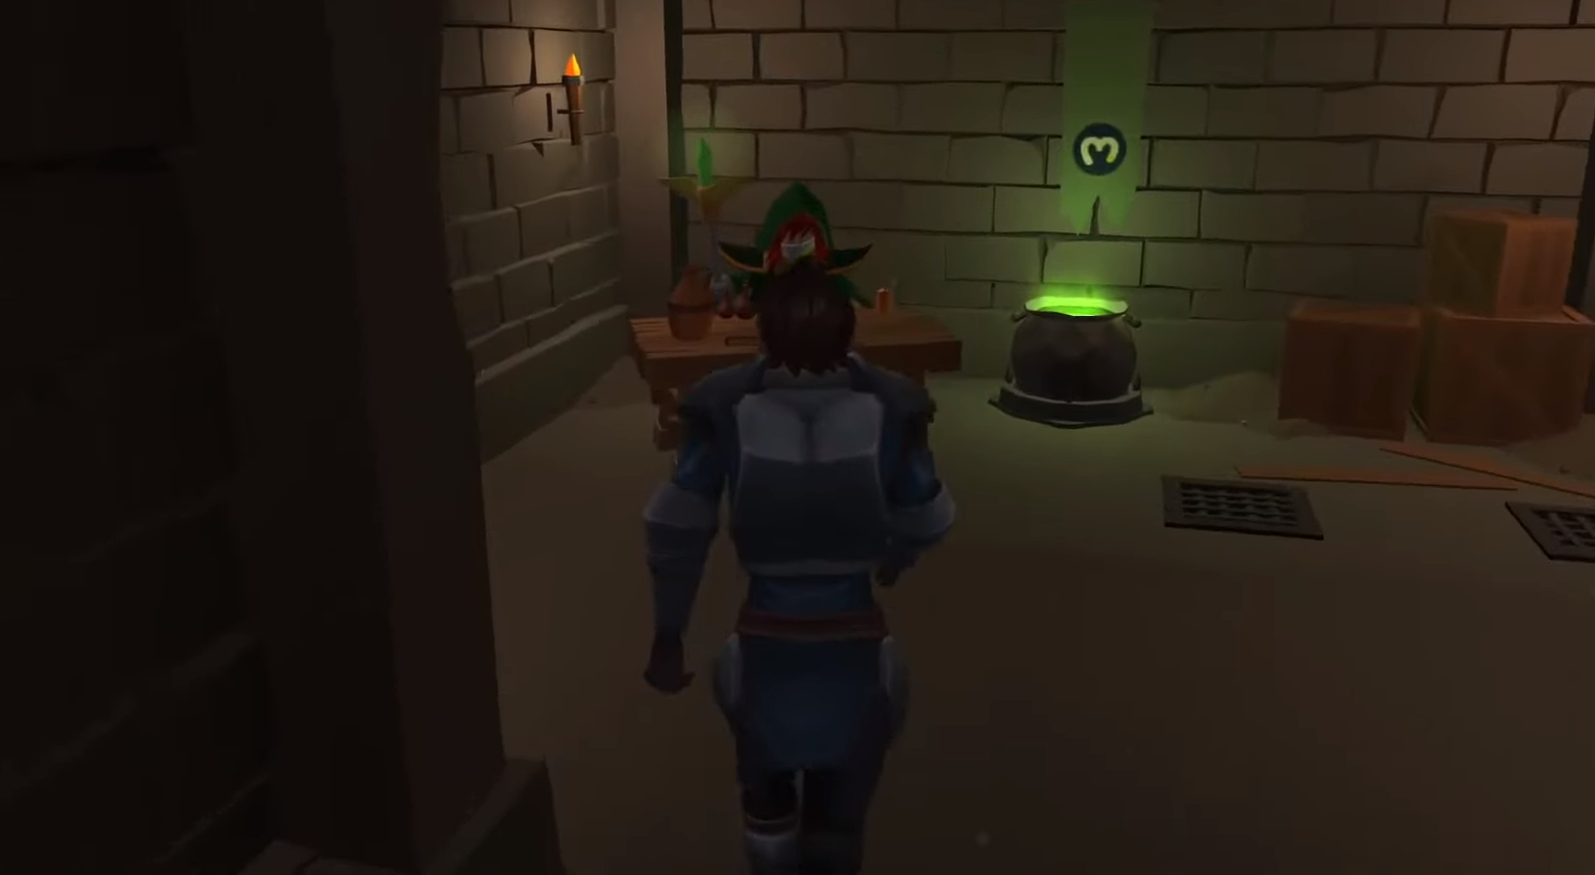
Once at the shop counter, the user can interact with it and see the available items:
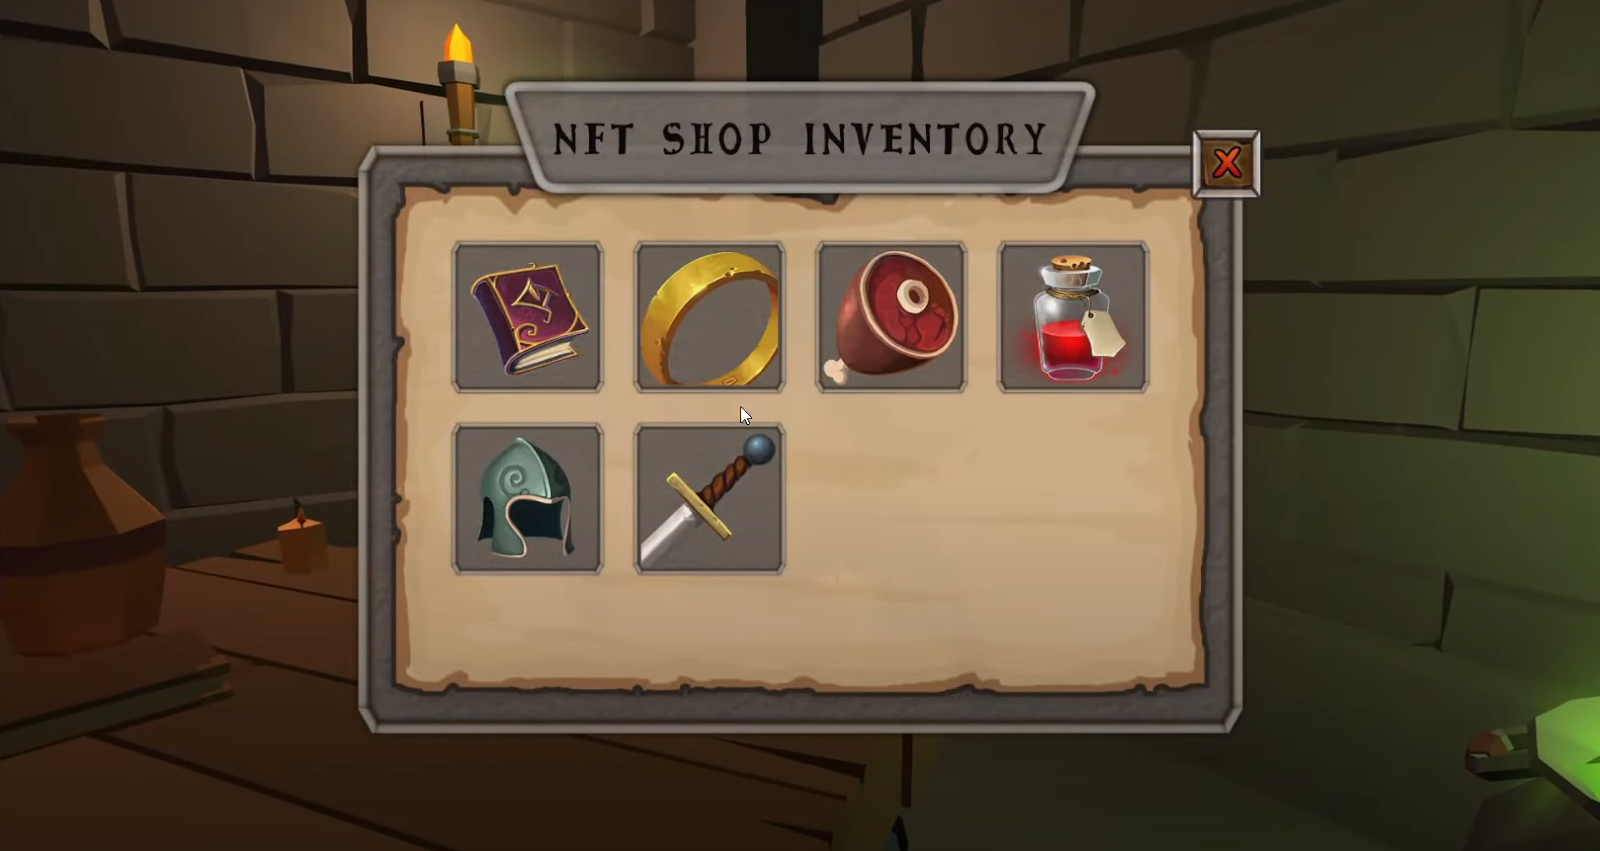
How to Buy NFTs In-Game
As you can see in the screenshot above, several items are in the NFT shop’s inventory. By clicking on any of the available items, players get to see the details of that item. This is also where they can use the “buy” button. So let’s say the example player clicks on the sword:
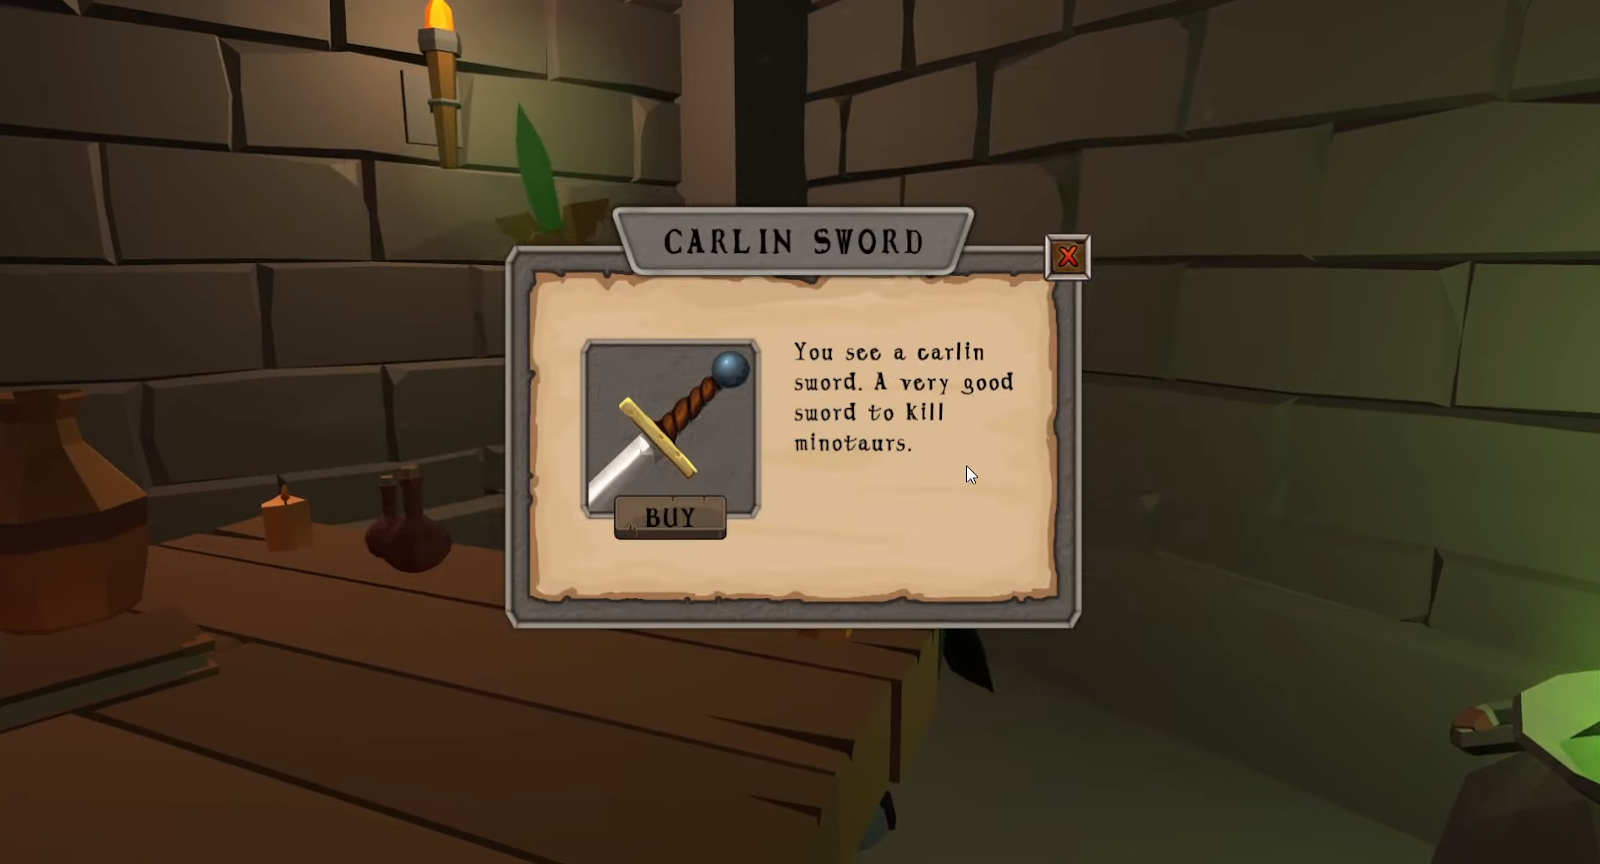
Furthermore, let’s say the player wants to buy the above sword. As the user clicks on the buy button, it will create the item’s metadata and save it to IPFS. Next, the player is asked to confirm the transaction inside their Web3 wallet, which will confirm the transaction:


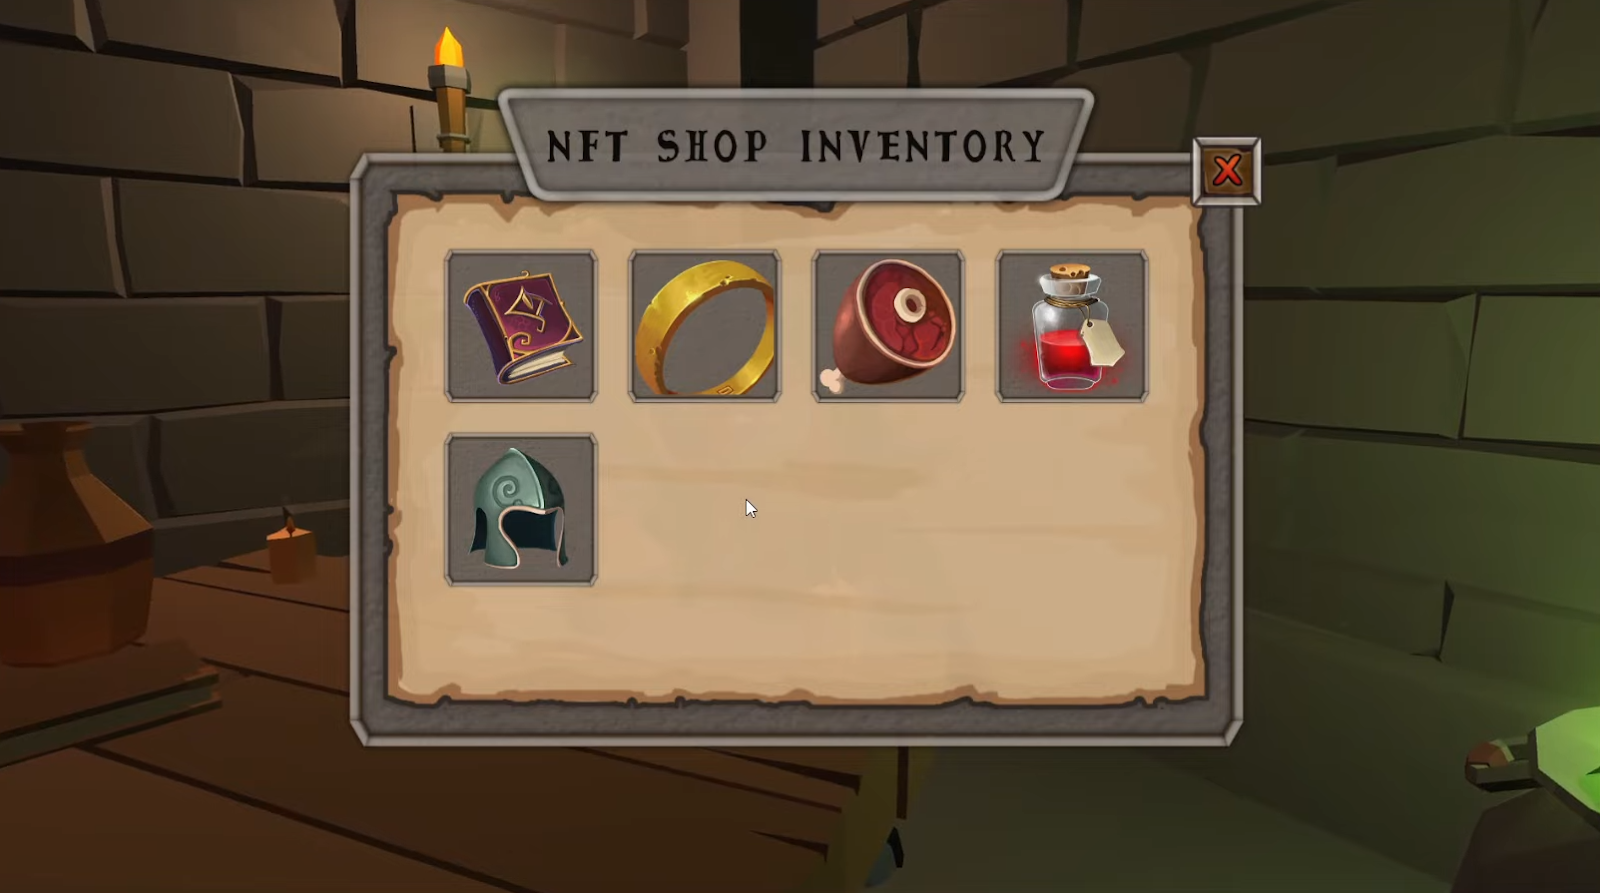
If the player returns to the shop counter after the purchase, the sword will no longer be available in the NFT shop:
Player’s Inventory and OpenSea
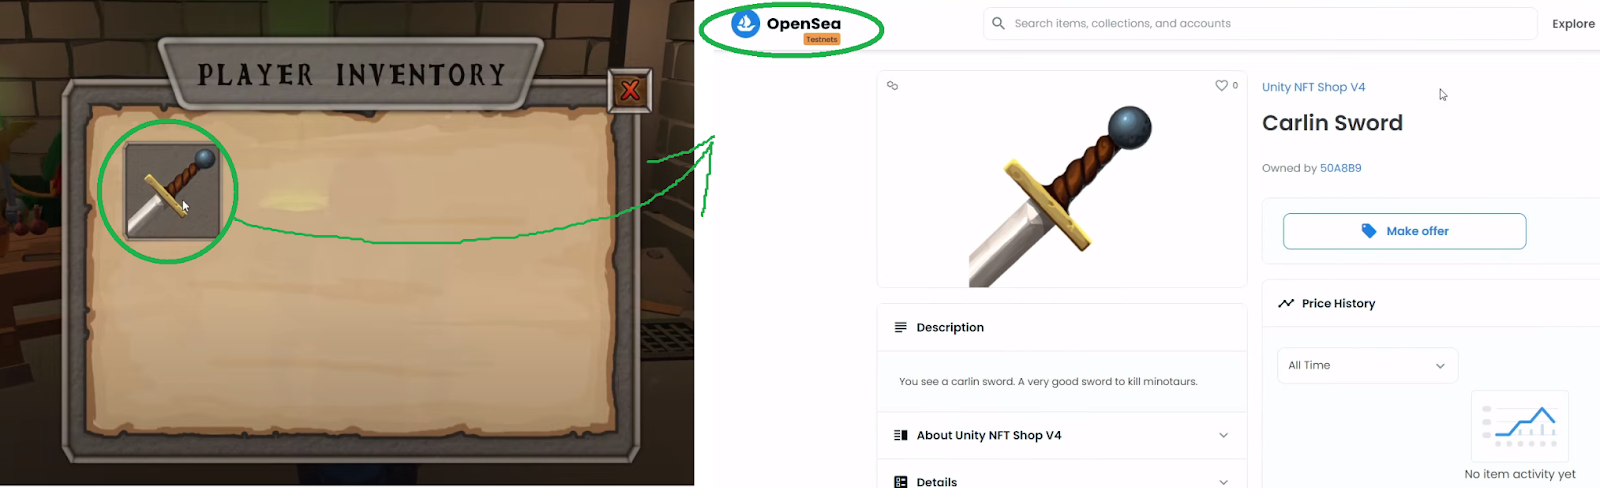
However, after players buy NFTs in-game, they get to see these items inside their inventory by pressing the “I” key:

As you can see in the screenshot above, the example player’s inventory now displays that sword. In addition, our example game also lets players view their items on OpenSea. They get to do this by simply clicking on the item:
Implementing “Buy NFTs In-Game” with Unity and Moralis – Example Project
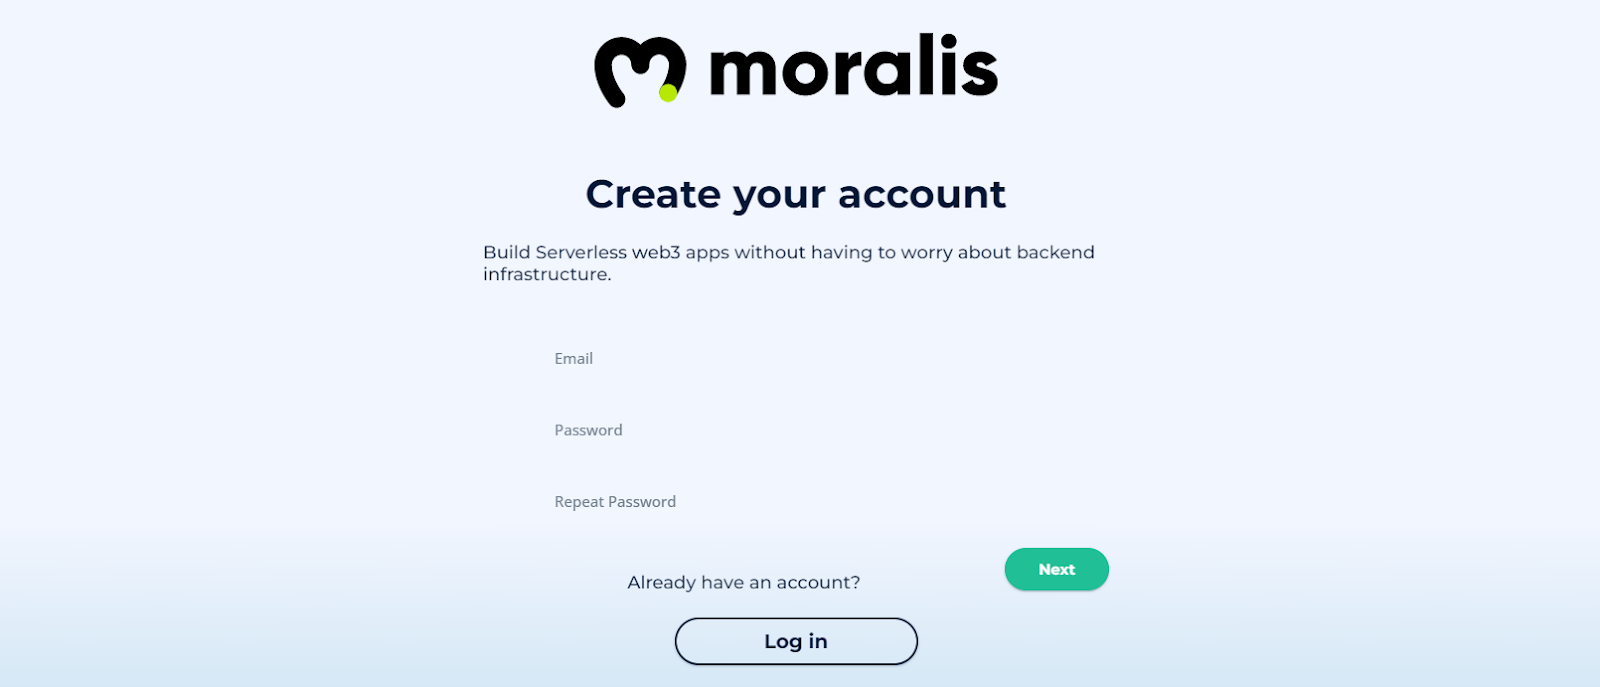
There might be some of you hearing about Moralis for the first time. If that’s the case, you should know that this is the ultimate Web3 development tool. This “Firebase for crypto” platform is the one-stop solution for your Web3-related backend needs. It enables frontend developers to use Moralis’ infrastructure and easily create phenomenal Web3 applications. By using Moralis, you don’t need to deal with the limitations of RPC nodes. With its single workflow, you can create a Moralis dapp in a couple of minutes. Also, Moralis’ cross-chain and cross-platform interoperability give you many options. So, if you want to complete the example project following our lead, make sure to create your free Moralis account. In addition, we encourage you to join Moralis Projects and earn some unique NFTs.
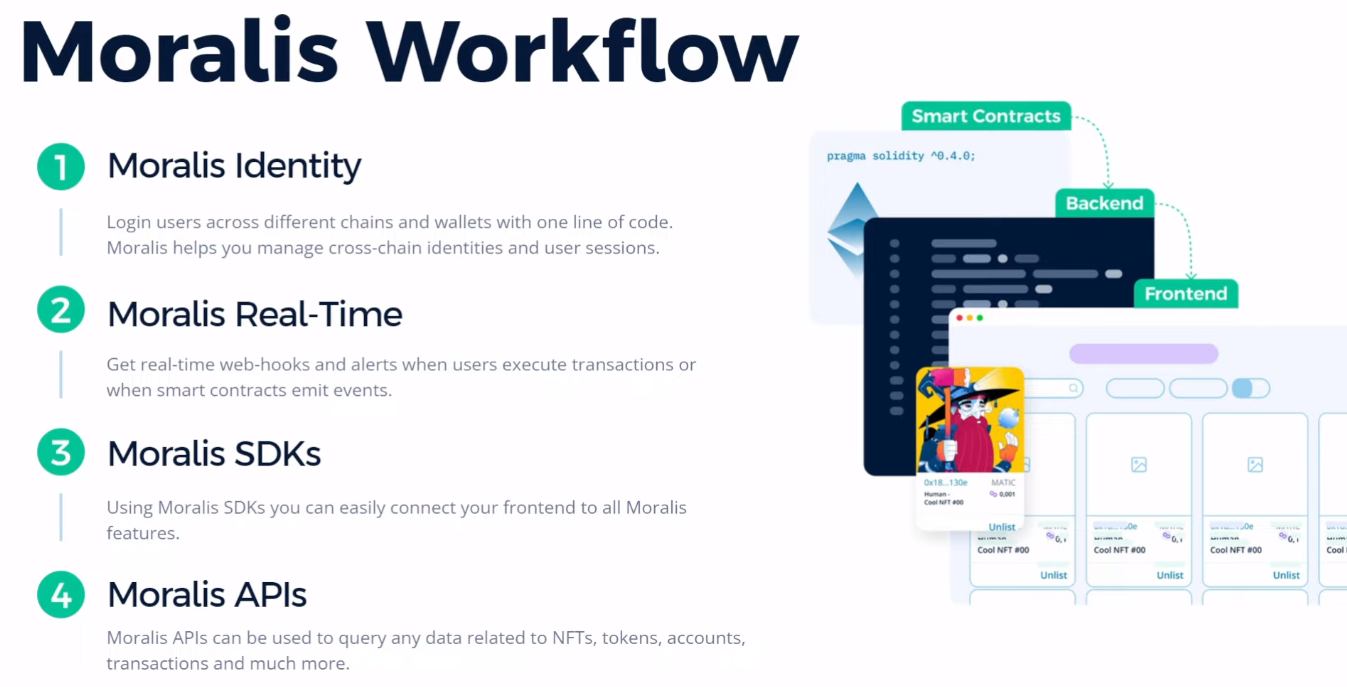
We will do a proper overview of all the six stages presented in the introduction as we move forward. However, for more details, we will reference the timestamps of the video that you can find at the end of this article. In that video, a Unity expert from Moralis will help you get to the finish line. Nonetheless, make sure to use our project’s GitHub repository to access the entire code, including all example assets.
Project Structure Overview
Starting at 4:25, you will get a chance to go through the structure of our project. As such, you will learn that you can find all the assets and scripts inside the “_Project” folder:

Inside the “Scenes” folder, you’ll also have a chance to find our “Game” scene. As far as the third-party assets go, they await you inside the “ThirdParty” folder. Nonetheless, inside “Moralis Web3 Unity SDK > Resources,” you will find the prefab that you’ll populate using your Moralis server’s details. Then, starting at 5:37, you will get to look at the project’s hierarchy:
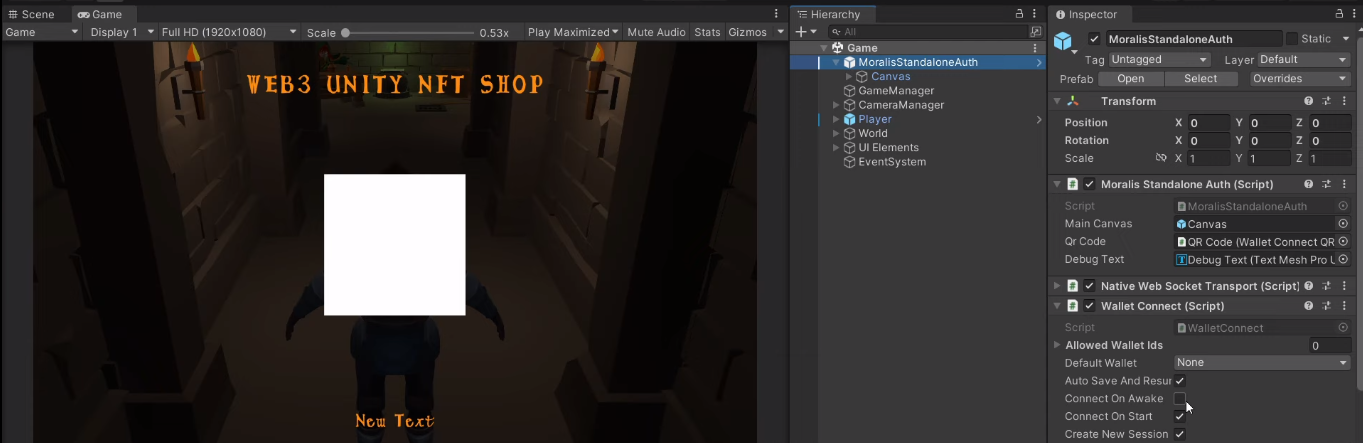
The “MoralisStandaloneAuth” prefab will cover Web3 authentication as presented in the demo above. Also, “GameManager” will handle game stages and trigger some events. There’s also the “cameraManager” prefab, handling the avatar’s camera and the camera that focuses on the NFT shop. This is also where you’ll get to see Unity Cinemachine’s power. Nonetheless, you’ll also take a look at “Player, “World”, “UI elements”, and “EventSystems”. As far as the visual aspects of the “buy NFTs in-game” go, you’ll get to the NPC seller and the shop counter inside “World”:
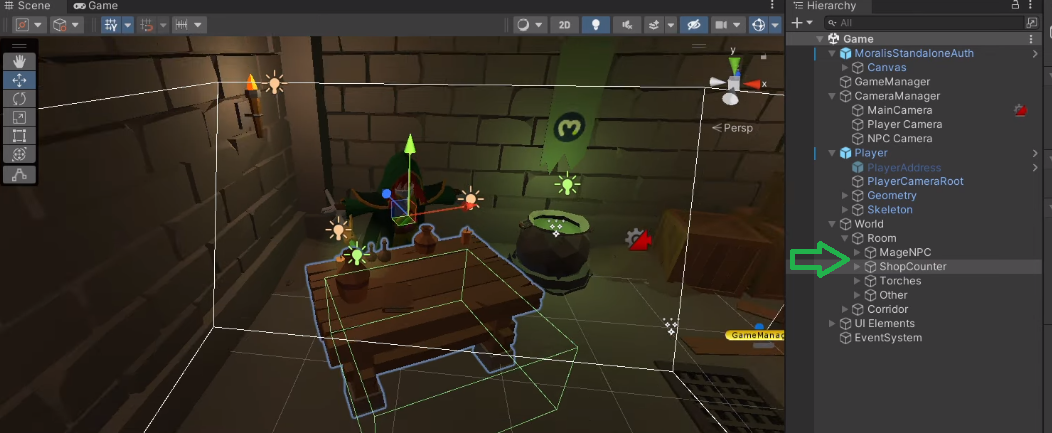
As the screenshot above indicates, the shop counter’s collider will play a crucial role. After all, it will trigger the NFT shop and give players a chance to buy NFTs in-game. However, it is “UI Elements” that contains “ShopInventory” and “PlayerInventory”. Moreover, you will learn more about the new game input system (“GameInputAction” asset) in the video.
Initial Moralis Setup
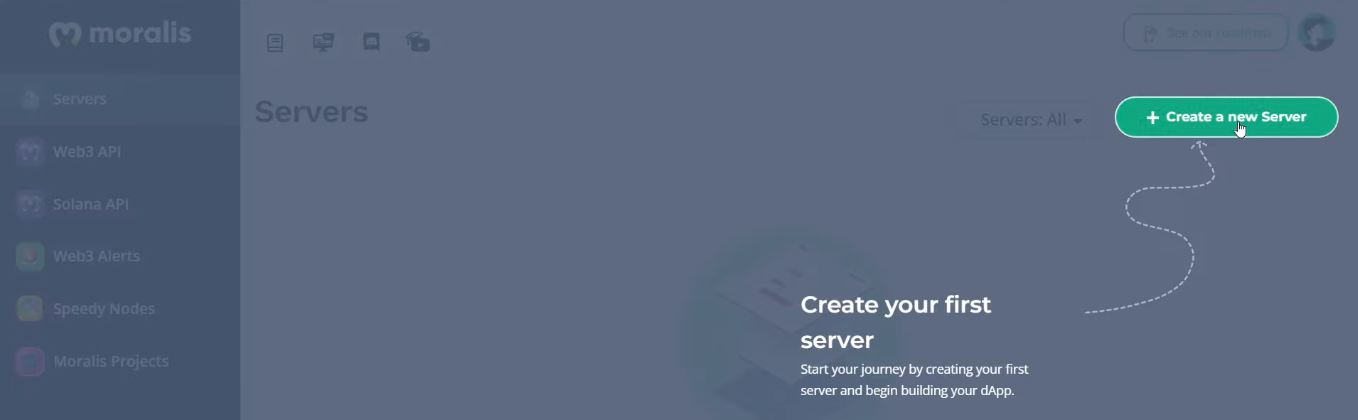
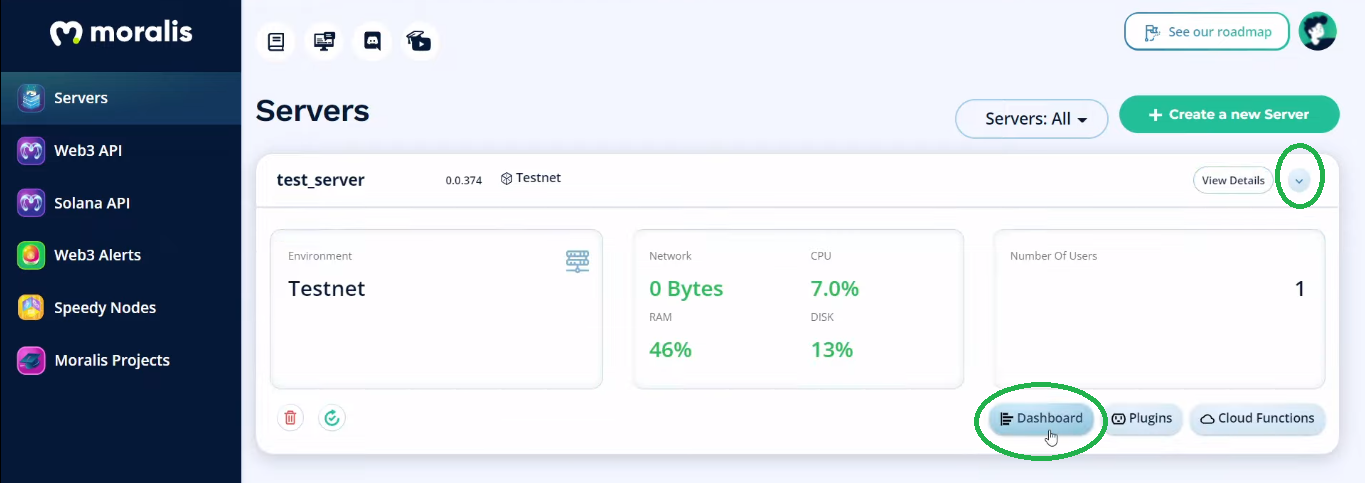
Now it’s time to complete the initial Moralis setup (10:00). Fortunately, this setup is straightforward and takes little to no time. In case you haven’t done so yet, first create your free Moralis account. Otherwise, just log in to your account and access your Moralis admin panel. There, you’ll see the “+ Create a Server” button inside the “Servers” tab:
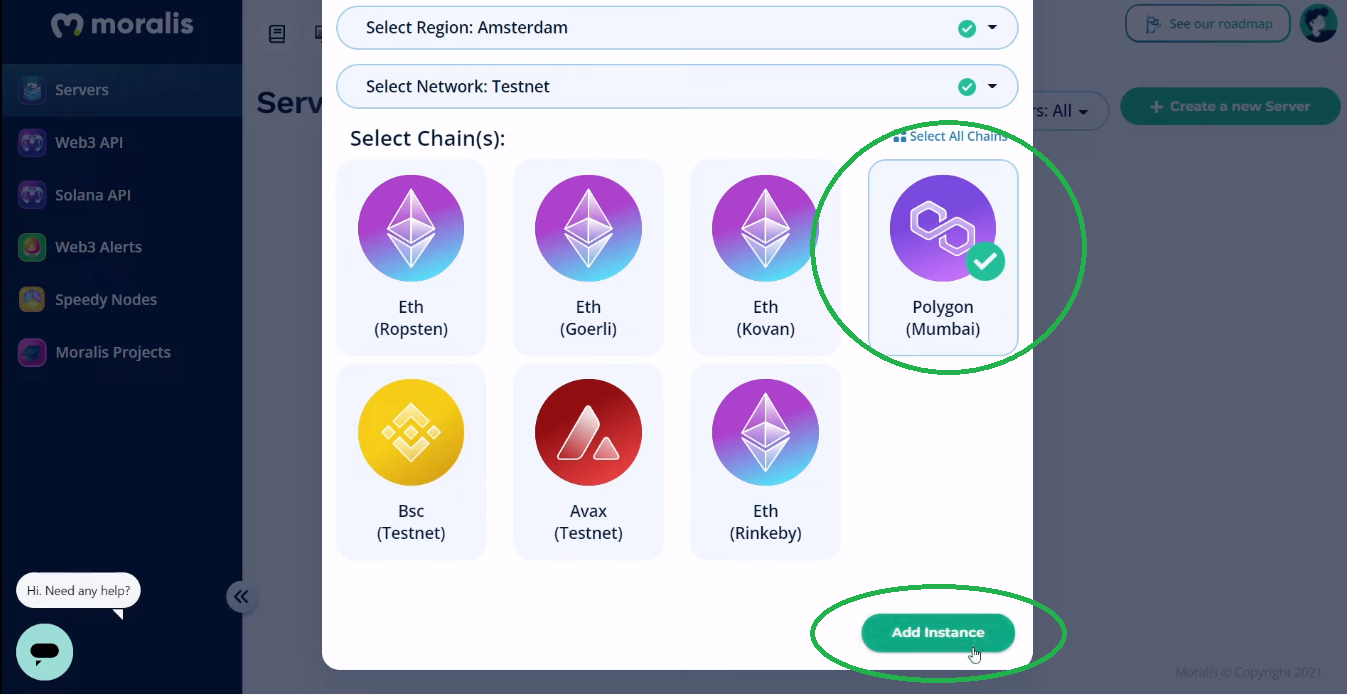
For the sake of this example project, select the “Testnet Server” option. Next, enter your server’s details and choose Polygon’s testnet (Mumbai). Finally, spin up your server by clicking on the “Add Instance” button:
Once your server is ready, you’ll get to access its details via the “View Details” button:
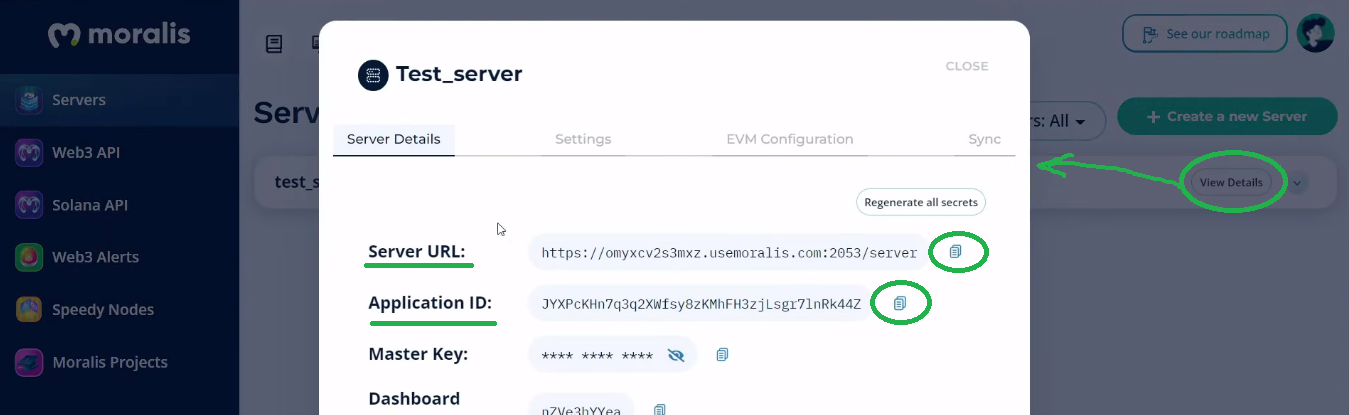
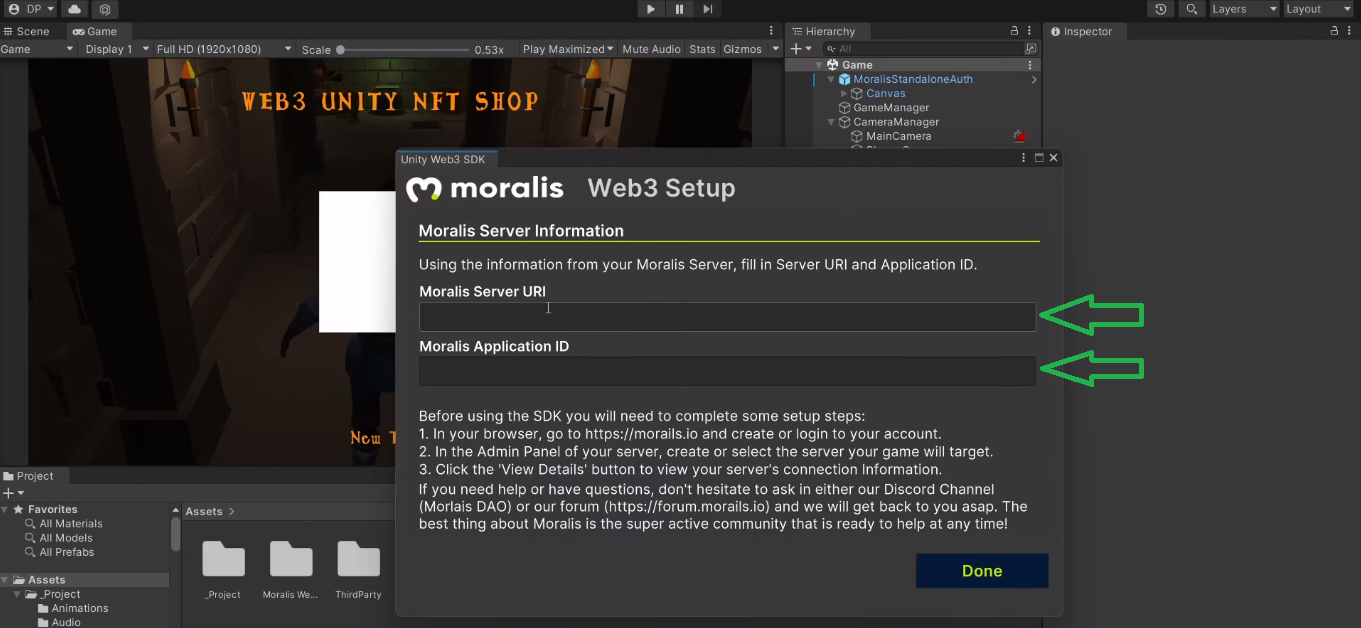
You’ll paste the above-copied details into Unity easily, thanks to the latest version of the Unity SDK:
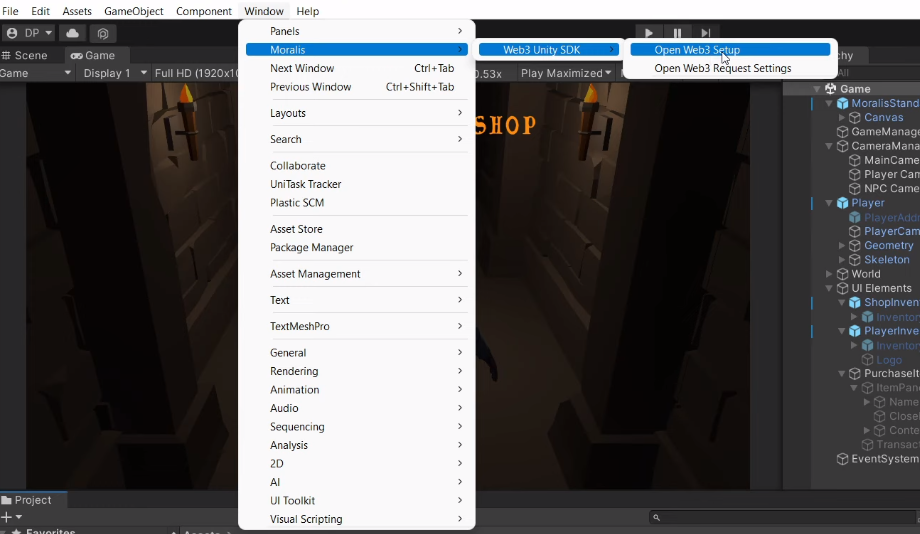
Here’s the interface where you need to enter your Moralis server’s details:
Preparing NFTs
Starting at 12:30, you get to learn about managing shop items. This is where a Moralis expert will walk you through the “ShopInventory” script. As a result, you’ll get acquainted with querying data from the Moralis dashboard. Most of which will revolve around the “ItemData” class. The latter has a name, a description, and an image URL, which are the essence of our example in-game NFTs. Furthermore, the video tutorial below will show you how to create your own “ItemData” class (15:10).
In addition, the “ShopInventory” script code walkthrough will help you see the power of Moralis. Further, you’ll see how hooks such as “FindAsync()” simplify things.
Deploy Our Web3 Contract
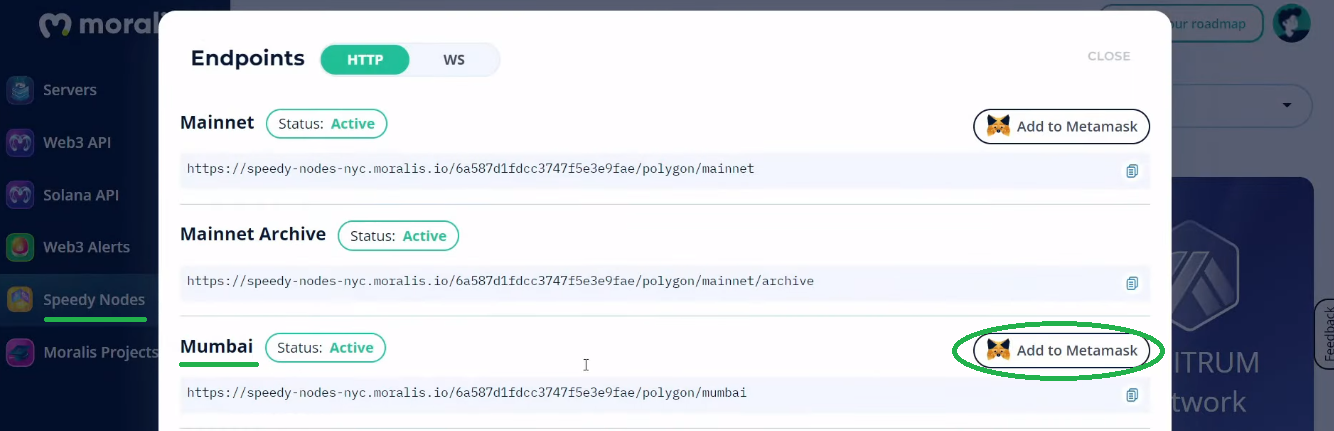
As we pointed out during the initial Moralis setup, we base our example project on the Mumbai testnet. As such, you need to add this network to your MetaMask. Fortunately, Moralis Speedy Nodes make that pretty easy (29:30):
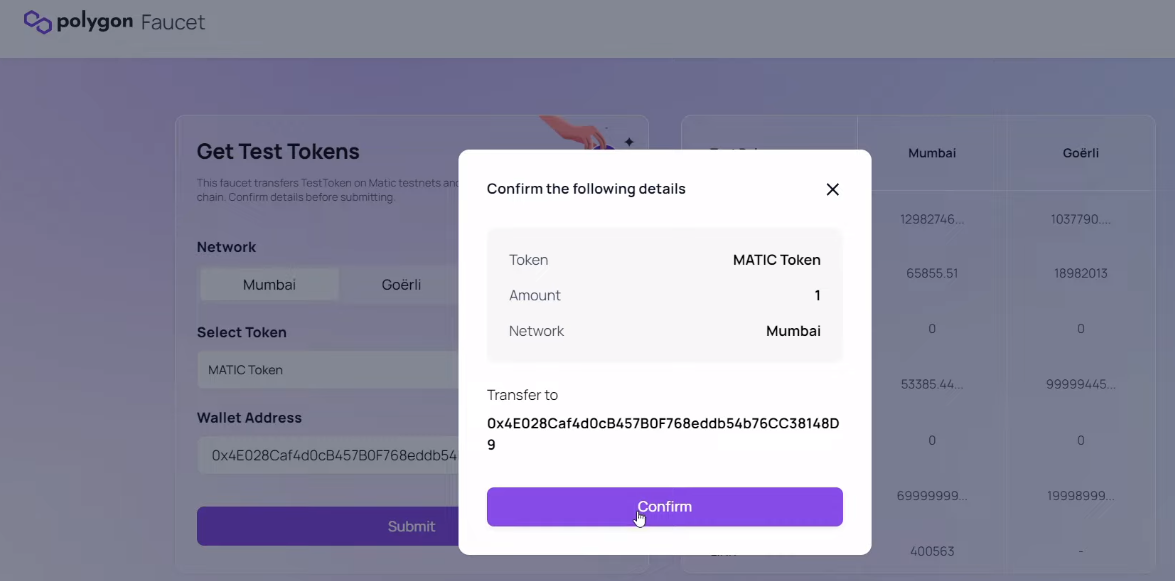
In addition, to deploy our smart contract, you will also need some “play” MATIC. To acquire some test MATIC, you must utilize a Mumbai testnet faucet (30:21):
With your MetaMask switched to Mumbai and “play” MATIC in your wallet, you are ready to open Remix (31:13). Next, you can copy the entire code of our contract (“ShopContract“). Of course, the video below will walk you through the smart contract’s code. Moreover, our contract focuses on the ERC-1155 token standard. Once you are ready, use the “Injected Web3” environment and deploy the smart contract:
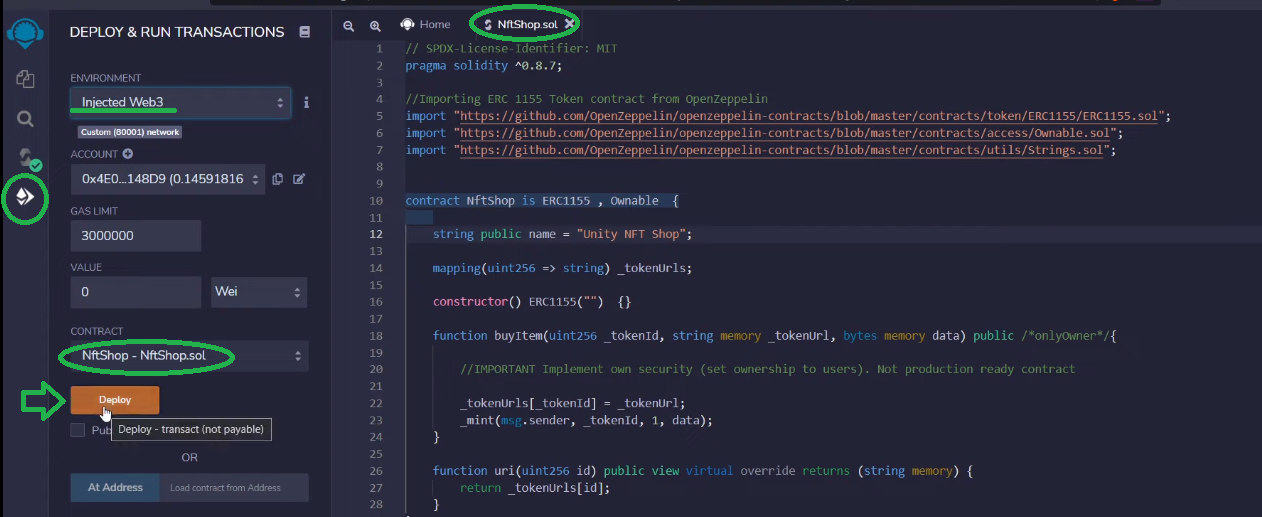
After your instance of the above smart contract is deployed, you’ll be able to copy its address into the “GameManager” script (35:45).
Minting NFTs
If you remember our demo, you know that to buy NFTs in-game, players mint them by clicking on the “buy” button. They also need to confirm the minting transaction with their Web3 wallets. So, how do we set this up inside Unity? We use the “ShopItem” script (36:45). The latter triggers the corresponding event, handled by the “PurchaseItemManager” script. The exact event handler (“ActivateItemPanel”) is triggered when players select any particular item from the shop. Finally, it is the “buy” button that triggers the “PurchaseItem” function (39:16):
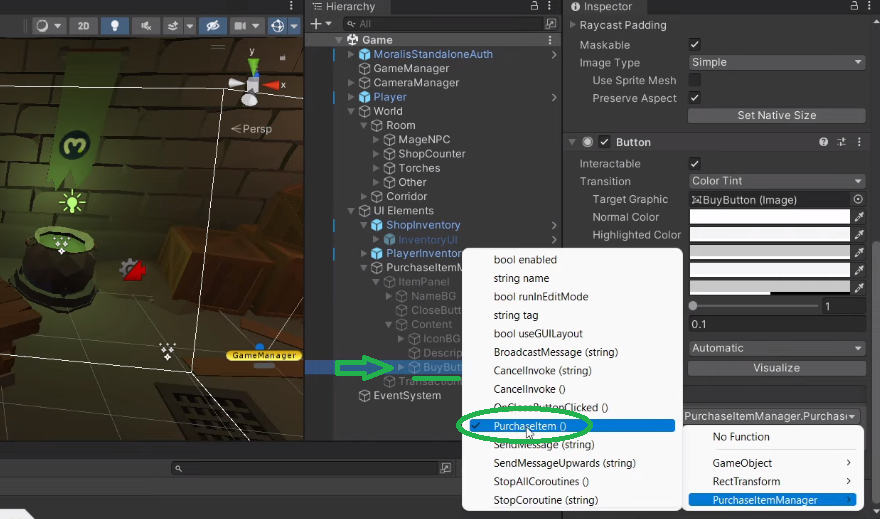
This is where Moralis’ SDK will mesmerize you again with its power (e.g., the “SaveToIpfs” method). Thanks to Moralis’ IPFS integration, you easily create your NFTs’ metadata (JSON files). This metadata is then used to mint NFTs via the above-deployed smart contract. Moreover, the “PurchaseItemFromContract” function triggers the contract in question. In addition, our scripts also make sure to delete the purchased items from the shop inventory (45:43).
Get Minted NFTs
Finally, it’s time you learn what enables items to be displayed inside players’ inventory and on OpenSea. For details, use the video below starting at 49:46. For this aspect to function properly, “PlayerInventory” will need to do the heavy lifting. First, our game gets players’ NFTs via the “LoadPurchadedItems” method and displays them inside the players’ inventory. As far as displaying NFTs on OpenSea goes, the “CheckNftOnOpenSea” method will get things done. It will do so via Unity’s “openURL” method.
Finally, here’s the video tutorial we’ve been referencing throughout the article:
Build a Marketplace to Buy NFTs In-Game – Summary
This article made it possible for you to build a Web3 game with Unity that allows players to buy NFTs in-game. All you needed to do was deploy your own instance of our smart contract and complete the initial Moralis setup. By using our code, you had a chance to have the entire project finished in minutes. Also, using the above video tutorial, you had a chance to go through the code in more detail. So, at this point, you know how to mint game assets as NFTs.
If you enjoyed this example project, we highly recommend that you take on our other Unity tutorials. For instance, learn to do blockchain game transactions, master connecting a Unity game with Web3 login, or build a Web3 MMORPG. On the other hand, you might be eager to explore other aspects of blockchain development. If so, visit the Moralis blog and the Moralis YouTube. Some of the latest topics include an EIP 1559 example, a full decentralized finance guide, building a Web3 Twitter clone, building a decentralized autonomous organization (DAO), SPL vs ERC20 tokens comparison, building a Solana token dashboard, how to create your own metaverse, creating a BNB NFT, building a play-to-earn game smart contract, fractional NFTs, and NFT-based memberships. As such, these two content outlets may support your free ongoing blockchain development education.
However, if you want to become a Web3 developer sooner rather than later, you may want to take a more professional approach. Hence, you should consider enrolling in Moralis Academy – the fastest-growing online academy focused on blockchain development. Aside from top-tier courses, this is where to get expert mentorship, a personalized study path, and become a member of one of the most amazing communities in the industry.
