If you are a Unity developer, now might be the perfect time to learn how to get involved in the Web3 realm. While Web3 comes with an extensive set of features and offers users the ability to emerge into the metaverse, onboarding users is always the first step. As such, we want to show you how easily you can connect a Unity game with Web3 login. By using the ultimate Web3 development platform, Moralis, you get to walk the path of least resistance.
Moralis (a.k.a. “Firebase for crypto”) and its ultimate Web3 SDK make blockchain development straightforward. Essentially, Moralis covers all of your crypto-related backend needs so that you can fully focus on creating an excellent Web3 UI. Hence, you get to attract more users and ensure that your dApps (decentralized applications) are successful. Moreover, when creating a Unity game with Web3 login, Moralis’ Web3 backend platform offers you the Moralis Metaverse SDK.
Moving forward, we will show you how easy it is to build a Unity game containing Web3 login when using the right tools. As such, we’ll also take you by the hand and guide you through the initial Moralis setup. The latter is your gateway to accessing Moralis’ full power. With the initial setup completed, we will take on a simple example project to make things clear for you. We strongly encourage you to follow our lead and take action by creating your own Unity game with Web3 login. Moreover, for maximum convenience, we also made the entire project accessible at GitHub. Nonetheless, we will first go through the preview of our finished Web3 login example built with Unity. As such, you will know exactly what to expect to get out of the example project that will follow.

Unity Game with Web3 Login Example – Preview
As mentioned, our Web3 authentication example is all about simplicity. Here’s what it looks like in a web browser:

Yes, you are correct; there is a single button in the screenshot above. When users click on “Authenticate”, a Web3 wallet pops up, prompting the user to connect with MetaMask:
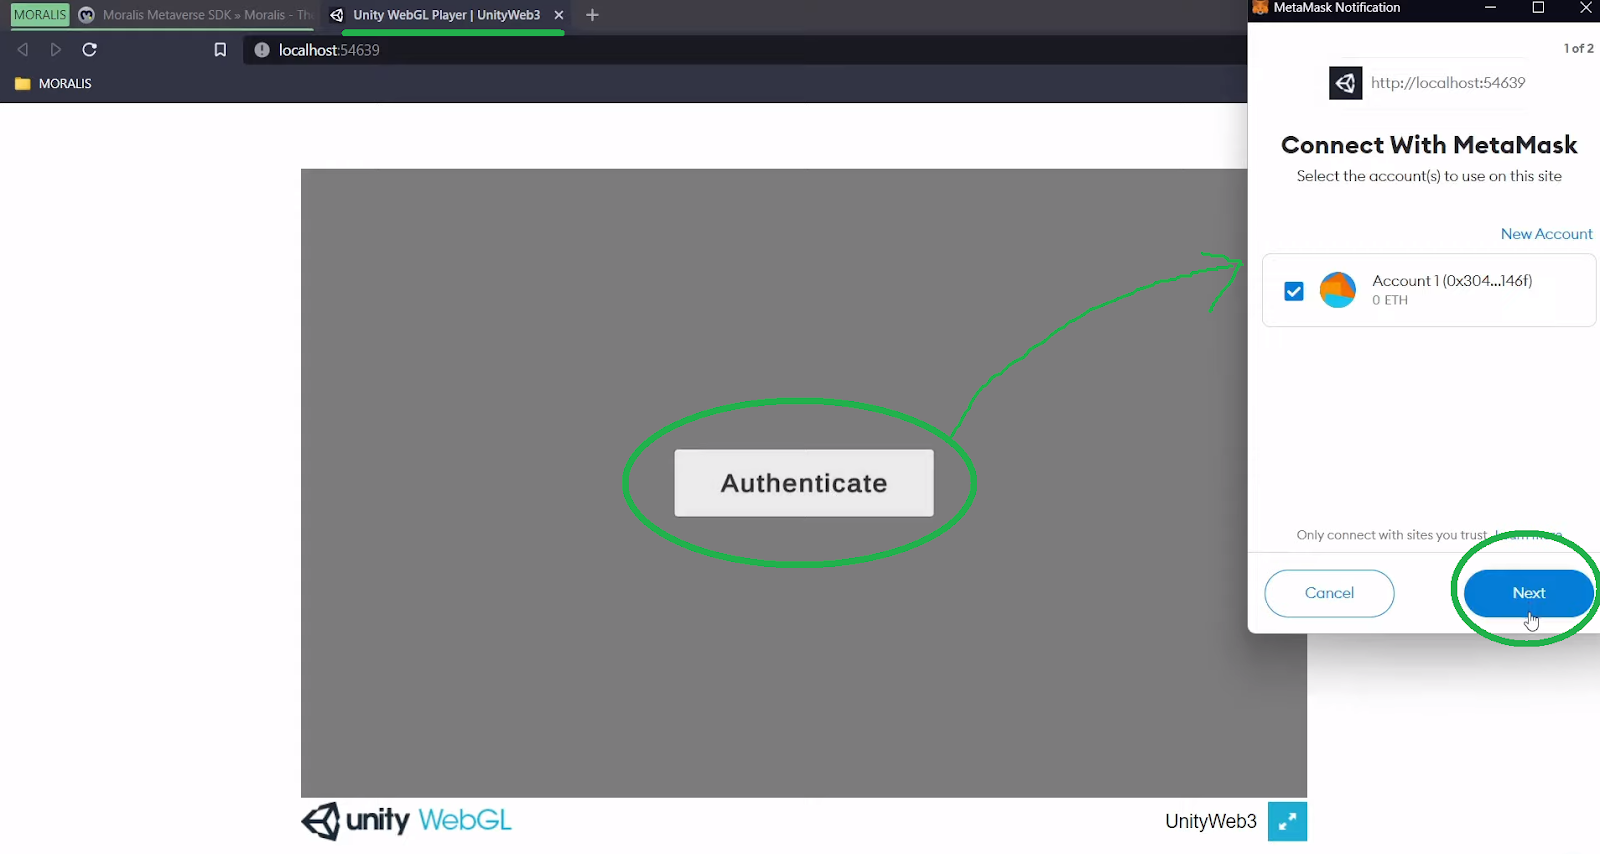
To proceed, users need to click on the “Next” button. This detects their wallet’s address and asks them to confirm the connection:
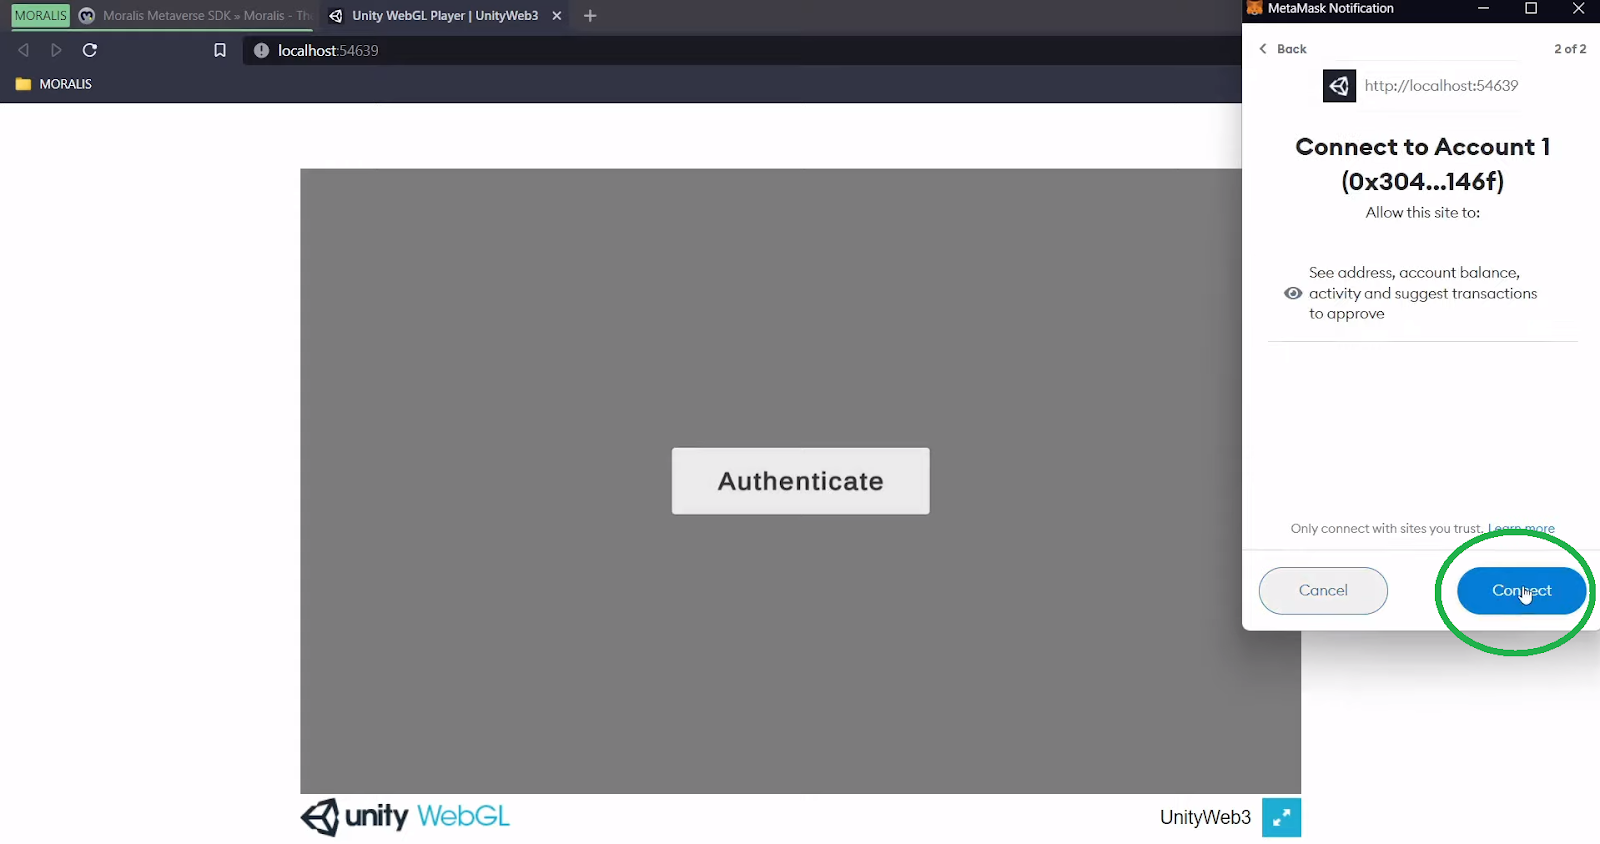
By clicking on the “Connect” button, the connection is established, and users are finally able to sign their permissions:

After clicking on the “Sign” button, our example Unity game with Web3 login displays a logged-in address:

Moreover, as you can see, we used Moralis’ MetaMask integration, which enables us to use this most popular hot wallet as an authentication tool. However, Moralis offers other Web3 user onboarding options. While MetaMask may be the best option for web users, WalletConnect offers better solutions for mobile users. Furthermore, doing Web3 authentication via email or using Web3 social login is also possible. Although, keep in mind that MetaMask for developers is quite essential.
Connecting a Unity Game with Web3 Login – Example Project
As stated in the introduction, the entire project for this Unity game with Web3 login example has been made available on GitHub. Thus, you can start by cloning the code. However, when working with Unity, it is best to download the example project’s ZIP file:

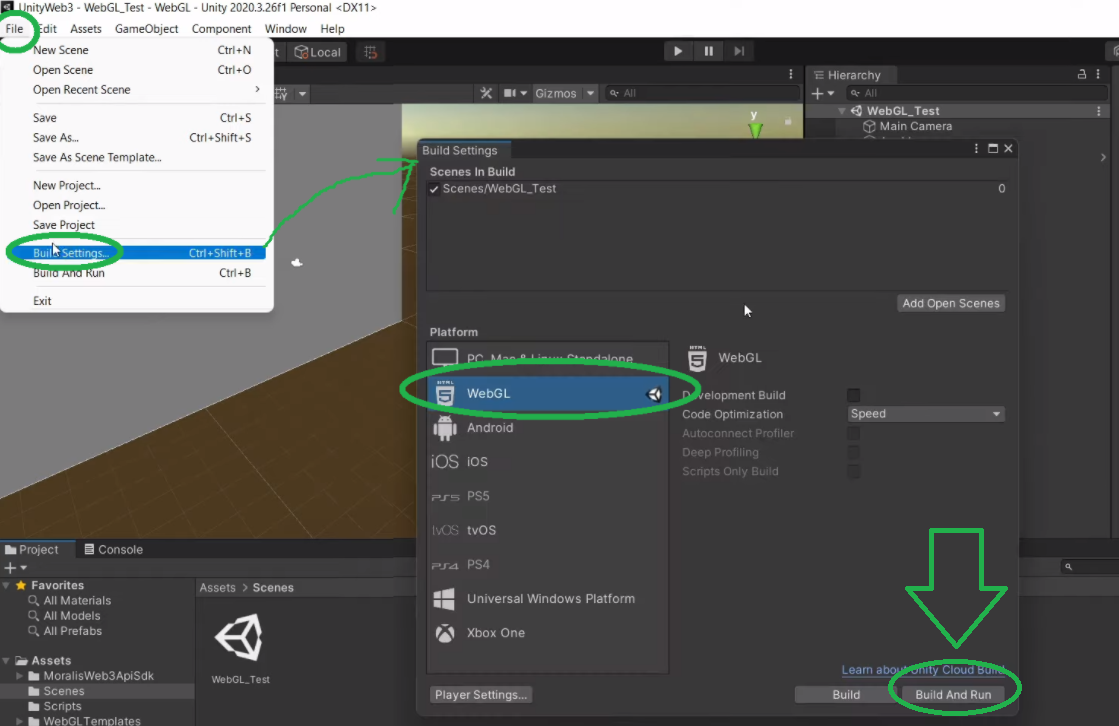
After successfully downloading the ZIP file, as shown above, you need to unzip it. Then, open “WebGL_Test” in Unity. Since we will be building for WebGL, make sure you have this set as a selected platform inside “Build Settings” (“File” > “Build Settings”):

Also, note that the “MoralisWebApiSdk” folder contains all the SDK elements, including demos. However, let’s now focus on the “WebGL” scene:

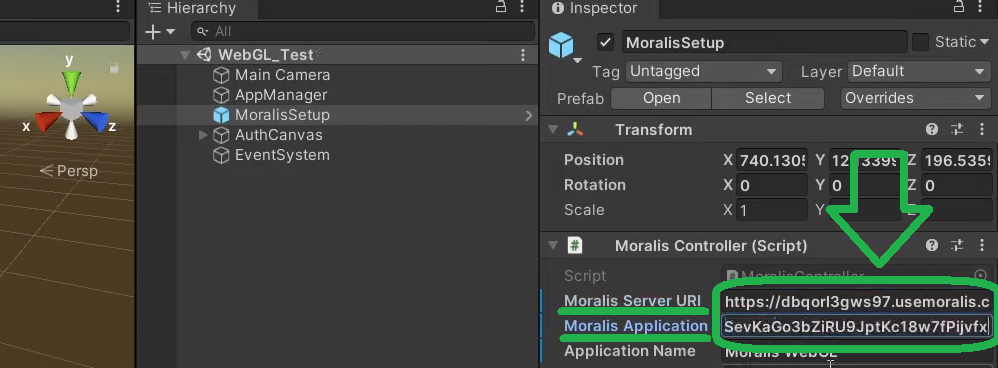
If you are following along, you can see that you get an error message at the bottom of your Unity screen. This indicates that we haven’t entered our Moralis server URL and application ID. To see the entry fields for these details, you need to select the “MoralisSetup” prefab:

To obtain the URL and ID details, you need to create your Moralis server. Fortunately, this is quite easy to do. However, to assist you even further, we’ve laid out the required steps in the following two sections.

Initial Moralis Setup
Whether you are just connecting a Unity game with Web3 login, indexing the blockchain, or creating dApps using the ultimate Ethereum dApp boilerplate, you need to start with the initial Moralis setup. This gives you access to Moralis’ SDK. Moreover, the main goal of this setup is to get your Moralis server up and running. Only then will you get to access its details.
Access Your Moralis Admin Area and Create Your Moralis Server
- Create a Free Moralis Account – Use the link on the left to access the Moralis signup page. There, enter your email address and create your password. Then complete the process by clicking on the confirmation email that will be sent to your email’s inbox. On the other hand, in case you already have an active Moralis account, simply log in.
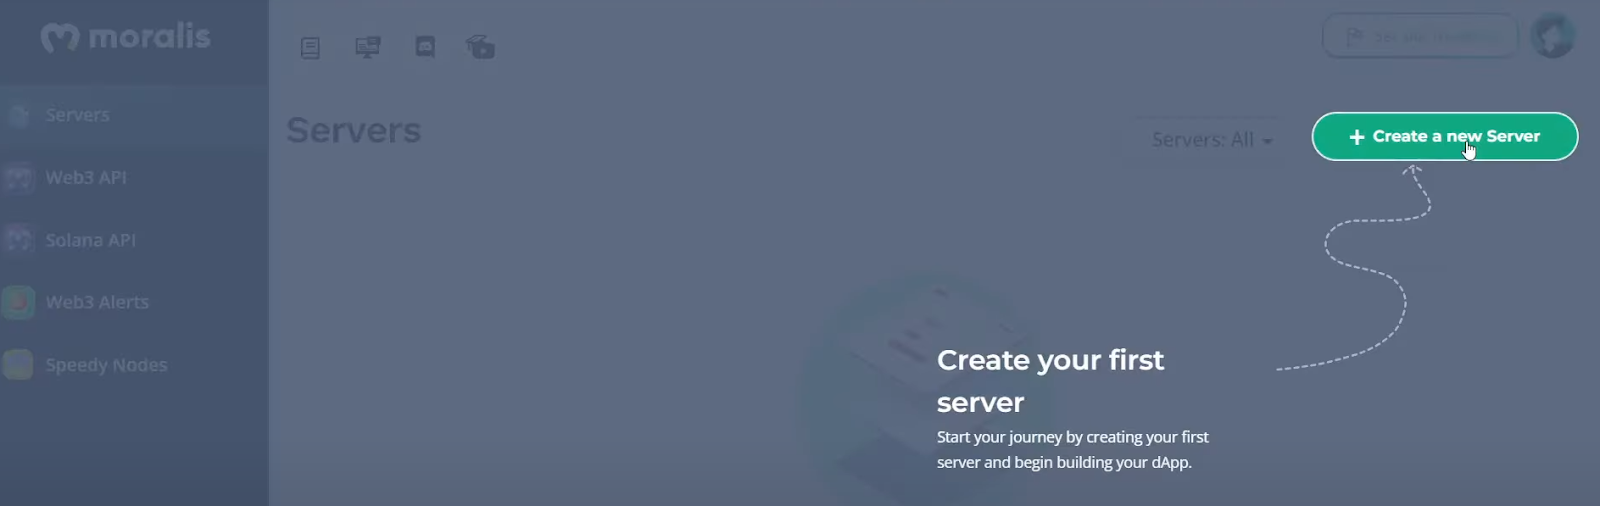
- Create a Moralis Server – At this point, you should be logged in to your Moralis account and be inside your admin area. Within the “Servers” tab, click on the “+ Create a new Server” button located in the top-right corner. If you are doing this for the first time, the on-page tutorial will guide you:
After clicking on the “+ Create a new Server” button, you’ll need to choose among three network type options (see the screenshot below). Go with the one that best suits your project.
Note: When dealing with example projects or when testing dApps, we recommend you stick to the “Testnet Server” or “Local Devchain Server” options. However, when it’s time to go live, you’ll need to select “Mainnet Server”.

After selecting the network type, another pop-up window will appear. You will be asked to enter your server’s details. These include your server’s name (this can be anything you want), your region, network type, and chain(s). To finally run your server, click on the “Add Instance” button:

Access Your Moralis Server’s Details and Populate Unity
- Access Your Server’s Details – By now, your server should be up and running. As such, you can access its details. To do this, click on the “View Details” button next to your server:

The details will be displayed in a new window. On the right-hand side, you’ll see the copy icons. Use them to easily copy your server’s URL and application ID one by one:

- Populate Unity – All that’s left to connect Moralis’ SDK with Unity is to populate the relevant fields in Unity. As such, simply paste each of the two details in the corresponding entry fields:
Unity Game with Web3 Login – Our Main Scene and Unity Setup
Now that we have added Web3 functionally to Unity by connecting it with Moralis, it’s time to look at the main scene of our example:

As you can see in the screenshot above, our authentication canvas consists of a background, authentication button, and “EventSystem”. There’s also “WalletAddressLabel”, which ensures that users’ addresses are displayed after successful login.
Let’s now take a closer look at our button. The “On Click ()” option is currently empty. So, to get the functionality we are after, we obviously need to do something here. As such, start by clicking on the plus icon:

Next, you need to attach “AppManager” to the newly added on-click event. You do this by clicking and dragging “AppManager” from the hierarchy:
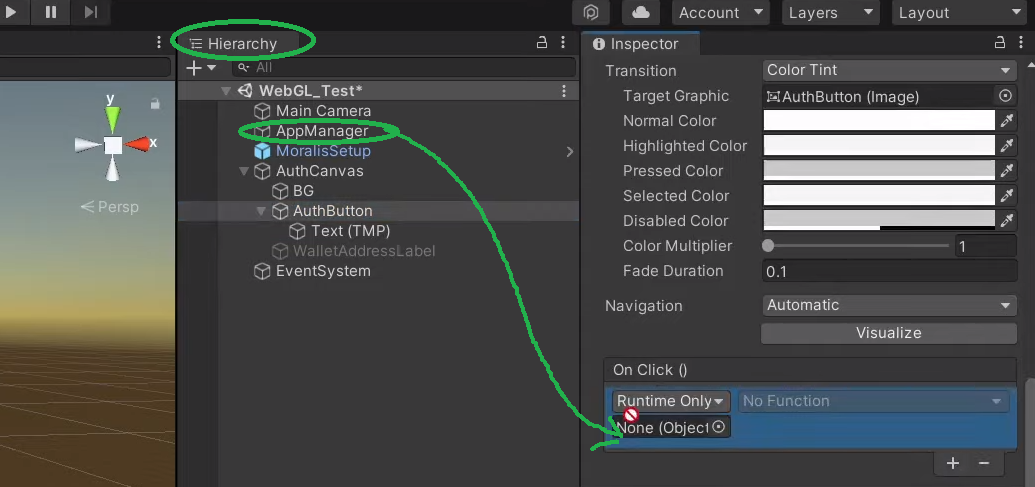
Then, open the drop-down menu by clicking on “No Function”. Then, select “AppManager” and finally click on “HandleAuthButtonClick ()”:

You can now take a closer look at the methods powering our project’s Web3 functionality. As such, click on “AppManager” in the “Hierarchy” tab:
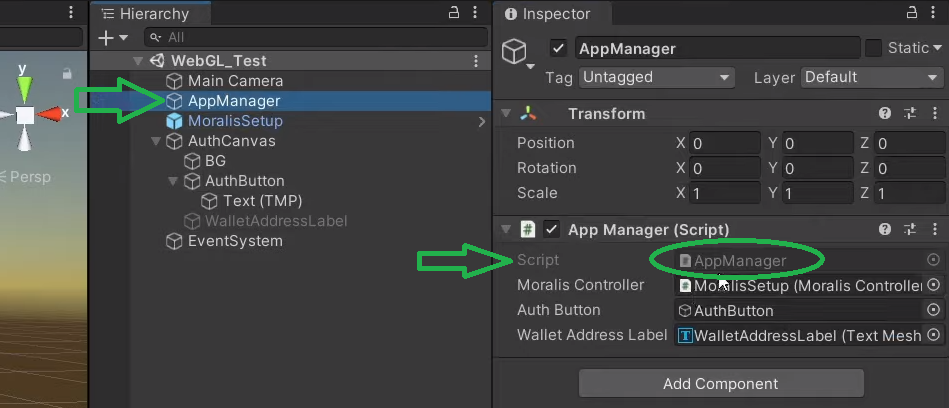
To open the relevant script, click on “AppManager” inside the “App Manager (Script)” tab on the right-hand side.
Main Script Walkthrough
The first mention-worthy lines are the ones that include Moralis’ namespaces:
using MoralisWeb3ApiSdk;
using Moralis.WebGL;
using Moralis.WebGL.Platform.Objects;
Next, let’s focus on “MoralisController”. This hook is in charge of the Moralis setup tab (where we entered our server’s details). Moreover, we also need an authentication button (“authButton”) and a wallet address label (“walletAddressLabel”):
    public MoralisController moralisController;
    public GameObject authButton;
    public TextMeshProUGUI walletAddressLabel;
We want to initiate the Moralis controller on start. In addition, we want to check if users are already logged in:
    private async void Start()
    {
        if (moralisController != null)
        {
            await moralisController.Initialize();
        }
        else
        {
            Debug.LogError("MoralisController is null.");
            return;
        }

        authButton.SetActive(!MoralisInterface.IsLoggedIn());
    }
Looking at the last line above, you can see that it also ensures that the authentication button is only enabled when users are not yet logged in.
Another important method used inside the script is “LoginWithWeb3”. The latter is compatible with GL and does all the heavy lifting. It also includes the “GetWalletAddress” method, which obtains users’ addresses and displays them after they successfully log in:
  private string GetWalletAddress(MoralisUser user)
    {
        return user.ethAddress;
    }
Thanks to Moralis, “.ethAddress” is all it takes to get users’ addresses. If you are interested in more details about the main script used in our “Unity game with Web3 login” example, check out the video below at 4:40.
Moralis Dashboard
Another powerful tool that becomes available to you after creating a Moralis server is the Moralis dashboard (database). Moreover, you access this database by clicking on the arrow next to the “View Details” button (see the image below). Next, you simply click on the “Dashboard” button:

Inside your server’s dashboard, you will be able to see all the logins and other users’ details. Moreover, in combination with the Moralis “sync” feature, the Moralis dashboard enables you to index the blockchain. Furthermore, as you sync and index smart contract events, all the on-chain data becomes available inside your Moralis server’s dashboard. With all this on-chain data at your disposal, you can easily read it and use it in your programming. As such, you can add all sorts of features to your Web3 games or dApps.

Multi-Platform Ready
Since our example project is focused on the WebGL platform, we want to show you that other platforms can also be selected. To access the demo scene that is multi-platform ready, navigate to the “Example” folder inside “MoralisWeb3ApiSdk”:
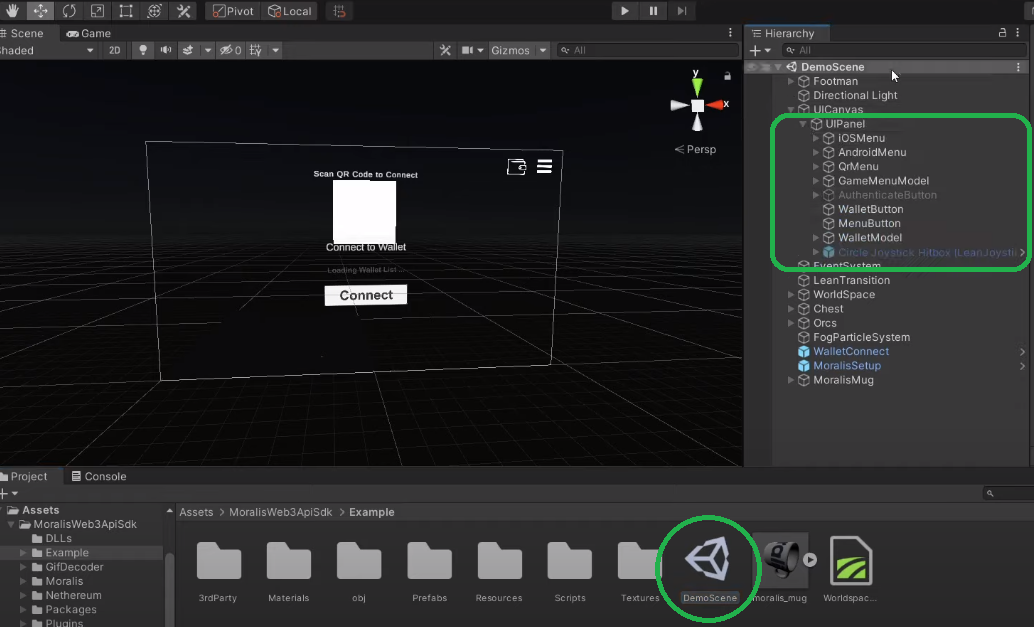
All of the above panels (marked in the image above) are activated properly via the “MainMenuScript” script.
Unity Game with Web3 Login – Build and Run
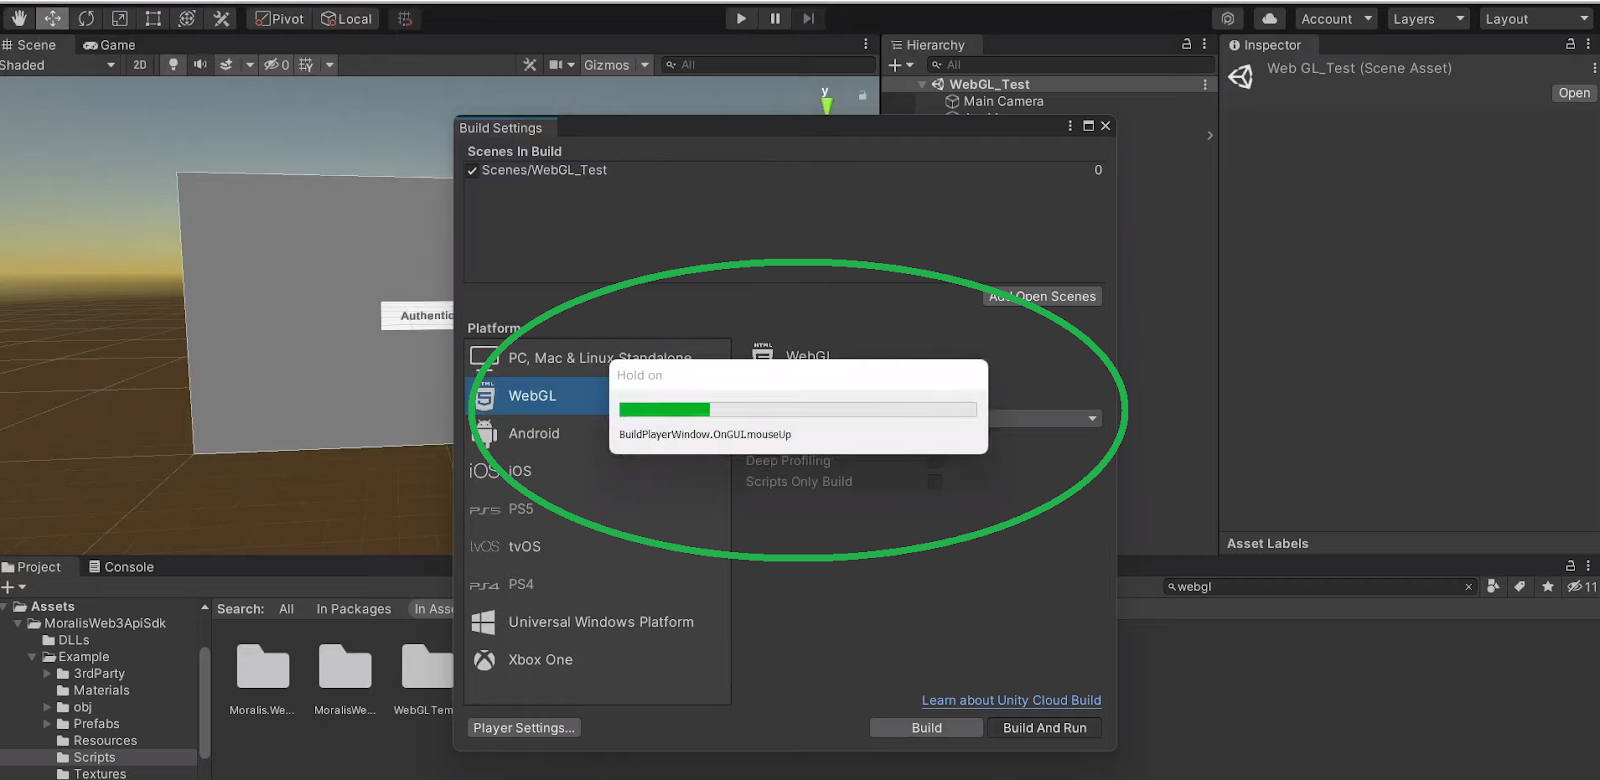
So far, we’ve covered everything you need to know to properly use our project template. Also, you should have completed the initial settings properly. As such, you are ready to build and run your own version of our example Unity game with Web3 login. Hence, go to the “Build Settings” again and click on the “Build And Run” button:
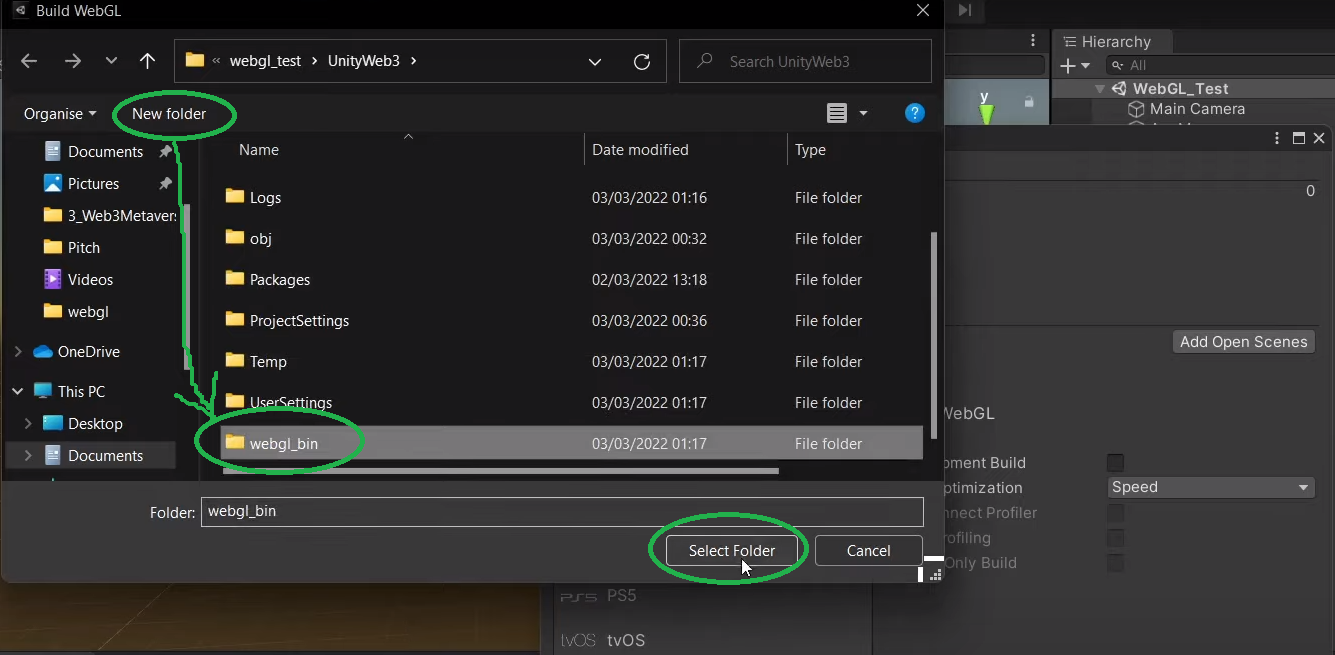
This will open a new window. There, you need to select the folder in which you want to build. We recommend creating a new folder:
Next, you will see a “progress bar” showing that Unity is building and testing your project:
Once finished, you are ready to test run your Unity game with Web3 login. If you’ve followed our guide to the point, you should have gone through the same steps as presented in the “Unity Game with Web3 Login Example – Preview” section, and things should work correctly.
Nonetheless, if you are more of a video person, we recommend watching the video below. In it, a Moralis expert goes through the same steps as presented above:
Connecting a Unity Game with Web3 Login – Summary
At this point, you know that connecting a Unity game with Web3 login is a walk in the park when using Moralis’ Metaverse SDK. Moreover, when you use our project ZIP files, you only need to add your Moralis server’s details. Moreover, you’ve also learned that numerous platforms are supported. As such, we really encourage you to take things to the next level. Thus, make sure to use the knowledge obtained herein to connect your unique Unity game with Web3 login.
However, if you lack ideas or need more practice first, we recommend checking out our other metaverse example projects. For instance, you can learn how to build a medieval metaverse game or a Web3 MMORPG. On the other hand, you might be interested in exploring other blockchain development topics. If so, we encourage you to visit the Moralis YouTube channel and the Moralis blog. Both of these outlets can serve your free crypto education progress perfectly. Moreover, some of the latest topics there include Web3 e-commerce, a Web3 Amazon marketplace, Alchemy API alternatives, creating a BNB Chain token, cloning Coinbase Wallet, creating a Solana token, and an NFT minting page walkthrough.
However, free education rarely gets the most optimal results. This is especially true if you want to become a blockchain developer as fast as possible. As such, you might be interested in a more professional approach. If that’s the case, enrolling in Moralis Academy could be just what you need.