Coinbase is one of the undisputed giants within the cryptocurrency industry. In addition to its well-known centralized exchange (CEX), Coinbase Wallet provides an easy way for users to access the world of crypto. Many entering the Web3 realm do so due to its decentralized aspects – however, centralized platforms like Coinbase still see widespread adoption. This is simply due to certain centralized platforms’ easy-of-use. As such, cloning Coinbase Wallet and implementing your own decentralized elements might be an excellent idea. For instance, you could create a Coinbase clone with its wallet feature, create a DAO for it, and utilize governance tokens; yes, tons of options are available. But, let’s start with the basics and see how easy the process of cloning Coinbase Wallet can be when using the right tools.
Using the upcoming sections in combination with an extensive video guide, you will have a chance to master the process of cloning Coinbase Wallet. Along the way, you’ll learn how to use some excellent tools, with Moralis leading the pack. Moralis’ ultimate Web3 development platform, also known as “Firebase for crypto”, is the best Web3 backend platform. It covers all your backend needs so that you can fully focus on creating the best user experience. By completing some basic initial Moralis setup steps (a step-by-step guide available below), you can access the full power of Moralis’ SDK. This powerhouse provides you with Moralis servers, Moralis dashboard (database), and Moralis’ “sync” feature. Moreover, the latter enables you to easily sync and index smart contract events and index the blockchain. As such, you can easily create a Coinbase clone. Now, before we explore how to do so, let’s look at some basics.
Crypto Wallets Explained
This article will be all about cloning Coinbase Wallet. In turn, you’ll be able to create a Coinbase clone in record time by using the proper tools. However, before we actually focus on our example project, we want to make sure that you are all up to speed. Thus, we want to quickly explain what Web3 wallets are.
So, as the “Web3” and “wallet” words suggest, we talk about wallets that are able to store crypto assets and provide a gateway to the crypto realm. Moreover, we can primarily divide Web3 or crypto wallets into two categories. First, we have “cold” wallets that are hardware storage (or even a piece of paper). These offer the highest level of safety; however, their primary purpose is for long-term storage. The second option is “hot” wallets, which come in the form of software. These can be online applications, mobile applications, or browser extensions. Furthermore, aside from offering crypto assets storage, hot wallets also enable us to interact with various blockchains.

MetaMask is probably the most popular hot crypto wallet, and it’s also a powerful development tool. Thus, it is often used in the “MetaMask for developers” phrase. By using this incredible tool, Web3 authentication becomes uncomplicated. However, to make Web3 user onboarding even more straightforward, one should also implement Web3 social login and Web3 authentication via email. Moreover, many reputable centralized exchanges (CEXs) also have their own hot wallets. The two most popular ones are Binance – see our BSC Wallet article for more information – and Coinbase Wallet. As one of the top two choices, it’s easy to see why cloning Coinbase Wallet is so interesting.

Cloning Coinbase Wallet – Example Project
The task of creating a Coinbase clone with Moralis and the Ethereum React Native boilerplate, such as cloning Coinbase Wallet, can be done in a matter of hours. As mentioned, we will lay out the process overview in this article. However, for more detailed guidance, watch the video below. In addition, to assist you further, we will reference specific video timestamps throughout the content herein. If this is the first time that you’ve heard about the ultimate Ethereum mobile boilerplate, we recommend you check out our React Native Web3 guide. Moreover, we believe having a clear picture of what we’ll be building makes things simpler, especially when we want to create a Coinbase clone. Hence, let’s do a quick preview of our Coinbase Wallet clone.
Cloning Coinbase Wallet – Preview
Here is a sequence of screens that shows how a new user may use our Coinbase Wallet clone:
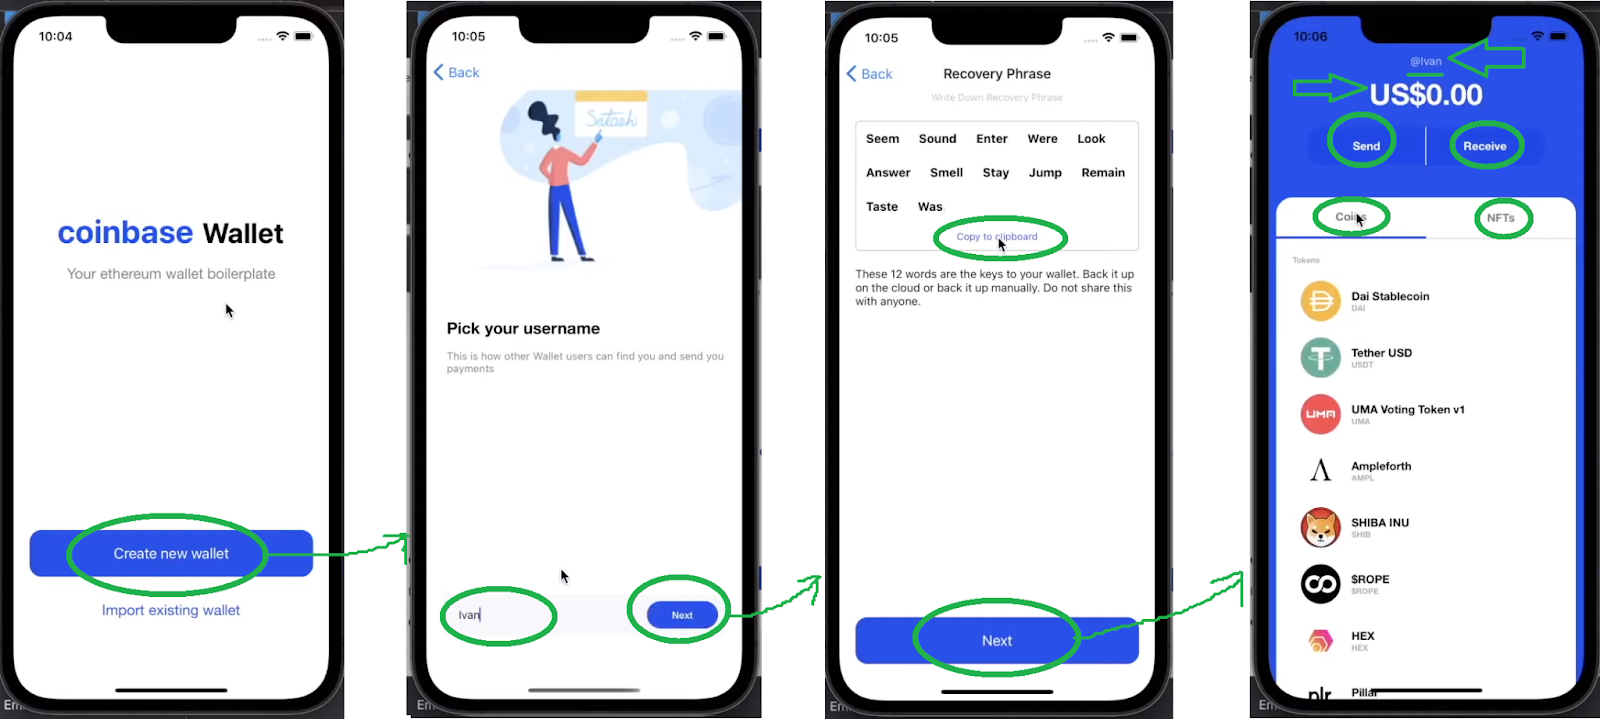
Looking at the screens in the image above, you can see that users can choose between creating a new wallet or importing an existing wallet. They get to select either of the two options by clicking on the corresponding button. For this demo, we went and created a new wallet. So, after new users click on the “Create a new wallet” button, our mobile dApp takes them to the next screen. Here, they need to pick their usernames. As such, they need to enter their preferred combination of characters in the entry field at the bottom.
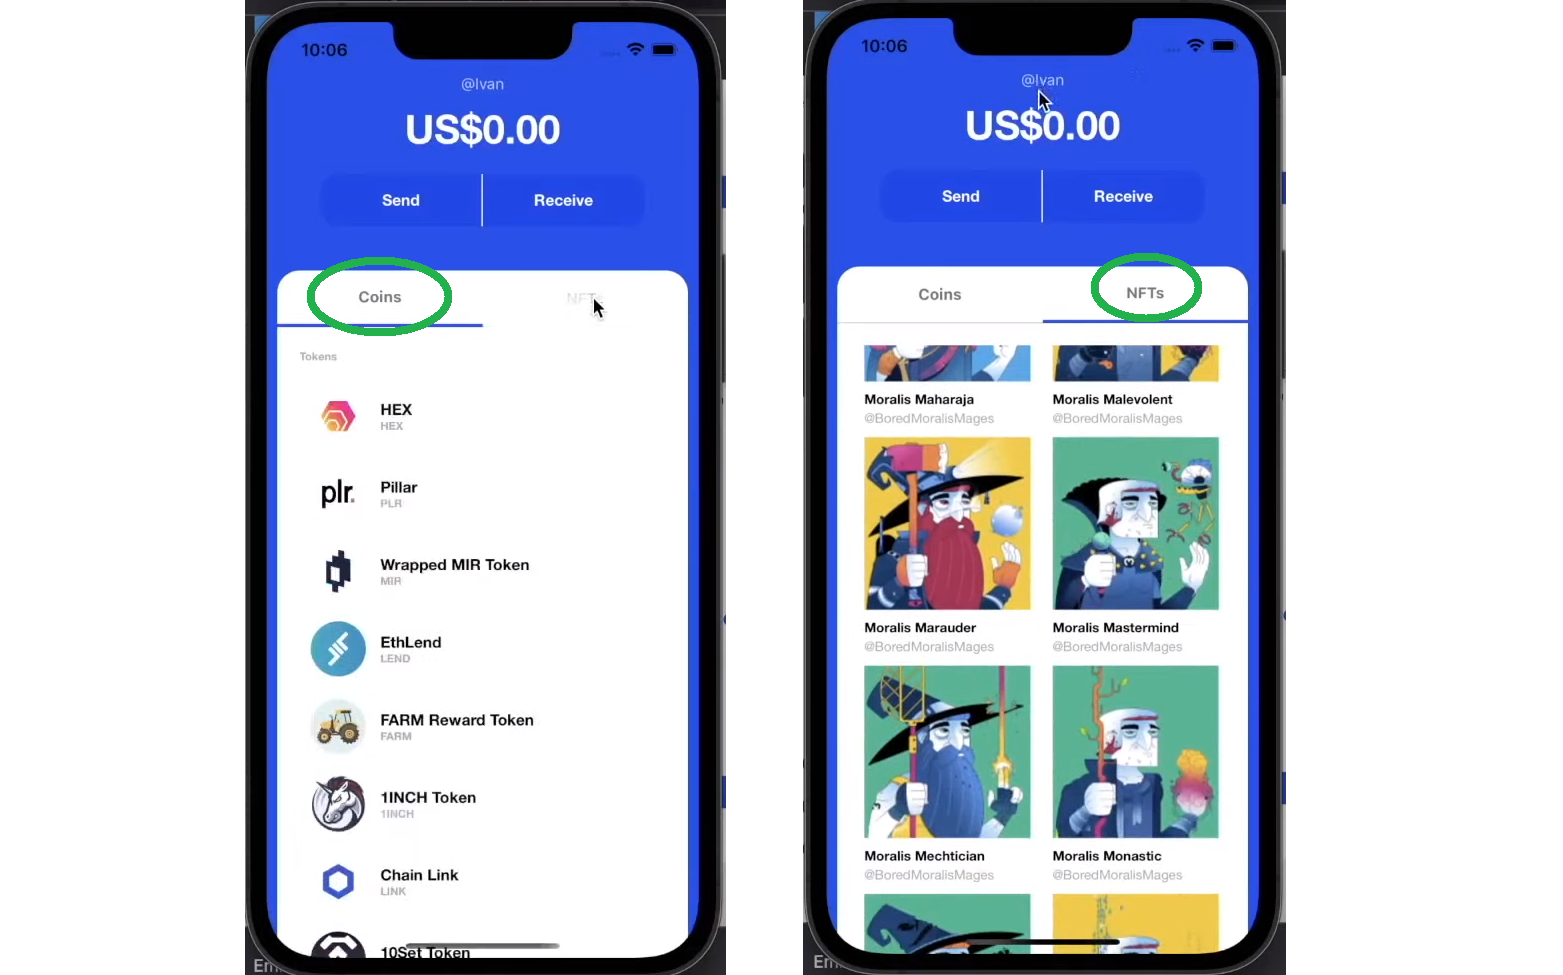
After entering their usernames, users must click on the “Next” button. This takes them to the “seed phrase” screen. This is where they need to copy twelve random safety words. Note that this is a critical step that enables users to recover their wallets or import them on other devices. There’s even the “Copy to clipboard” button for extra convenience. To move forward, users need to click on the “Next” button. By doing so, they land inside their wallet’s dashboard. There, they get to see their total balance, send and receive funds, and view listed tokens (fungible and non-fungible tokens [NFTs]). Furthermore, here’s how both of these tabs are displayed:
That also concludes our quick preview, and you should be ready to create a Coinbase clone. Now, if you are more of a video person, check out the video tutorial below starting at 3:15:15 for a more detailed preview. In addition, we’ve also made the entire design layout available for you at Figma.
Ethereum React Native Boilerplate – Cloning Coinbase Wallet Shortcut
Note: Our developers have been working hard to create the ultimate Ethereum React Native boilerplate. Though, keep in mind that the latter is a work in progress. However, since we’ve been testing the boilerplate for some time now, it’s been improved tremendously. Nonetheless, if you encounter any errors, make sure to use our forum to let us know the details. Together, we can contribute to crypto adoption by bringing phenomenal Web3 dApps to mainstream users.
In order for your dApp to look like the one presented in our preview above, you need to complete the video tutorial in full. Below is a brief overview of some of the necessary initial steps you need to complete if you’d like to create a Coinbase clone.
Initializing Ethereum React Native Boilerplate
When it comes to working with any of our boilerplates, you need to start by cloning the code. Moreover, here are the steps you need to complete (you may also use the video below starting at 4:21):
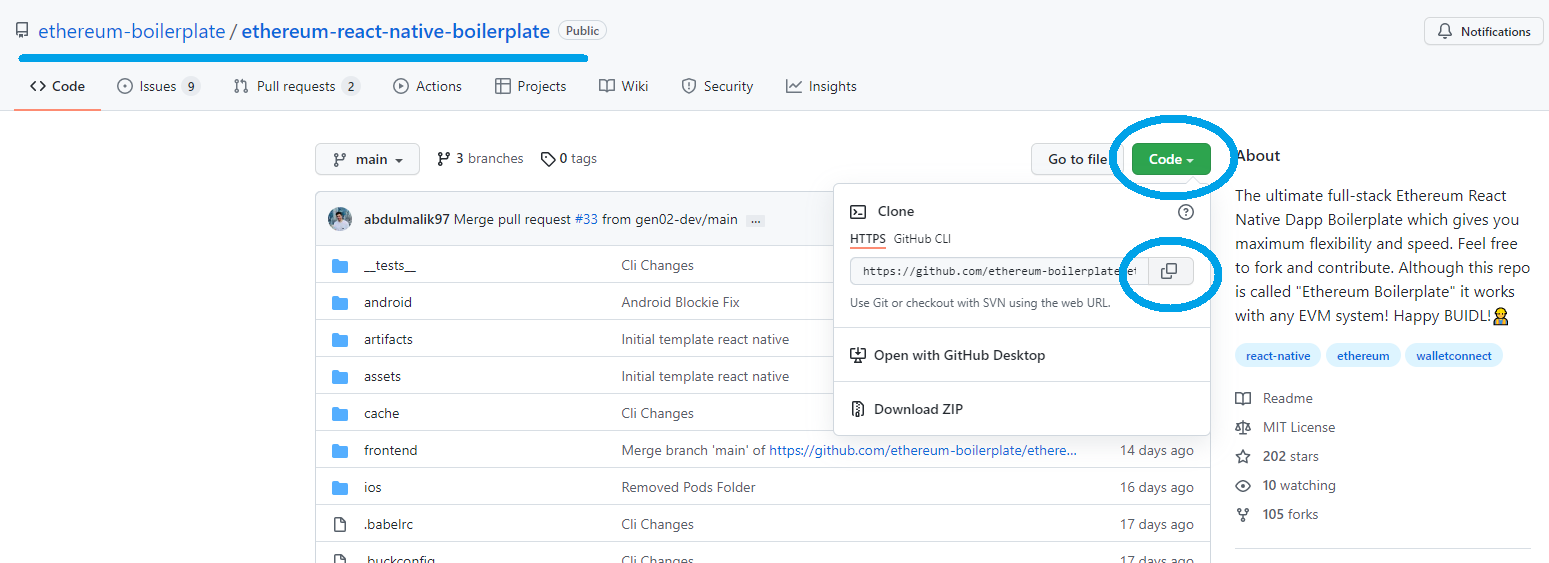
- Visit the Ethereum React Native boilerplate page at GitHub (link above). For the sake of this “cloning Coinbase Wallet” challenge, you may also use our Coinbase clone starter code or even the final code. In order to get the most out of this example project, we recommend starting with the Ethereum React Native boilerplate and then applying the tweaks (see the next section).
- Next, copy the HTTPS address:
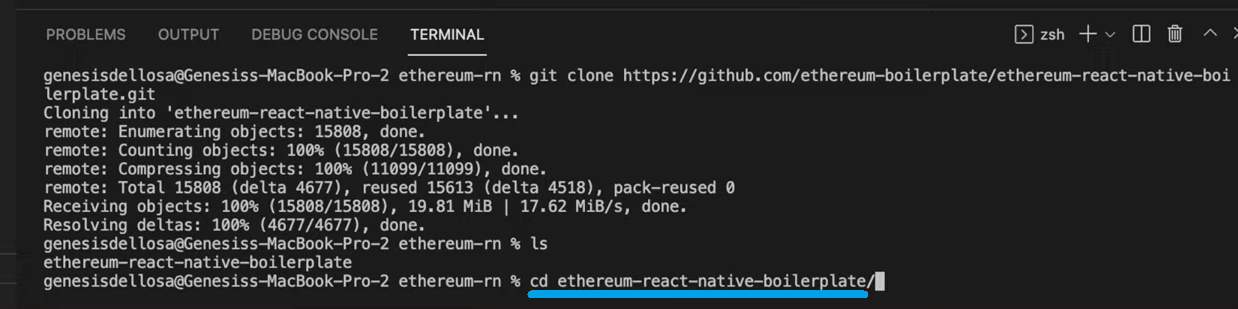
- Then, open a new project inside Visual Studio Code (VSC). Moving forward, run VSC’s terminal to clone the code. For that purpose, you’ll need to enter the “git clone” command followed by the above-copied address:

- Once you’ve cloned the code, you need to go into the corresponding folder. This is easily done with VSC’s terminal (“ls” and “cd” commands):
- Now, you need to install all dependencies. Hence, use the “yarn install” command in the terminal. In case you prefer to use the NPM package manager, use npm-relevant commands.
- Next, it’s time to go to the iOS folder (type “cd ios” in the terminal). Once in the “ios” folder, run the “pod install” command in the terminal.
- Then, you need to return to the root folder. As such, enter “cd ..” in the terminal’s command line.
- With all of the above steps under your belt, you can run the app. You do this by entering the following commands in the terminal:
- For iOS: npx react-native run-ios
- For Android: npx react-native run-android or npx react-native start
Tweaking Cloned Ethereum React Native Boilerplate
If you decided to take the most educational path, you’ve started with the Ethereum React Native boilerplate. This means that you need to apply some tweaks to the code (video at 5:50). Let’s start by removing some of the frontend folders. Hence, go to the “frontend” folder inside VSC. Within the “frontend” folder, select the “Components” folder, and select these folders:
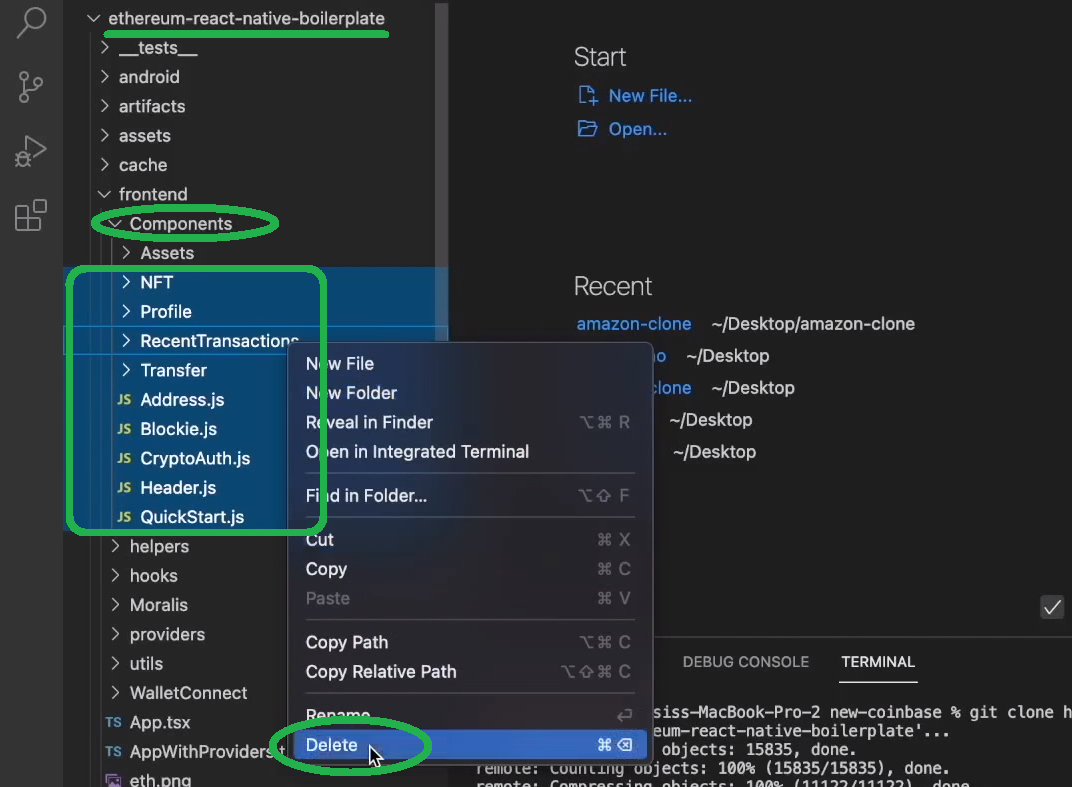
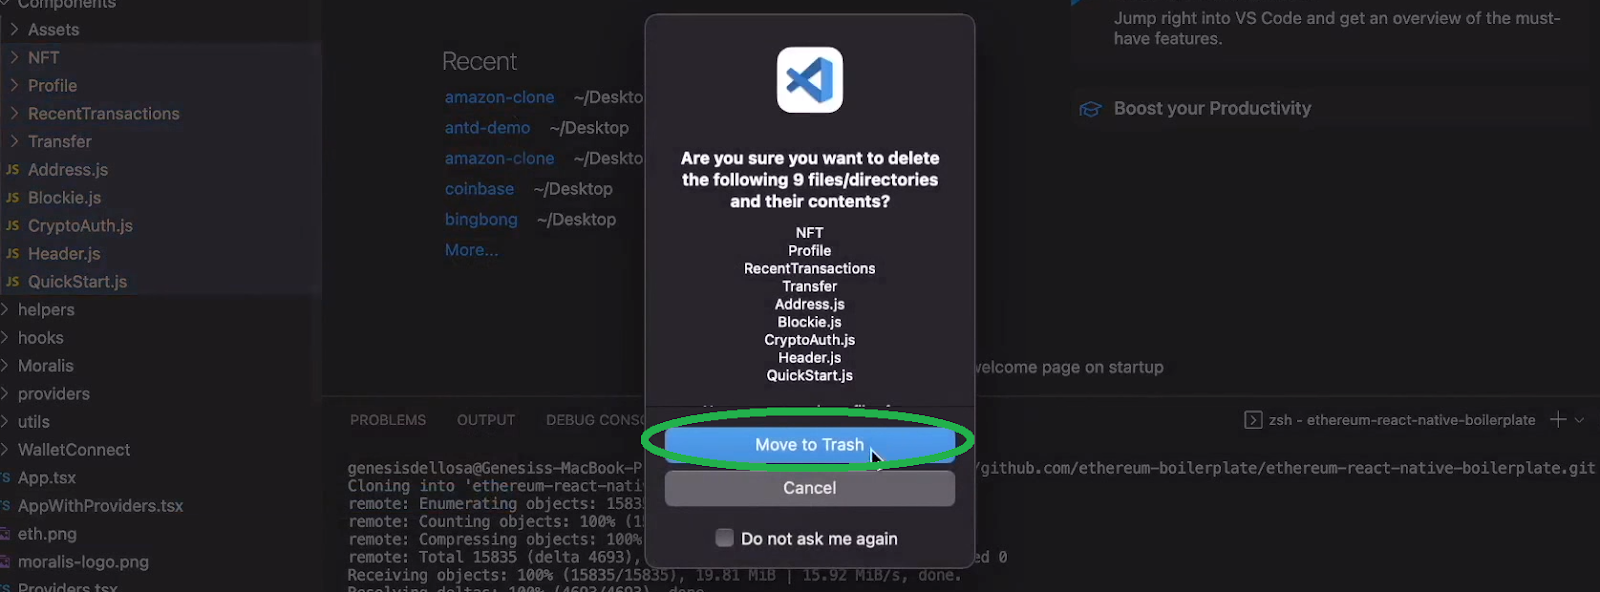
Next, right-click your selection and then click “Delete”. Then, confirm your action by clicking the “Move to Trash” button:
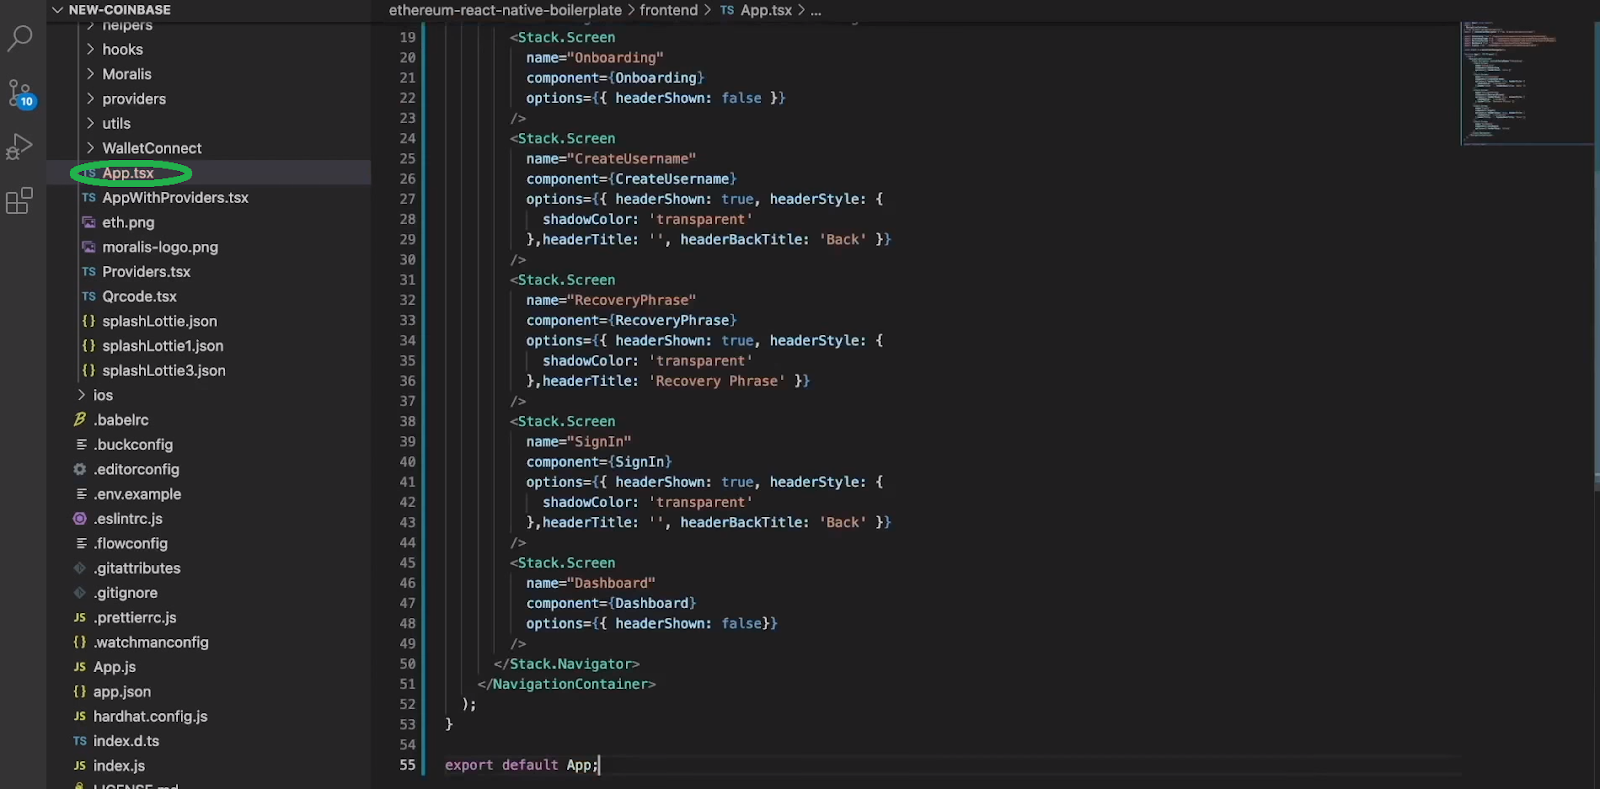
Moving forward, use the link to the final code given in the first step in the previous section. Then copy the code inside the “App.tsx” file and use it to replace the code inside your project’s “App.tsx” file:
Moreover, use the video at 9:27, to follow a Moralis expert, showing you which part of the code to delete. As such, you will be able to fully focus on onboarding.
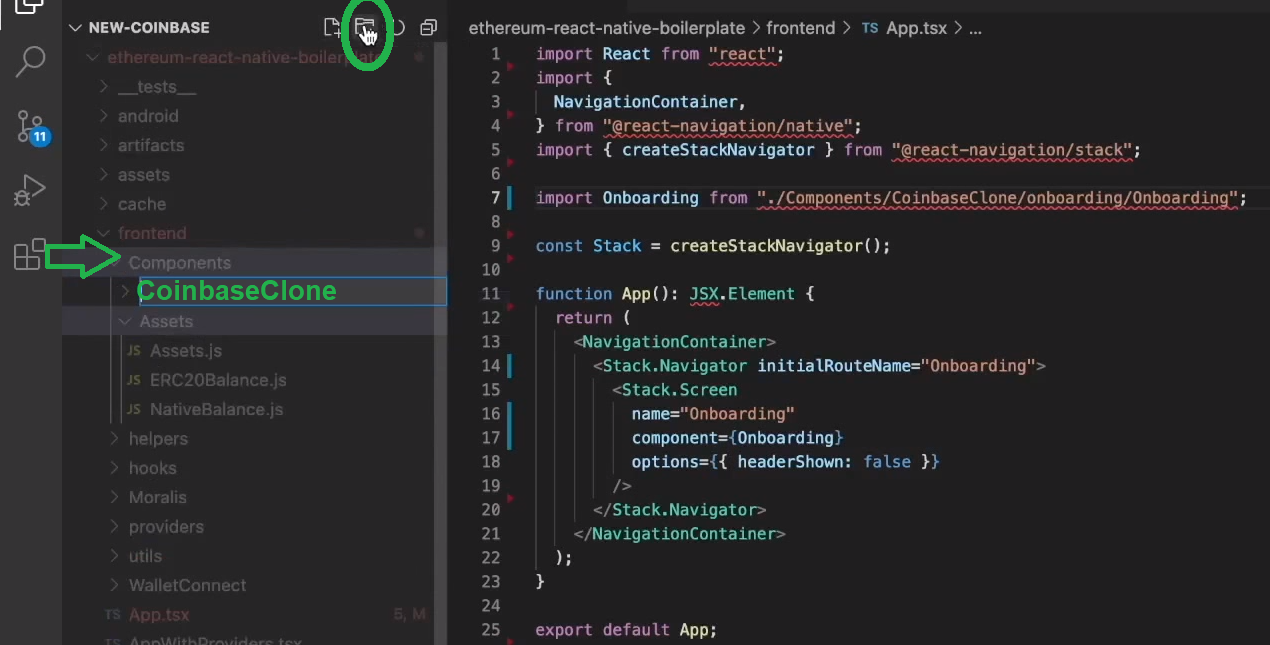
Next, you need to go to the “Components” folder again. There you want to create a new folder called “CoinbaseClone” by clicking the “create new folder” icon at the top of VSC:
Then repeat the same steps to create the “onboarding” folder inside the “CoinbaseClone” folder. Inside the “onboarding” folder, you want to create the “Onboarding.js” file by clicking the icon to the left of the “create new folder” icon:

To quickly populate the above created “Onboarding.js”, copy the content from the file with the same name inside the final code. Again, use the video below (11:30) to see which part of the code should you delete for now.
Note: Remember, that if you want to avoid the above tweaking, you can also use the starter code (link in the previous section).
Cloning Coinbase Wallet – Video Tutorial
With the initial setup completed, you are all set to dig deeper into our “cloning Coinbase Wallet” quest. Moreover, to make sure you get the most out of this experience, we will hand you over to one of Moralis’ experts. Starting at 12:18 he will show you how to run Xcode (12:18). This is also where you’ll learn to create the onboarding screen as presented in the preview above. However, while waiting for the app to run, you will see how to properly populate the “Providers.tsx” file (16:45). Here, you’ll need to complete some initial Moralis setup to create a Moralis server and obtain its details.
Moving forward, you will be able to tackle the creation of the user registration screen (56:24). This is where you will get to see the power of Moralis’ SDK and its Web3 API. Next, you’ll need to create the recovery phrase screen (1:48:10). At 02:07:48, the expert will guide you through the dashboard screen creation. Finally, you’ll also get a chance to create the sign-in screen (02:53:12). As a result, you’ll cover all of our example mobile dApp’s screens. As such, you will know how to create a Coinbase clone.
Finally, here’s the video tutorial we’ve been referencing throughout the article:
Cloning Coinbase Wallet – How to Create a Coinbase Clone – Summary
In this article, you’ve had a chance to learn the gist of cloning Coinbase Wallet. Moreover, if you’ve used our guidance, including the above video, you now know how to use the ultimate mobile dApp boilerplate. The latter, in combination with Moralis, makes all the difference. This is how developers get to save more than 87% of development time when creating mobile dApps. Also, you can use the ultimate Web3 boilerplate to get quicker results when working on web dApps.
Now that you know how to create a Coinbase clone, we encourage you to take your mobile dApp development further. As such, you can start working on your own ideas or get some inspiration at the Moralis YouTube channel or the Moralis blog. There you can find a ton of content offering simple explanations of various crypto aspects and example project tutorials. For example, some of our latest topics cover launching an NFT minting page, what is the metaverse, how to create a metaverse dApp with Unity, a reentrancy smart contract example, and much more. Also, these two outlets are a great way to continue your free blockchain development education.
However, if you are serious about becoming a blockchain developer as soon as possible, you may want to consider a more professional approach. In that case, you ought to enroll in Moralis Academy and choose among the many high-quality courses. Though, an even greater value awaits you in the form of one of the most incredible communities. In addition, you’ll receive a personalized education path to optimize your progress and professional mentoring for additional shortcuts.