If you want to learn how to create a DAO from scratch, make sure to finish the video tutorial above from start to finish. It will show you the step-by-step process of creating the required smart contracts and the backend and frontend scripts. However, you can also take the shortcut version and create a DAO in ten minutes (more or less) by following along in this article! All you need to do is complete the following eight steps:
- Clone our code
- Install the required dependencies for the frontend (JavaScript)
- Implement your wallet’s private key, Infura project ID, and Etherscan API key
- Deploy your instances of our four smart contracts:
- Minting and managing governance tokens:
contract GovernanceToken is ERC20Votes { }
- Transferring governance power:
contract Box is Ownable { }
- Defining rules:
contract MoralisGovernor is
    Governor,
    GovernorSettings,
    GovernorCountingSimple,
    GovernorVotes,
    GovernorVotesQuorumFraction,
    GovernorTimelockControl
{ }
- Enforcing rules:
contract TimeLock is TimelockController { }
- Obtain your Moralis Web3 API key and store it in a backend “.env” file
- Install the required dependencies for the backend (Python)
- Run your backend
- Run your frontend
Our example DAO is targeting the Ethereum Goerli testnet. As such, make sure to obtain some Goerli ETH via a reliable Goerli testnet faucet, which awaits you on our vetted crypto faucet list. You’ll also need a Moralis account to implement and use the core backend function. So, sign up with Moralis and create a DAO following our lead!
Overview
Before we take you through the steps that will enable you to create a DAO in ten minutes, we will make sure you know what kind of DAO you are going to build. Therefore, we will do a quick demonstration of our example project. We’ll also look at two diagrams to help you understand the relations between our DAO’s smart contracts and its core process.
Below the tutorial, you can also find a few sections that will help you better grasp the theory behind decentralized autonomous organizations (DAOs). This is where we explain what a DAO is and why it makes sense to create a DAO. We’ll also explore tokenized participation and even look at some examples of popular DAO tokens.
Demonstration of Our Example DAO
In the screenshot below, you can see all the main sections of our frontend:
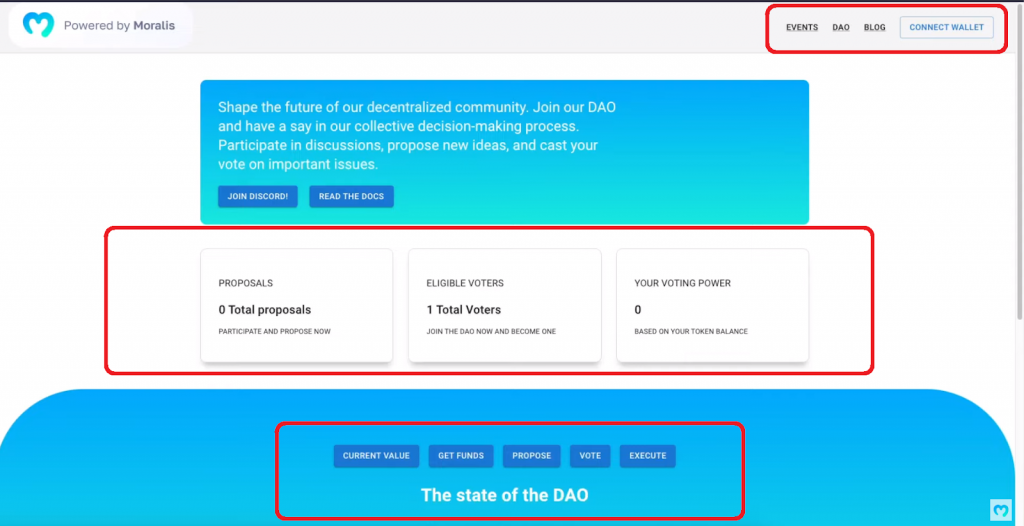
In the top-right corner, our example dapp offers a simple menu. While the “Events”, “DAO”, and “Blog” options are just placeholders, the “Connect Wallet” button plays an important role. After all, this button allows users to connect to our DAO’s interface with their Web3 wallets. Once connected, users can start participating (creating new proposals and voting on existing ones).
The “Join Discord” and “Read the Docs” options are also just placeholders that you can easily activate. Then, there’s the middle section, which displays details related to the DAO’s activity. As such, it shows the number of total proposals, eligible voters (users that own governance tokens), and the connected user’s voting power.
As for the bottom, this is where the connected users can interact with our DAO. So, to view all the options in this interactive section, we need to look at an example user who is successfully connected:
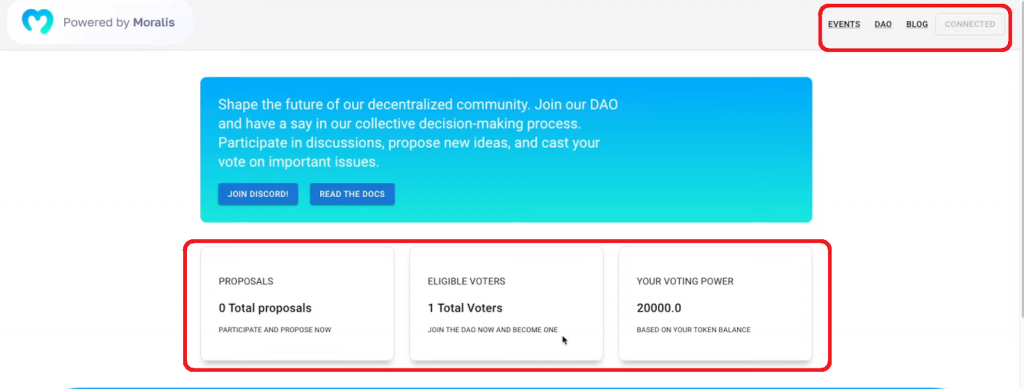
The above screenshot shows that the “Connect Wallet” button is turned into an inactive “Connected” button. Also, the middle section now automatically displays the data related to the connected user.
Here are all the options that the interactive section offers to connected users:
- The “Current Value” tab displays the state of the DAO:

- Via the “Get Funds” button, users can obtain the governance tokens:
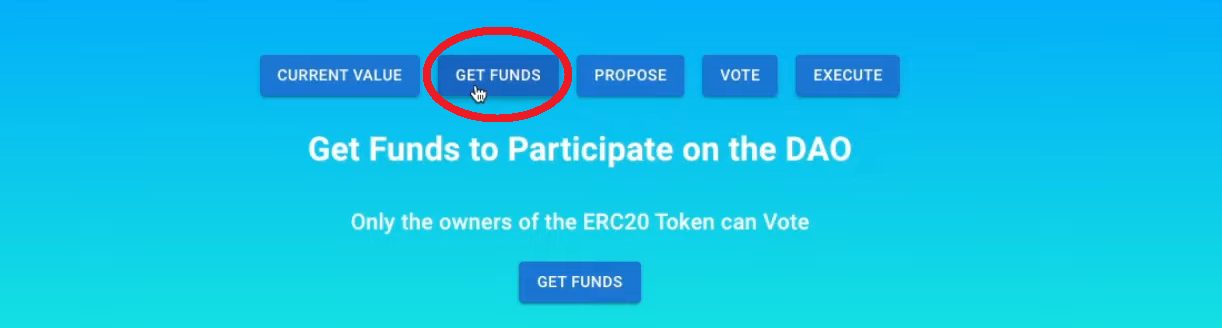
- The “Propose” tab allows users to create new proposals:

- Via the “Vote” tab, users get to vote on existing proposals:

- The “Execute” option allows users to execute accepted proposals:

The Process Flow of Our Example DAO
We created four smart contracts that ensure our example DAO runs in a fair and automated manner. The following two diagrams should help you understand the relationships between these smart contracts and the process flow of our DAO:
- Our smart contracts:
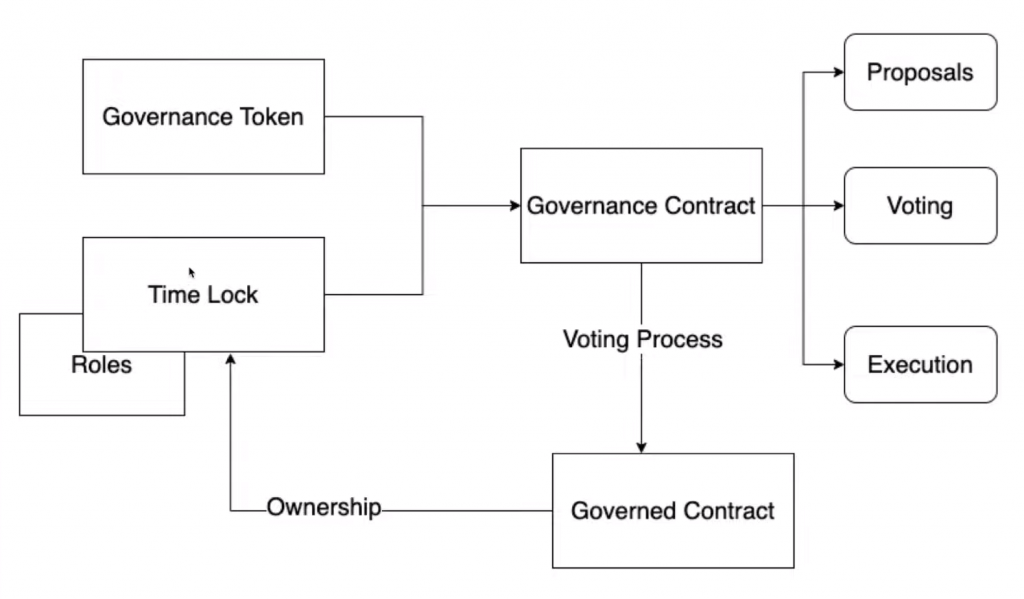
The “Governance Token” smart contract is the one that mints and governs ownership and transfers of our DAO’s governance tokens. To assign ownership, we use a simple “Governed” contract. The latter transfers the ownership to the “Time Lock” contract, which assigns roles. In combination with the governance tokens (the amount of tokens matters), the “Time Lock” contract governs the DAO. However, the way governance should be enforced is set in the “Governance” contract. The latter includes the functionalities and rules of our DAO.
- Proposal and voting:
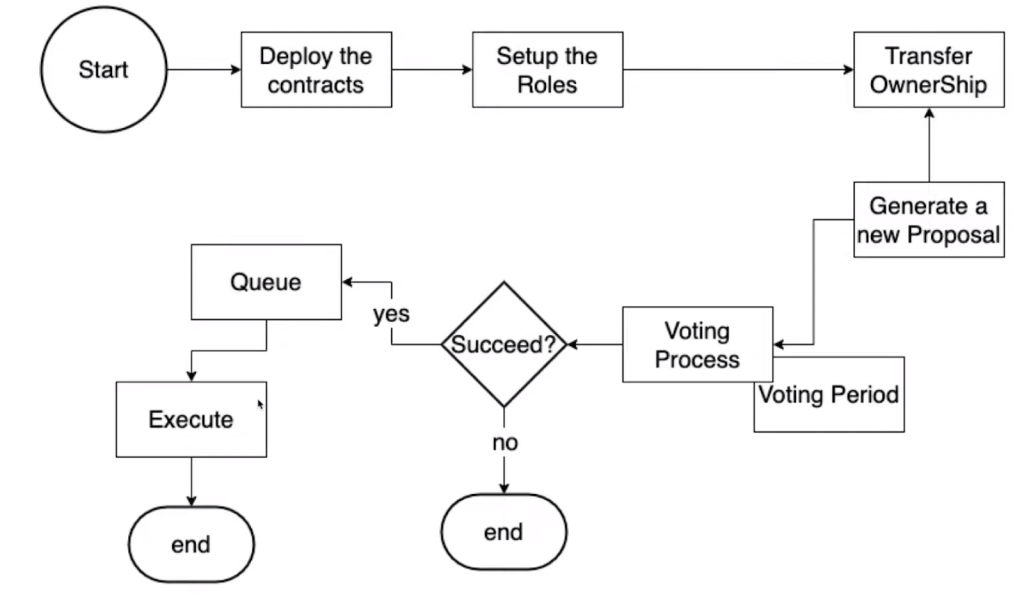
First, we need to deploy the smart contract. We must set up roles and transfer the ownership to the “Time Lock” contract. Then, DAO members are able to generate new proposals that go through the voting process. If a proposal is not accepted, this is the end of it. However, if a proposal is accepted, it moves to the queue from where DAO members can execute it, as demonstrated above.
Note: Our example DAO gives greater voting power to members holding a larger number of governance tokens. On the downside, this kind of governance can lead to certain members gaining too much power. However, generally, the more invested a person is in a particular DAO, the more that person wants to see the DAO succeed, which also incentivizes larger governance token holders to act in the best interest of the DAO. Moreover, some DAOs utilize off-chain voting; however, we believe on-chain voting is more transparent. Thus, our example DAO focuses on on-chain voting.
Tutorial: How to Create a DAO
If you like our example DAO, you now have a chance to create your instance of it by completing the eight steps outlined in the intro. If you just want to play around with our example DAO, you can even skip the second step. In that case, you’ll rely on our smart contracts already live on the Goerli testnet. However, we encourage you to also deploy your own instances of our smart contracts. After all, smart contracts are the most important aspect of any DAO. Thus, learning how to properly deal with these on-chain programs will make a difference if you decide to create your own DAO down the line. So, below are the eight steps on how to create a DAO.
Step 1: Clone Our Repo
All the scripts related to our example DAO await you on the “DAO-Full-Stack” GitHub repository page:
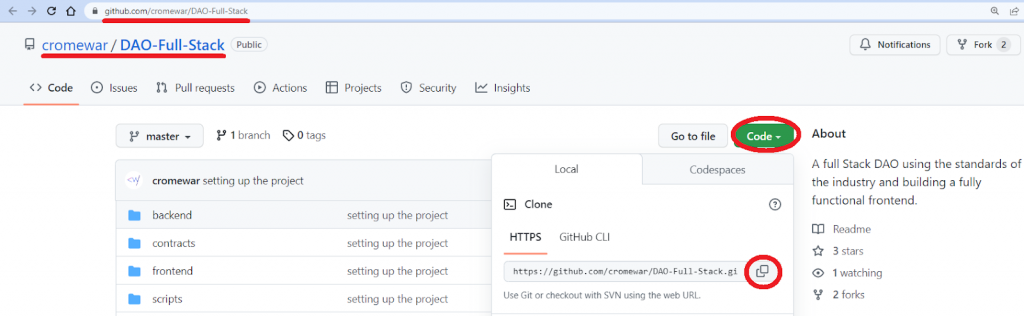
As demonstrated in the above screenshot, you can copy our repo address and then use that address with the following command:
git clone https://github.com/cromewar/DAO-Full-Stack.git
Step 2: Install Frontend Dependencies
The second step of our tutorial is about installing all the required dependencies for the frontend. Fortunately, this is pretty simple. First, you just need to cd into the “frontend” folder. Then, enter this simple command:
yarn
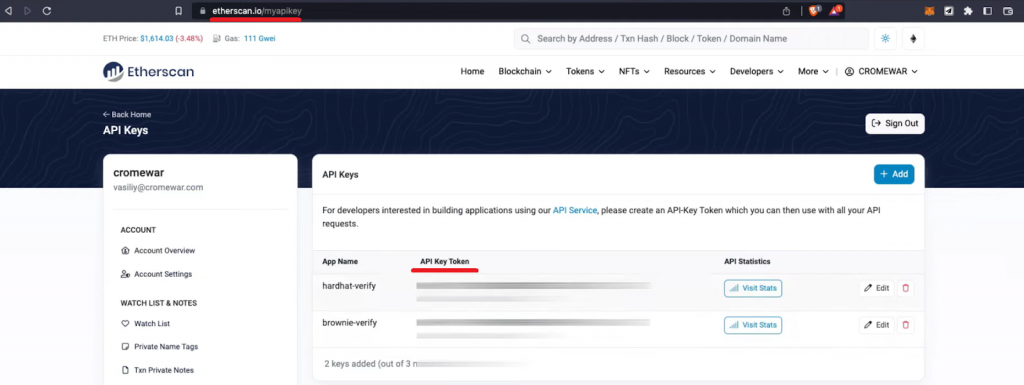
Step 3: Implement Your Private Keys
Within the main project directory, you can find the “.env.example” file. The latter already contains three environmental variables: WEB3_INFURA_PROJECT_ID, PRIVATE_KEY, and ETHERSCAN_TOKEN. You need to populate these variables with your values. You’ll get your Infura project ID from your Infura dashboard, your wallet’s private key from your MetaMask account, and your Etherscan API key from your Etherscan account. With all the variables in place, also rename the “.env.example” file to “.env”.
Step 4: Deploy Your Instances of Our Smart Contracts (Optional)
Note: As mentioned previously, you can skip this step and use our smart contracts that are live on the Goerli network. However, if you want to create a DAO for production purposes, make sure to deploy your instances of our smart contracts.
You can access all the smart contracts related to our example DAO inside the “contracts” folder. In line with the above-presented smart contract diagram, these are our four smart contract Solidity scripts: “Box.sol“, “GovernanceToken.sol“, “MoralisGovernor.sol” and “TimeLock.sol“. By deploying “GovernanceToken.sol“, you will, in a way, also learn how to create your own ERC-20 token.

As you may know, there are different ways to deploy and verify smart contracts. For instance, you can use Remix IDE and deploy your contracts via your favorite browser. You may also use Hardhat if that is the method you are familiar with. However, our repo includes all the scripts to use Brownie. If you wish to use this Python-based development and testing framework for smart contracts, you’ll want to use our utility scripts that you can find in the “scripts” folder. For detailed guidance on how to deploy smart contracts with Brownie, use the video at the top, starting at 34:47.
Whichever method for deploying the smart contracts you choose, you’ll get their blockchain addresses as a result. You must add those addresses to the “map.json” file in the “frontend/src/chain-info/deployments” directory. However, if you use Brownie, you can do that automatically by executing the “update_frontend.py” script.
Note: If you wish a more detailed code walkthrough of each of our smart contracts, use the video at the top (14:07) or visit our “How to Build a Decentralized Autonomous Organization” tutorial.
Step 5: Obtain Your Moralis Web3 API Key
If you look into the “backend/tokens” directory, you’ll find another “.env.example” file. This one contains the MORALIS_API_KEY variable, which you must populate with your Moralis Web3 API key. To obtain this key, log in to your Moralis account. Then, you’ll be able to copy your API key from your Moralis admin area in the following two clicks:
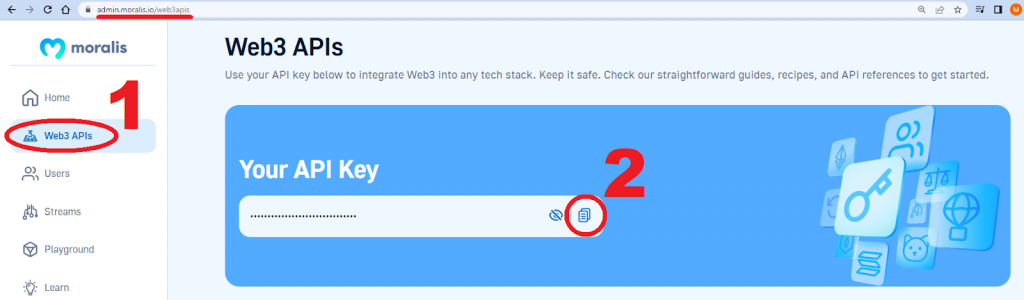
Just like you did with the first “.env.example” file, also rename this one to “.env”.
Step 6: Install the Backend Dependencies
To create a DAO with our scripts, you must also install all the required dependencies for your Python backend. Thus, make sure to install the following Python dependencies for the “.env” file:
eth-browniedjangoweb3
Step 7: Run Your Python Backend
With your backend dependencies in place, run the following command to start your backend:
python manage.py runserver
Step 8: Start Your JavaScript Frontend
To complete the final step of today’s quest on how to create a DAO, run the command below:
npm start
By completing the above eight steps, you created a DAO with minimum effort. However, keep in mind that you can learn even more by coding the main scripts (including smart contracts) that power our example DAO from scratch. If that interests you, make sure to use the video at the top of the article. As for the following sections, they are here to help you get the theory behind DAOs under your belt.

What is a DAO?
A DAO is an organization governed through smart contracts on a blockchain network, such as Ethereum. It allows network participants to vote freely from anywhere in the world on pertinent issues affecting the organization. Furthermore, a DAO eliminates traditional forms of governance, which are usually structures that encourage high levels of centralization and concentration of power.
Hence, you can say that a DAO is the blockchain-driven equivalent of democracy. It upholds this democratic structure on the internet by allowing participants to decide on more granular issues. Today, even the ones considered too “minute” or insignificant to be community decided in the past can be regularly discussed and decided in forums. Moreover, in a DAO, big or small adjustments to the protocol can be decided by all participants.

Tokenized Participation via Governance Tokens
In a DAO, decision-making capabilities are powered by a native token. However, why a token? A native token supports the running of the platform, encourages skin in the game, is a quick way to raise funds for the organization, governs incentives, and creates transparency. Moreover, it allows users to vote on a poll by signing a transaction with a Web3 wallet like MetaMask.
Tokens follow different standards, but the ERC-20 token standard remains a widely popular choice. Tokens also dictate the weight of members’ vote(s). For example, if one token is equivalent to one voting share, then those who hold more voting shares have more influence on the decision. That said, there are many ways to gauge the weight of one’s vote based on tokens. Furthermore, all of these votes are voluntary. One may choose to participate or not in certain polls.
Another advantage that DAOs confer is transparency, as transactions can be freely viewed on the blockchain. Thus, it is difficult to lie or conceal the decision-making process.
Simply put, you can allow your dapp’s users to run a part of the whole organization when you create a DAO!
Examples of DAO Tokens
DAO tokens are an important part of the organization’s design and an essential part when you create a DAO ecosystem. Some of the biggest DAO tokens in the blockchain space today are:
- Aave – Aave (AAVE) tokens are used in the world’s third-largest dapp and Ethereum’s second-largest lending protocol. It facilitates lending and borrowing on the Aave platform, which continues to have a rather large TVL.
- Maker – Maker (MKR) is used in MakerDAO, the largest DeFi lending platform. It allows users to vote on MakerDAO’s parameters, including business logic and risk management systems.
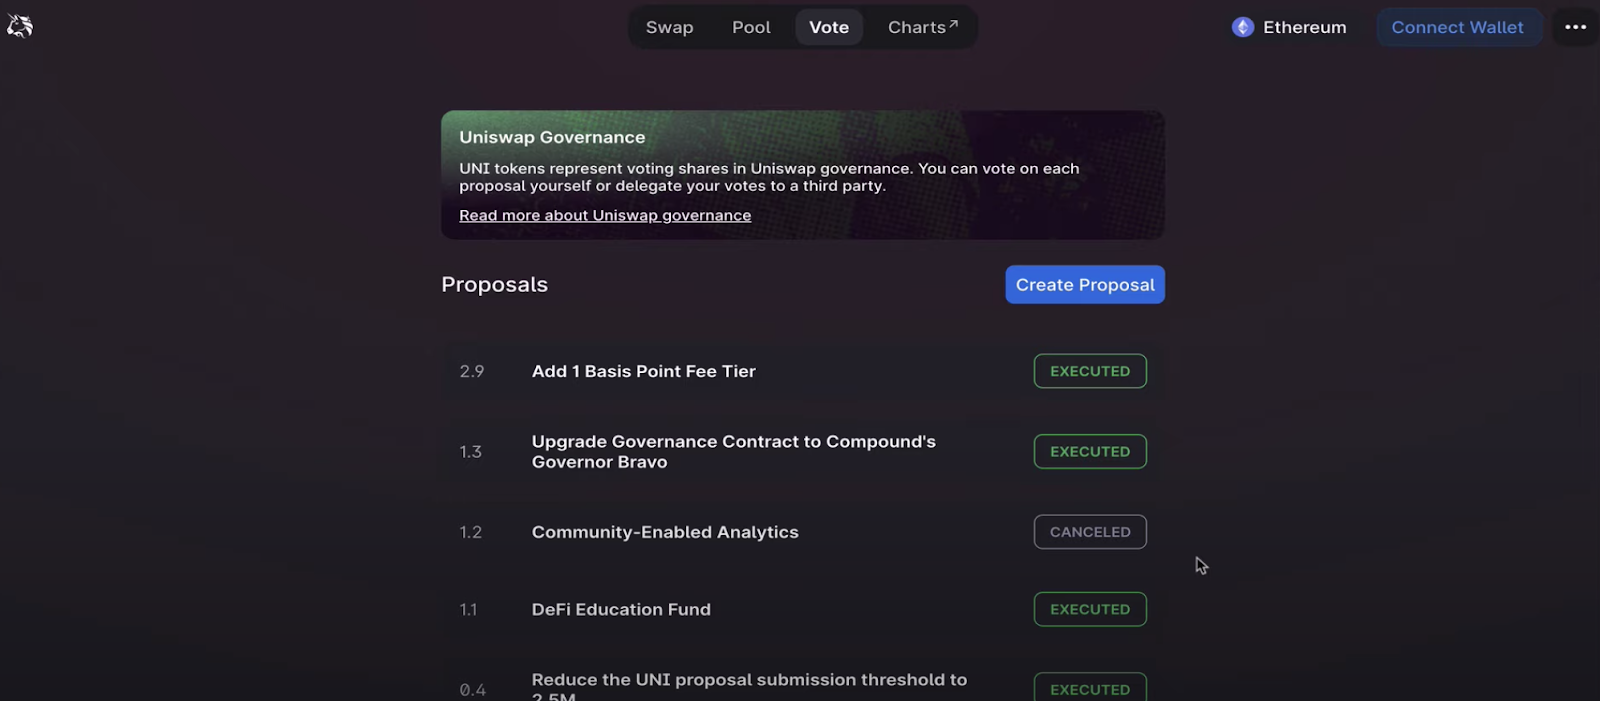
- Uniswap – The Uniswap (UNI) token and DEX are widely popular. This platform is the second-largest DEX on Ethereum. Users holding the UNI token can vote on new proposals (see the above screenshot). However, developers still have a significant say in Uniswap decisions, making it less decentralized than others.
Why Create a DAO?
Why would someone want to create a DAO? How is it relevant to dapps or blockchain development projects? There are many reasons why you should create a DAO. DAOs can be applied to many different situations, scenarios, and protocols. In DeFi, for example, DAOs can help build trust by letting users participate in their protocol updates. Developers can propose new changes to the protocol, but to earn trust, users can vote on whether changes should be implemented or not.
Examples of DeFi DAO applications are lending platforms, yield-earning dapps, and decentralized exchanges (DEXs). If you want to learn how to create a DEX, visit the Moralis blog for an easy five-step guide.

Today’s DAO landscape is much more dynamic than that of the past. It is made up of protocol DAOs, investment DAOs, service DAOs, and social DAOs. You can also find several DAO operations systems that greatly influence the ecosystem, such as Aragon, Syndicate, Orca, and DaoStack. Moreover, there are grant DAOs and media DAOs. Collector DAOs are relevant if you are into NFT dapps or NFT platforms.
As a blockchain developer, learning how to create a DAO can enrich any project you hope to build. Whether you’re interested in finance or in how to launch an NFT marketplace, DAOs have utility.

How to Create a DAO in 10 Minutes – Summary
In today’s article, you had an opportunity to learn how to create a DAO the easy way. By completing the eight steps, you were able to create your own DAO in minutes. That was possible by utilizing our template scripts. Moreover, just by looking at our scripts, especially our Solidity smart contracts, you learned a lot about how DAOs function. Of course, you also had a chance to take the longer but more educational path of writing the core scripts from scratch following our video tutorial. Last but not least, we explained what DAOs are and what tokenized participation via governance tokens is. Additionally, we looked at some leading DAO tokens and answered the “why create a DAO?” question.
In one of today’s steps, you also learned how to obtain your Moralis Web3 API key. As such, you are now equipped to utilize the power of Moralis to build killer dapps. With Moralis’ enterprise-grade Web3 APIs, you can cover blockchain-related backend aspects by simply copy-pasting short code snippets. What’s more, you can do this with leading legacy programming languages, such as JavaScript, Python, and Go.
If you wish to learn more about how to make the most out of Moralis, make sure to dive into the Moralis docs. Or, tackle one of our Web3 development tutorials that await you on the Moralis YouTube channel and Moralis blog. A great example of that is our Web3 marketplace development tutorial. Our blog is also the place to explore various blockchain development topics and learn more about some practical Web3 development tools. For instance, you can get acquainted with the Arbitrum testnet and learn how to use the best gwei to ETH calculator and Arbitrum faucet.
