E-commerce platforms, with Amazon as the prime example, have been on the rise for over a decade. More and more people focus on doing most of their shopping online. That is particularly true ever since the beginning of the pandemic back in 2020. However, with the evolution of Web3, which is slowly taking on the world, Web3 e-commerce is starting to take off. However, we are still early in the game, as such, this is the best time to learn how to create a Web3 e-commerce platform. This sounds like quite a time-consuming challenge, right? Well, with the right tools and proper guidance you can have your own Web3 e-commerce platform ready in about an hour. And, this is exactly what you will get out of this article. In addition, you will have a chance to get acquainted with the most advancing part of the Web3 tech stack.
Moving forward, you will learn how to create a Web3 e-commerce platform in five steps. Moreover, if you decide to take on this example project yourself, you will also get familiar with Moralis. This ultimate Web3 development platform, also known as Firebase for crypto, is the key to such a short development time. Once you complete the initial Moralis setup, you get to use its Web3 SDK to cover all your backend needs. As such, you simply copy and paste short snippets of code from the Moralis’ documentation. Furthermore, with time and resources saved, which you’d otherwise spend on the backend, you easily create a great Web3 UI. Aside from using Moralis to create a Web3 e-commerce platform, it is the tool for developing dApps (decentralized applications). Moralis enable you to create killer dApps using your JavaScript skills and MetaMask. As such, create your free Moralis account before moving forward.

Create a Web3 E-Commerce Platform in 5 Steps
Let us again encourage you to join us in this example project by taking action yourself. That way you will get the most out of this guide. As promised above, you don’t need more than your JavaScript proficiency, MetaMask, and a free Moralis account. Of course, you will also need to use your preferred code editor. Since we tend to use Visual Studio Code (VSC), all of the instructions herein will apply to that code editor.

Moreover, as the title suggests, we’ll break the entire process into five manageable steps:
- Project setup.
- Creating your e-commerce header.
- Creating pages – home page, categories page, and product page.
- Completing the initial Moralis setup.
- Backend implementation – Web3 API, payment, and database.
In combination with a video tutorial, we will cover all of the above five steps in detail. As such, you will get to follow our lead without breaking a sweat. However, before we dig into creating a Web3 e-commerce platform, let’s take a look at what we’ll be building.
Before You Create a Web3 E-Commerce Platform – dApp Preview
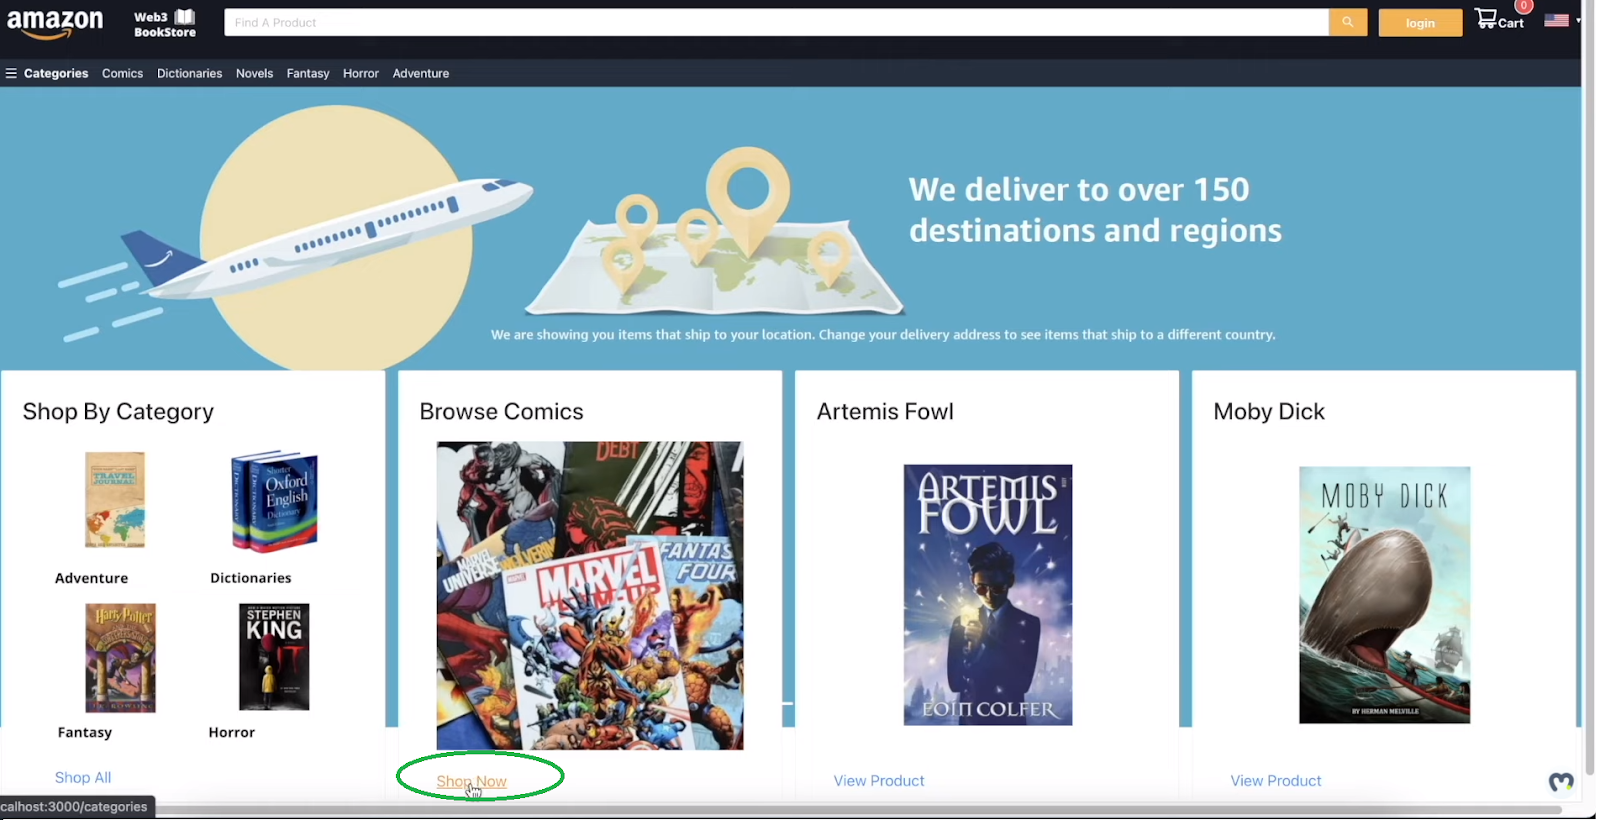
By the end of this article, you will have a chance to build your own Amazon-like web bookstore. Here’s what our Web3 e-commerce example’s homepage looks like:

If you took a good look at the screenshot above, you probably noticed that “Amazon” look, right? Hack, to make it obvious, we even used their logo. Furthermore, you can also see that we added a search bar at the top for maximum convenience. Moreover, just right to the search bar is the “login” button. The latter enables users to complete their Web3 authentication easily. For the sake of this example project, we decided to use the most popular Web3 wallet for the purpose of Web3 login. However, Moralis also offers you Web3 social login or Web3 authentication via email to boost Web3 user onboarding success rate.
Moving down our homepage, you can see the top menu just below the search bar. This is where users get to select among different categories. For the sake of this tutorial, we included the following categories: comics, dictionaries, novels, fantasy, horror, and adventure. Below the top menu bar, you can see the carousel area. Here, we set in place three rotating banners to engage customers. Furthermore, just below the carousel are four sections. These include “Shop by category”, “Browse comics”, “Artemis Fowl”, and “Moby Dick”. Moreover, each of these four sections comes with a button at the bottom. When users click any of those buttons, they are taken to a particular page. For example, if users click “Shop Now” under the “Browse Comics” section, they land on the “Results” page. On that page, they get to browse comics and select the ones they want to purchase:
This is the page users land on after clicking the “Shop Now” button under the “Browse Comics” section:

Example Web3 E-Commerce Preview – the Results Page
Let’s now explore the “Results” page further. Looking at the screenshot above, you can see that this page offers users to view what comics are available. In addition, users also see comics’ review stars ratings and their prices. Furthermore, looking at the left-hand side of the above image, you can see two search filters. As such, users get to view only comics with particular review stars. Moreover, users can also use the price filter. That option enables them to view comics of specific price ranges. Nonetheless, they can select one of the predefined price ranges or even enter their unique price range.
Example Web3 E-Commerce Preview – Completing a Purchase
This preview of our Web3 e-commerce wouldn’t be complete without showing you how users can complete their purchases. As such, let’s consider customers who want to buy a specific comic. First, they’d need to click the “Go to Product Page” button under a particular comic:

After clicking the “Go to Product Page” button, the customers would be taken to that product’s page. And, the latter contains the product title, star reviews, price, and a short description:

Furthermore, there’s also a cover image on the left-hand side. The latter also offers a zoom-in effect when hovering over it. Moreover, on the opposite side of the product’s page is a frame box. Using the content of this frame box, users get to select the quantity, preview the overall price, and buy the item. To actually buy the selected item, users need to click the “Buy Now” button. Though only logged-in users can complete the purchase.
Example Web3 E-Commerce Preview – Login
As mentioned previously, we based our Web3 e-commerce example login based on the MetaMask authentication. This means that users need to have the MetaMask browser extension and their crypto wallet ready. Once they have that covered, a click on the “login” button is all it takes:

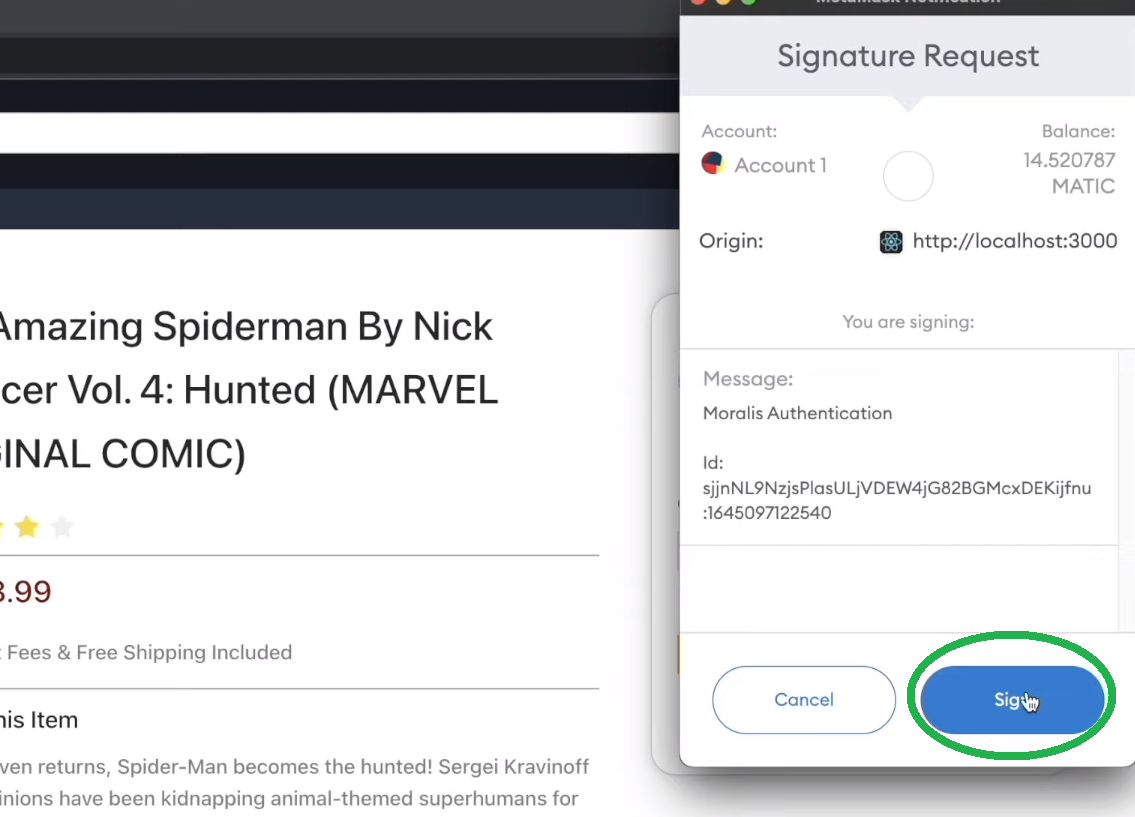
Of course, they also need to sign a MetaMask’s signature request by clicking the “Sign” button:
All logged-in users with sufficient funds can complete their purchases. After clicking the “Buy Now” button a new pop-up window appears:

Looking at the screenshot above, you can see that users are asked to enter their delivery addresses. Then, they also need to click the “OK” button. By doing so, their MetaMask extension will ask for confirmation. The screenshot below shows you that the product price is automatically converted into MATIC. A click on the “Confirm” button is all that’s left to do to complete the purchase:
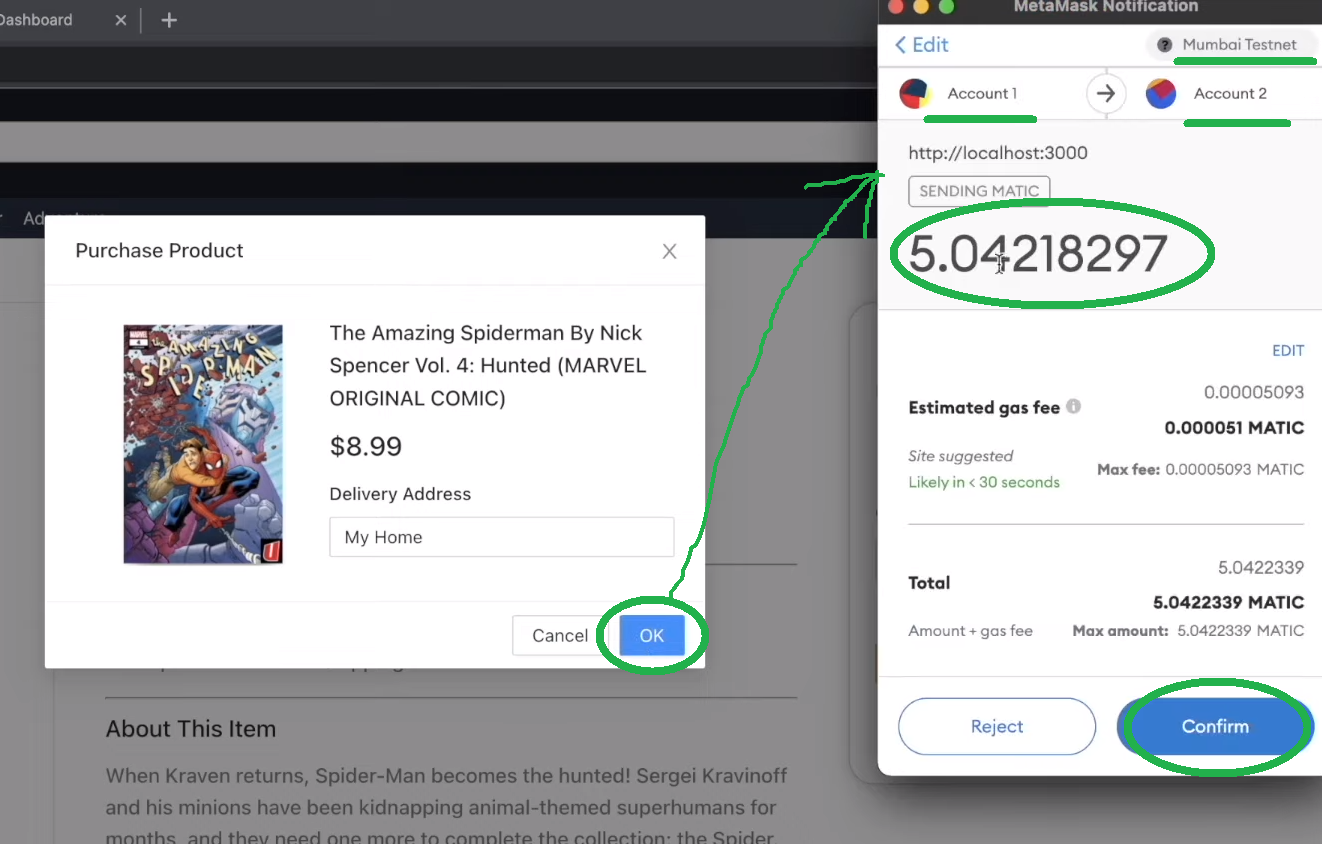
Note: For the sake of this example project, we are using the Mumbai testnet. Thus, the cryptocurrency used is “test” MATIC. Moreover, “Account 1” represents an example user’s account. On the other hand, “Account 2” is our example Web3 e-commerce owner’s account. This is the account to which all MATIC transactions used for purchases are sent to.
Create a Web3 E-Commerce Platform in 5 Steps – Example Project
Now that you know what we are going to be creating, it is time to roll up your sleeves and follow our lead. Moving forward, we’ll show you how to use Moralis to create a Web3 e-commerce platform. As such, you’ll learn how to implement all of the features and the website’s appearance as presented above. To refresh your memory, here are the five steps we need to cover:
- Project setup.
- Creating your e-commerce header.
- Creating pages – home page, categories page, and product page.
- Completing the initial Moralis setup.
- Backend implementation – Web3 API, payment, and database.
Using this article to cover all the steps would make things too extensive. As such, we will hand you over to one of Moralis’ experts. His detailed video tutorial will walk you through the entire code. However, to make sure you start on the right foot, we’ll guide you through the initial project setup.
Create a Web3 E-Commerce Platform – Step #1: Project Setup
First, launch your favorite code editor. As mentioned previously, we’ll be using VSC. Inside your code editor, open a folder (or create a new one). You will use this folder to store your project. Since Amazon is the leading e-commerce platform, we named our folder “Amazon”:

Then, use your terminal to enter proper commands. You should start by cloning the starter code. It is available at GitHub. As an alternative, you also have an option to use our final code. By using the “git clone” command, followed by the code’s URL, you get to clone the code:

Once the cloning is completed, use the “cd amazon-clone-1” command. The latter will open the cloned project:

Next, it’s time to install all of the dependencies. You do this by running “yarn” or “npm”. We went with the former:

Now, you are all set to run your template application. Hence, use “yarn start” in the terminal:

If you’ve finished all of the above substeps properly, you should be looking at this screen:

Basically, you are looking at a blank canvas – a perfect starting point to create a Web3 e-commerce platform. Moreover, you can also see all the files that your project contains on the left-hand side of the VSC dashboard:

Before we hand you over to one of Moralis’ experts, let’s import the “antd” CSS library. As such, start by selecting the “App.css” file. Inside the file, paste “@import ‘antd/dist/antd.css’;’” in the top line:

Create a Web3 E-Commerce Platform – Steps #2-5
Now that you’ve completed the initial setup, you are ready to take on the remaining four steps. For detailed guidance use the video tutorial below.
Step #2: Creating Your E-Commerce Header
Following a Moralis expert’s lead in the video below, you will first learn to create your e-commerce header (05:45).
Step #3: Creating Pages
Next, you will be creating the most important pages. The details of building your home page await you at 15:50, the categories page at 22:14, and the products page at 47:14.
Step #4: Initial Moralis setup
When it comes to Web3 development, this is one of the most important steps. It is the one that enables you to use Moralis and its full power. It is also the one that you need to complete when taking on other projects. Moreover, as part of the initial Moralis setup you need to create a Moralis server and copy its details to the “index.js” file (video below at 01:00:58):

Step #5: Backend Implementation
With Moralis at your disposal, you finally get to tackle the backend aspect of your Web3 e-commerce (01:05:57). This is where you will learn how simple things are when using Moralis and its Web3 API. This will also give you access to the Moralis dashboard. The latter is basically your server’s Web3 database.

Furthermore, the Moralis dashboard is a powerful tool. In combination with the Moralis “sync” feature, the Moralis dashboard enables you to sync and index smart contract events. As such, you essentially index the blockchain as effortlessly as possible. Nonetheless, as part of this final step of the “create a Web3 e-commerce” quest, you will also learn how to enable payments.
Finally, here is the video tutorial we’ve been referring to throughout the above sections:
Web3 E-Commerce – Create a Web3 E-Commerce Platform in 5 Steps – Summary
We’ve covered a lot of ground in today’s article. Moreover, if you took on our example project yourself, you now have your own Web3 e-commerce platform ready. Along the way, you’ve learned how to cover both frontend and backend aspects. However, honestly, when using Moralis, there’s really very little work needed to cover all your backend needs.
If you enjoyed this example project and are interested in sharpening your blockchain development skills further, make sure to visit the Moralis’ YouTube channel and the Moralis’ blog. Both of these outlets are some of the best options when it comes to free crypto education. Some of our latest articles focus on how to build a Web3 Amazon marketplace, how to connect a Unity app to a Web3 wallet, Alchemy PI alternatives, cloning Coinbase Wallet, how to create a BNB chain token, how to create a Solana token, how to launch an NFT minting page, and how to create a metaverse dApp with Unity. However, in case you are eager to become a blockchain developer sooner rather than later, you may want to take a more professional approach. As such, you might want to consider enrolling in Moralis Academy.

