In this article, we’ll show you how to connect a Unity app to a Web3 wallet. However, if you’d rather skip the tutorial and jump straight into the code and project repository, be sure to check out the following GitHub page:
Full Documentation – https://github.com/MoralisWeb3/youtube-tutorials/tree/main/unity-wallet-mobile
Developing Web3 games and applications for multiple platforms can be a taxing endeavor. Thus, it is only logical to utilize development tools that potentially make this process more accessible. One such tool is Unity. Unity allows you to quickly develop cross-platform applications for numerous different devices. Moreover, when it comes to blockchain development, it is further interesting to allow users to connect their Web3 wallet to Unity applications. This has traditionally been a complex process; however, with Moralis, we can do so in a couple of minutes. As such, we’ll show you how to connect a Unity mobile app to a Web3 wallet with Moralis!
From a traditional perspective, the process has been quite cumbersome when someone wants to connect a crypto wallet to a mobile dApp, as this process would require an extensive amount of backend blockchain development. With Moralis, this is taken care of – sparing you from needing to reinvent the wheel. Moralis provides a ready backend infrastructure for all users, making Web3 development more straightforward. As such, you can significantly cut development time for all your future blockchain projects with an average of 87% when working with the Moralis operating system.
So, if you’re looking to become a blockchain developer, the initial step in your journey is to sign up with Moralis. This will allow you to move much quicker to market and provide you with the best developer experience on the market! In addition, you’ll be able to finish the “connect Unity app to Web3 wallet” quest quickly and easily!
How to Connect a Unity App to a Web3 Wallet
In this section of the article, we’ll dive deeper into how to connect a Unity app to a Web3 wallet. To illustrate the power of working with Moralis, we’ll create a simple Android Unity application to which users can connect their MetaMask wallet and sign a message. In return, the app will display a success message along with the user’s wallet address.
Now, to make the tutorial more understandable, we’ll break down the process of how to connect a crypto wallet to a mobile dApp into the following five steps:
- Developing a frontend UI.
- Setting up a Moralis server.
- Configuring the Web3 wallet connection.
- Adding the app manager script.
- Fine-tuning the UI.
Moreover, if you are more interested in a video guide, check out the following clip from the Moralis YouTube channel. Here, you can follow along as one of our developers take you through the complete process:
Following along in the above video, will make it even easier for you to connect a Unity app to a Web3 wallet. So, with no further ado, let’s initiate the process by creating a Unity project and developing the frontend of our application!
Step 1: How to Connect a Unity App to a Web3 Wallet – Developing a Frontend UI
The first thing you’ll need to do is download Unity and install Unity Hub. Moreover, as we’re about to create an Android application, there are a few adjustments to be made. To make Unity suitable for Android development, we need to ensure that the ”Build Settings” are set to the Android platform.
As such, the first thing you’ll need to do is install the Android SDK. To do so, you need to open Unity Hub, navigate to the ”Installs” tab, click on the cogwheel, and click on ”Add modules”. You’ll then need to install ”Android Build Support” and include the Android SDK.

With the platform changed to Android, we can continue by creating a new scene which we’re going to call ”Main”. Following this, the next step is to create and add a new canvas and panel to ”Main”. Within the panel, we add a button, which we’re going to name ”ConnectButton”, and a ”TextMeshPro” element which we are going to call “WalletAddressText”. Moreover, we’ll also add a text to the button saying ”Connect to Wallet”.
Now, this is essentially it for the demo application’s UI. However, the UI should be based on your preferences. As such, you are free to play around in Unity and add your spin to the UI of your applications so that it fits your development needs. However, this is basically what the structure of the application we’re creating looks like:

Moreover, if you’d like to learn more about UI (user interface) development within the crypto space, we recommend taking a closer look at Moralis’ Web3UI kit. Now, let’s move on in our quest to connect a Unity app to a Web3 wallet by setting up a Moralis server!
Step 2: How to Connect a Unity App to a Web3 Wallet – Setting Up a Moralis Server
Once you’re satisfied with your app’s UI, the next step in the process is to download the Moralis Metaverse SDK. To do so, all you need to do is click on the previous link and hit the ”Start Now” button further down on the webpage. You’ll then need to navigate to “Releases”, which you can find on the right side of the webpage, and finally download the Unity package.
Once you have downloaded the SDK, you can drag the file into the ”Assets” field in Unity, which will prompt you to import the files. With the files imported, you’ll receive access to a folder with all the Moralis Metaverse SDK elements.

Following this, you’re going to add the ”MoralisSetup” element to the ”Main” scene. This can be accomplished by dragging and dropping the file into the scene’s ”Hierarchy” field.

Once the ”MoralisSetup” element is incorporated into your Unity project, you’ll notice that you’ll need to add some information. For example, you need to add a server URL, application ID, and a Moralis Speedy Node URL. As such, you’re going to need your very own Moralis server.

Creating a Moralis Server and Acquiring a Blockchain Node
If you haven’t already, the next step is to create a Moralis account. This is entirely free, and you’ll be able to do so in a matter of seconds. Once you have an account at your disposal, you can create a new server by clicking on the ”Create a new Server” button at the top right of the Moralis admin panel. This will provide you with a drop-down menu with three alternatives. For this tutorial, we opted for a ”Testnet Server”.

Once you select this alternative, a new window will appear where you need to add a server name, pick a region, and finally select chain(s). For this tutorial, we’re going to choose the ”Eth (Ropsten)” alternative. As such, if you’re following along, we recommend that you do the same. Now, all that remains is to click on the ”Add Instance” button at the bottom right.
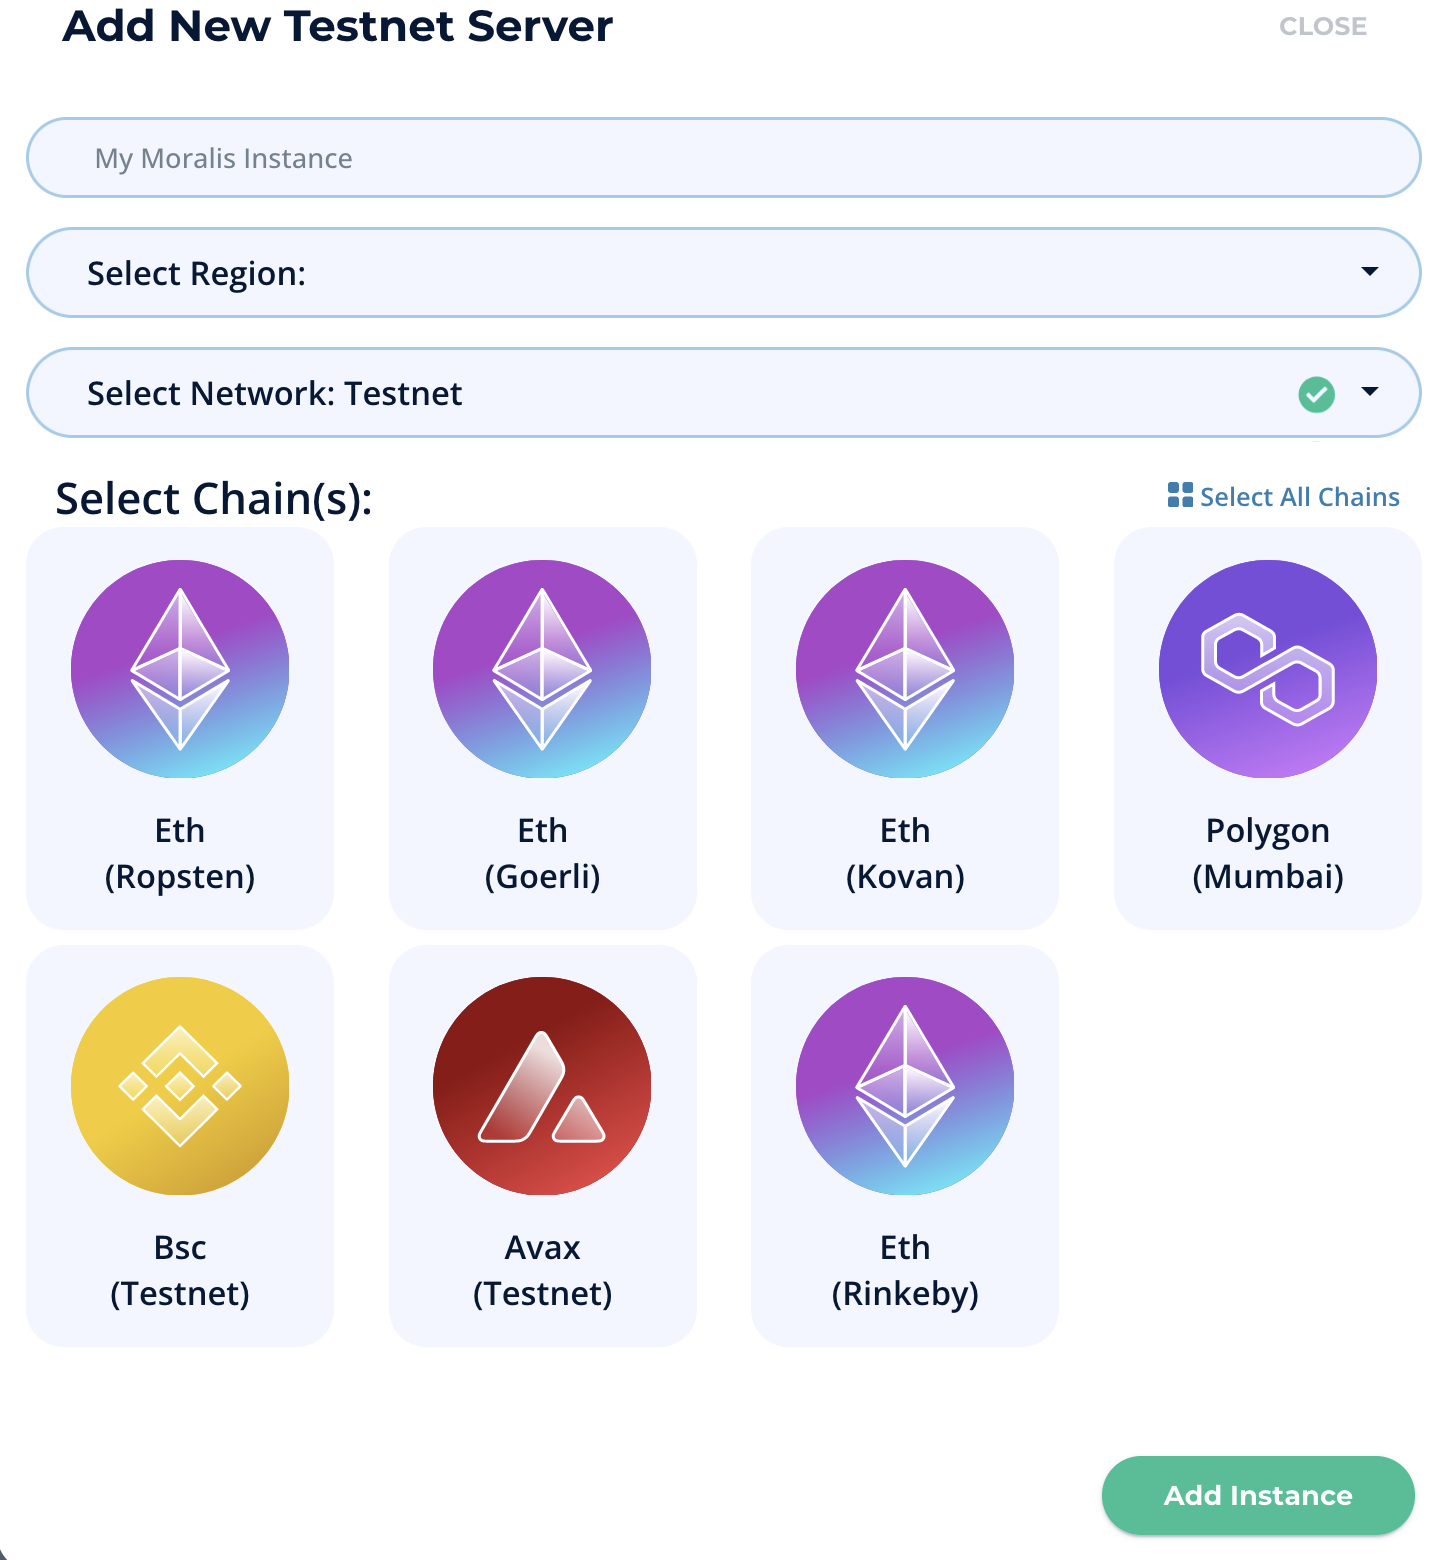
This will spin up the server, and you’ll be able to find the server URL and application ID by clicking on the ”View Details” button for the server in question. You can then copy-paste this information into Unity’s corresponding fields.
The final part of this step is to acquire a blockchain node. To get a hold of a node, you need to click on the ”Speedy Nodes” tab to the far left of the Moralis admin panel. This will provide you with a bunch of networks. Since we chose ”Eth (Ropsten)” when we created the server, you can click on the ”Endpoints” button for the Ethereum network, copy the Ropsten URL, and paste this into the proper field in Unity.

That’s it for setting up a Moralis server and successfully connecting it to your Unity project!
Step 3: How to Connect a Crypto Wallet to a Mobile dApp – Configuring the Web3 Wallet Connection
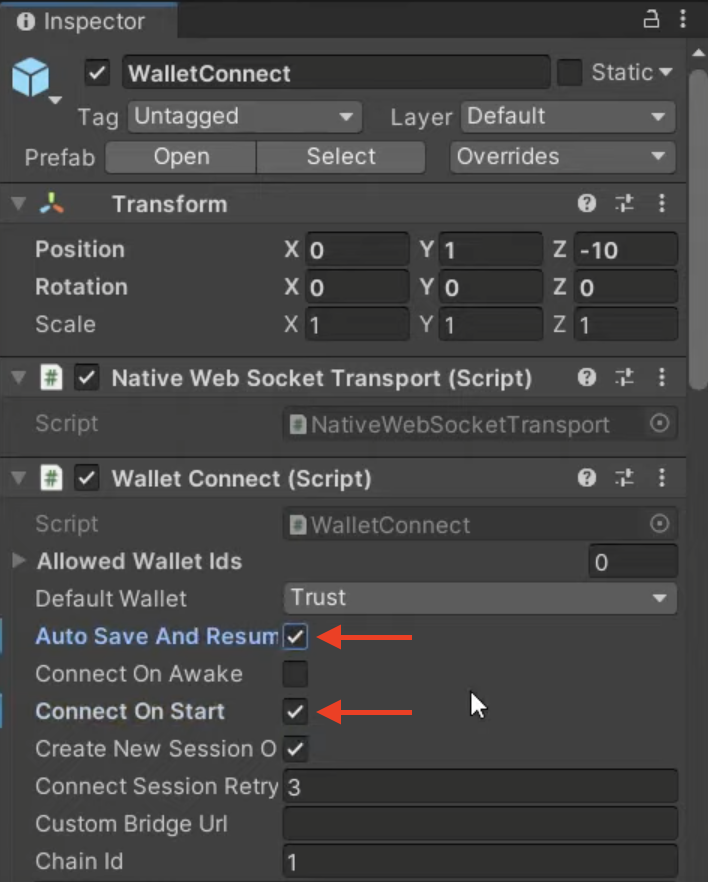
Now that you have your Moralis server connected to the application, the next step is to configure the Web3 wallet connection. You need to add the ”WalletConnect” element to your ”Main” project. You can do so by once again simply dragging and dropping the component to the ”Hierarchy” field.

With the element added to the project, you’ll need to make a few adjustments. First, you want to checkmark the ”Auto Save and Resume” and ”Connect On Start” options. You can then proceed with deleting all of the connected events.
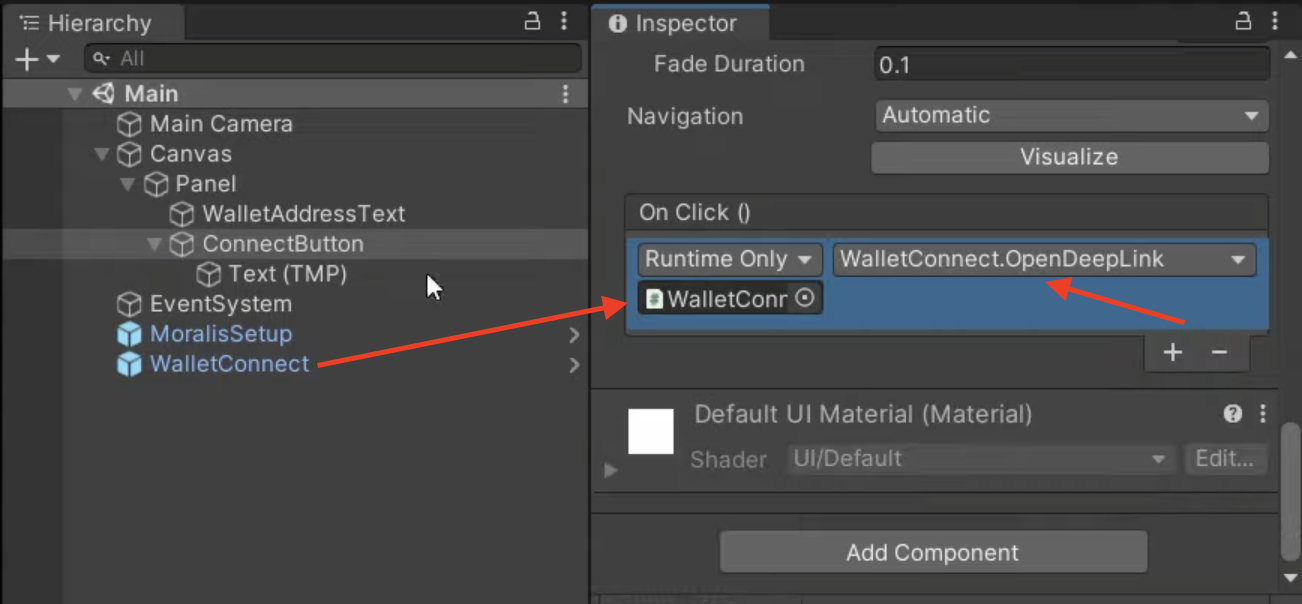
Next up, we’re going to activate the ”ConnectButton” that we created in the first step. With the button activated, we’ll add an ”On Click ()” event and drag the ”WalletConnect” file to the field that says ”None (Object)”. Then you’ll also need to click on the ”No Function” drop-down menu and choose ”OpenDeepLink ()”. As such, whenever a user clicks the button, it will automatically open their MetaMask application.
However, we’d also like MetaMask to handle all the returning information. As such, we’re going to need a script. Thus, we’ll take the following section to show you how to add the script and make a few alterations to the code so that it suits our app.
Step 4: How to Connect a Unity App to a Web3 Wallet – Adding the App Manager Script
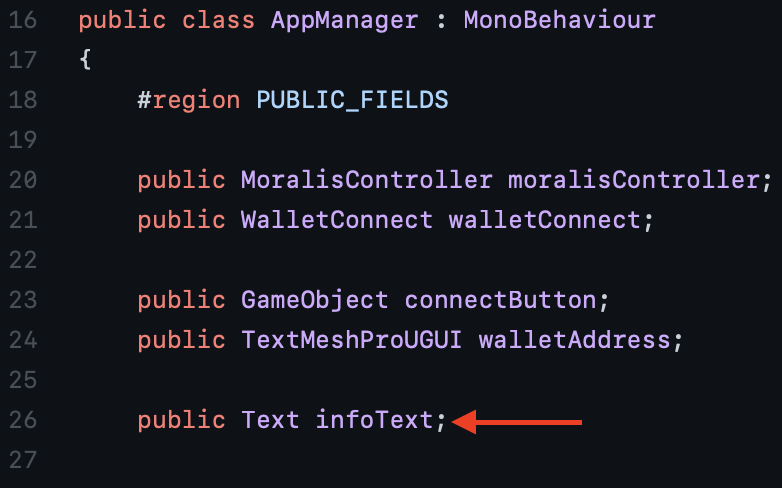
In this step, we’re going to add a script that will manage the application. Fortunately for you, we are providing you with an already prepared script called ”AppManager”. As such, before we begin, you can go ahead and visit the GitHub repository and download the script. Next up, we’re going to create a new Unity object and name it ”AppManager”. You can then navigate to the object, click on ”Add Component”, and select the newly downloaded script.

Now, if you take a closer look at the actual code, you’ll notice a fields section. As such, we’ll need to add each field/button and connect these to our project. To accomplish this, you can simply drag and drop ”MoralisSetup” to the ”MoralisController” field and ”WalletConnect” to the ”Wallet Connect” field in the ”Inspector” module in Unity. After this, we’re also going to add the ”ConnectButton” to the ”Connect Button” field and ”WalletAddressText” to the ”Wallet Address” field through the same process.

With the fields connected to the script, we must also add the ”WalletConnectHandler()” function to the ”Connected Event Session” for the ”WalletConnect” element in Unity. As such, we can simply drag the ”AppManager” element into the ”Missing (Object)” field for the ”Connected Event Session”. Following this, we can click on the ”No Function” drop-down menu and select the ”WalletConnectHandler()” function.
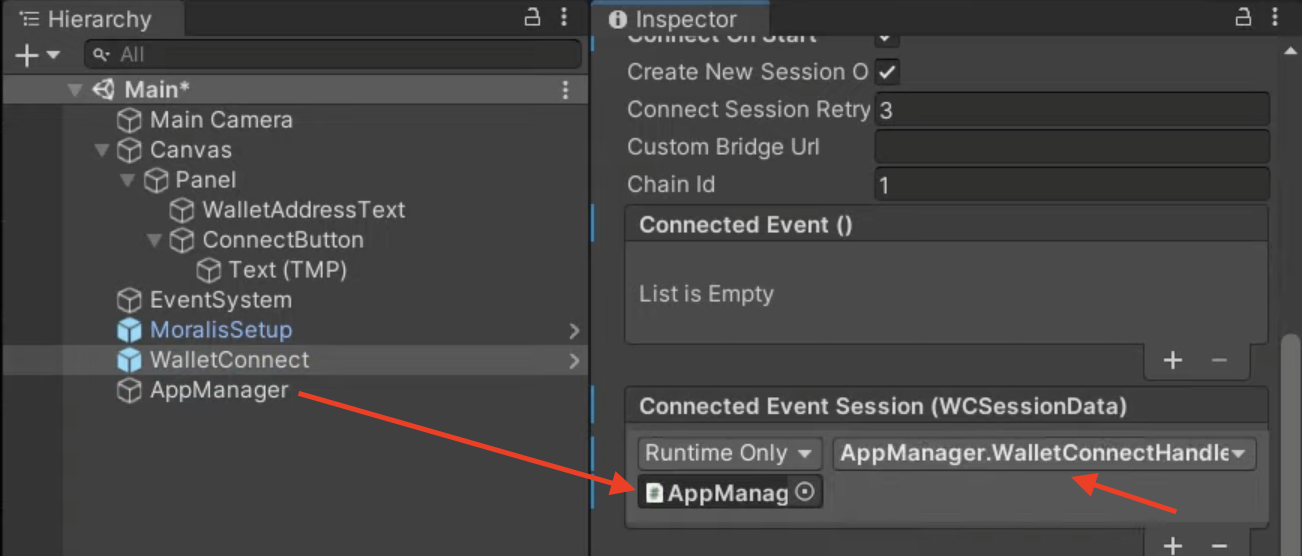
Lastly, the final part of the fourth step is to add the ”WalletConnectSessionEstablished()” function to the Unity application. To do so, we can add a ”New Session Connected” and a ”Resumed Session Connected” event where we, through the same process as described in the previous paragraph, call ”WalletConnectSessionEstablished()”. This will look something like this in the Unity interface:

Step 5: How to Connect a Crypto Wallet to a Mobile dApp – Fine-Tuning the UI
In the final step, we’ll make the UI a bit more user-friendly. As such, you can head back to the script and go back to the fields section. You’ll notice an additional field called ”infoText”, which we haven’t yet connected to our Unity scene, which is next on the agenda.
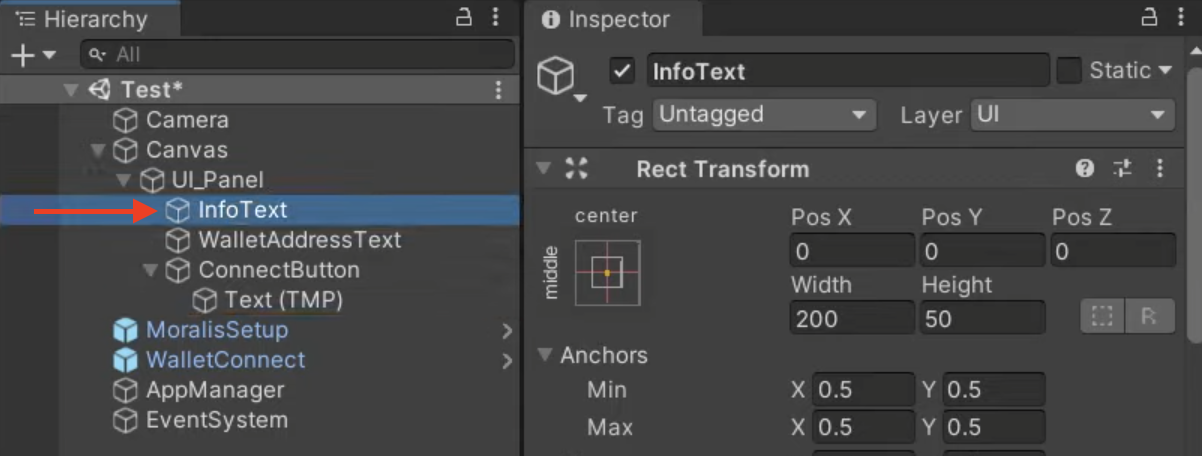
You can head back to Unity and add a new text inside the ”UI_Panel” (same as the “Panel” object, only a new name) and name this ”InfoText”. Following this, you might need to make a few adjustments so that the element fits your app’s UI. However, as this might differ depending on your preferences, we won’t be diving any deeper into this.
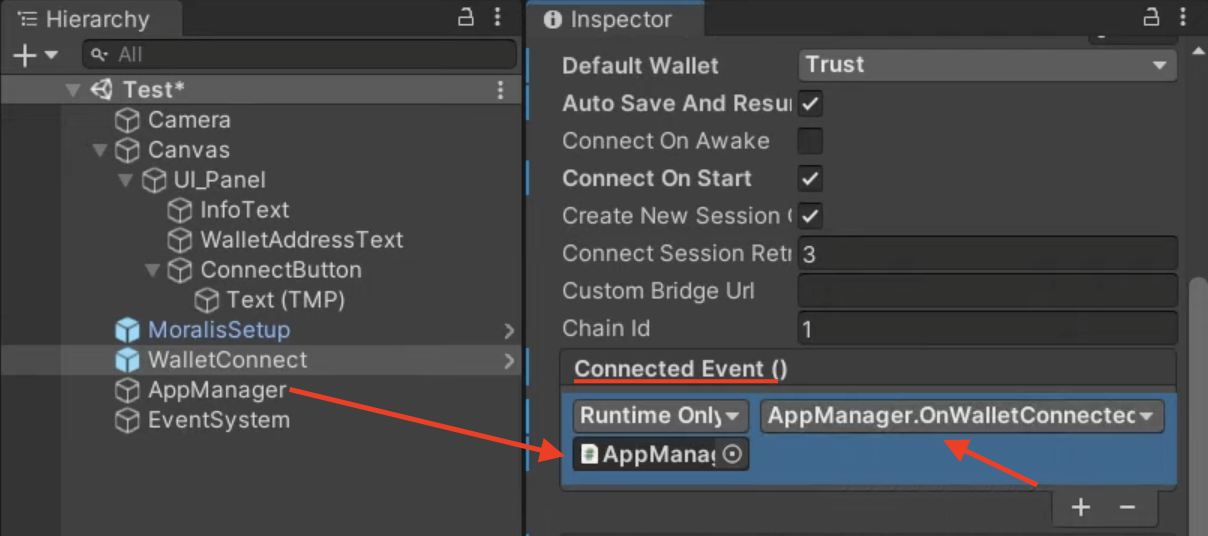
With this info text, we want to display a message if a user successfully logs in or not. Moreover, we also want to inform the users if their wallets successfully connect or if the connection fails. For this reason, we need to add a ”Connected Event ()” and a ”Disconnected Event ()” to call the ”HandleWalletConnected()” and ”HandleWalletDisconnected()” functions from the script. As such, this will look something like this in Unity:

Finally, the last thing we’ll need to do is add the ”InfoText” to our ”AppManager” by simply dragging this element to the ”Info Text” field.

All that remains from here is to click on ”Build Settings”, add the scene, and then hit the ”Build And Run” button at the bottom right. Now that’s it for this tutorial; if you followed the five steps from above, you should know how to build and connect a Unity app to a Web3 wallet with ease!
Moreover, if you’d like to take a closer look at the entire code and the application in its entirety, you can visit the GitHub repository to which we linked in the initial section of this article.
How to Connect a Unity App to a Web3 Wallet — Summary
Connecting a Unity application to a Web3 wallet doesn’t have to be difficult when working with the Moralis operating system. Moralis provides you with an already developed backend infrastructure allowing us to connect a crypto wallet to a mobile dApp in just minutes. In fact, it is possible to achieve this through the following five steps:
- Developing a frontend UI.
- Setting up a Moralis server.
- Configuring the Web3 wallet connection.
- Adding the app manager script.
- Fine-tuning the UI.
Following this process allows you to create a simple demo application where users can authenticate themselves with their MetaMask wallet and sign a message. As such, this clearly demonstrates the power of working with Moralis.
Moreover, if you have further interest in Web3 development, then check out the Moralis website. Visiting the site will allow you to discover additional development tools such as the Moralis NFT API, Price API, the system’s native support for IPFS, and much more. You can also visit the Moralis blog for more incredible content and read guides on topics such as “how to create a BNB Chain token” or “how to create a coinbase clone”.
As such, if you want to become a more prominent blockchain developer, sign up with Moralis right now! Creating an account is free, and it will help you in any future Web3 development endeavors.
