Twitter has been one of the most popular social media platforms for users in the crypto realm. However, crypto users realize that a decentralized version of Twitter would be highly beneficial since it would eliminate the negative aspects of Twitter’s centralized platform. Thus, we decided to build a Web3 Twitter clone. By creating and launching a Twitter clone with Web3 functionality, such a platform can harbor the many pros blockchain tech offers and can provide users with true decentralization. While this task may sound cumbersome, you’ll be surprised how straightforward the process can be when using the right tools. Also, with the proper tools, you can have a Web3 Twitter alternative ready in less than one hour and thirty minutes. So, please pay close attention as we explore how to build a Web3 Twitter clone in this article using tools such as Moralis and Remix!
Moving forward, we will first take a closer look at a demo of our example Web3 Twitter clone. That way, you’ll know what to expect moving forward. Hence, it will also help you decide whether or not you want to roll up your sleeves and follow our lead. Furthermore, those who decide to build their own Web3 Twitter alternative will get to use their React skills. Moreover, we will start by creating and deploying a smart contract. This is where we will use Solidity and Remix. Then, we will devote our attention to setting up the frontend using React and JavaScript. We will create sidebars, the homepage, profile, and settings pages. Next, things will get interesting as we integrate the Moralis SDK. As such, we will start incorporating Web3 functionalities with ease. So, make sure to create your free Moralis account before moving forward.

Our Web3 Twitter Clone – Demo
This is what users see when starting with our Twitter clone:

As with all dapps (decentralized applications), users must first complete Web3 authentication using Web3 wallets. So, by clicking on the above “Connect Wallet” button, users get to select their preferred Web3 login tool:
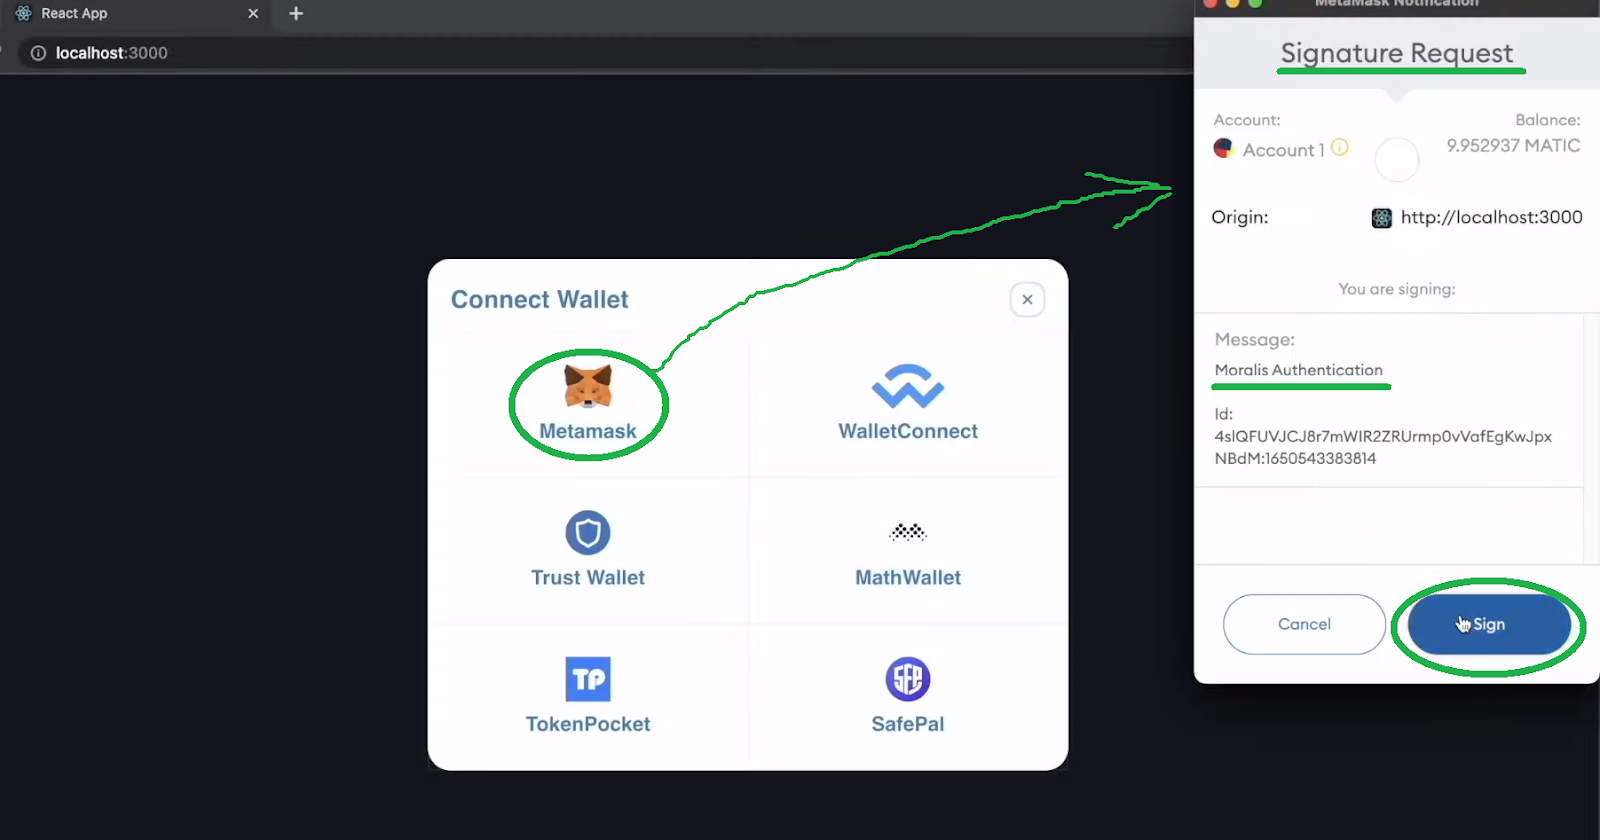
For the sake of this demo, let’s assume that an example user chooses to authenticate with MetaMask. So, after clicking on the MetaMask icon, this crypto wallet’s extension pops up and requests a signature. Once the user clicks on the “Sign” button, they land on our Web3 Twitter’s homepage:
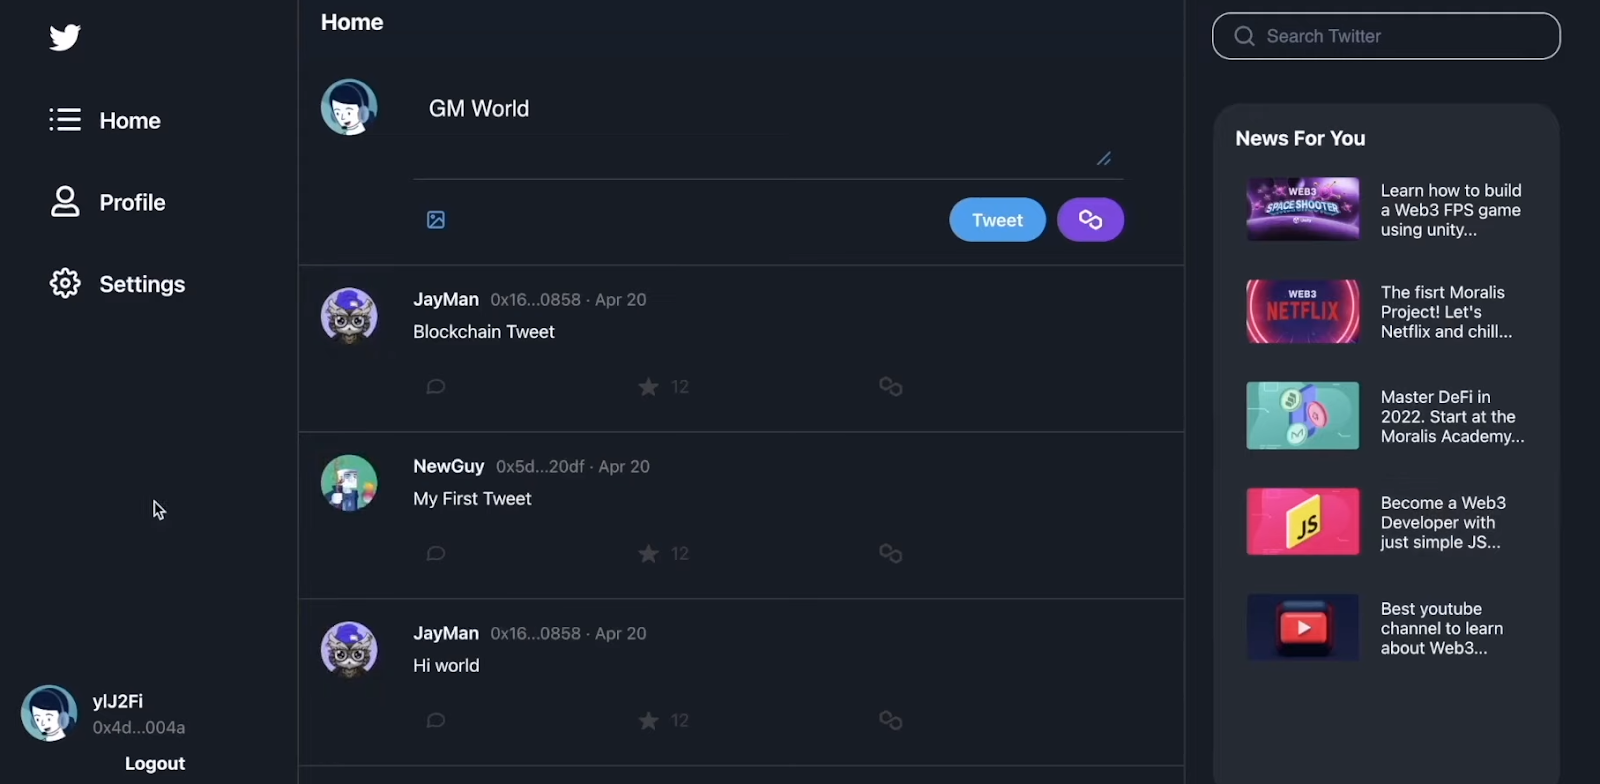
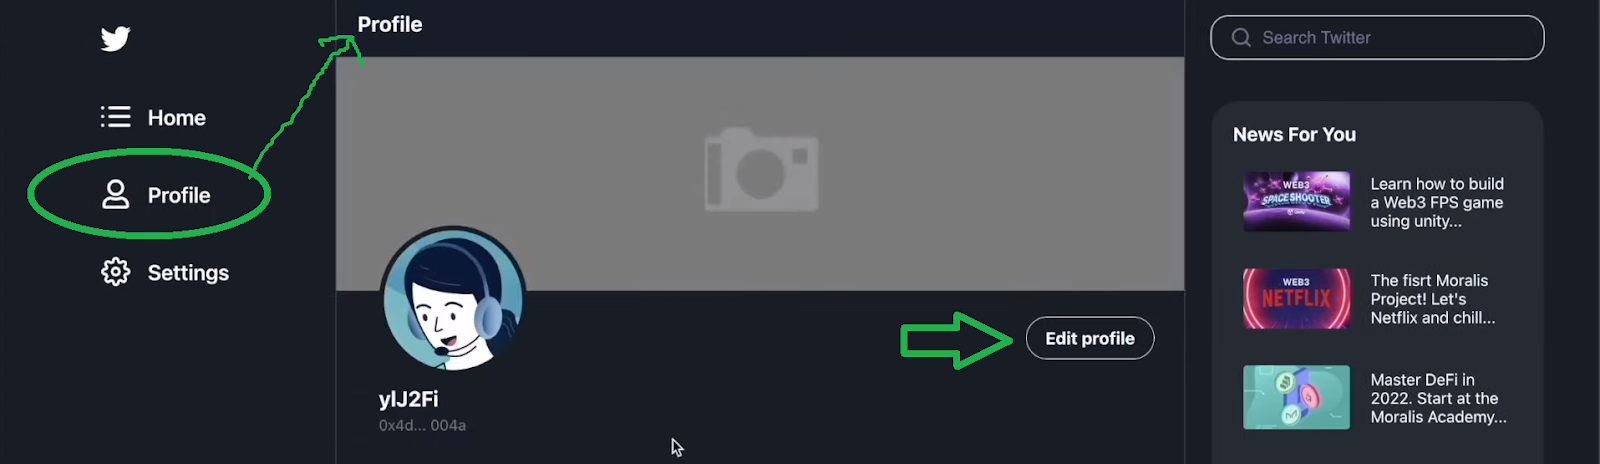
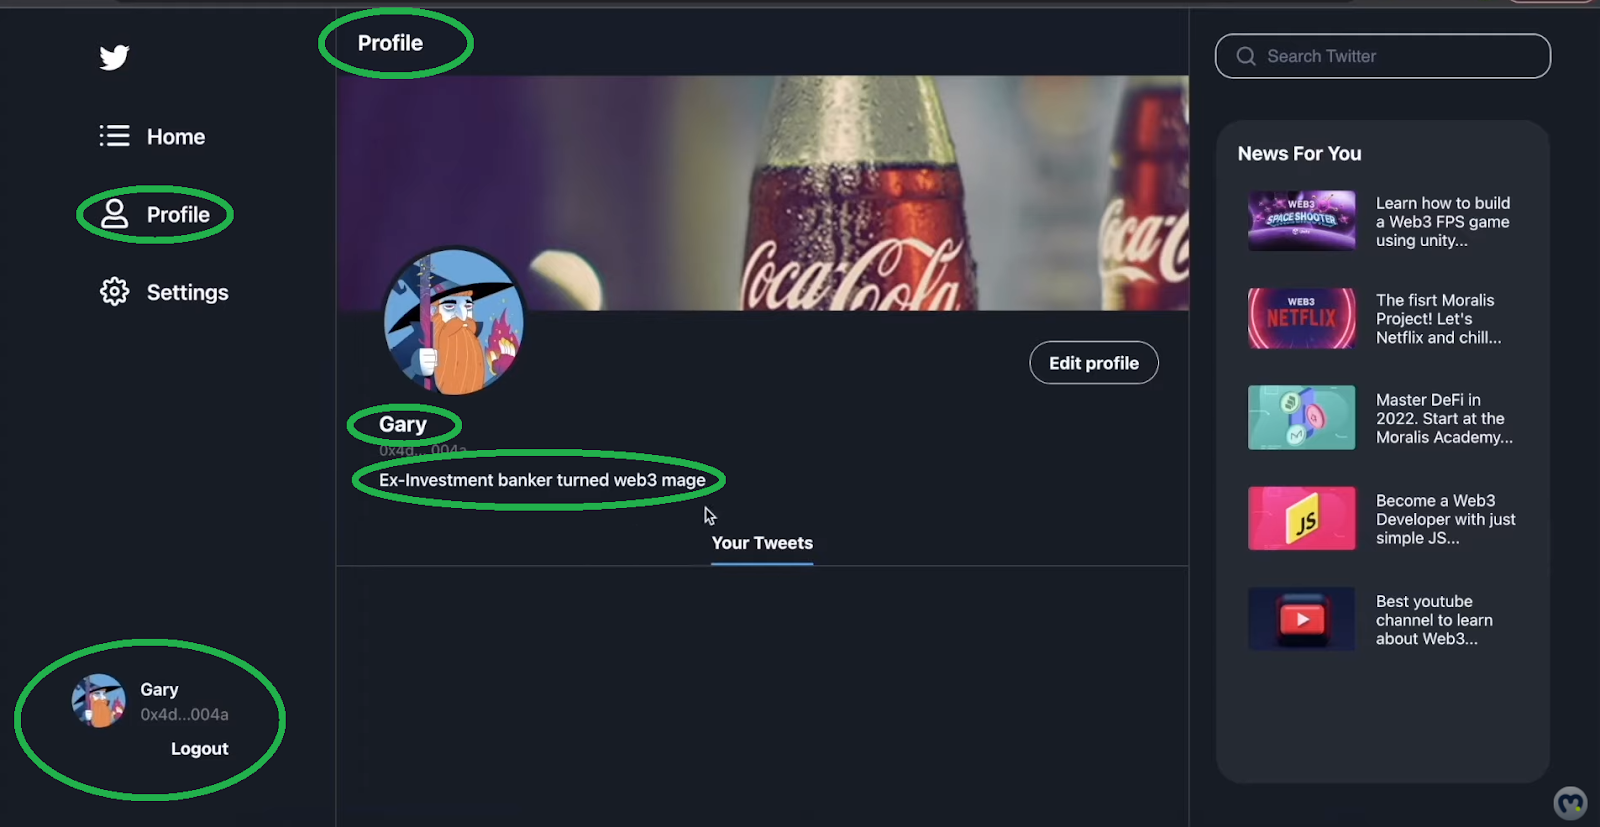
Since the example user has logged in for the first time, they have a default user icon. However, they can already see some tweets on the homepage feed. As such, they can go to the “Profile” tab and press the “Edit profile” button to personalize their account:
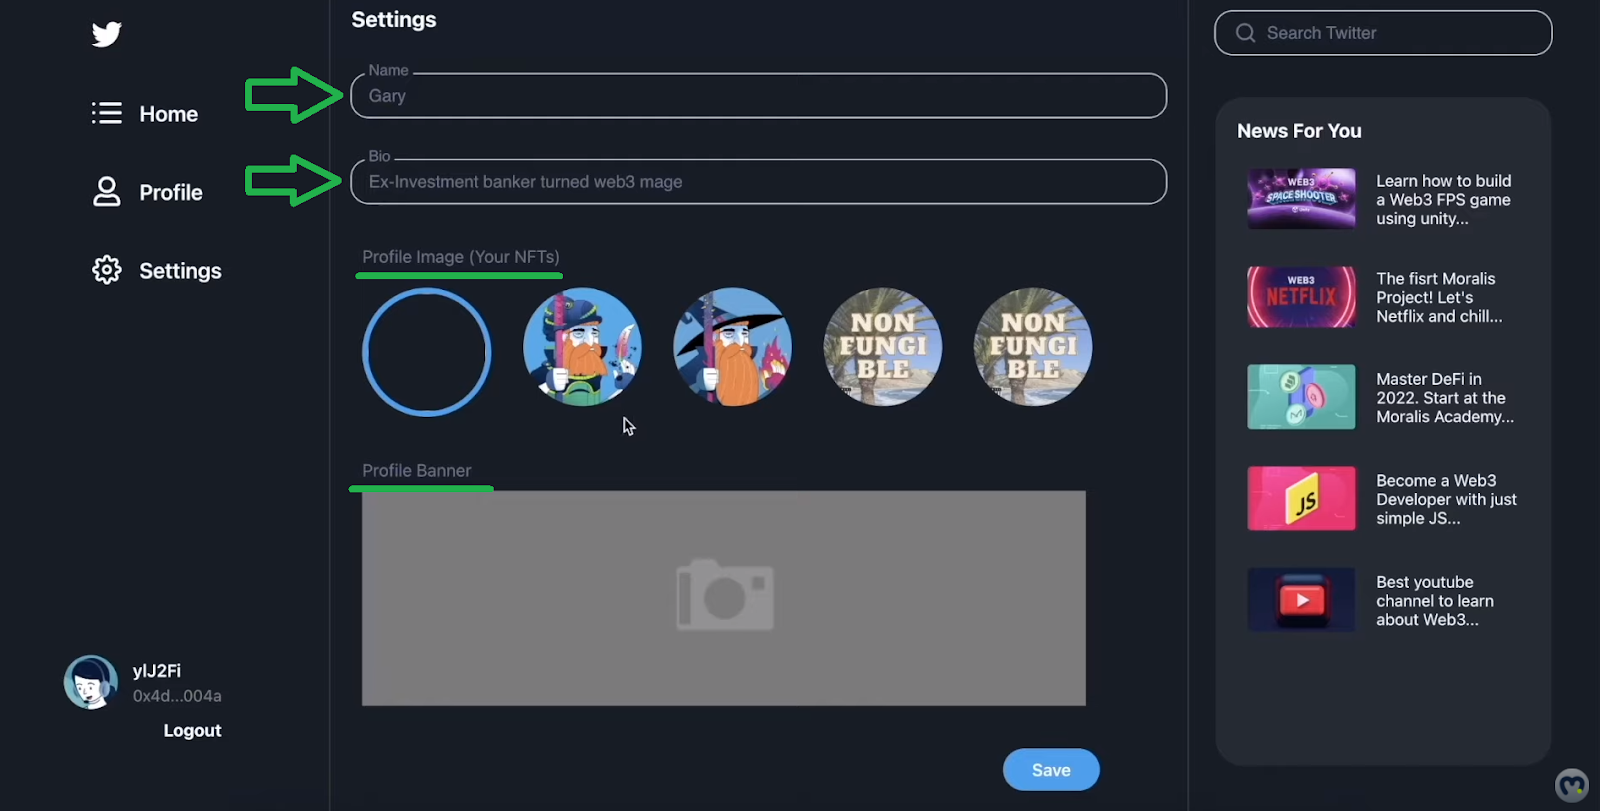
As you can see in the screenshot below, users can enter their names and bio. They also have a chance to use any of their NFTs (non-fungible tokens) as their profile images. Of course, that applies only to the NFTs stored in the connected wallet. Finally, users can also upload images to personalize their banners by clicking on the gray area below “Profile Banner”:
After completing the settings step and have clicked on the “Save” button above, users have successfully personalized their accounts:
Tweeting in our Web3 Twitter Clone
When users want to tweet, they need to use the “Home” tab:
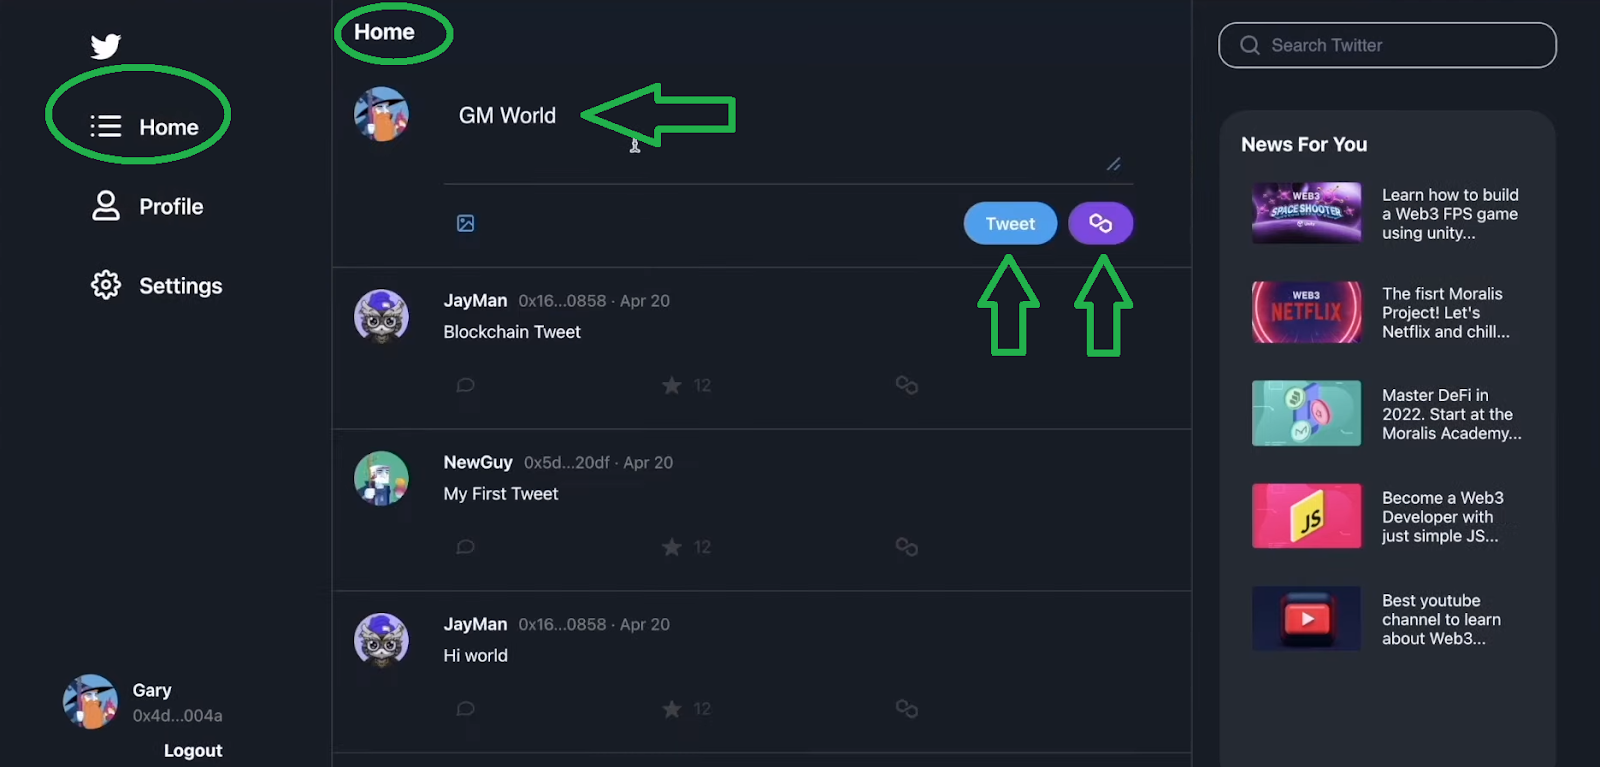
Next, they need to enter some text (where it says “GM World”). Using the “image” icon, users can also add an image to their tweets. Finally, they have two options – they can do a regular tweet or save their tweet on the blockchain. In our case, we are using Polygon’s Mumbai testnet, as we can see by looking at the Polygon icon. Let’s first take a look at regular tweets. After clicking on the “Tweet” button, the new tweet almost instantly appears in the tweet thread:
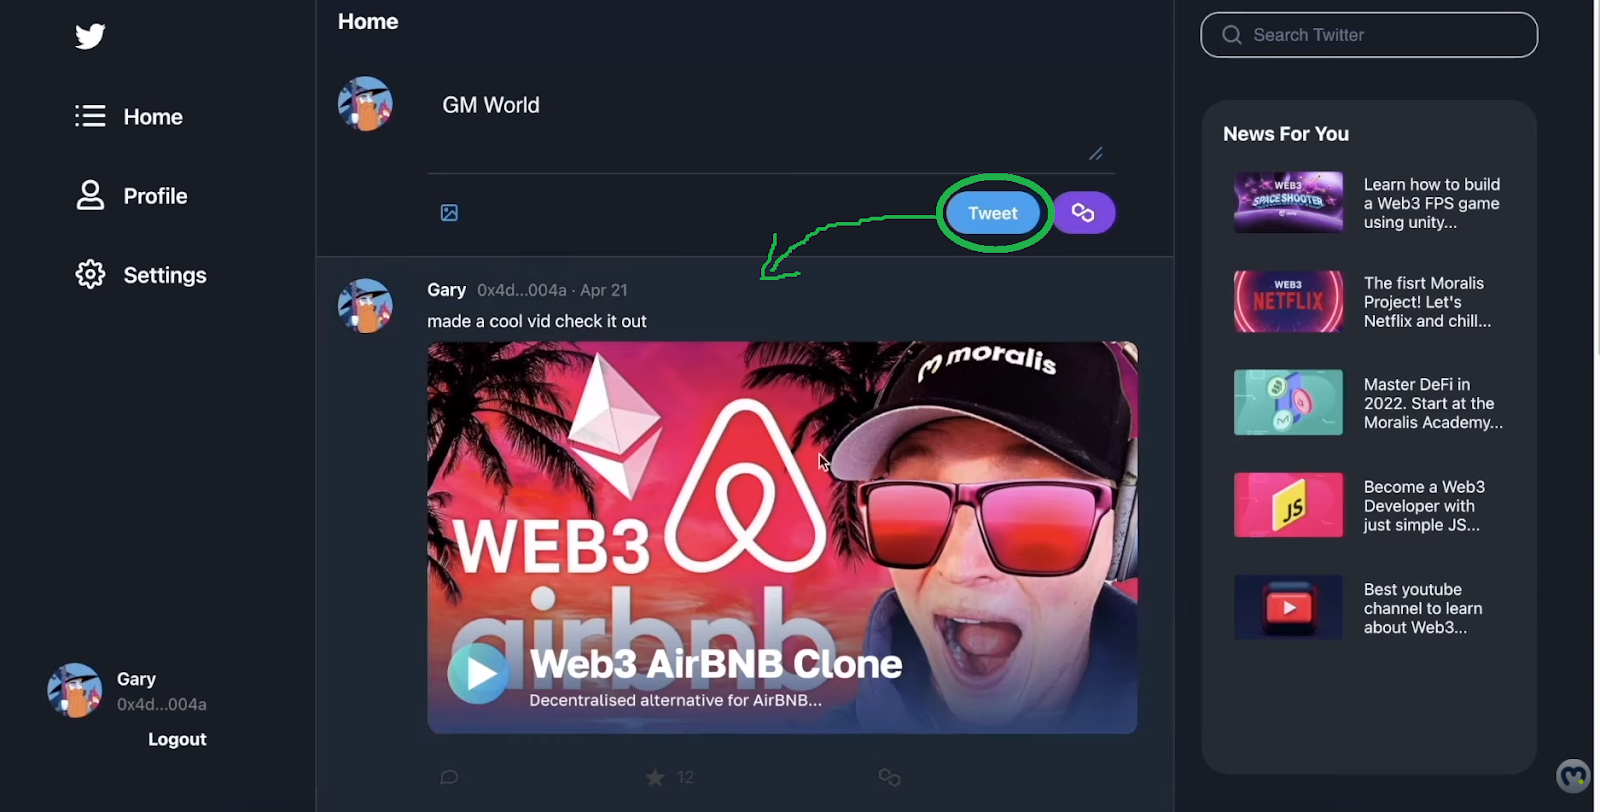
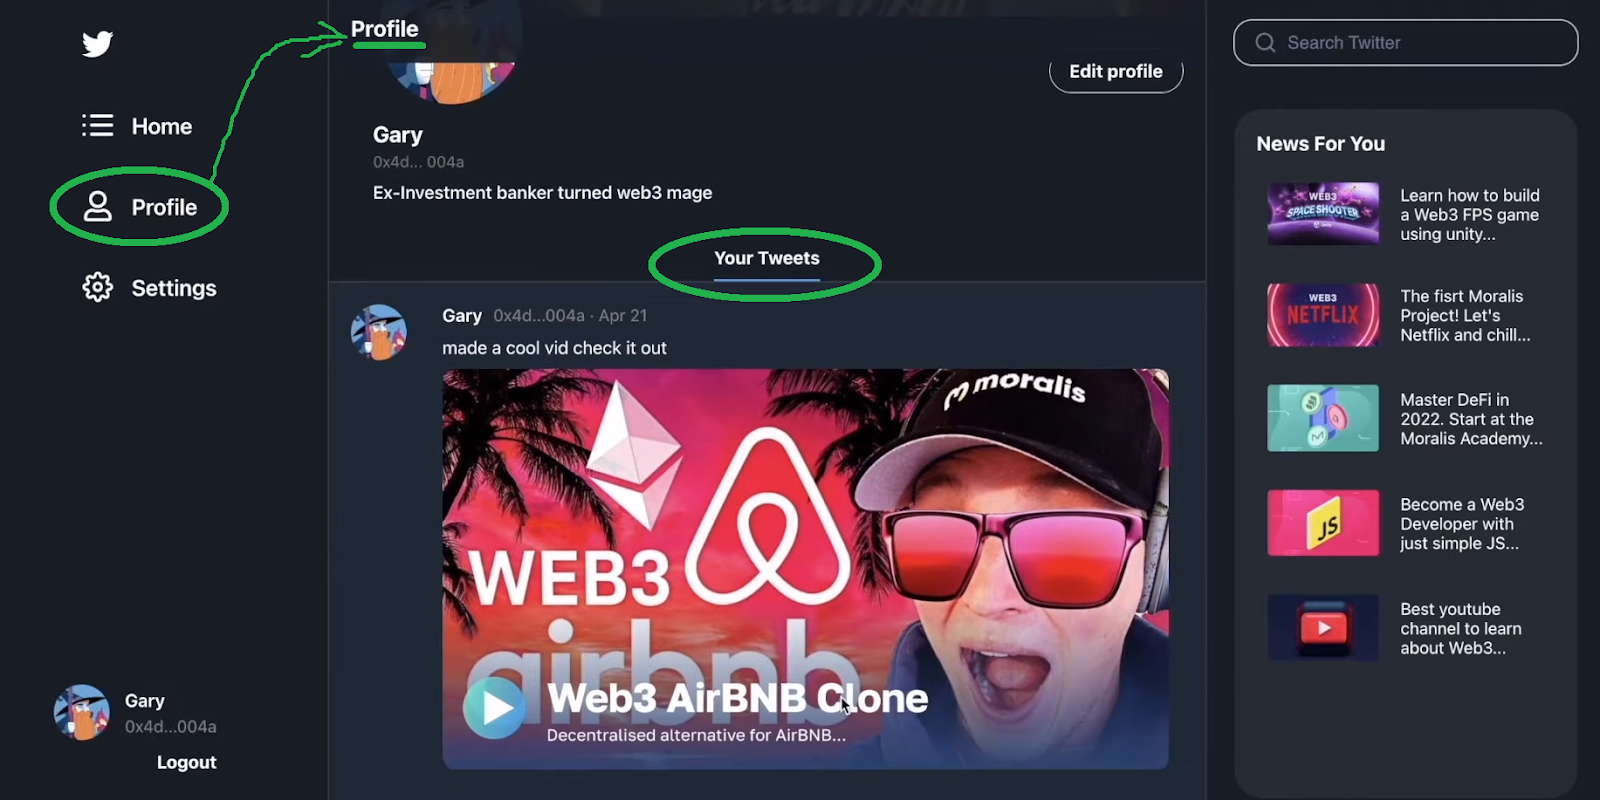
Once users have tweeted, they can see their tweets inside their profile tab, under the “Your Tweets” section:
On the other hand, if users want to post their tweets on the blockchain, they need to use the “Polygon” button:
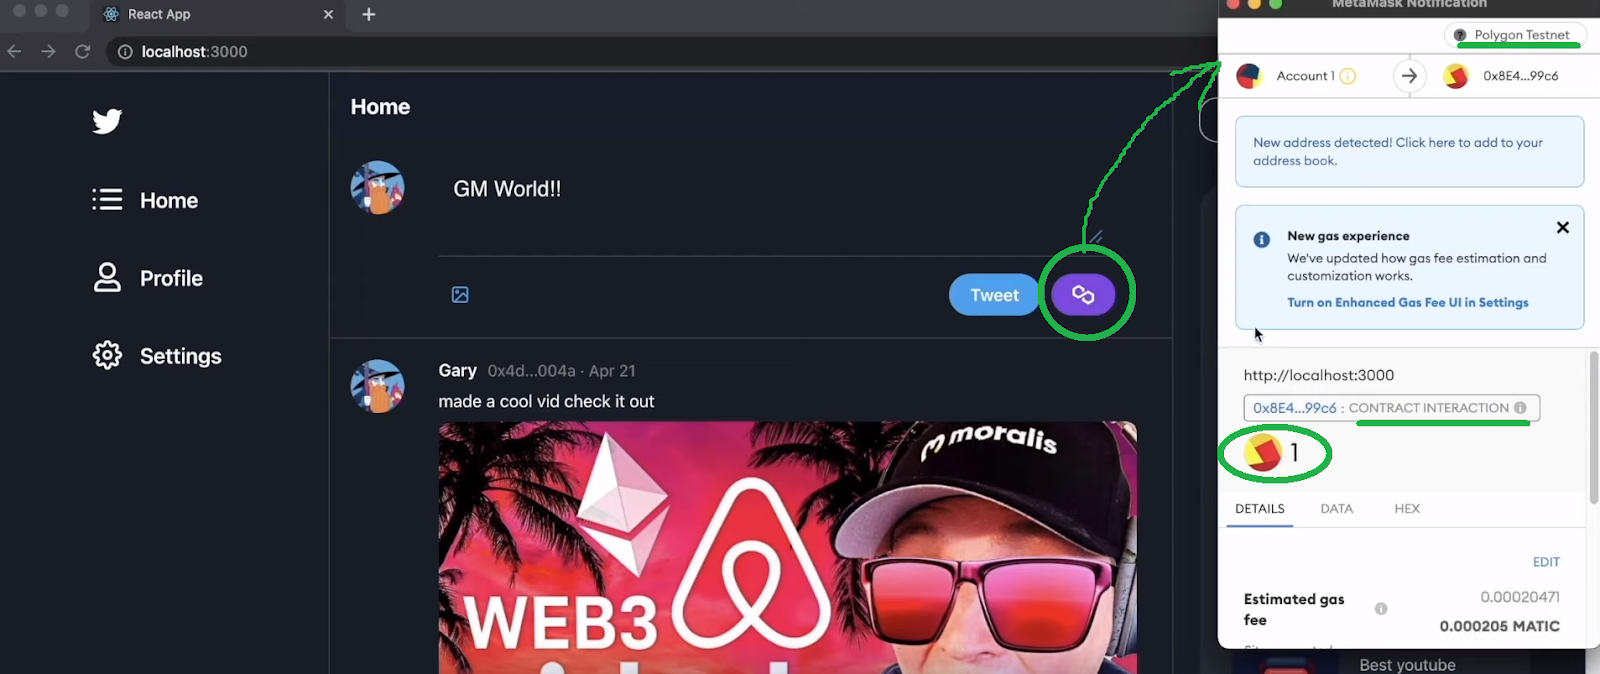
By doing so, their Web3 wallet prompts them to confirm the transaction. As such, users need to confirm by paying for gas and a fee to save the tweets on the blockchain (one MATIC):
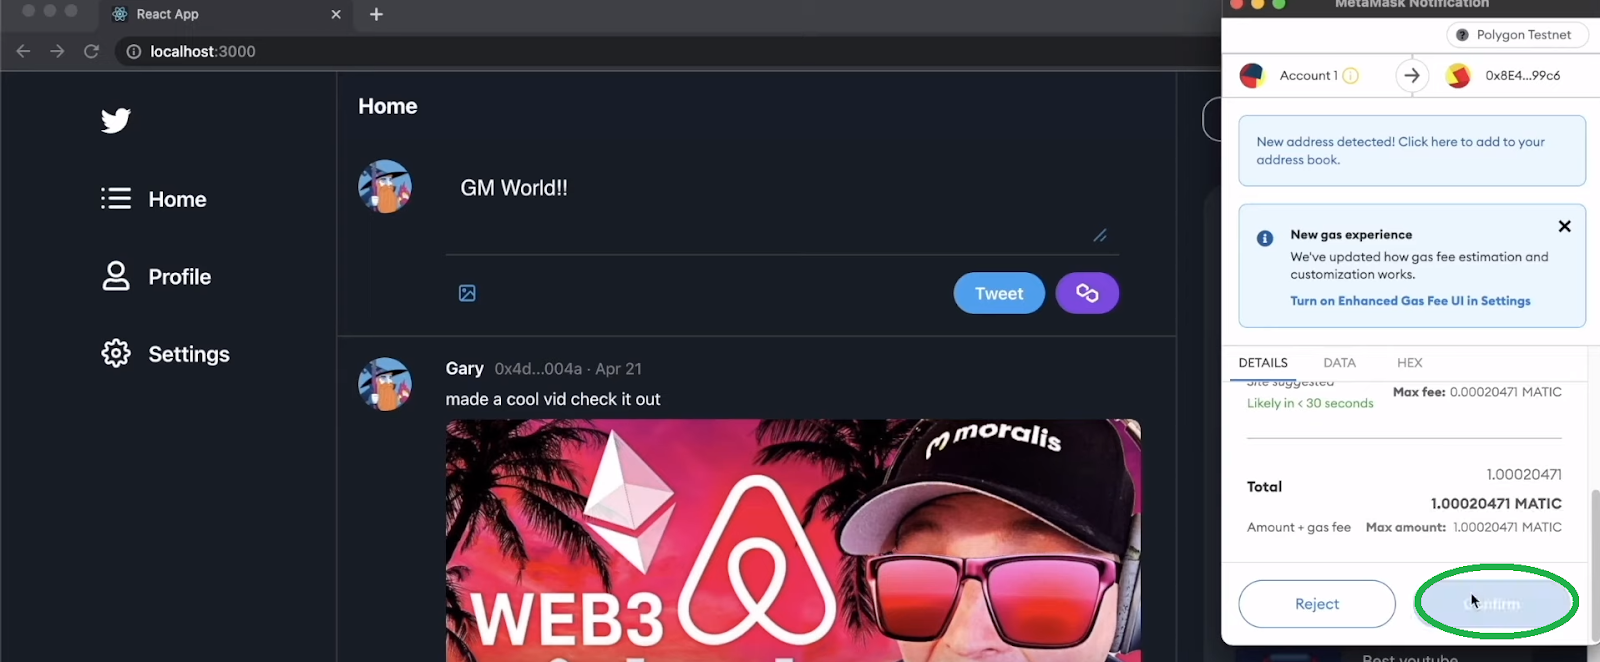
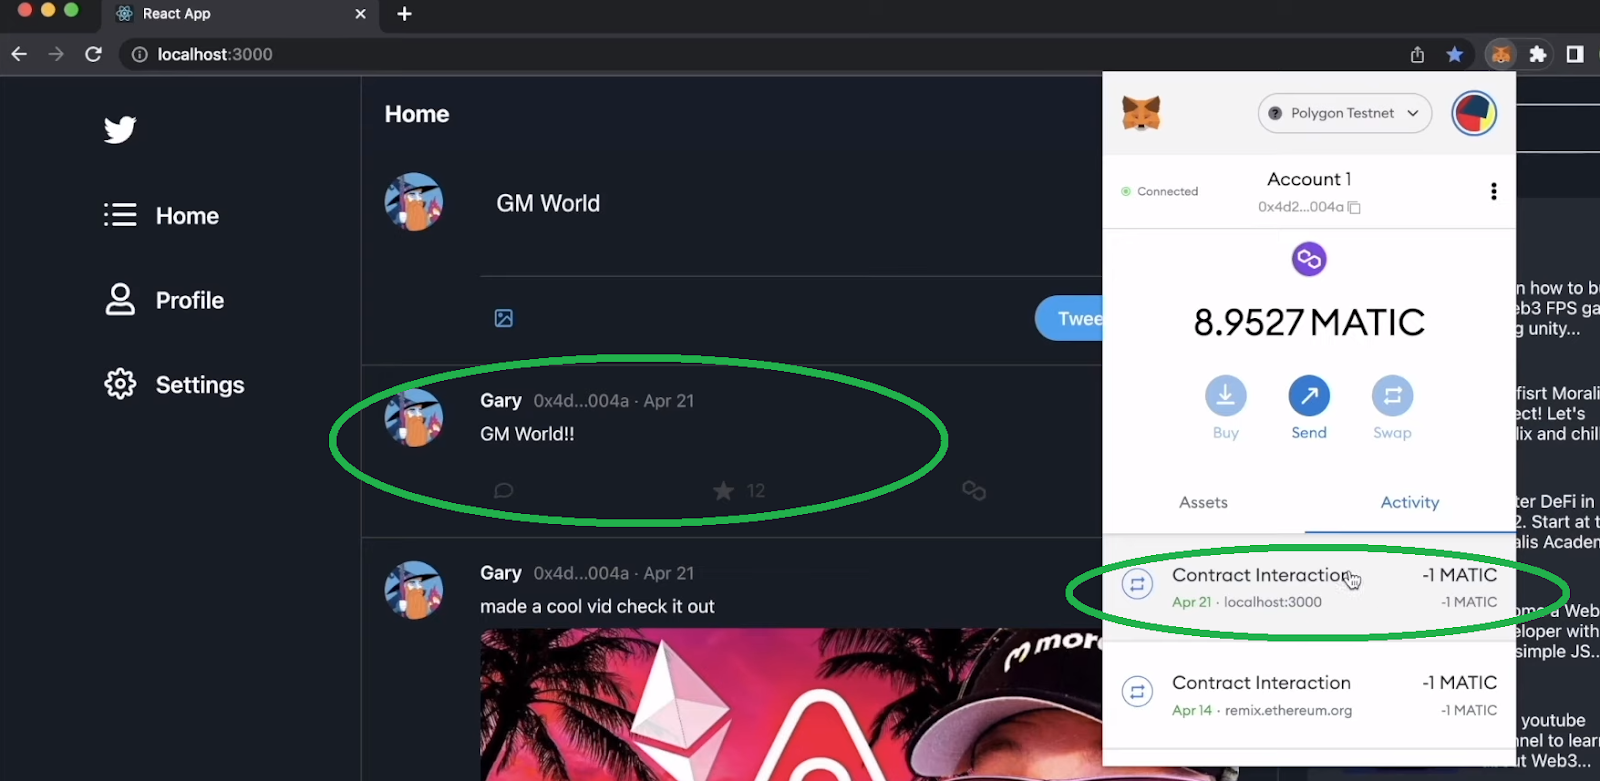
As soon as the confirmed transactions get processed, their on-chain tweet appears in the tweet thread:
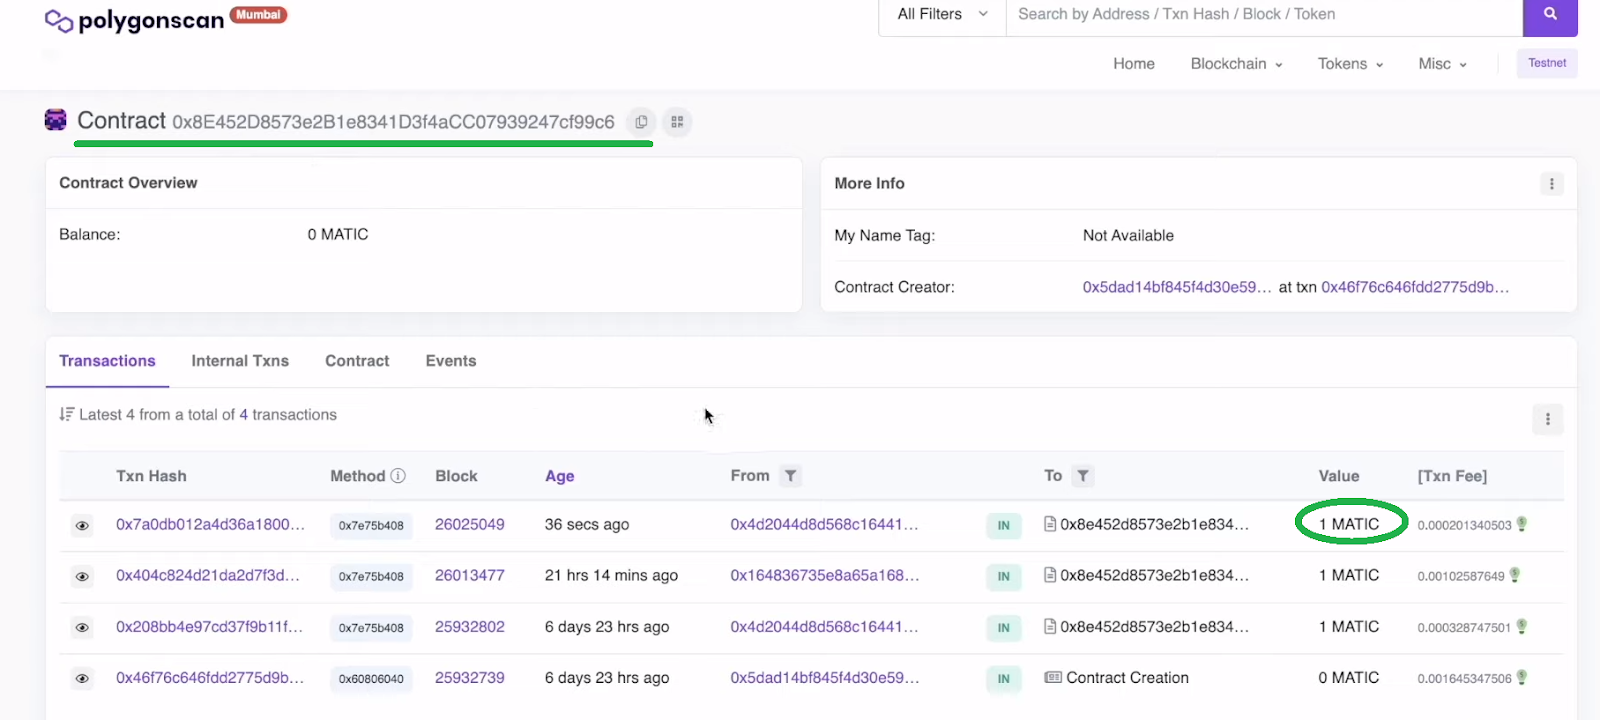
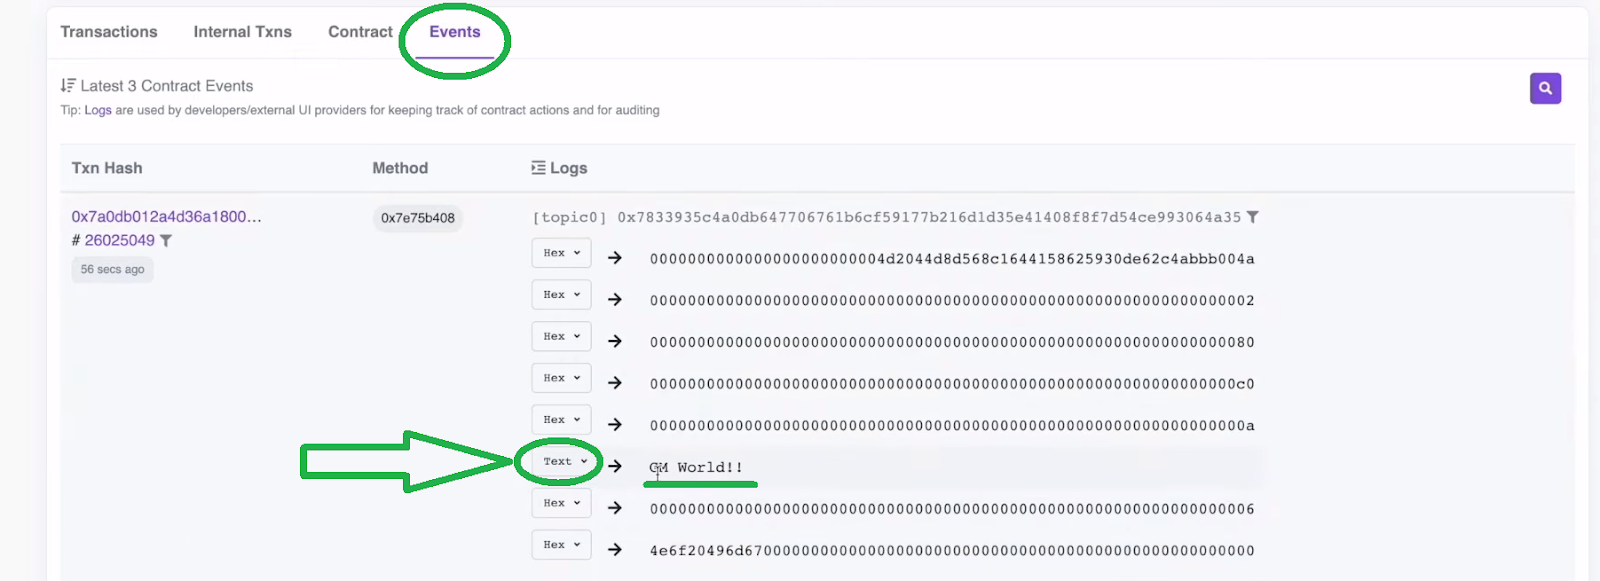
To show you that the above tweet is saved on the Mumbai blockchain, let’s use PolygonScan (testnet). There, we can see the above one MATIC transaction for our smart contract’s address:
Furthermore, if we now use the “Events” tab and turn the example transaction’s “Hex” into “Text”, we can even see the example tweets content:
That wraps up our Web3 Twitter clone demo. Hopefully, you can see how incredible this example dapp is. Hence, you are ready to get your hands dirty and join us as we go on to build it. Let’s get started!

Build a Web3 Twitter Clone with React, Moralis, and Remix
As mentioned in the introduction, there are several aspects to our example Web3 application. We will use React for the frontend of our build. Then, there’s our “tweeting” smart contract, where we will use Remix and Solidity. Finally, there’s the backend, where we will use the ultimate Web3 backend platform – Moralis. This “Firebase for crypto” operating system will enable us to index the blockchain and sync and index smart contract events. We will do this with the Moralis dashboard (database), which becomes available to you when you create your Moralis server. Fortunately, you get to do this with your free Moralis account. So, if you haven’t created one yet, use the link referenced earlier in this article!
Note: Moving forward, we will start referring to a video tutorial, which you can find at the bottom of this article. In that video, a Moralis expert will walk you through all the steps in detail, so pay close attention as you watch it. Moreover, to make the process as simple and as smooth for you as possible, make sure to clone our code. You have two options: you can use our starter or our final code. If you are in a hurry, use the latter. However, if you want to make the most out of this example project, we encourage you to clone the starter code.

Web3 Twitter Smart Contract
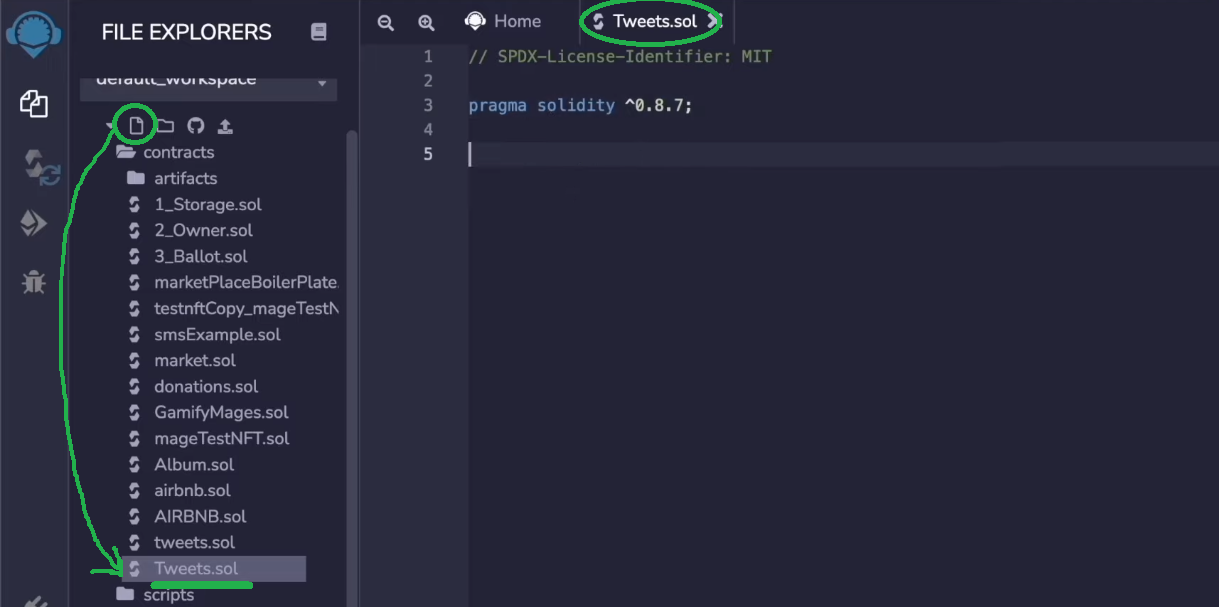
If you checked out the above demonstration, you know that there’s a smart contract enabling the Twitter clone’s users to post tweets on the chain. We will start our example project by creating that smart contract (video below at 4:42). Hence, make sure to open up Remix and create a new file called “tweets.sol“:
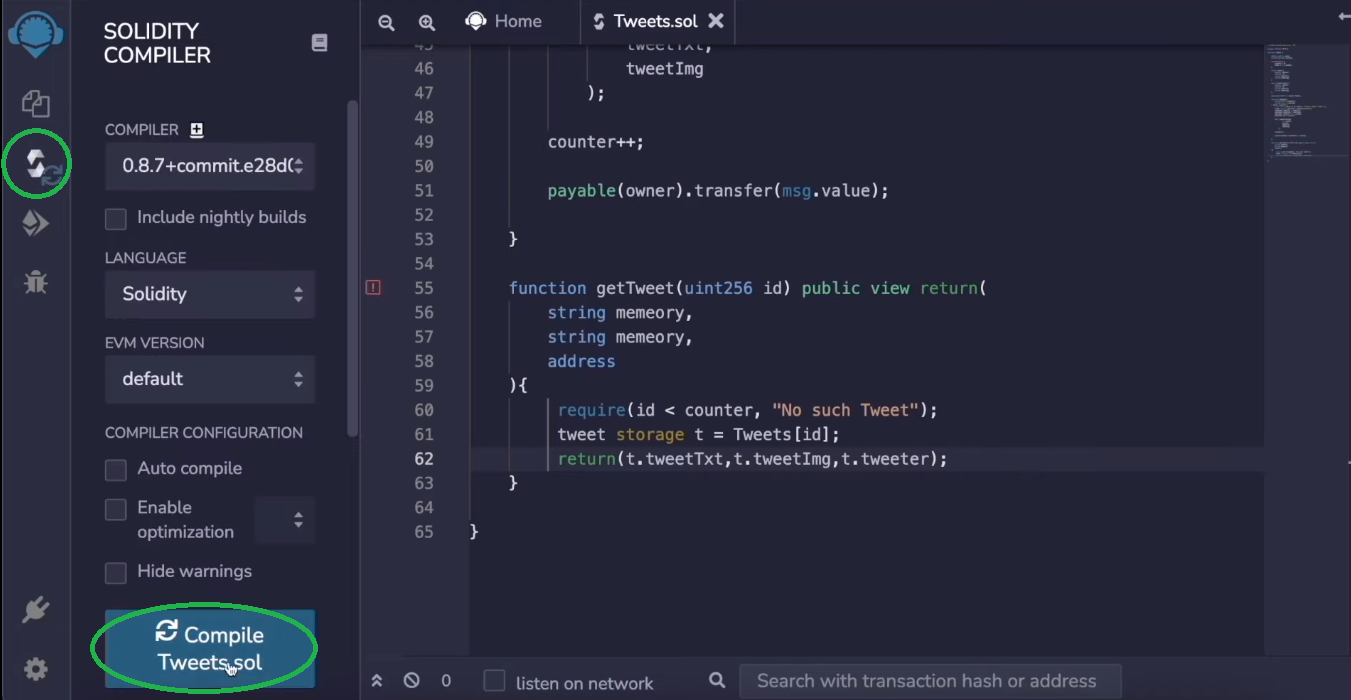
You’ll start by adding the “pragma” line, followed by the details of our example smart contract. You can use the video tutorial below to enter the code manually or use the above “tweets.sol” link and copy-paste the code into Remix. Once the smart contract is ready, you need to compile it. Fortunately, Remix makes that pretty simple (15:51):
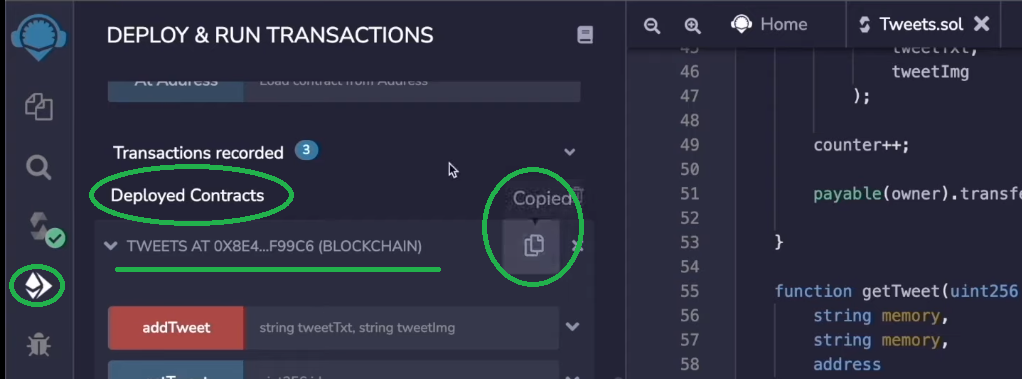
After successfully compiling your smart contract, you need to deploy it:
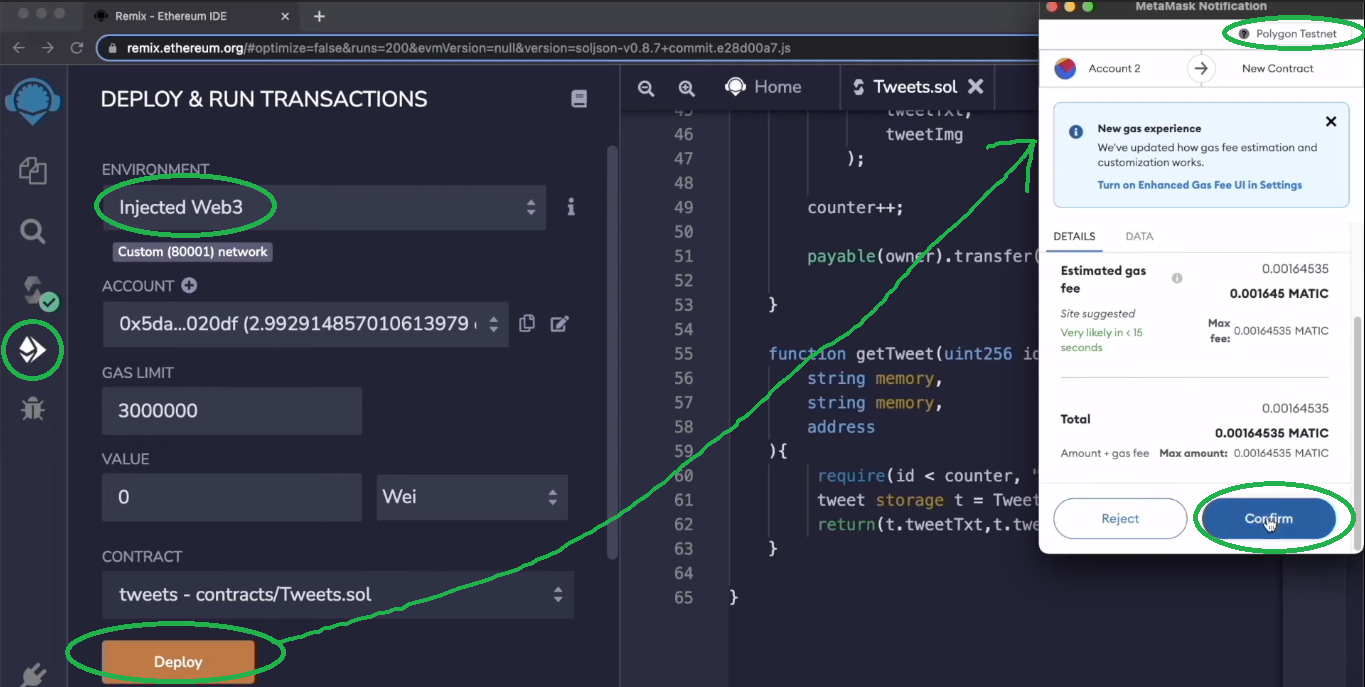
Before clicking on the “Deploy” button, select the “Injected Web3” environment. Also, make sure your MetaMask extension is connected to the Mumbai testnet. Once your smart contract is deployed, you’ll be able to copy its address, which you can use on PolygonScan:
Twitter Clone Frontend
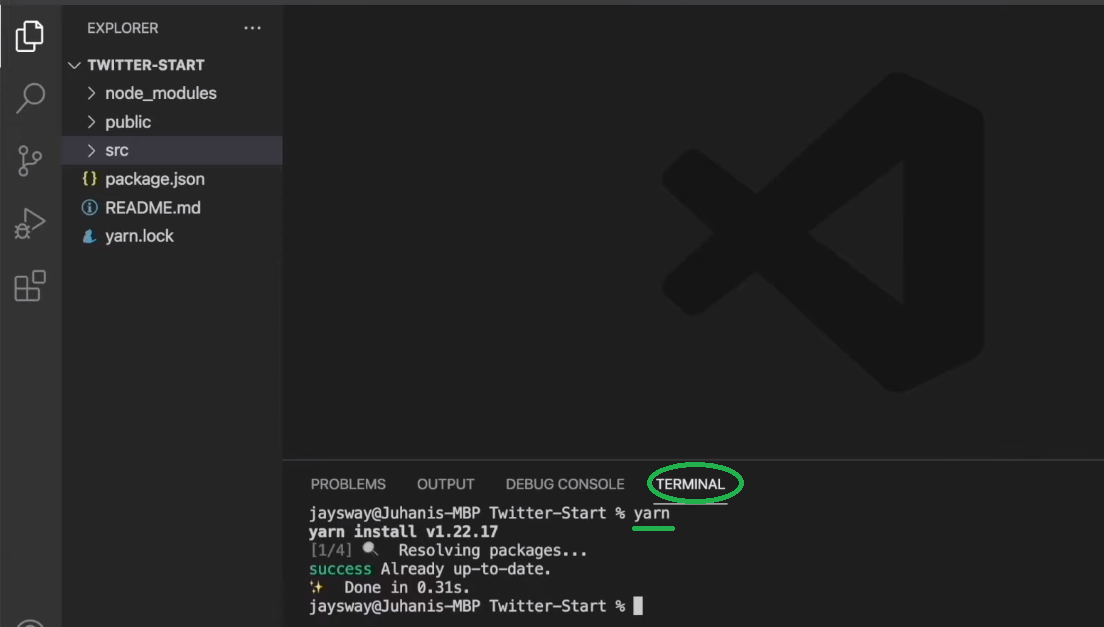
Now that your “Twitter clone” smart contract is ready, it’s time to build a proper UI for our Web3 Twitter. As mentioned above, we will use React to create our frontend. However, we will also use web3uikit as an additional shortcut. For a detailed step-by-step guide, use the video below starting at 20:15. First, you will cover the initial setup, starting by cloning the code and installing all dependencies:
Note: As you can see by looking at the screenshot above, we use Visual Studio Code (VSC), our preferred code editor. Feel free to use the same code editor or use your favorite alternative.
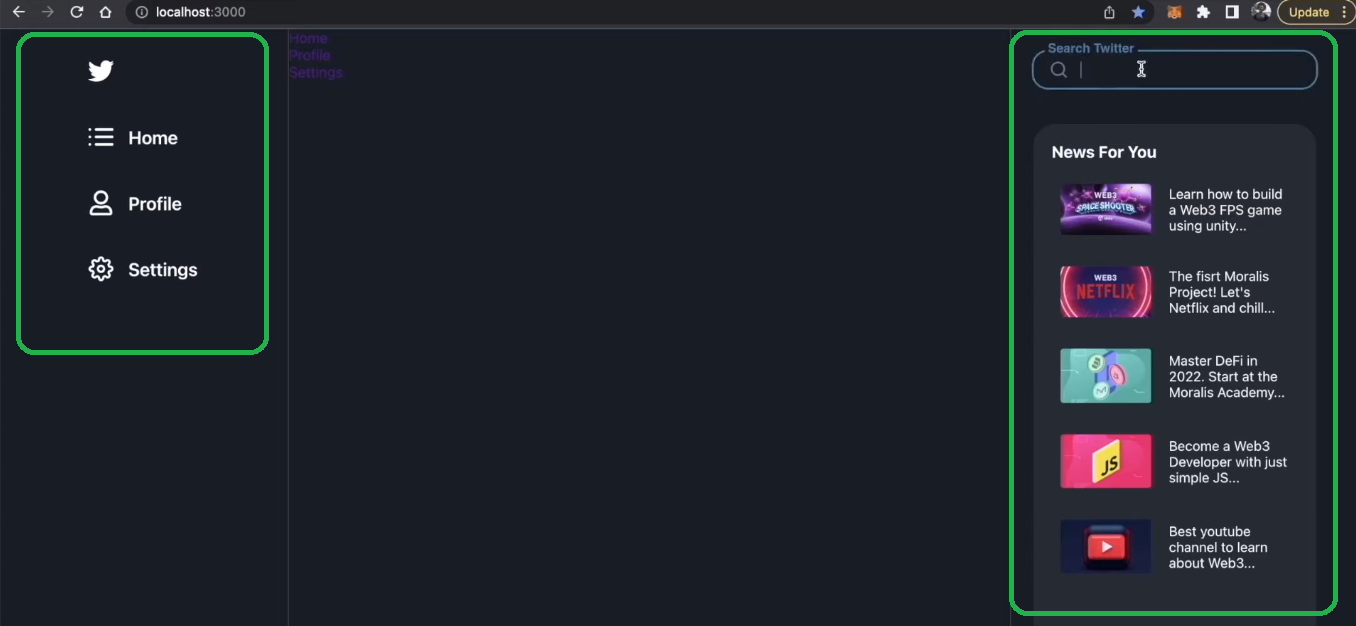
After completing the initial frontend setup, you’ll start building your Web3 Twitter clone’s sidebars (22:41). Here, using the “Sidebar” component will make things a lot simpler. As such, you will have the sidebars, as presented above, ready in less than ten minutes:
Next, you will go about creating the homepage (31:44). For that purpose, you will use the “Home.js” file, where you will make sure that all of the logic is set properly. This is also where you will see the power of the web3uikit project firsthand. Hence, you will get to add the text area, icons, and buttons fast and without breaking a sweat. Also, you will learn how to make the uploading images feature pretty neat. With the “tweeting” areas set in place, you will focus on creating your tweet feed using the “TweetInFeed.js” file. Then, to complete the frontend of your Web3 Twitter, you will also add the “Profile” page (46:41) and the “Settings” page (49:53).
Web3 Twitter Backend
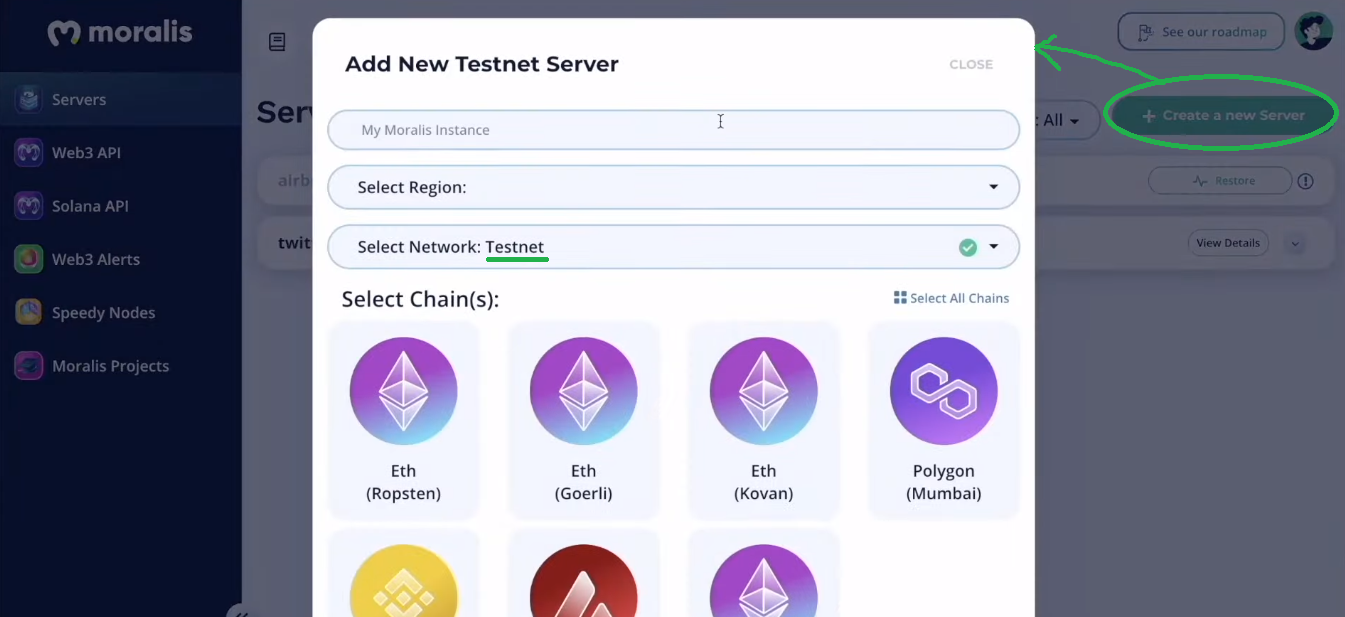
Now that your frontend is ready, it is time to add Web3 functionality to your Web3 Twitter (57:29). As you already know, you can do this with Moralis quite effortlessly. So, you’ll want to log in to your free Moralis account. Inside your Moralis admin area, you need to create a Moralis server (57:46):
Once your server is up and running, you’ll be able to obtain its details (server URL and application ID):
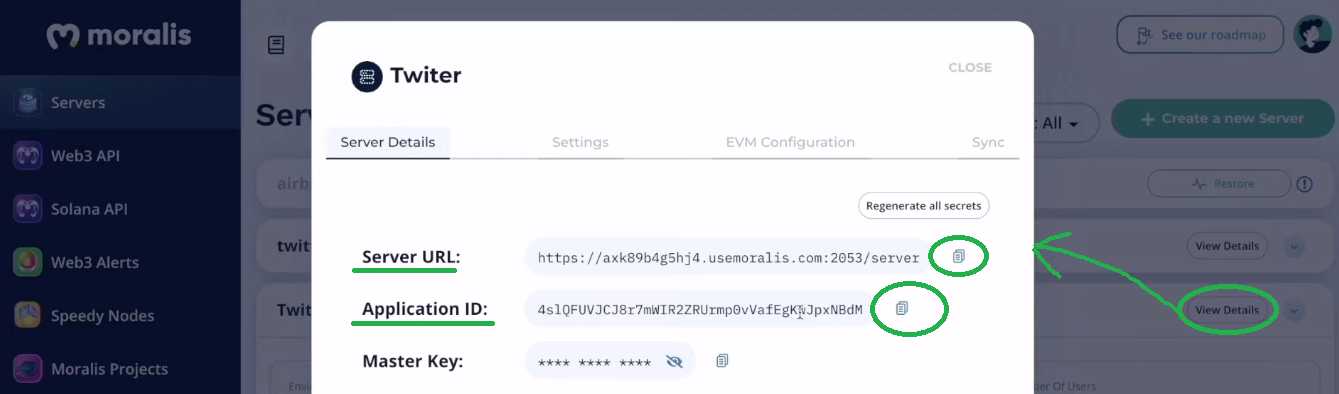
You’ll need to paste the above details into the “index.js” file to get Moralis’ functionality:

With the initial Moralis setup under your belt, you’ll add Web3 authentication to your Web3 Twitter clone. You’ll do so with the “App.js” file. Moreover, web3uikit will again make things a whole lot simpler. As such, you’ll have an attractive “Connect Wallet” button ready in seconds. Nonetheless, you’ll begin to see the power of the Moralis SDK when using “isAuthenticated”.
Working with On-Chain and Off-Chain Data – Moralis Dashboard
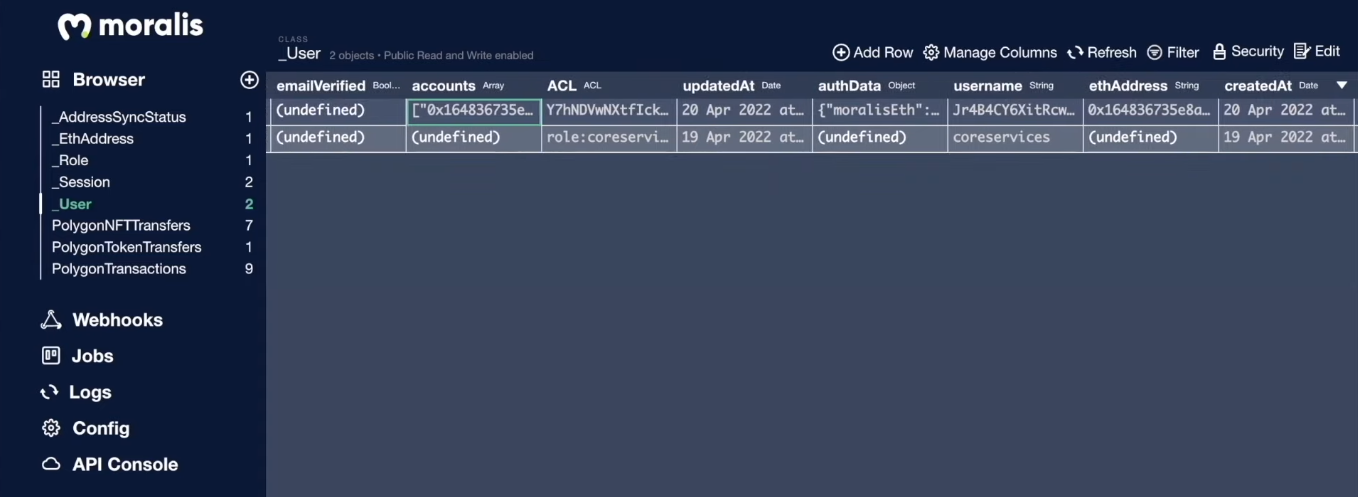
Moving forward, you’ll get familiar with the Moralis dashboard (1:00:59). The latter will enable you to store off-chain data as well as on-chain data:
You will first focus on “Settings.js” and how to upload to IPFS. In turn, you have a way to save the image files that users want to tweet in a decentralized way. This is where the “useMoralis” method will help you out as you go about creating the “saveEdits” async function. The latter will be triggered by the “Save” buttons on the settings page. In addition, you will also use the “useMoralisWeb3Api” method to utilize “useEffect”, which will fetch users NFTs via “getNFTs”. Hence, they will be able to use those NFTs as their profile pictures. Last but not least, you’ll learn how to set the option to save tweets on the blockchain in place. Starting at 1:12:40, you will learn how to implement this immutable Web3 feature via the Moralis dashboard’s “Tweets” class.
How to Build a Web3 Twitter Clone – Summary
If you rolled up your sleeves and took action, you now have your own Web3 Twitter clone up and running on the Mumbai testnet. Along the way, you refreshed your React skills and learned how to create a simple smart contract using Solidity and Remix. You encountered the ultimate shortcut for Web3 development – Moralis. As a result, you were able to create your Moralis server, which gave you access to the Moralis SDK, including its database. Finally, you used this database to index the blockchain.
If you enjoyed this example project, we recommend checking out our other “clone” guides. These include building a Uniswap DEX clone, Web3 Airbnb clone, Web3 Netflix clone, Web3 Spotify clone, Coinbase clone, OpenSea clone, and a Reddit clone for Web3. Furthermore, these tutorials are available for free on the Moralis YouTube channel and the Moralis blog. Aside from these slightly more advanced tutorials, these two outlets also offer countless other simpler example projects and topics. For instance, some of the latest articles focus on SPL vs ERC20 tokens, a Solana token dashboard, how to create your own metaverse, how to create a BNB NFT, dynamic NFTs, fractional NFTs, NFT-based memberships, how to build a play-to-earn (P2E) game smart contract, how to get blockchain SMS notifications, how to add a Web3 connect wallet button to your website, and much more.
If you want to become a Web3 developer fast and with confidence, check out Moralis Academy. Moralis Academy is the number one blockchain education suite online, offering top-quality blockchain development courses. Further, you can get a personalized study path and expert mentorship and become part of an amazing community. Ultimately, you can become blockchain certified in record time!