With its extensive ecosystem, low transaction fees, and a popular NFT marketplace, BNB Chain proves to be the network of choice among those wanting to create non-fungible tokens (NFTs). Although BNB Chain isn’t as decentralized as Ethereum, creators are willing to compromise that aspect as they’ve experienced more profitable gains from creating BNB NFTs. So, if you want to create a BNB NFT due to BNB tokens’ benefits, you’ve come to the right place. Now, for those believing that you need to be a Solidity expert to accomplish this, don’t worry. Even though BNB Chain is EVM-compatible and we can use Ethereum’s NFT standards (ERC-721 and ERC-1155), you don’t need to be proficient in Solidity; however, only if you’re using the right tools and proper guidance. Thus, if you’re using Moralis, you can easily have BNB NFTs ready in about 20 minutes.
This article will show you how to use Moralis to create a BNB NFT. Moralis (Firebase for crypto) covers a full scope of Web3-related backend needs. Furthermore, Moralis’ SDK also includes the ultimate NFT API, which makes NFT development feel like a breeze. However, this pinnacle of the current Web3 tech stack is not the only excellent tool we’ll utilize. To complete today’s example project where we will create a BNB NFT, you will also use Remix, OpenZeppelin, and MetaMask. Also, you will learn about the Moralis dashboard and Moralis’ cloud functions. With this knowledge, you can then easily incorporate BNB NFTs in your dapps (decentralized applications). Nonetheless, if this is your first encounter with the best Web3 backend platform, make sure to create your free Moralis account. You’ll need it to take on the example project covered herein.

Create a BNB NFT with Moralis, Remix, and MetaMask – Overview
Let’s briefly overview the steps required to create a BNB NFT. We will start by creating a Moralis server. With a Moralis server up and running, you will access your server’s database and Moralis’ cloud functions. Then, you will need to create your smart contract. By using OpenZeppelin, you will obtain a smart contract template, eliminating a lot of hurdles. In addition, you’ll have a chance to take an additional shortcut by using our smart contract. Next, you will use Remix to apply the necessary tweaks to the smart contract.
Moving forward, you will store your BNB NFT’s metadata using your Moralis dashboard and Moralis’ cloud functions. As such, you will get to obtain your NFT’s URI, which you will need to paste inside your smart contract. Then, you will also add BNB Chain’s testnet to your MetaMask, which will enable you to connect to its network. At that point, you’ll also learn about Moralis Speedy Nodes. Finally, you will have everything ready to create a BNB NFT. Accordingly, you will mint your example NFT using Remix to deploy your smart contract to BNB Chain’s testnet.

Create a BNB NFT – Example Project
If you want to create a BNB NFT or any type of NFT, remember that there are artistic and technical parts to creating NFTs. The artistic aspect is not what we will focus on herein. That’s the part you can easily outsource. For the sake of this project, you can use any existing open-source image. However, for developers, things get interesting when it comes to the technical part. After all, this part takes common digital files and converts them into non-fungible tokens (NFTs). As such, unless you decide to use partially centralized NFT marketplaces, such as OpenSea, a certain level of development skills is required to mint NFTs.
As far as our Binance NFT example goes, we’ll be using an open-source image. Further, we are going to mint several NFTs according to the ERC-1155 standard. Also, our example NFTs are going to represent swords. We chose to take that route since these kinds of NFTs can be easily incorporated into NFT game development. As mentioned above, we will deploy our example NFTs on BNB Chain’s testnet. Of course, we could use BNB Chain’s mainnet; however, it is better to use testnets for example projects.
Note: As of February 2022, Binance Smart Chain (BSC) and Binance Chain merged under the cover name BNB Chain. The functionalities of the two chains remain the same. As such, you could say that our mission herein would be to show you how to create NFT on Binance Smart Chain.

Moralis Server – Your Gateway to Web3 Development
If you want to use Moralis to assist you with minting tokens or to create a Moralis dapp, you need to create a Moralis server. Fortunately, you can do this fast and without breaking a sweat by following this guide:
- Log In to Your Moralis Account – In case you haven’t created your free Moralis account yet, do so now. Use the link at the end of the introduction. Then, simply login to your account.
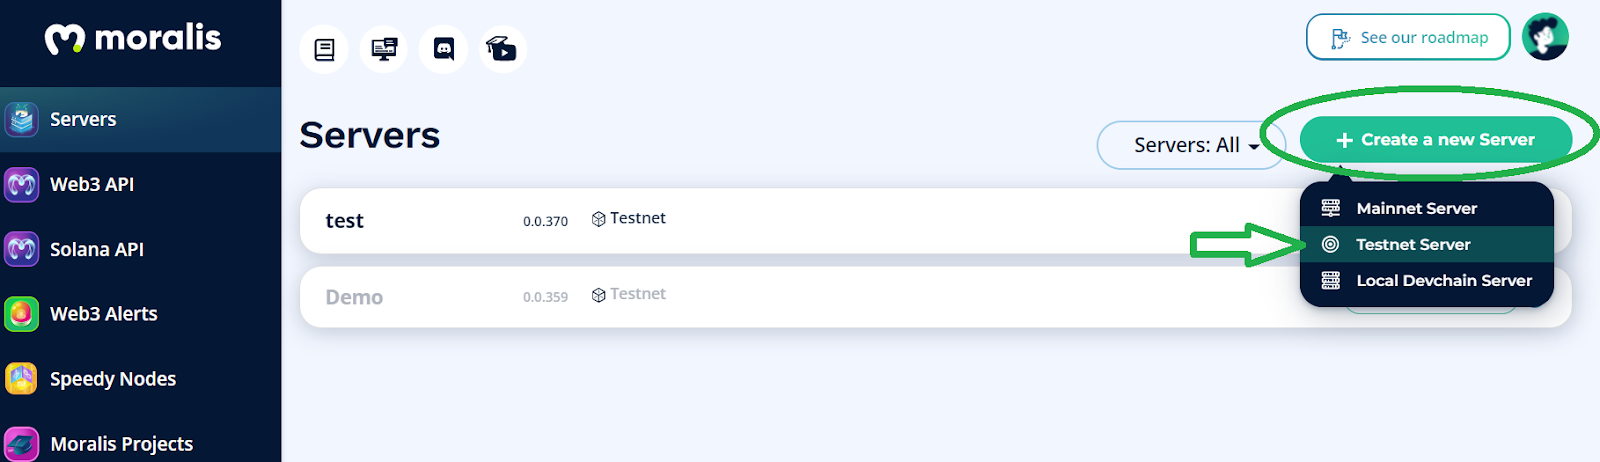
- Create a Moralis Server – Within the “Servers” tab of your Moralis admin area, you need to click on the “Create a new Server” button to create your Moralis server. Then, you’ll be asked to select a server type:
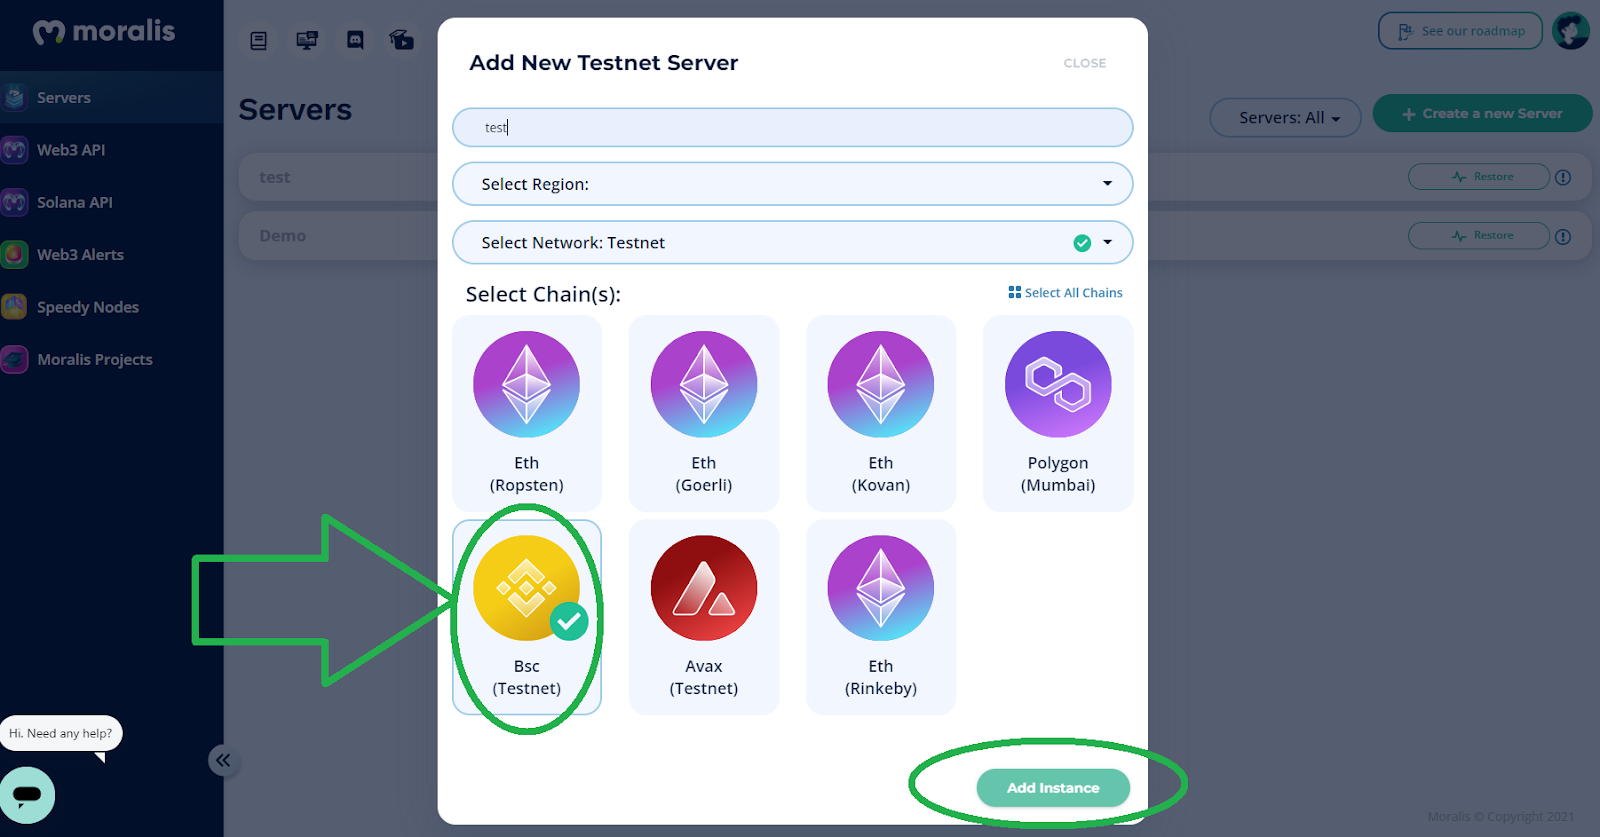
Next, you’ll get to enter your server’s details, including selecting chains. Hence, make sure you select BNB Chain’s testnet (“BSC testnet”) before clicking on “Add instance”:
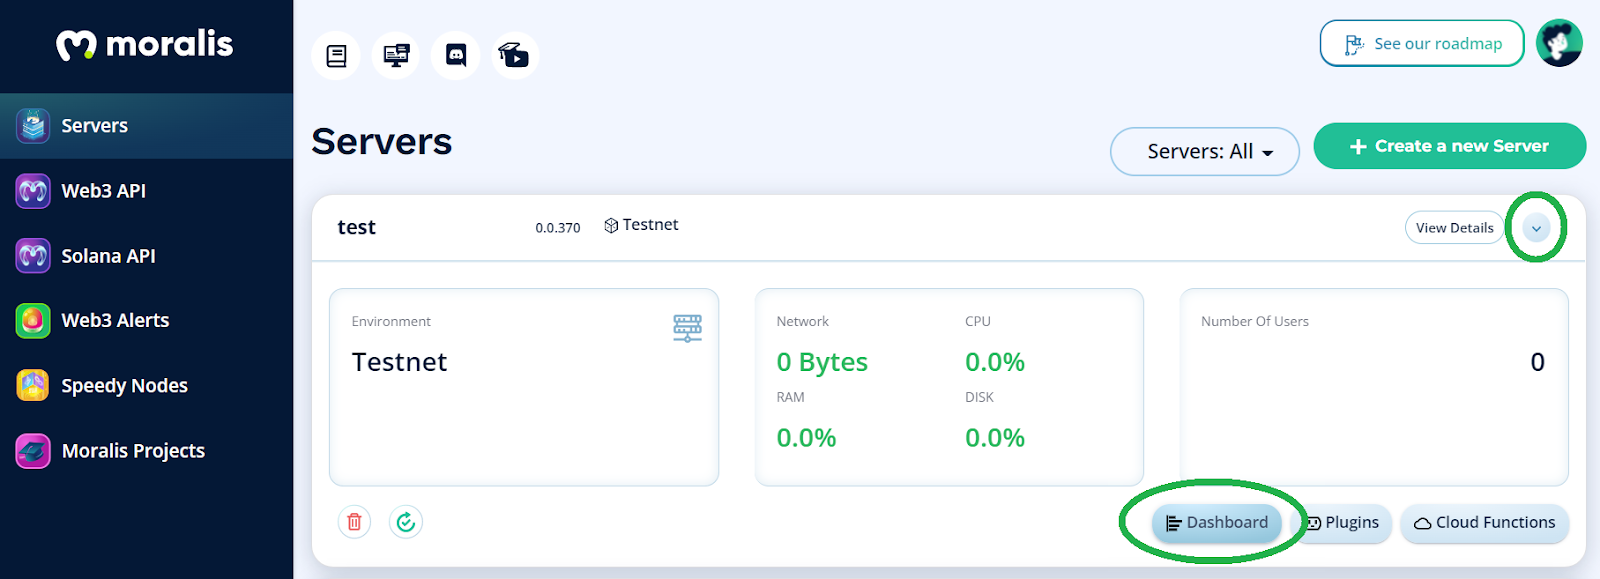
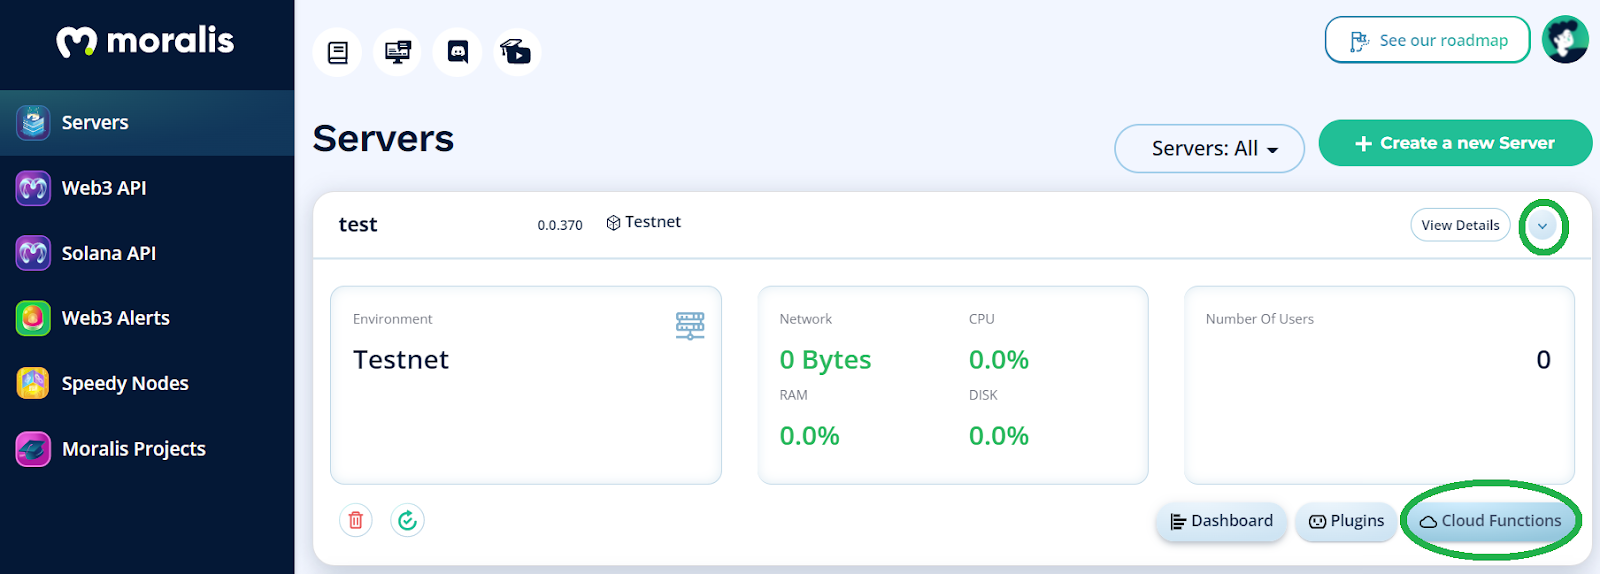
With your server spinning, Moralis’ backend functionality is at your disposal. In our case, we will focus on using the Moralis dashboard (database) and cloud functions features:

Your Smart Contract to Create a BNB NFT
When it comes to minting NFTs, smart contracts play an essential role, no matter which NFT standard you choose. Unless you are willing to use NFT marketplaces, you need to work with smart contracts to mint NFTs. However, that doesn’t mean you need to become a Solidity expert. As mentioned previously, you don’t need to create your smart contracts from scratch either. Instead, you can start with verified templates. This is where OpenZeppelin makes things a lot simpler. Furthermore, feel free to use our example smart contract – “ERC1155.sol“. The latter awaits you on GitHub.
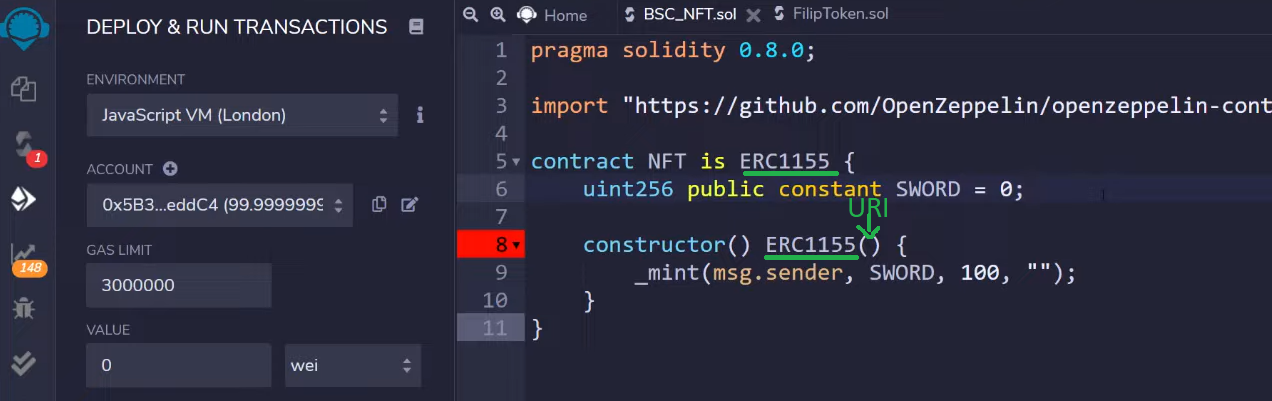
Below, you can see that we’re inside Remix – an open-source online IDE. Inside Remix, first, create a new file and name it as you please. Of course, feel free to use the same name as we did. Second, use the top line to add the pragma line (see the screenshot below). Next, import our “ERC1155.sol” smart contract by entering “import” followed by our example smart contract’s URL:

Here’s the gist of our smart contract example:
Note: In case you want more detailed guidance, refer to the video at the end of this “how to create a BNB NFT” article (1:32).
By looking at the screenshot above, you can see the name of our BNB NFT – “SWORD”. Furthermore, “100” indicates that we will create one hundred instances of our example token. Nonetheless, we need to get our NFT’s URI in order to use our smart contract.
Note: Here’s a definition of “URI” for those of you new to NFTs’ metadata:

As you may know, URIs are given inside NFTs’ metadata, which typically comes in the form of JSON files. Thus, moving forward, we will create JSON files and then use their URIs to mint our BNB NFTs.
BNB NFTs’ Metadata and Moralis
When it comes to our NFTs’ metadata, Moralis will make things pretty simple for us. At this point, you should already have your Moralis server ready. As such, you can open your dashboard:
Inside your dashboard, create a new class by using the “plus” icon:
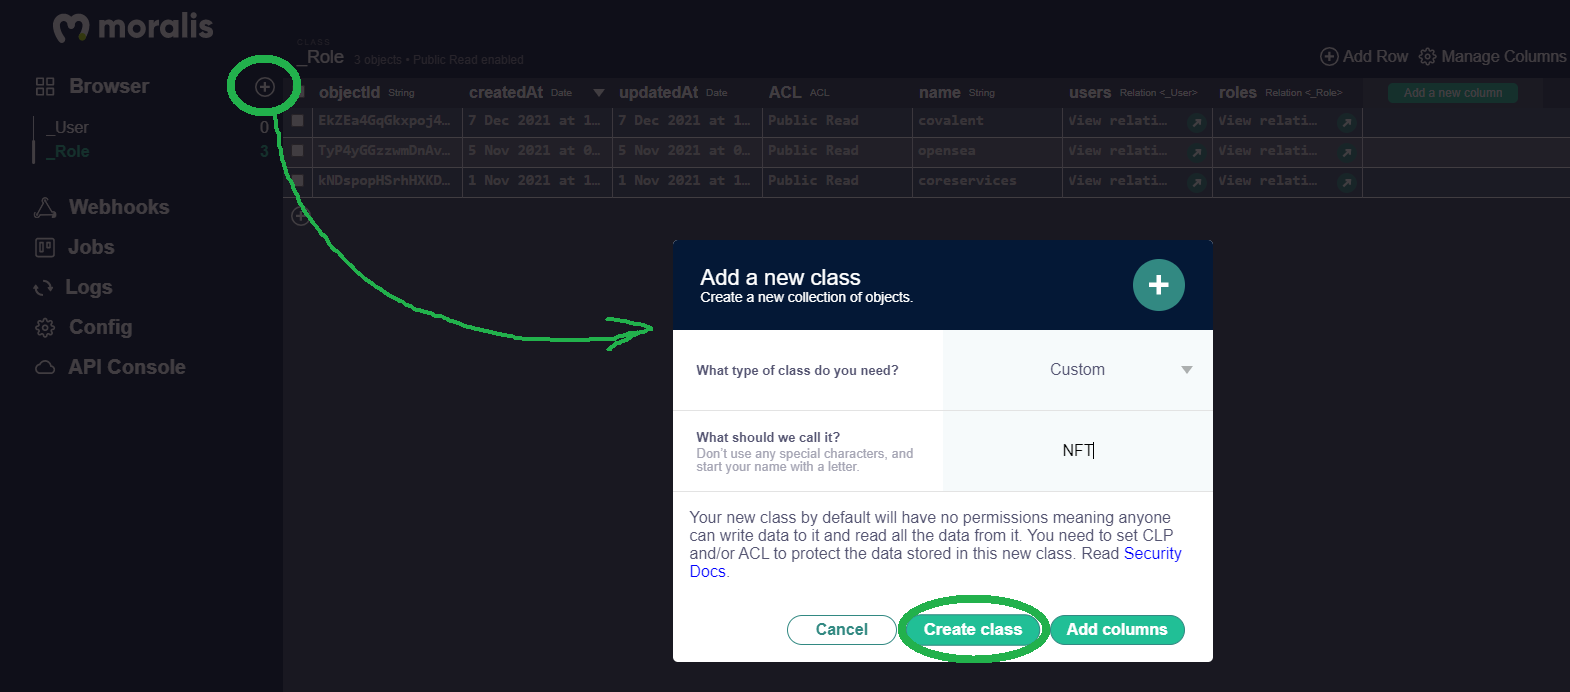
You will need to give your new class a name. This can be anything you want, although we recommend you follow our lead and name it “NFT”. By doing so, things will be somewhat clearer as we move along. After entering the class’ name, click on the “Create class” button (see the screenshot above). Then use the “Add a new column” button. After doing so, you will need to choose the right type of data and add its description. Essentially, you want to create columns to store the details of your example BNB NFTs. As such, feel free to add the same columns as we did. These include “image”, “nft_id”, and “damage”:

Note: Use the video below starting at 8:45 for more details. Be aware that the Moralis expert in that video is working with an older version of the Moralis dashboard.
After successfully adding the columns, it’s time to populate one row, which we’ll use to create a BNB NFT. For this example project, we will do this manually. As such, make sure to upload the image file and enter your NFT ID and the value of “damage”. Furthermore, you ought to know that there’s a practical way to automate populating rows. The latter makes things a whole lot simpler when you want to bulk mint NFTs. In addition, when batch minting is in question, you also want to upload folders to IPFS.
Generating BNB NFTs’ Metadata with Moralis’ Cloud Functions
After populating the top row of your “NFT” class, you can focus on generating metadata files. If you remember, this is the way to get URI links. As mentioned, we are going to do this with Moralis’ cloud functions:
Click on “Cloud Functions” for your server and enter these lines of code:

The code above accesses specific columns and rows of your “NFT” class. By doing so, it uses the data in those columns to create a JSON file for your example NFT. Moreover, feel free to use the video below (11:27) in combination with Moralis’ documentation for more details about viewing your JSON file. Essentially, you need to copy your URI link:

For more info on the above, check out the video below starting at 11:31.
Inserting URI to Remix and Adding BNB Chain’s Testnet to MetaMask
After copying your URI, return to Remix. There, you want to paste the URI inside the parentheses following “ERC1155” of the “constructor()” function. See the image in the “Your Smart Contract to Create a BNB NFT” section. Moreover, we need to comply with the ERC-1155 standard’s guidelines for the ID holder. Thus, make sure to replace “0” in your URI with “{id}”:

Before you can deploy your smart contract to the BNB Chain testnet, you need to add that network to your MetaMask. Fortunately, you can use Moralis Speedy Nodes to do this with a few clicks. For detailed instructions, check out the video below starting at 16:43. However, here’s the gist of it:
- Use the “Speedy Nodes” tab inside your Moralis admin area:
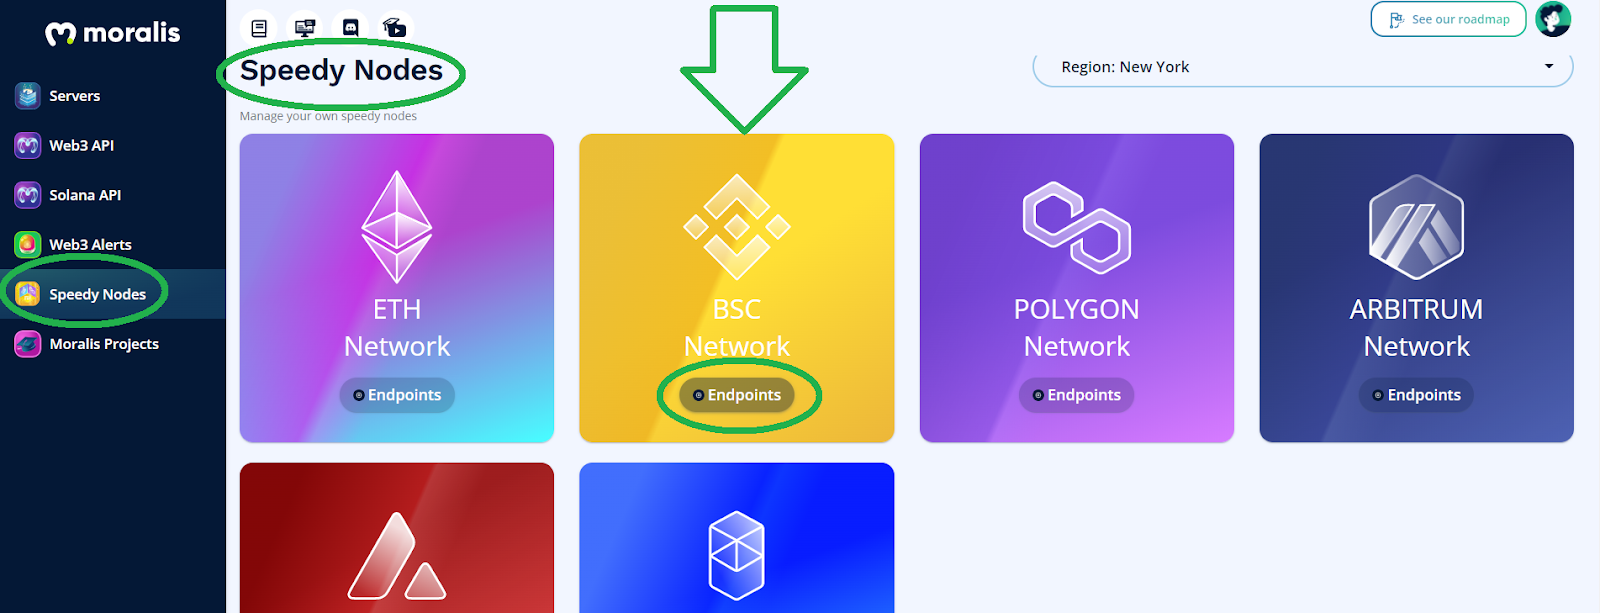
- Under “BSC Network”, click on “Endpoints”.
- Click on “Add to MetaMask” inside the “Testnet” section:

- Switch your MetaMask’s extension to the “BSC Testnet” network:

Create a Binance NFT – Minting
Note: Minting involves executing an on-chain transaction. Hence, you need some “test” or “play” BNB tokens to cover the gas fee. As such, use “https://testnet.binance.org/faucet-smart” and enter your MetaMask address to get some play BNB.
Now that you’ve connected your MetaMask to BNB Chain’s testnet, you can finally create a BNB NFT. This is the minting part, which you will do by deploying your smart contract using Remix. First, match your Remix settings with the ones displayed here:
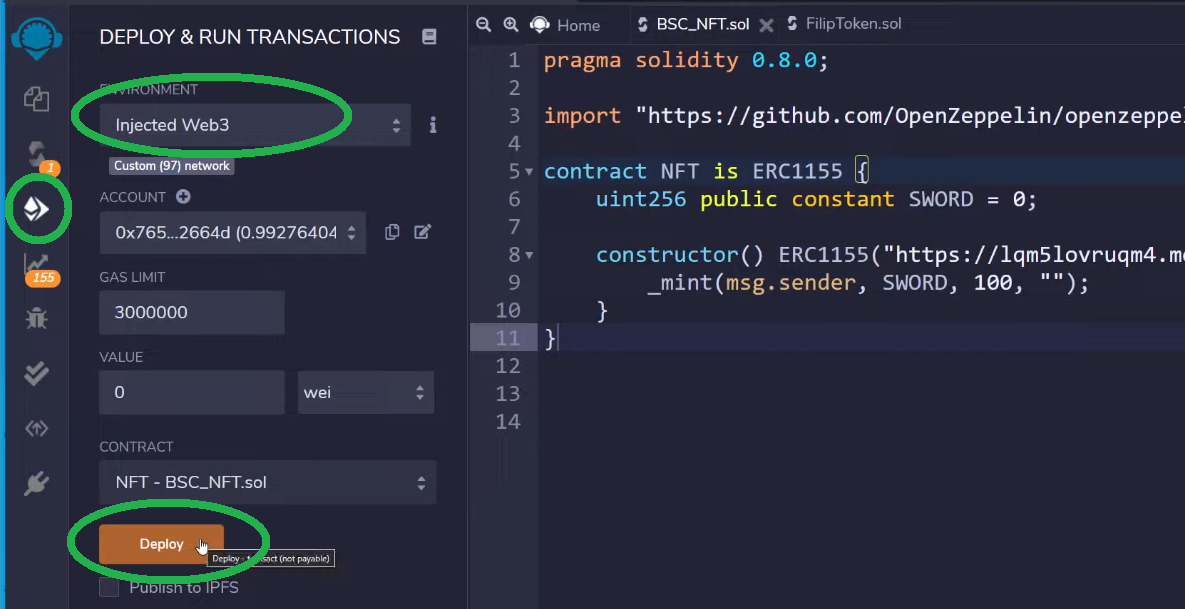
Then, click on the “Deploy” button to execute the on-chain transaction. You will need to confirm the latter with MetaMask.
Note: We encourage you to use BscScan (testnet) to search for your transaction’s hash and, thus, confirm that it was executed:

Finally, below is the “how to create a BNB NFT” video tutorial we’ve been referencing throughout this article. It will provide you with a more detailed walkthrough. In addition, starting at 19:48, you have a chance to get some neat ideas on how to take BNB NFTs to the next level.
How to Create a BNB NFT – Summary
At this point, you know how to create a BNB NFT in about 20 minutes. If you took on our example project, you’ve learned how to create a Moralis server and how to use Remix. Moreover, you’ve also had a chance to get familiar with the Moralis dashboard and Moralis’ cloud functions. These two features enable you to generate your NFTs’ metadata and their URIs. Finally, you also had an opportunity to deploy your example smart contract using Remix and MetaMask.
If you enjoyed this example project, you should explore Moralis’ blog and YouTube channel. There are several tutorials there that can help you become a Web3 developer. For example, some of the latest topics include fractional NFTs, dynamic NFTs, an example play-to-earn (P2E) game smart contract, and NFT-based memberships. Also, it shows how to build a Uniswap DEX clone, how to get blockchain SMS notifications, how to build a play-to-earn game, how to add a Web3 connect wallet button, use a Mumbai testnet faucet, and much more. However, in case you want to become a blockchain developer with confidence fast, consider enrolling in Moralis Academy. There, you’ll get to access professional-grade blockchain development courses. You’ll also get a personalized study path and expert mentors and become a part of one of the most advancing communities in the industry.