Creating a Binance NFT on BNB Chain, rather than creating an NFT on Ethereum, comes with certain benefits. One of these benefits is Binance’s low fees. In fact, exorbitant gas fees on Ethereum are a huge reason developers want to steer clear of its blockchain. Thus, learning how to create a Binance NFT is a trend that keeps soaring. Of course, BNB Chain’s level of decentralization does not match that of Ethereum; however, Binance offers other benefits. Aside from the above-mentioned low fees, it comes with Binance’s extensive ecosystem, including an NFT marketplace where you can sell and trade NFTs. If developing a non-fungible token on Binance sounds interesting, pay close attention to the content herein. As we examine this article more closely, you’ll be well-equipped to create a Binance NFT. Moreover, as the title suggests, you can do this in five steps!
We’ll guide you step by step through the five stages presented herein. You’ll discover some excellent tools that will make the journey a lot simpler. Platforms such as OpenZeppelin and Remix simplify things when dealing with smart contracts. We will also use the most popular Web3 wallet, MetaMask. It will enable us to interact with BNB Chain’s testnet. Also, we’ll explore the pinnacle of the current Web3 tech stack, Moralis, to cover our backend needs. This “Firebase for crypto” platform comes with the ultimate Web3 SDK. We can use cloud functions, nodes, databases, a full scope of APIs, and much more with its platform. Ultimately, Moralis is the best Web3 backend platform that supports the most popular chains. As such, make sure to create your free Moralis account now. Without further ado, let’s begin our journey and look at how we can create a Binance NFT in five steps!
Creating a Binance NFT with Moralis
You probably understand that we will rely heavily on Moralis to help us create a Binance NFT. Moralis’ ultimate NFT API can serve you well if you decide to advance your NFT development. With Moralis’ ultimate Web3 development platform in your corner, you can also utilize your Binance NFTs effortlessly. Hence, you can incorporate NFTs in your decentralized applications (dapps).
As mentioned above, we will use OpenZeppelin to obtain a smart contract template. We will then use Remix to tweak the template and deploy our smart contract. We encourage you to join us on our journey and take action yourself. By doing so, you will learn how to easily create a Binance NFT. You can then use this valuable skill for your own projects or offer that in-demand service to your clients.
Now, let’s look at each phase of how to create a Binance NFT in five steps:
- Create a Moralis Server – You can create your Moralis server with your free Moralis account. That also gives you access to your server’s database and other backend functionality.
- Create Your Smart Contract – We will start with a smart contract template from OpenZeppelin. Then we’ll tweak the code inside Remix.
- Store Your Binance NFT’s Metadata – We will use the Moralis dashboard and Moralis’ cloud function option for storing metadata and obtaining the example NFT’s URI.
- Insert URI and Add BNB Chain’s Testnet to MetaMask – Moralis Speedy Nodes and MetaMask make this step incredibly easy.
- Mint a Binance NFT – We will use Remix to deploy your smart contract, which will mint our Binance NFT.

Creating a Binance NFT – Example Project
You must also note that there are two aspects to creating an NFT – the artistic and the technical part. The first part is something artists will focus on; however, you can use any existing open-source image. It is the technical part that converts a digital file into an NFT. That is what we call “minting”.
For our example Binance NFT, we are going to use a publicly available image file. We will mint several NFTs, which will represent swords. If you haven’t realized it yet, these NFTs can be utilized for NFT game development. Furthermore, you should also keep in mind that we will deploy our example NFTs on BNB Chain’s testnet. We always recommend using testnets when working on example projects or testing things out. That said, we are now ready to dive into the first step of our “create a Binance NFT in five steps” mission.
Note: In February 2022, Binance implemented an update that merged Binance Smart Chain (BSC) and Binance Chain under the cover name BNB Chain. However, the functionality of the chains is the same as it was. As such, you will basically learn how to create NFT on Binance Smart Chain.

Step #1: Create a Moralis Server
Whether you want to create a Moralis dapp or use Moralis to help you mint tokens, you need to start by creating your Moralis server. Fortunately, we can do so relatively quickly and easily following these simple substeps:
- Log In to Your Moralis Account – By now, you probably have your Moralis account ready. As such, log in to your account. However, if not, use the link stated at the beginning of this article to create your free account.
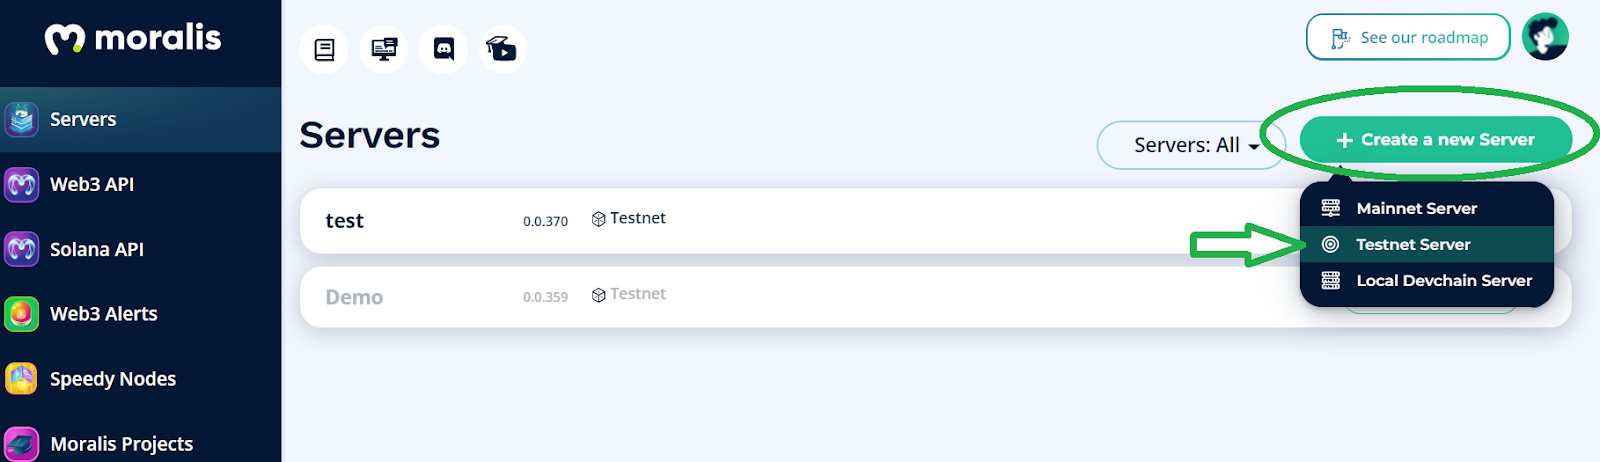
- Create a Moralis Server – Inside your Moralis admin area, you’ll get to create your Moralis server via the “Create a new Server” button. Then you’ll need to select the network type and enter your server’s details.
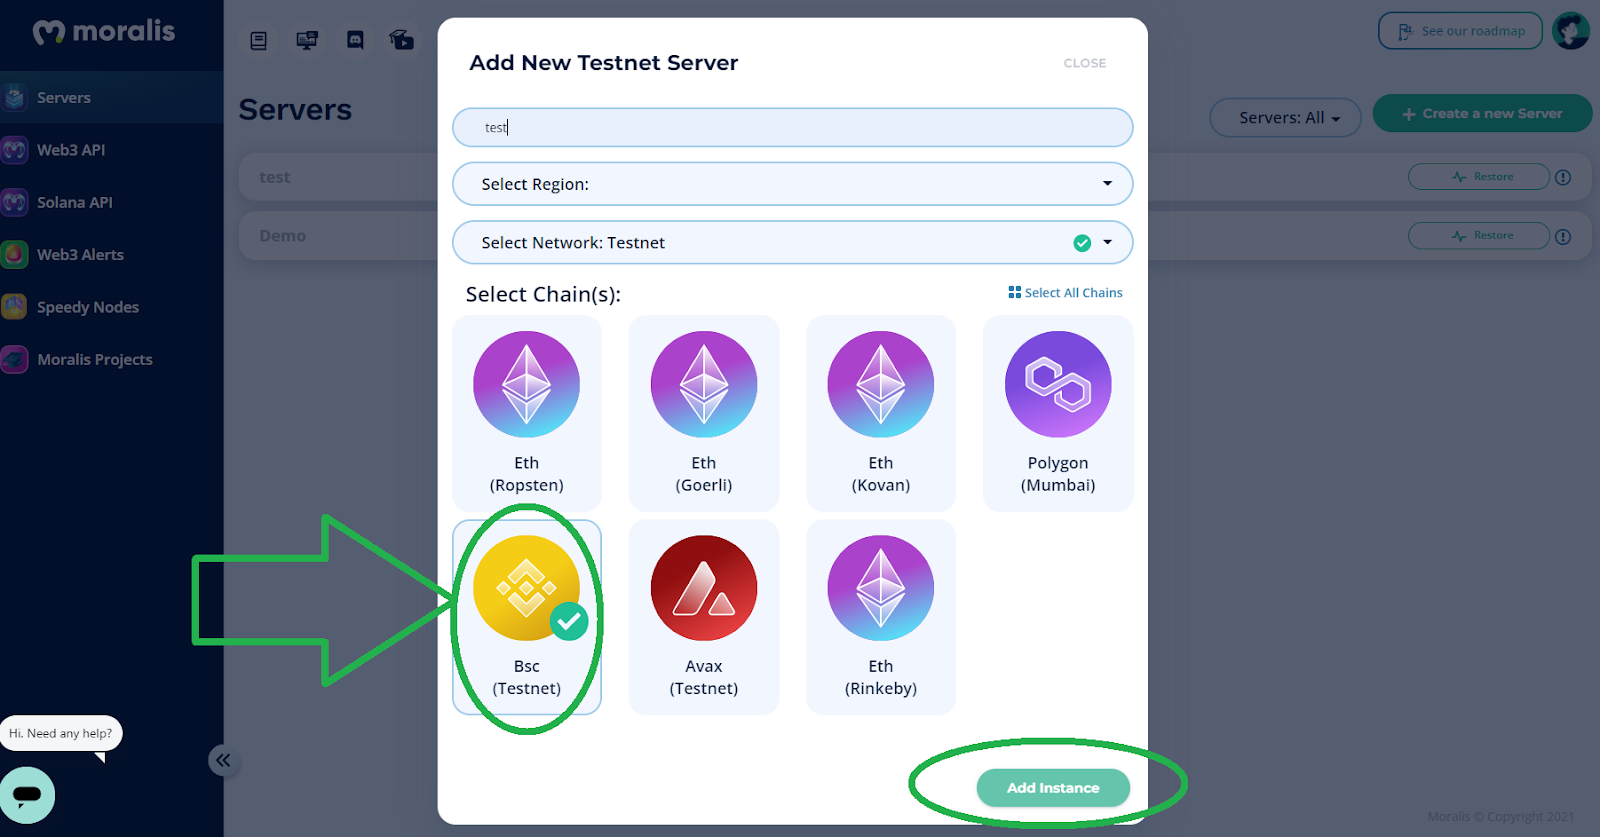
Make sure to select BNB Chain’s testnet (“BSC testnet”):
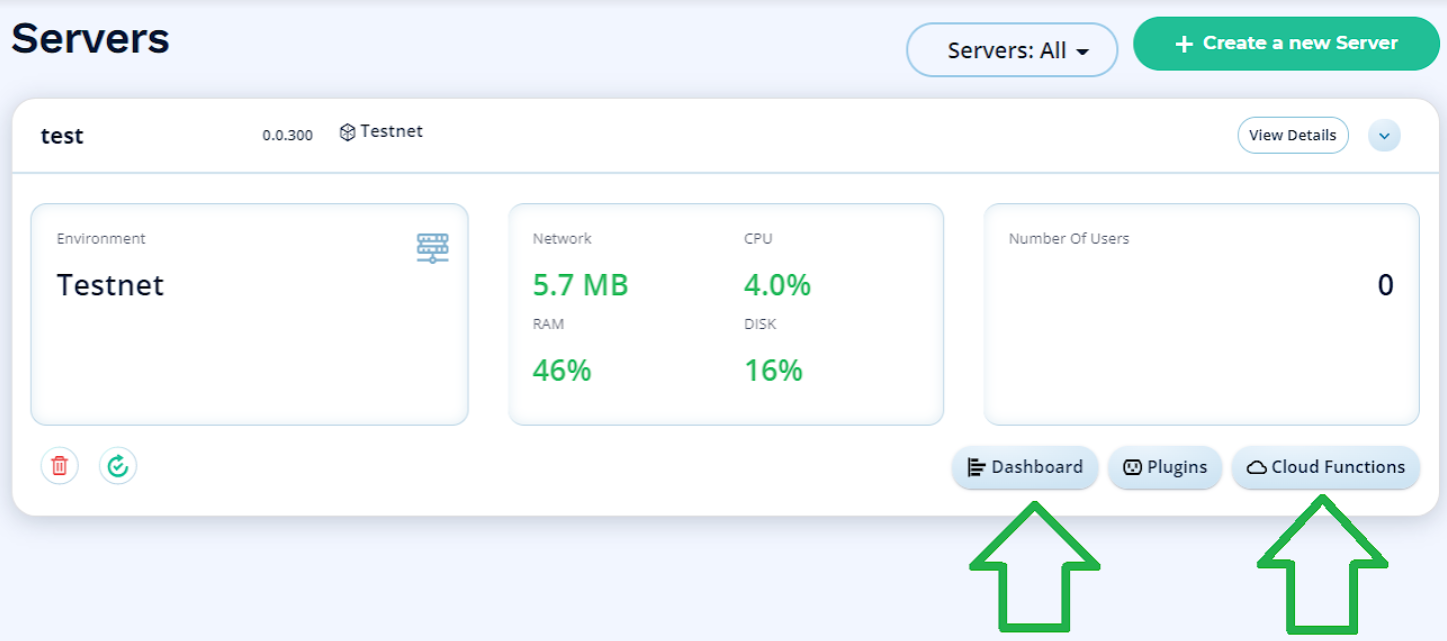
Once your server is up and running, you can utilize Moralis’ backend functionality. For the purpose of our example project, we will use the Moralis dashboard (database) and create a cloud function:
Step #2: Create Your Smart Contract
Smart contracts are essential when it comes to minting NFTs. Whether you are interested in creating ERC-721 tokens or ERC-1155 tokens, you can’t avoid using smart contracts. However, instead of creating your own smart contract from scratch, you can use verified templates. As such, OpenZeppelin comes in handy. To make things even simpler for you, we’ve developed our own smart contract, “ERC1155.sol”, available on GitHub. Don’t let the Ethereum standard (ERC-1155) confuse you. Since BNB Chain is EVM-compatible, Binance NFTs follow the same standards. However, if you were interested in creating a single Binance NFT, an ERC-721 contract might be an even better fit for you.
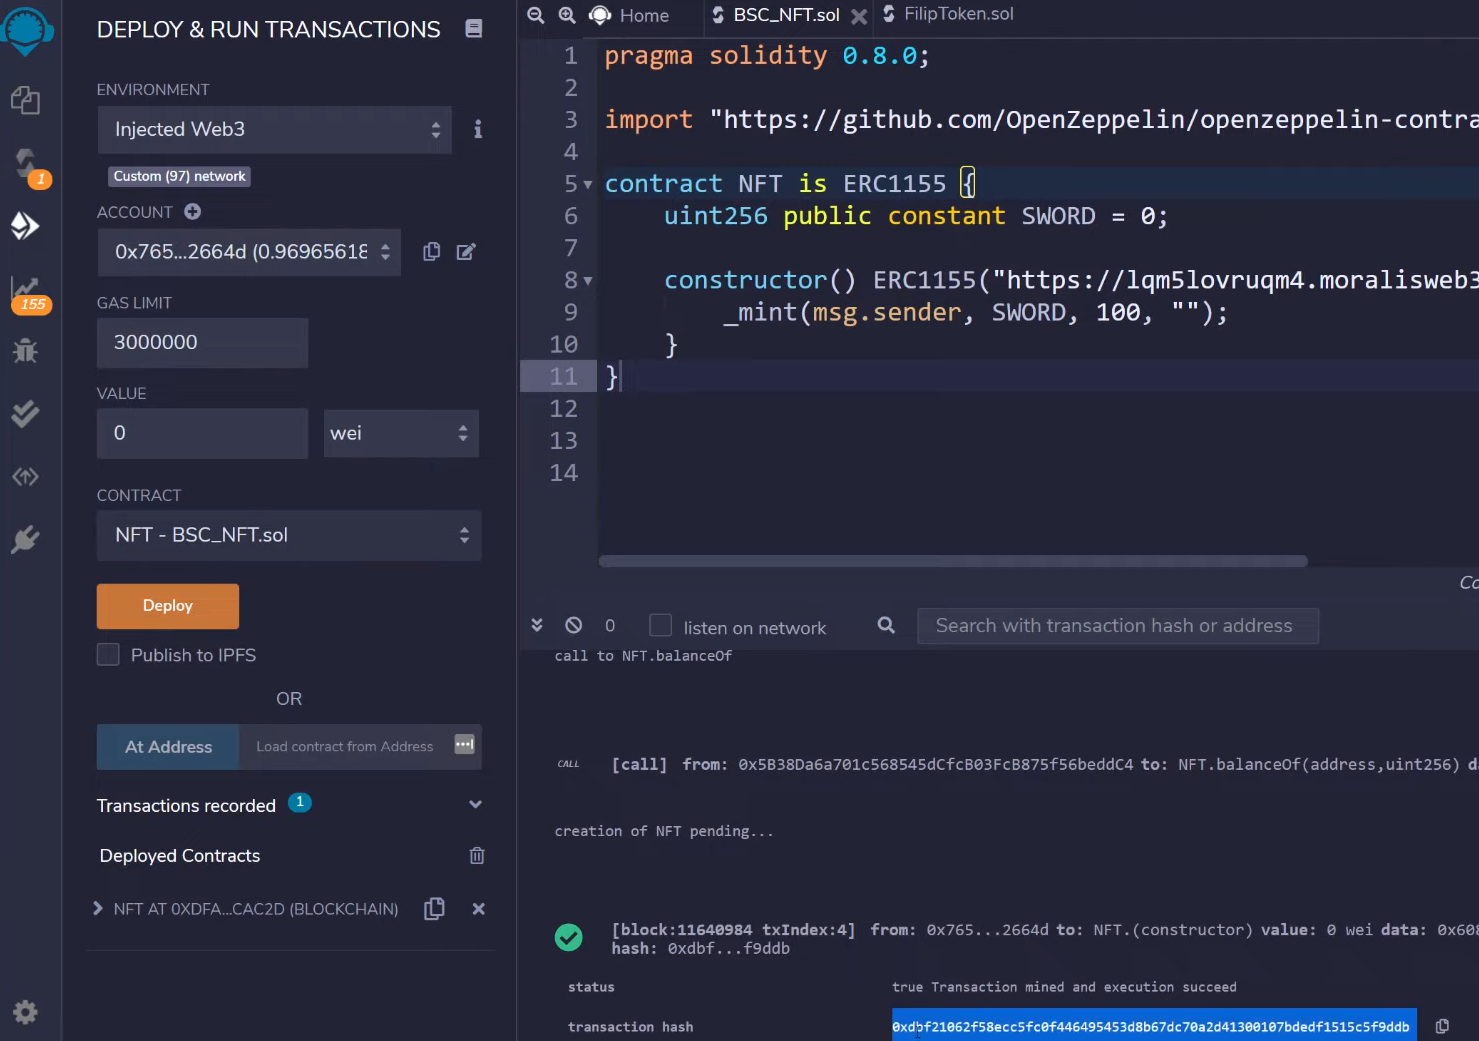
Now, to use Remix for this part, open this online IDE and create a new file. First, add the top pragma line (as shown in the image below). Then, enter “import” followed by our “ERC1155.sol” smart contract’s URL:

Even if you know nothing about Solidity, you can see that our example smart contract is pretty simple:

Note: For more detailed guidance, use the video below starting at 1:32.
As indicated in the screenshot above, we named our Binance NFTs “SWORD”. In addition, we decided to mint one hundred instances of our example NFTs. However, to give our smart contract a file to mint into NFTs, we must also obtain a relevant URI.

In the case of NFTs, URIs can be found within NFTs’ metadata. Moreover, NFTs’ metadata typically comes in the form of JSON files. Hence, this implies that we need to create and store JSON files to obtain their URIs and then mint NFTs. This is where we will let Moralis make things as straightforward for us as possible.
Step #3: Store Your Binance NFT’s Metadata
By now, you have your Moralis server up and running. As such, you can access its dashboard:
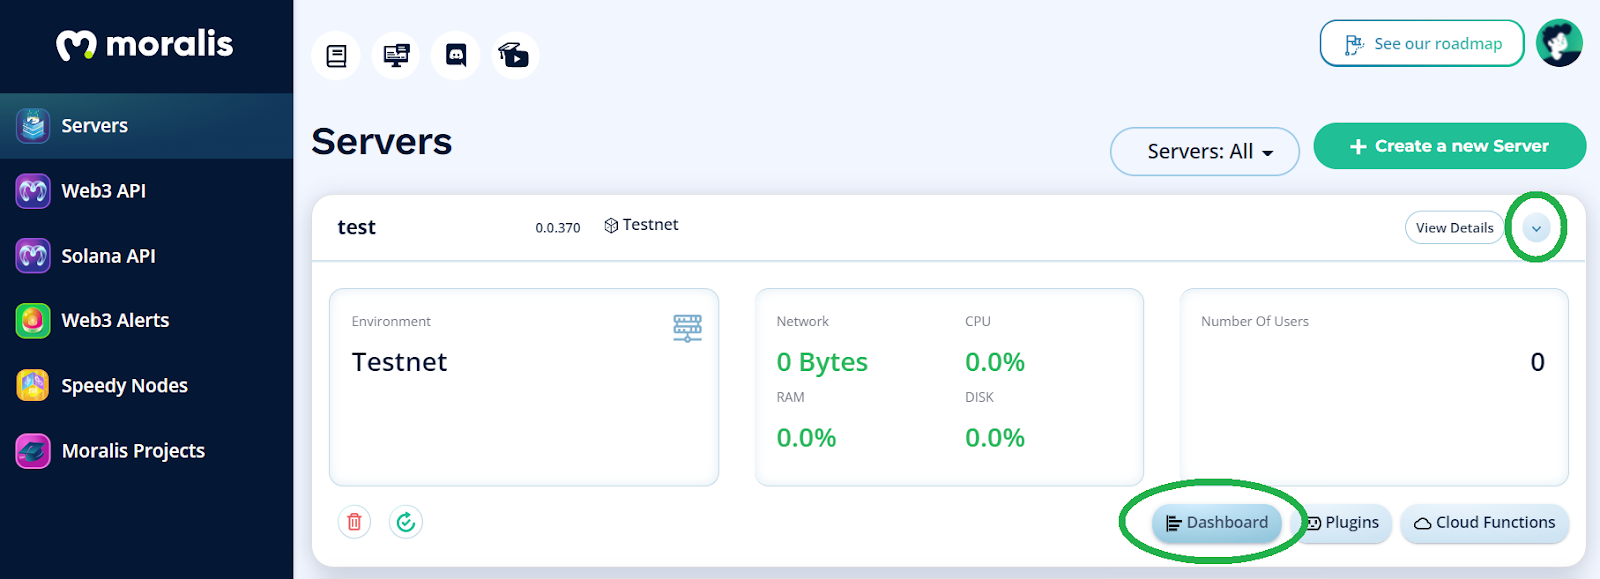
Start by creating a new class:
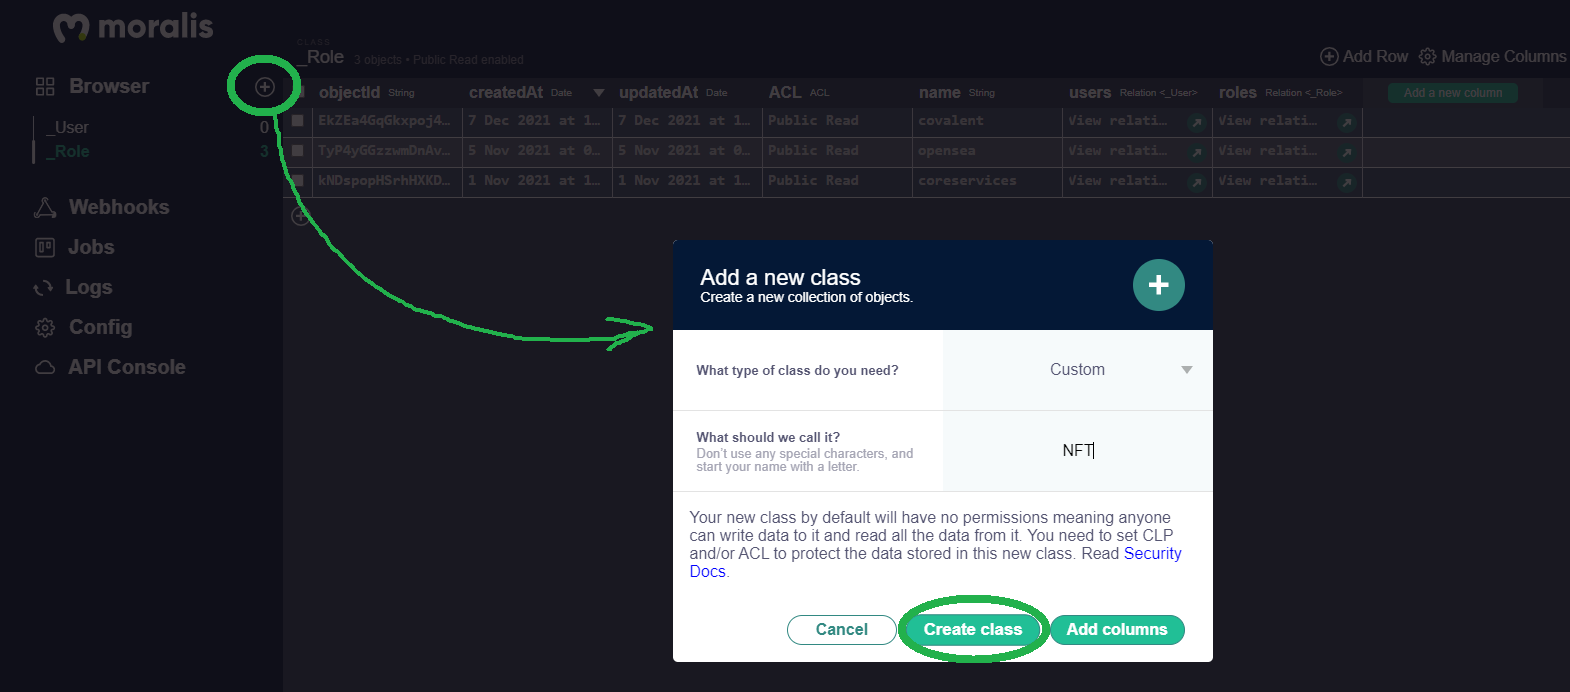
Feel free to call it as you please. For extra convenience in the following steps, we encourage you to name it “NFT”. Confirm your action by clicking on “Create class”. Once you’ve created this class, you can use the “Add a new column” button. After clicking on it, you need to select the type of data and add your description. As such, you get to create the columns that will store the details of your Binance NFT. We added the “image”, “nft_id”, and “damage” columns (you will use these column names later on):

Note: For more details, use the video below at 8:45. Although, keep in mind that a Moralis expert uses an older version of the Moralis dashboard. As such, the interface looks a bit different.
With the columns added, you need to populate one row manually. This is where you upload the image file, enter your NFT ID, and enter the value of “damage”. If you want to bulk mint NFTs, there’s a neat way to automate populating rows. Moreover, this is also a way to learn how to upload folders to IPFS.
Using a Cloud Function to Generate Metadata
You are now ready to learn how to generate metadata files that include the URI links. As mentioned, this is where we will use Moralis’ cloud functions feature:
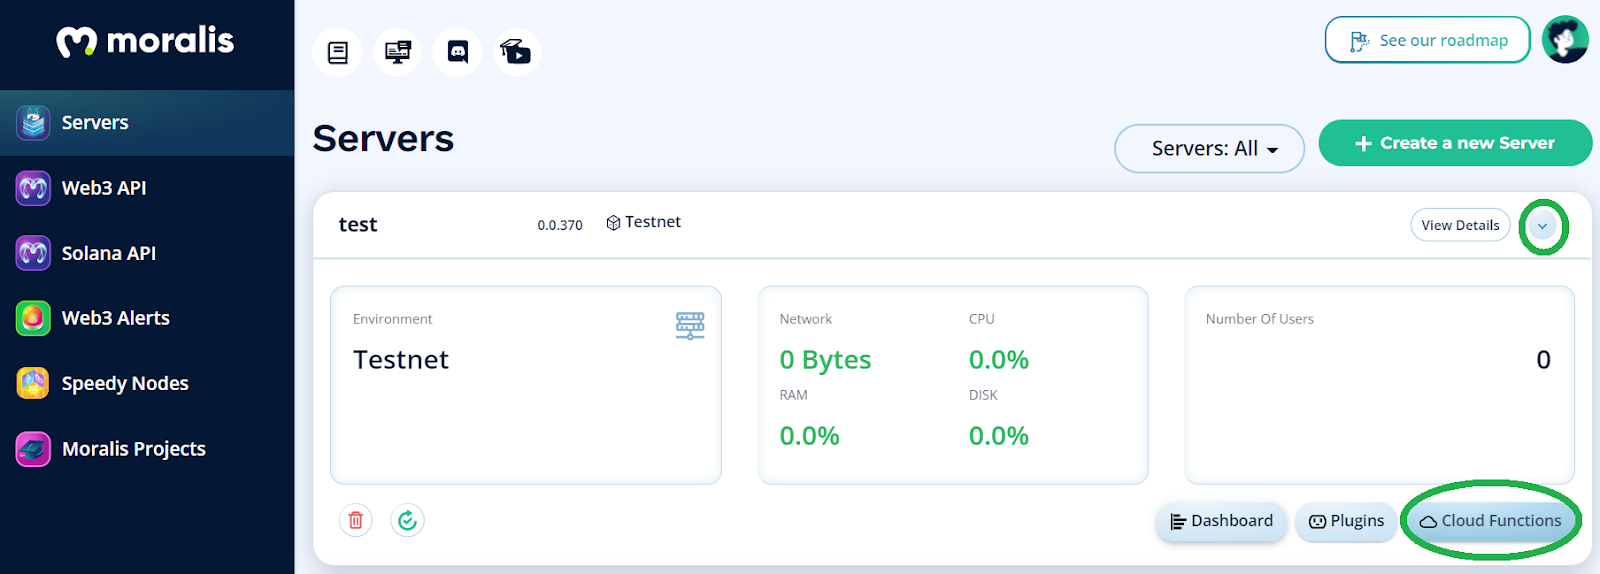
By clicking on the “Cloud Functions” button, you’ll be able to enter the following code:
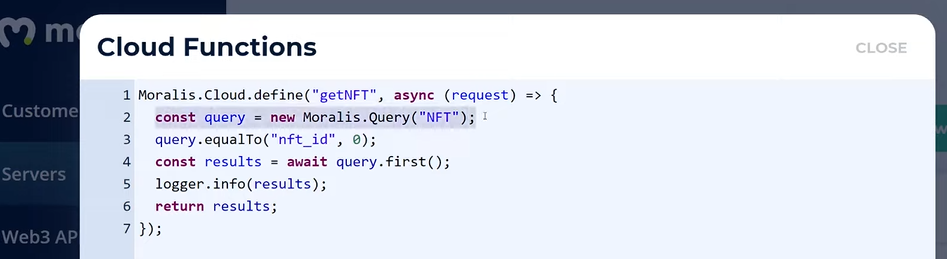
The above lines of code ensure that you access specific columns and rows of the above-created “NFT” class. Hence, the above cloud function will return a JSON file for your example NFT. For more details on viewing this JSON file, use the video below at 11:27 and Moralis’ documentation. What you will need is the URI link:

Step #4: Insert URI and Add BNB Chain’s Testnet to MetaMask
Now that you have your URI, you need to return to Remix and paste it in the marked spot (see step #2). Since we decided to mint more than one Binance NFT, we need to follow the ERC-1155 standard’s guidelines for the ID holder. As such, we must replace “0” in our URI with “{id}”:

Using Moralis Speedy Nodes
With your URI inside the “constructor” function in Remix, it is time to get your BNB Chain node. Fortunately, Moralis is also an excellent blockchain node provider. It covers this feature with Moralis Speedy Nodes. The latter enables you to add supported networks to your MetaMask with just a couple of clicks. Here’s how you do this:
- Select “Speedy Nodes” from the side menu of your Moralis admin area:
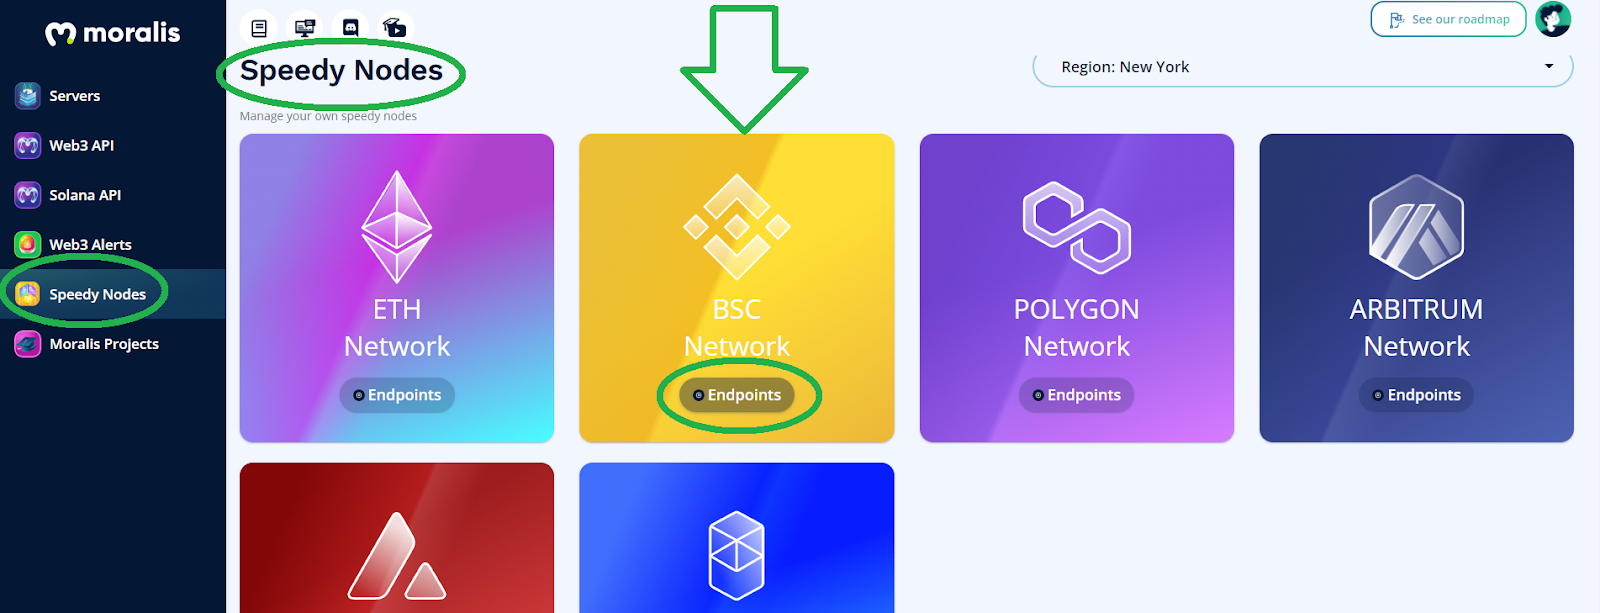
- Click on “Endpoints” under “BSC Network”.
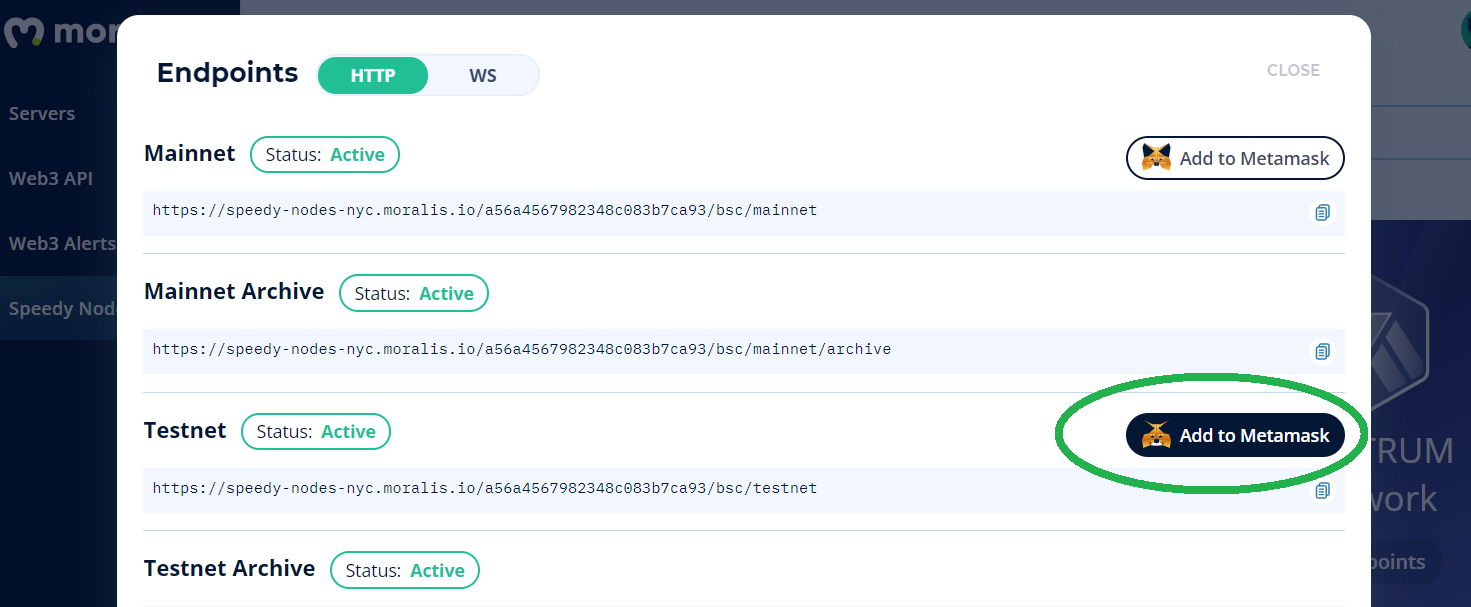
- Use the “Add to MetaMask” button for BNB Chain’s testnet:
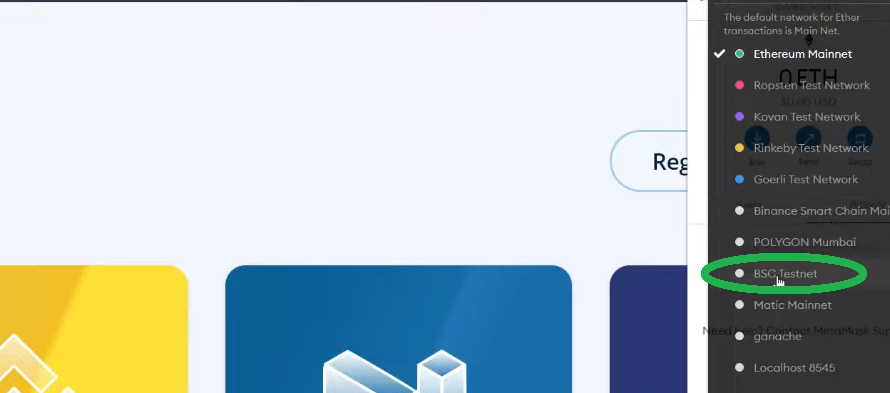
- Switch your MetaMask network from “Ethereum Mainnet” to “BSC Testnet”:
Note: To cover transactions on BNB Chain’s testnet, you need “test” or “play” BNB tokens. You can collect some by visiting “https://testnet.binance.org/faucet-smart”, where you’ll enter your MetaMask address.
Step #5: Mint a Binance NFT
At this point, you should be connected to BNB Chain’s testnet with your MetaMask. Also, you should have some “play” BNB tokens in your wallet. If so, you can proceed with minting your Binance NFT. Start by ensuring that your settings in Remix match the following ones:

Then, you can execute the transaction by clicking on “Deploy”. Next, you’ll need to confirm the transaction within your MetaMask. Once you complete the transaction, you can use BscScan (testnet) to search your transactions’ hash:
If you are interested in a more detailed walkthrough of the above example project, make sure to watch the video below. Also, by watching the video (at 19:48), you can get some excellent ideas on how to take your “Binance NFT” quest even further.
How to Create a Binance NFT in 5 Steps – Summary
If you’ve covered the above sections, you now know how to complete all of the five steps needed to create a Binance NFT. If you took on our example project yourself, you created a Moralis server and your smart contract. You also stored your Binance NFT’s metadata, inserted your URI, and added BNB Chain’s testnet to your MetaMask. Finally, you minted your Binance NFT. By completing all these tasks, you gained some valuable knowledge about OpenZeppelin, Remix, Moralis, and MetaMask. As a result, you are ready to take on a new example project that awaits you on the Moralis blog or the Moralis YouTube channel.
Both outlets explain a full scope of blockchain development terms and aspects. As such, they can serve as your free ongoing crypto education. For example, some of the latest topics focus on what Ethereum Name Service (ENS) is, how to claim an in-game NFT, what is Web2 and Web3, Web3 contracts, NFT utility, Web3 game design, connecting a Web3 wallet to a Twitter account, and how to connect a Web3 wallet to a website. In addition, it covers many other Web3 authentication aspects.
You might be eager to go full-time crypto as soon as possible. If that’s the case, you ought to consider taking a more professional approach. As such, enrolling in Moralis Academy might be the right path for you. Aside from accessing top-tier blockchain development courses, you will also get a personalized study path. On top of that, you will become a member of one of the most advancing communities in the industry and get expert mentors to help you overcome any challenges.

