Due to the exorbitant fees when purchasing or creating an NFT on Ethereum, users and developers have turned their attention to Binance Smart Chain (BSC). By offering low fees and being EVM-compatible, which enables the utilization of ERC standards, BSC has gained a competitive advantage over Ethereum. It’s not surprising that BSC is earning its way to the top for NFT creators of all sorts as they want to be profitable and as cost-efficient as possible. Therefore, anyone wanting to dive deep into NFT token development should learn how to create an NFT on Binance Smart Chain with Moralis. Moralis’ ultimate Web3 platform, which offers full support for Binance Smart Chain, makes the process of creating NFTs on BSC extremely straightforward. As such, this “create NFT on Binance Smart Chain – full guide” article will be an excellent starting point for those who want to explore the task of creating BSC NFTs.
Knowing how to create Binance Smart Chain NFTs with Moralis, either for your own projects or your clients who want to dip their toes into the crypto realm, will be highly beneficial. Fortunately, creating NFT on Binance Smart Chain is much simpler than most beginners think. These days, you have excellent tools at your disposal that enable you to launch NFTs in a matter of minutes (assuming you have your digital files [NFTs] ready). However, the tool that really makes things as simple as possible is Moralis, also known as “Firebase for crypto”. This ultimate Web3 development platform is fully cross-chain interoperable, meaning that all your development projects that are done on BSC, including BSC NFTs, can easily be deployed on other EVM-compatible blockchains. Thus, you will learn how to create NFT on Binance Smart Chain using Moralis herein.
Create NFT on Binance Smart Chain with Moralis
As mentioned earlier, Moralis is the ultimate Web3 development platform created by developers for developers. Furthermore, it offers full support for most of the reputable leading blockchains. Moreover, you get access to Moralis’ SDK, including its ultimate NFT API. The latter enables you to easily incorporate BSC NFTs within unique decentralized applications (dApps). All-in-all, the sky’s the only limit as far as Web3 development is concerned when working with Moralis. However, we will not be creating dApps today; instead, we will show you how to create NFT on Binance Smart Chain by taking on a simple example project.
Moreover, aside from using Moralis, we will simplify our work by using OpenZeppelin to get a smart contract template and Remix to deploy the relevant smart contract without breaking a sweat. Furthermore, we encourage you to do the best you can to follow along by implementing all the steps on your own. That way, you will learn how to easily create NFT on Binance Smart Chain either for yourself or your clients, which may turn out to be one of the best skills you’ve learned in your career.
As an overview, here are the tasks we will complete moving forward:
- Create a Moralis server to gain access to a database and backend functionality.
- Obtain a smart contract template from OpenZeppelin and use Remix to tweak the smart contract for our needs.
- Use your Moralis dashboard and the cloud function option to store NFTs metadata and obtain its URI.
- Use Moralis Speedy Nodes, MetaMask, and Remix to mint NFTs.
- Explore how you can take things further and create even more BSC NFTs.
Creating Binance Smart Chain NFTs – Example Project
We will use a publicly available image file and turn it into several BSC NFTs (they will represent swords), which could potentially further be used in NFT game development. However, before we move on, please keep in mind that we will be deploying NFTs on BSC’s testnet for the purpose of this example project. We suggest you do the same until you learn how to properly create NFT on Binance Smart Chain. Yet, even then, it may be smarter to first deploy your NFTs on the testnet to ensure that all is in order before minting them on BSC’s mainnet. With that said, let’s create some BSC NFTs, shall we? As mentioned, we’ll start our quest by creating a Moralis server.

Initial Setup of a Moralis Server
For you to obtain Moralis’ full backend functionality, you need to create a Moralis server. By creating a server, you’ll gain access to its database and an option to add cloud functions, both of which we will use to create Binance Smart Chain NFTs. So, follow these steps to complete the initial Moralis setup:
- Create a Free Moralis Account – Just click the link to the left and then enter your email address and create your password. Moreover, don’t forget to confirm your account – you need to click the confirmation link in the confirmation email that will be sent to you. However, if you’ve already created your Moralis account, just log in.
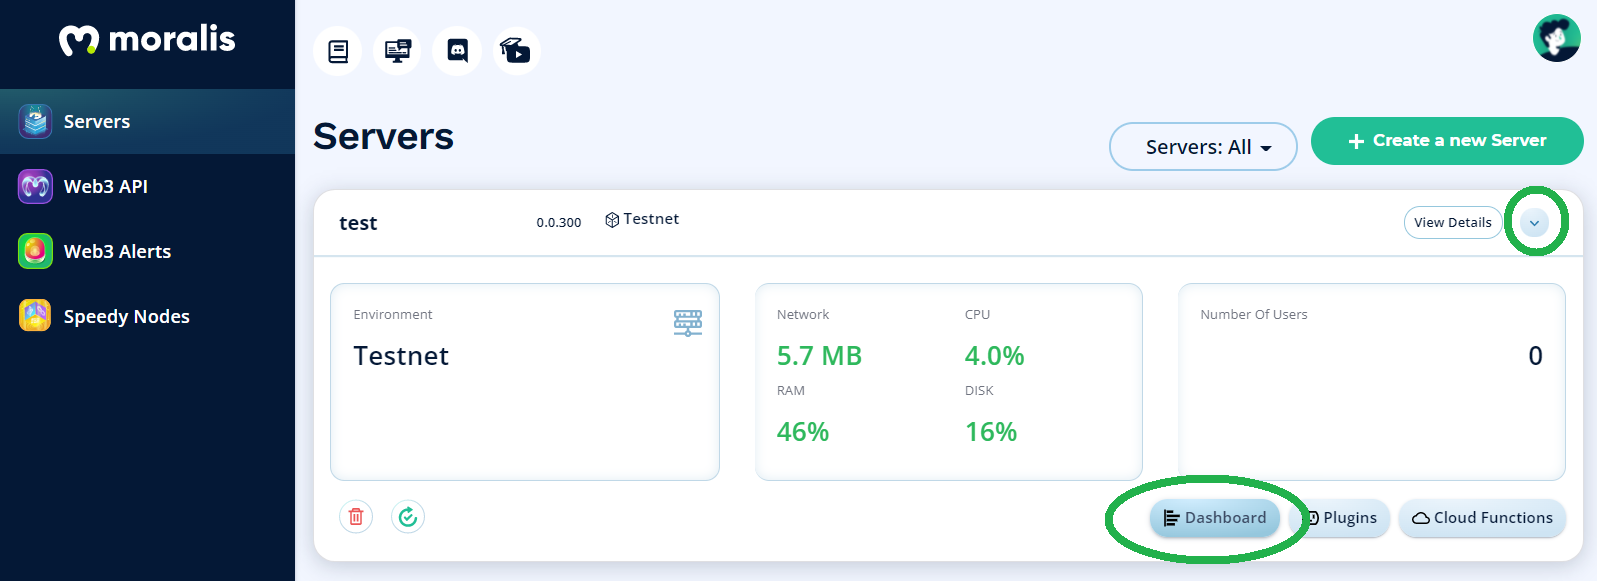
- Create a Moralis Server – After logging in to your Moralis admin area, navigate to the “Servers” tab (see the image below). There, click on the “+ Create a new Server” button in the top-right corner. Next, select a network option from the drop-down menu. For the purpose of our example project, we recommend selecting the “Testnet Server” option. However, when you are ready to deploy your NFTs to any mainnet, you’ll need to go with the “Mainnet Server” option.

After selecting the network type, you’ll need to enter your server’s name (this can be anything you want), select region, network, and chain(s) (we will be using BSC’s testnet for this project). To complete this step, click on “Add Instance” to spin up the server.
By creating your Moralis server, you’ll gain access to Moralis’ backend capabilities. For example, if you were to build your first dApp, you’d need to obtain your server’s details that are now available to you. However, for the purpose of creating BSC NFTs, we need to access our server’s database and create a cloud function. This is something we’ll cover as we move forward.

Create NFT on Binance Smart Chain with Moralis – Smart Contract
Now it’s time to get a proper smart contract. As promised, you do not need to create your own smart contract from scratch. Instead, you can use OpenZeppelin to obtain a smart contract template for all sorts of purposes. In our case, we will use their “ERC1155.sol” smart contract available at GitHub. Despite this contract’s Ethereum standard (ERC-1155), it will enable us to mint our Binance Smart Chain NFTs since BSC is EVM-compatible.
Using the link above, you can import this smart contract to Remix. First, create a new file in Remix and add the top pragma line. Then, type “import” and paste GitHub’s URL for the “ERC1155.sol” smart contract next to it:

With the smart contract provided by OpenZeppelin, we have everything in place to apply the necessary tweaks that will serve our example project. Following the rules of the Solidity coding language, things are rather simple:

Looking at the image above, you can see that we are referencing the imported smart contract with “ERC1155”. Moreover, we’ve named our NFTs “SWORD” and decided to mint one hundred instances. However, before we can mint our Binance Smart Chain NFTs, we need to provide a proper URI.

URIs for NFTs are provided with their metadata, which is stored in the form of JSON files. This means that we need to host the files that we want to convert to BSC NFTs (or NFTs on any other chain) somewhere in order to obtain their links (URIs). This is where Moralis will make things simple for us. As such, let’s take a look at how to use the Moralis dashboard (database).
Using Moralis Dashboard for BSC NFTs Metadata
At this point, you should have your Moralis server created, which means that you can access its dashboard. To do this, just click on the arrow next to “View Details” to see additional options. Then, click on “Dashboard”:
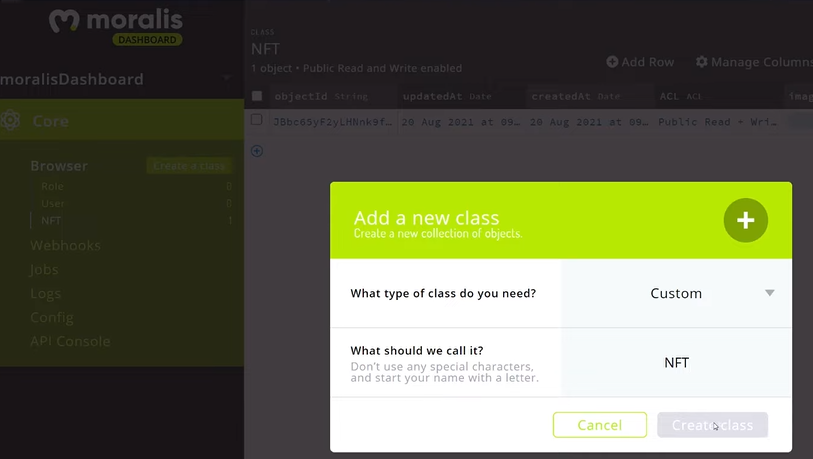
Once you’re inside your server’s dashboard, you need to create a new class:

You can follow our lead and call it “NFT”:
With a new class created, you get to add columns within it by clicking on the “Add a new column” button (then, select the type of data and add a description). These columns will represent your Binance Smart Chain NFTs’ details. Again, we recommend you to follow our lead and add the “image”, “nft_id”, and “damage” columns:

Make sure to pay attention to the column names because you’ll be using them when creating a cloud function. For the sake of this example project, we populated the first line manually (uploading the image file, typing NFT ID, and entering damage). To create multiple NFTs, we’d need to create a line for each of them. In case you want to bulk mint NFTs, there’s a more advanced solution available.
Using a Cloud Function to Generate BSC NFTs Metadata
With the necessary information and an image file uploaded to your server’s dashboard, you are ready to generate metadata files (including URI links). For that purpose, you use a cloud function:

After clicking on the “Cloud Functions” button, you can immediately start typing the code. These are the lines that will help you create NFT on Binance Smart Chain:
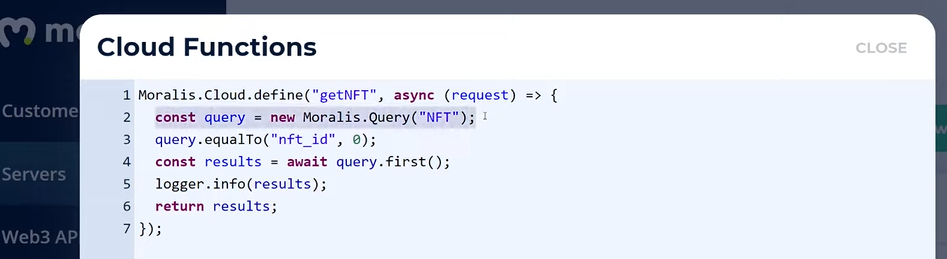
As mentioned above, this is where you get to access specific columns and rows of your “NFT” class without your server’s dashboard. The cloud function presented above will provide you with a JSON file for your NFT. However, in order to view it, you need to use your servers’ URL, followed by: “/functions/getNFT/?_ApplicationId=[yourMoralisAppId]&id=0” (for more details, check our Moralis’ documentation). As such, you should obtain your Moralis server URL and application ID. For that, we use the “View Details” button:

Note: Make sure to use your server’s details and NOT the ones shown above.
By entering this complex URL in your browser, you’ll see your potential NFT’s metadata:

Create NFT on Binance Smart Chain with Moralis – Mint Your NFTs
Furthermore, the above-presented complex URL is what you use as a URI within your smart contract inside Remix (see the “Create NFT on Binance Smart Chain with Moralis – Smart Contract” section above). However, since we are minting one hundred NFTs, we need to use the ID holder according to the ERC-1155 standard. We do this by replacing “0” in our URI with “{id}”:

Moralis Speedy Nodes
Now that you’ve inserted your URI inside the “constructor” function, you’re almost ready to deploy your contract and finally mint your BSC NFTs. However, you first need to use a BSC node. Fortunately, Moralis has your back once again. By using Moralis Speedy Nodes, you get to add any supported network to your MetaMask with a click of a single button. In our case, you need to do so for BSC’s testnet:
- Go to the “Speedy Nodes” tab of your Moralis admin area:
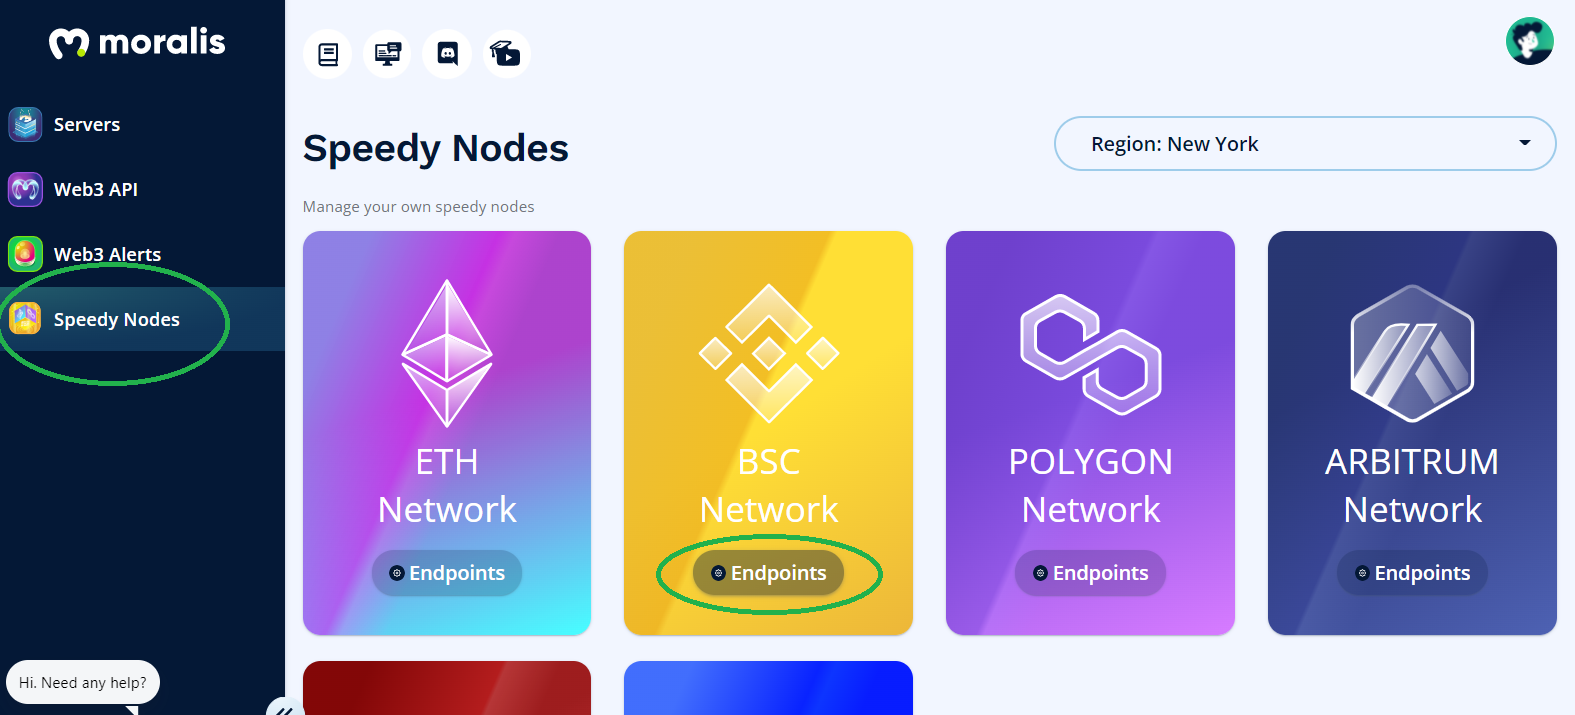
- Click on the “Endpoints” button under “BSC Network”.
- Click on the “Add to MetaMask” button for the testnet:

When prompted, confirm/allow MetaMask to add the network.
- Go to MetaMask and select “BSC Testnet”:

Note: If this is your first time using your MetaMask with BSC’s testnet, you’ll also need to obtain some “test” BNB tokens. You do this by visiting “https://testnet.binance.org/faucet-smart” and entering your MetaMask address.
Deploy Your Smart Contract to Mint Your Binance Smart Chain NFTs
Once you’ve added the BSC testnet to your MetaMask extension and obtained some “play” BNB tokens, you are ready to deploy your smart contract and mint your NFTs. To do this, make sure your settings in Remix match the ones in the image below:

After clicking on the “Deploy” button, your MetaMask extension will be prompted. Just click on “Confirm” to finally create NFT on Binance Smart Chain. Now, you may use your “minting transaction hash” to view it on BscScan (make sure to select testnet):

This wraps up today’s mission. In case you’d like an additional code walkthrough for the lines of code used in Remix and the above cloud function, make sure to check out the video below. Moreover, this is also where you can watch a Moralis expert as he shows you how you could take your BSC NFTs quest to the next level (starting at 19:48).
Create NFT on Binance Smart Chain – Full Guide – Summary
After breaking the process of creating NFTs into multiple steps, it may seem like a lot of work; however, as you can see in the video above, you can easily do all of that in about twenty minutes. Moreover, by completing the steps above, you now realize that there’s minimum coding required to mint NFTs when using Moralis. Thanks to Moralis’ SDK, you get to cover most of the tasks by copying and pasting short snippets of code. Moreover, by using smart contract templates provided by OpenZeppelin, you can get by with no Solidity expertise.
As a matter of fact, JavaScript proficiency and the ability to use MetaMask are all you need to create all sorts of blockchain projects and phenomenal dApps with Moralis. However, in case you don’t know JavaScript yet, we recommend you enroll in the 2021 JavaScript Programming for Blockchain Developers course at Moralis Academy. Moreover, you might want to check out other high-value courses at Moralis Academy to help you go full-time crypto sooner rather than later. On the other hand, you can access a ton of free high-quality content on the Moralis YouTube channel and the Moralis blog. This includes simple explanations of various crypto realm terms and concepts and many example projects. For instance, you can learn to build with the Covalent API, sync and index smart contract events, build cross-chain dApps, how to host a dApp, build a decentralized messaging app, create an OpenSea clone, and much more.