The ability to build cross-chain dApps (decentralized applications) is imperative as blockchain developers want to scale and expand their Web3 applications across various chains. By using Moralis’ Web3 development platform, new and experienced programmers can develop dApps cross-chain quickly and easily. Moreover, through Moralis Speedy Nodes, you can create cross-chain dApps on networks including Ethereum, Binance Smart Chain (BSC), Polygon, Arbitrum, Avalanche, and Fantom. As such, this article will teach how you can build cross-chain dApps in a simplified way with Moralis.
Furthermore, Moralis’ formidable blockchain toolkit gives you an edge in building cross-chain dApps. In addition, with features such as the Moralis Price API, you can fetch price movements from decentralized data sources that’ll supercharge your cross-chain DeFi dApps. Moreover, Moralis will help you capitalize on the inherent advantages of building interoperability natively into your projects to create the most powerful dApps across numerous blockchains.
What are dApps?
If you’re new to blockchain development, you might be wondering, “what are dApps?”. Decentralized applications, or dApps, are similar to regular apps – they function and feel almost exactly like the applications we’ve grown used to – except that they run on a different backend. Furthermore, decentralized applications operate on peer-to-peer networks or blockchains.
Cross-chain dApps are quickly becoming the norm in blockchain development, and in the next few years, we predict that most dApps will become cross-chain dApps. However, why is this? It’s because blockchain interoperability will become an increasingly important feature when interacting with Web3. What’s more, Web3 development platforms such as Moralis are accelerating this phenomenon. With Moralis, it’s much easier to build cross-chain dApps, as the platform was designed to be cross-chain compatible from day one.
How to Build Cross-Chain dApps on Ethereum
If you want to dive right into an in-depth tutorial on how to build Ethereum dApps, you’ll find the following video from the Moralis Web3 YouTube channel highly informative. Furthermore, using these same steps, you can easily build cross-chain dApps for any network supported by Moralis!
Cross-Chain dApps vs Regular Apps
How do you differentiate cross-chain dApps from regular apps? Both types of apps can offer similar features and functions. However, in addition to having the same attributes as regular apps, cross-chain dApps include the following key features:
- They are stored on open-source, peer-to-peer blockchain networks.
- Decentralized applications operate without single-entity control.
- Usually, dApps use cryptographic tokens to facilitate operations.
- Their data is publicly accessible.
- They communicate with one another, a capability absent in older apps and first-generation dApps.
On top of these five fundamental distinctions, cross-chain dApps also offer the following benefits:
- Open-Source Advantage
Built on open-source blockchains, they encourage a massive army of developers to continually improve the network and infrastructure.
- Native Integration of Financial and Incentive Systems into the Design
By being seamlessly compatible with tokens or cryptocurrencies, payments and incentive systems are built into cross-chain dApps. Furthermore, tokenized incentives also drive adoption.
- Resilience
The decentralized nature of blockchain networks means that there is, most likely, less downtime when parts of the system, such as individual computers or parts of the network, experience issues.
- Resistance to Censorship
One of the fundamental advantages of blockchain networks is that they are censorship-resistant. The information is protected by the integrity of the network. Moreover, a single point of attack is difficult to carry out.
- Blockchain Interoperability
Interoperability is the ability of a blockchain to communicate with other chains. Furthermore, it gives blockchains the ability to exchange value with one another.
While traditional apps rely on Web2 or highly centralized infrastructure to operate, cross-chain dApps rely on Web3 or independent blockchains talking to each other. Thus, without centralized control, it is now up to blockchain bridges to communicate without the need for centralized authorities. Hence, cross-chain dApps have the benefits of being “permissionless” and independent from a central bureaucracy.
Capabilities of Interoperable Blockchains
To illustrate the power of cross-chain dApps and interoperability, here are some examples of what you can do:
- Enable cross-chain payments.
- Passive income or yield-earning that leverages arbitrage opportunities between dApps.
- Borrow crypto assets on one chain and use them as collateral assets on other chains, using a lending protocol.
- Ability to offer cross-chain liquidity.
Obviously, these examples (mostly centered on DeFi) are just the tip of the iceberg, as your dApp’s business model will work around your creativity. Moreover, cross-chain dApps expand your opportunities and let you attract more users, as they accommodate more than one blockchain or type of token.
Cross-Chain dApps Ecosystem
Global dApp adoption has increased by leaps and bounds in the past few years. With trends such as NFT games and DeFi not going away anytime soon, the market for building such dApps is soaring. Moreover, for instance, the need for programmers who know how to launch an NFT marketplace has never been higher.
Gaming dApps, financial dApps, social dApps, NFT dApps, and other types of decentralized applications are enjoying a creative boom. Hence, a cross-chain dApp developer is in extremely high demand. If you are a novice blockchain developer, you might want to check out these resources from Moralis’ site on JavaScript libraries for blockchain, Solidity, use cases for Solidity smart contracts, and the ultimate guide to Web3.
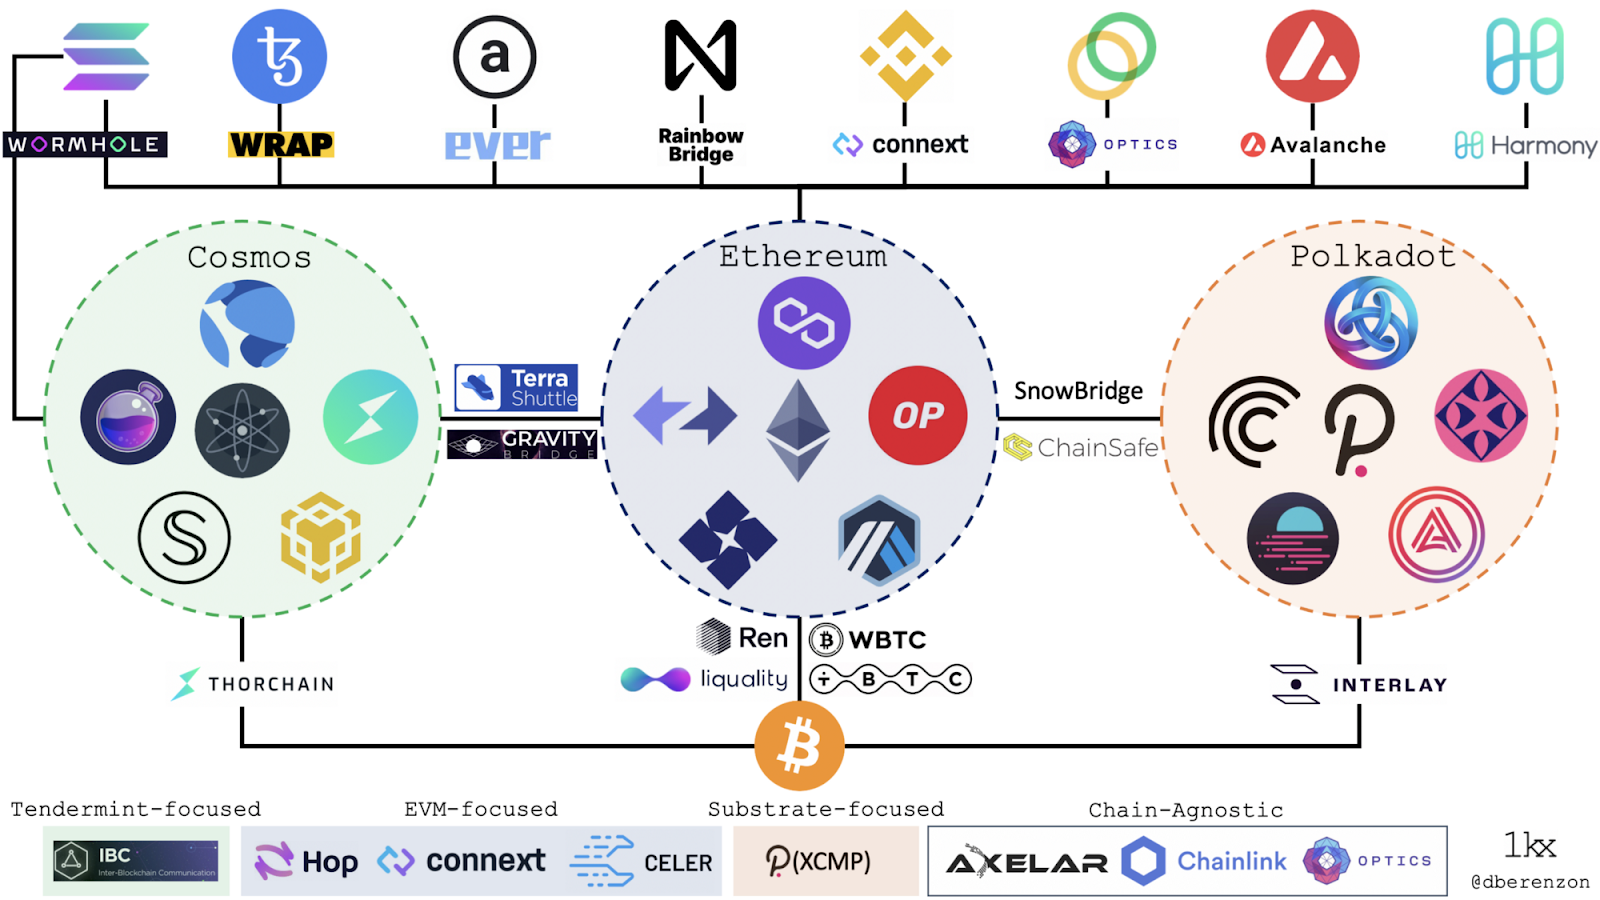
How blockchain platforms currently interact with each other through multi-chain bridges.
About eighty percent (80%) of dApps are still built on Ethereum. Thus, it’s important to remember Ethereum compatibility when building cross-chain dApps. However, there are a lot of blockchains competing for Ethereum’s top spot.
Currently, Ethereum makes up 2,596 of the total number of dApps that exist, which is 3,636 and counting. However, Binance Smart Chain (BSC) is already gaining ground with over 1,500 dApps built on its protocol. Solana and Polygon have about 400 dApps each. Polkadot supports over 200 dApps, and Avalanche has 68. The most important thing is to know how to let these dApps and ecosystems work with each other. Moralis helps you accomplish this with its natively-built cross-chain infrastructure.
How to Get Started on Cross-Chain dApps – Preliminary Installations
As a preliminary step, you need to install some software that will help you create the dApp on Ethereum.
To start building cross-chain dApps, you need to install the following:
- MetaMask

In this particular dApp project, we’ll be using MetaMask for user authentication and other transactions. For a deeper dive, make sure to read the article called “Building dApps with MetaMask” from the Moralis blog.
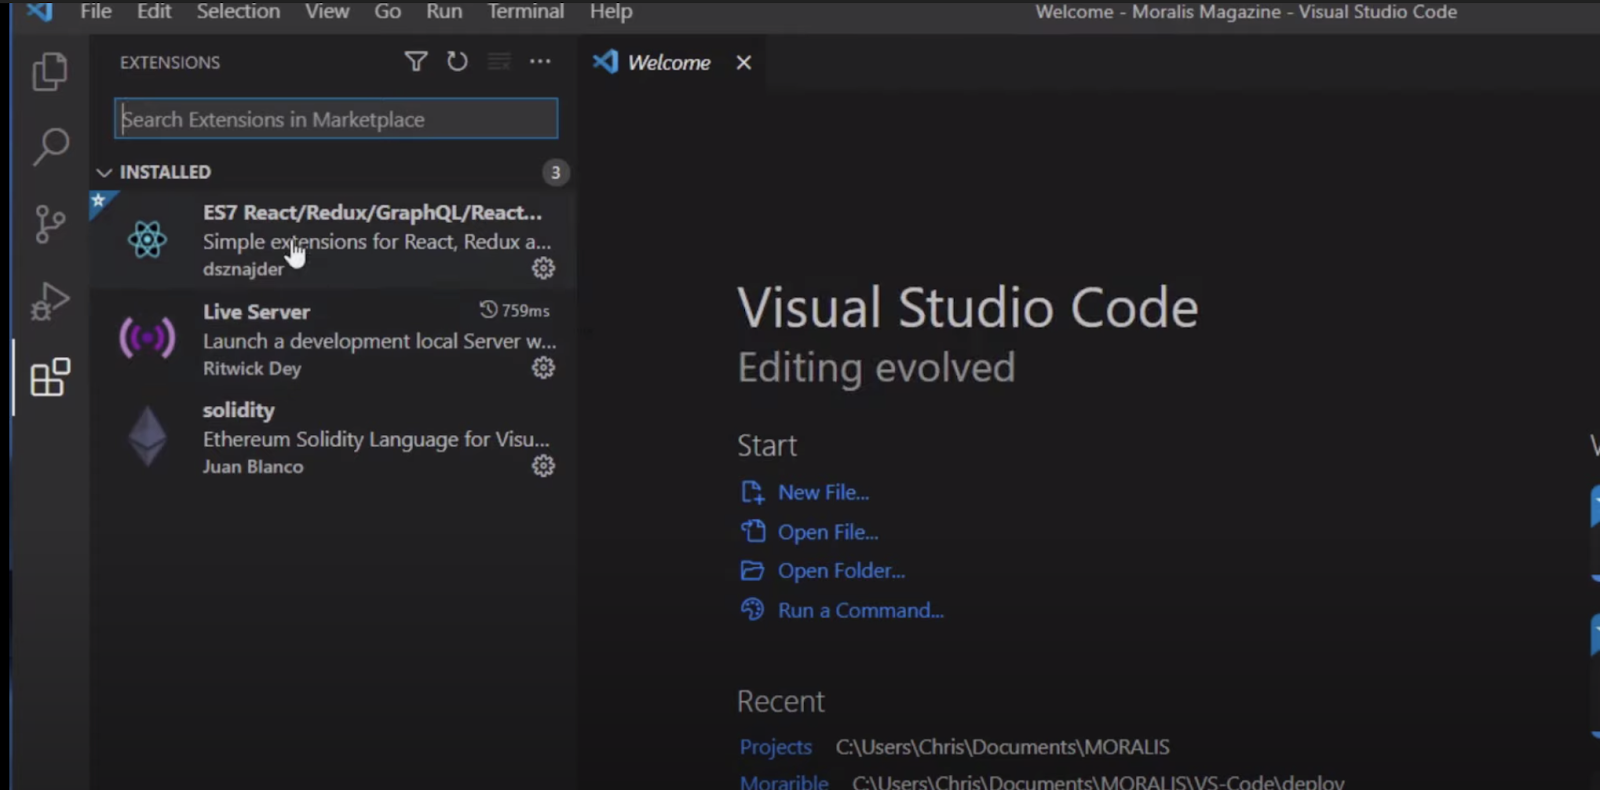
- A Code Editor like Visual Studio Code (VSC)
After installing Visual Studio Code, you need to install the following extensions within the code editor:
- Live Server extension.
- ES7 React/Redux/GraphQL/React-Native snippets.
- Solidity plugin.
- Node.js
When building using Moralis, you may need to go out and execute JavaScript outside of the browser. Thus, you will need to use Node.js.
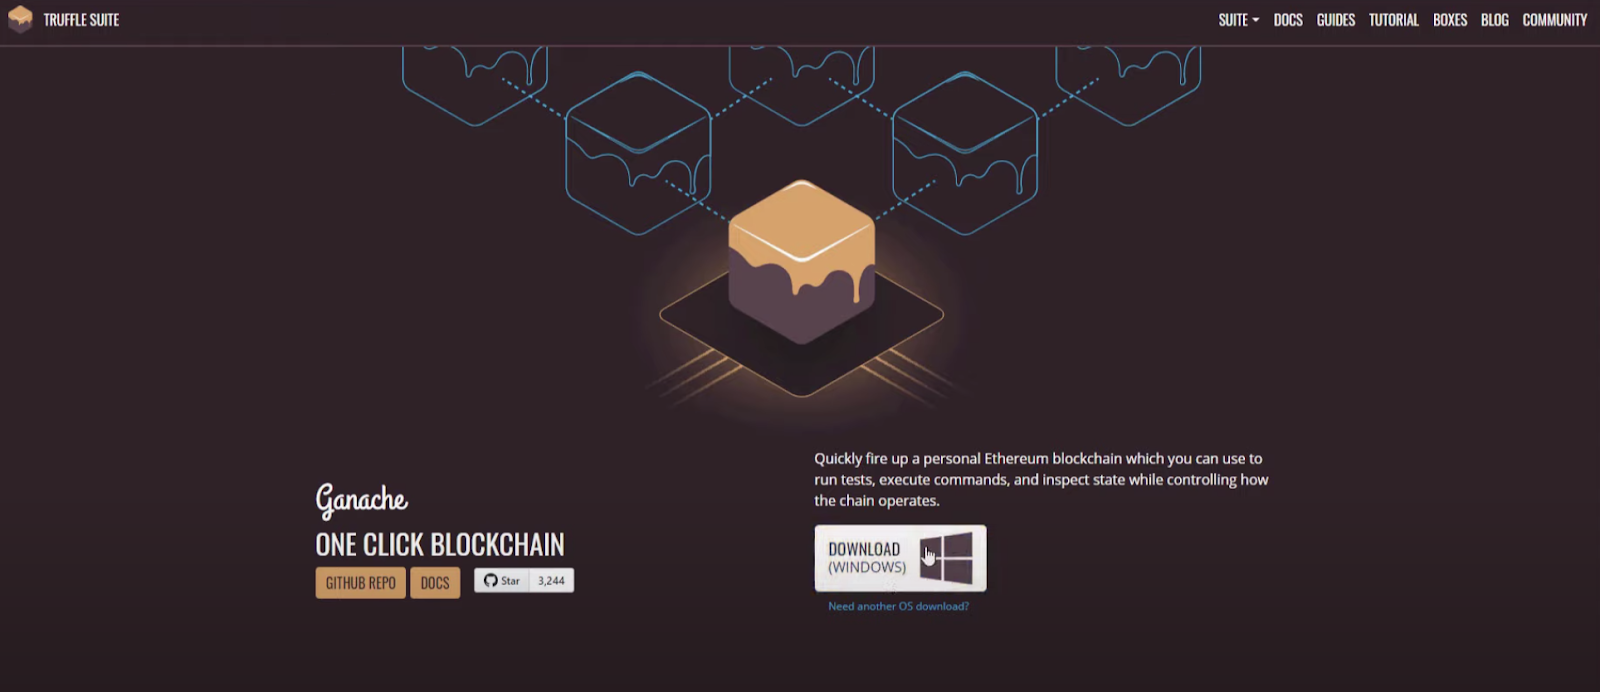
- Ganache
You need Ganache to create your local sandbox environment. This is prior to launching your dApp on the mainnet or even a testnet. Once you’re in Ganache, it will give you multiple addresses that you can use in creating your dApp or test tokens. To learn more about Ganache, read the article called “Ganache Explained – What is Ganache Blockchain?” from the Moralis blog.
With these four tools, you’ve completed your initial software requirements so you can proceed to build your dApp in a local environment.
Next Steps in Building Cross-Chain dApps
Here’s an overview of the succeeding steps:
- Creating a local blockchain.
- Importing accounts to MetaMask.
- Sending test transactions on the blockchain or testing the dApp on a local blockchain.
- Once complete and the application is built and ready to be tested in public, you can proceed to the testnet. On the testnet, you are in a public testing environment with only test/fake transactions with no monetary value.
- Once the bugs are ironed out, you can move on to the mainnet.
Step 1 – Creating a Local Blockchain on Ganache
Create a new workspace on Ganache under Ethereum. Then, name your workspace. In this case, we will be naming it “First Blockchain”. Click the upper right button, “Save Workspace”. Also, refrain from adding any Truffle projects in the meantime.
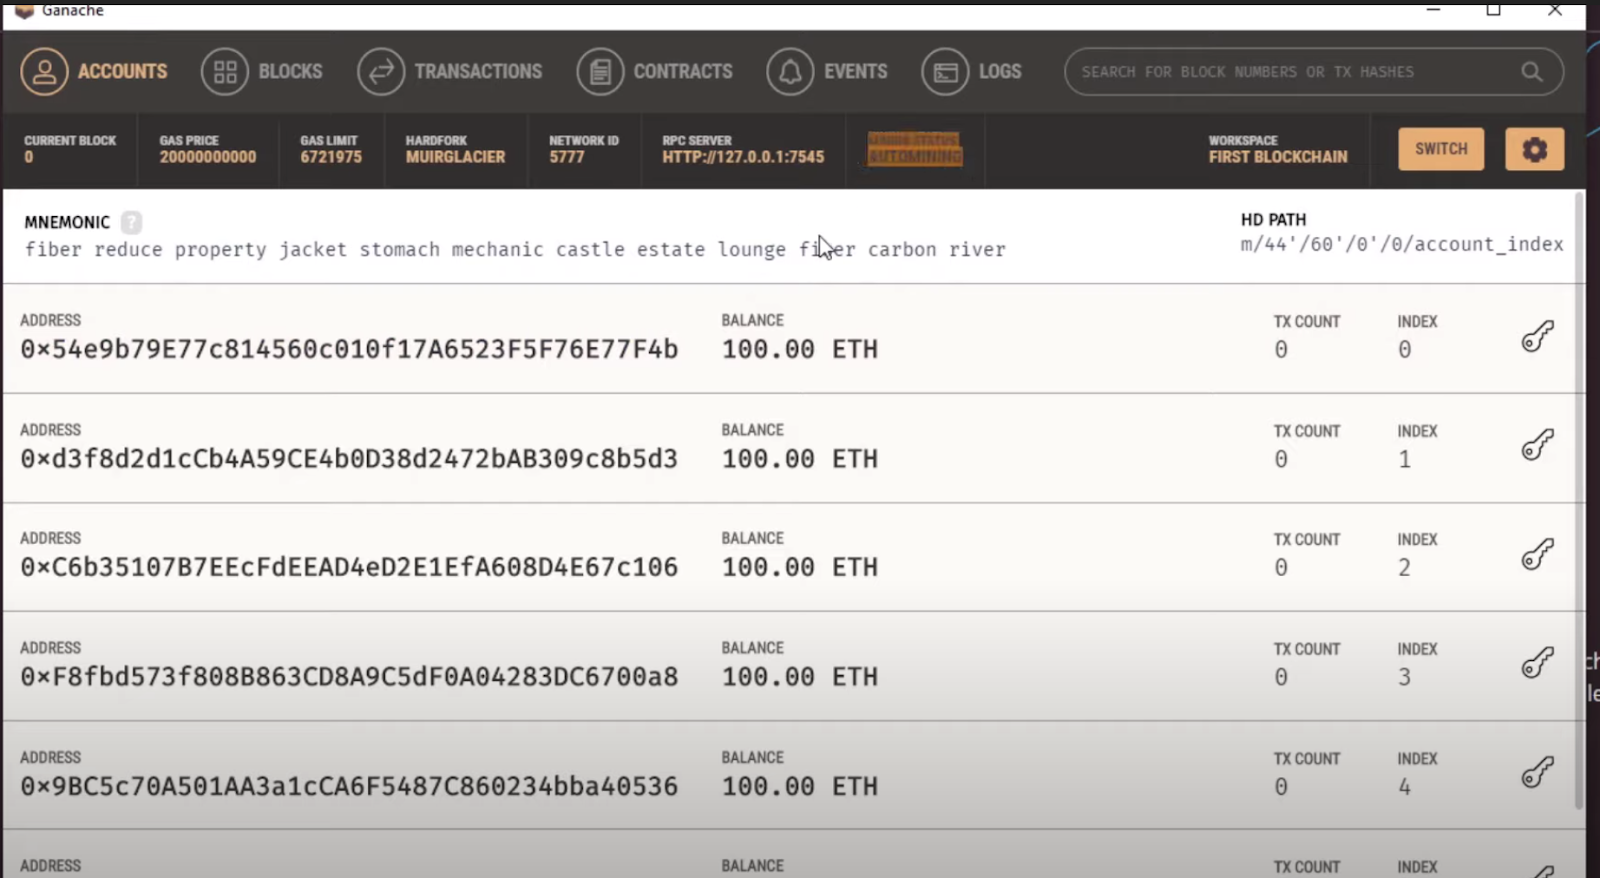
After saving, you’ll be given ten different addresses as part of your local blockchain. Furthermore, these blockchains are automatically mining. Whenever you are interacting with the addresses or making transactions, they will be mined as part of the regular block on the corresponding local blockchain. Each of the ten accounts has an address, and in this case, they contain 100 ETH, which is just local test ETH. Thus, every time you create a transaction on these addresses, it will be recorded on Ganache. On the right side of every line, you’ll find a key symbol, which will display your private key.
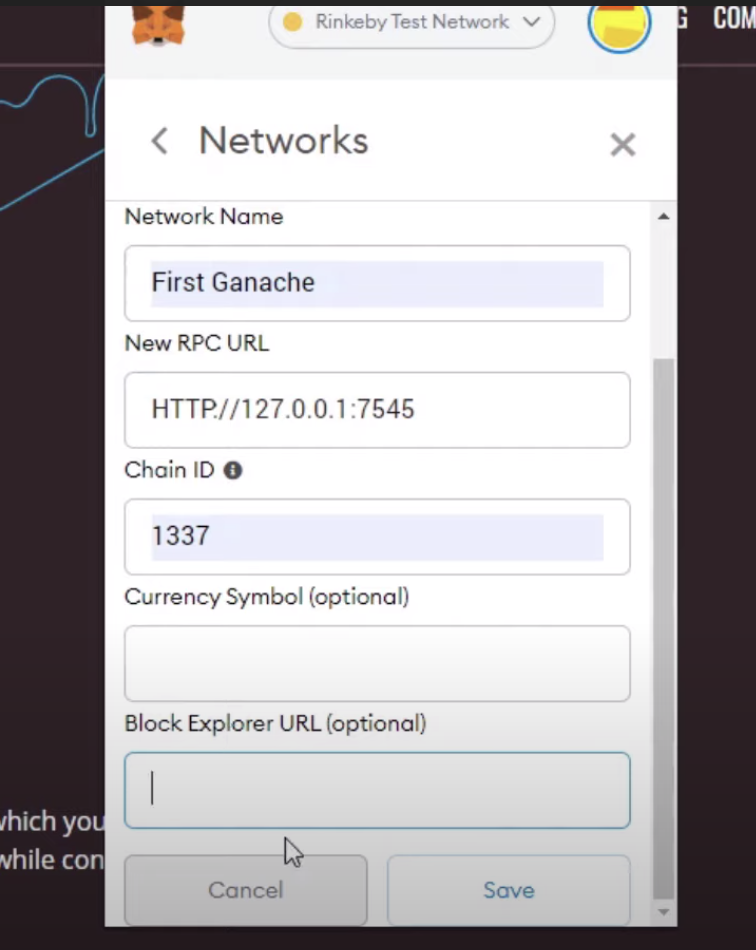
Step 2 – Connect to MetaMask
Once in MetaMask, click on “Networks” and connect to a custom RPC network. Fill in the key information, namely: the network name, the new RPC URL, the chain ID (in this case, we are using 1337); however, you can leave the last two options blank.
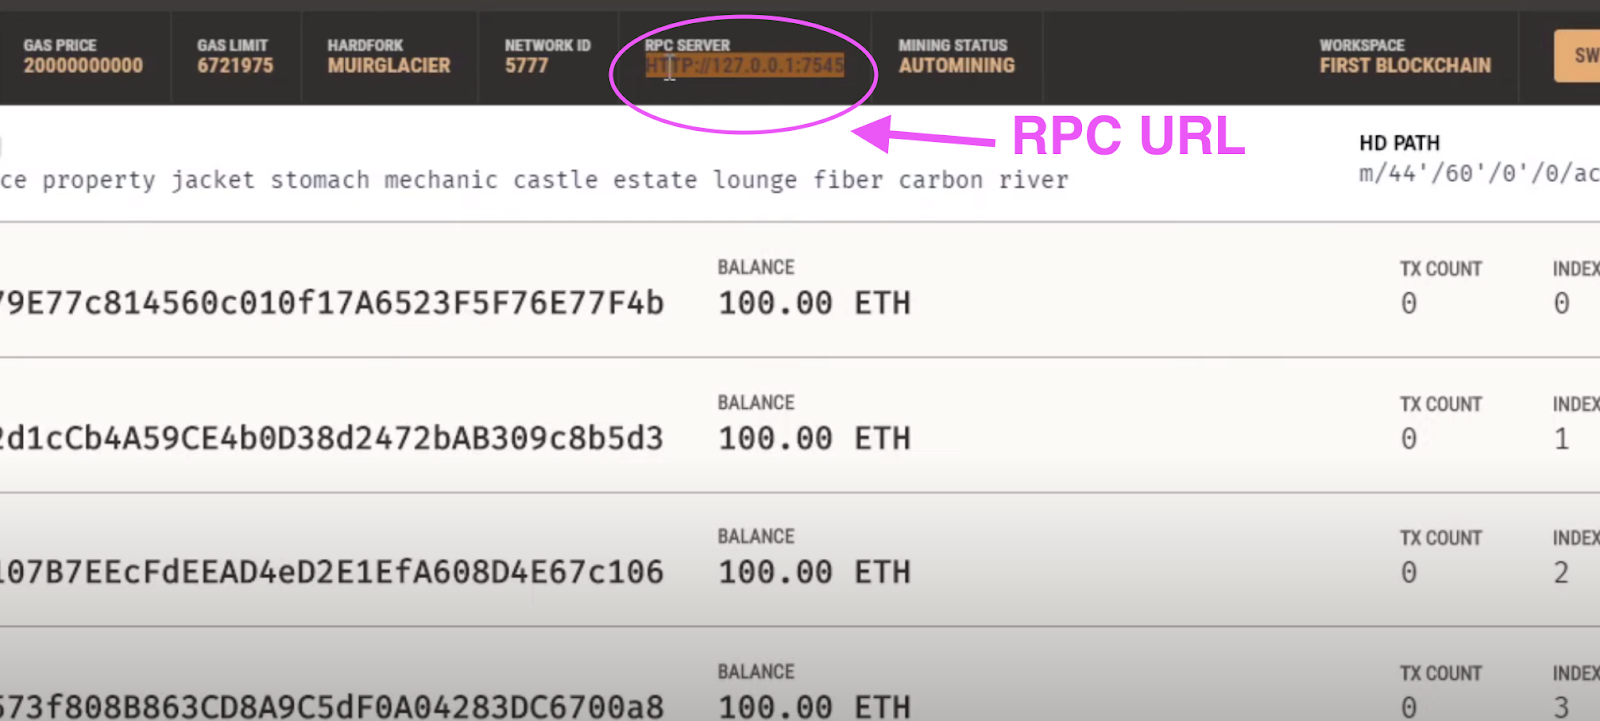
Moreover, you can obtain the RPC URL information from your Ganache workspace as shown here:
Now, save your details. Once you’ve saved it, your new network name will appear on MetaMask’s list of networks. As you go into your own network, you will see that there is no ETH in it. You need to import one of the accounts on Ganache. Furthermore, to import ETH, click on the MetaMask icon at the top right, choose “Import Account”, and paste the private key on the designated field.
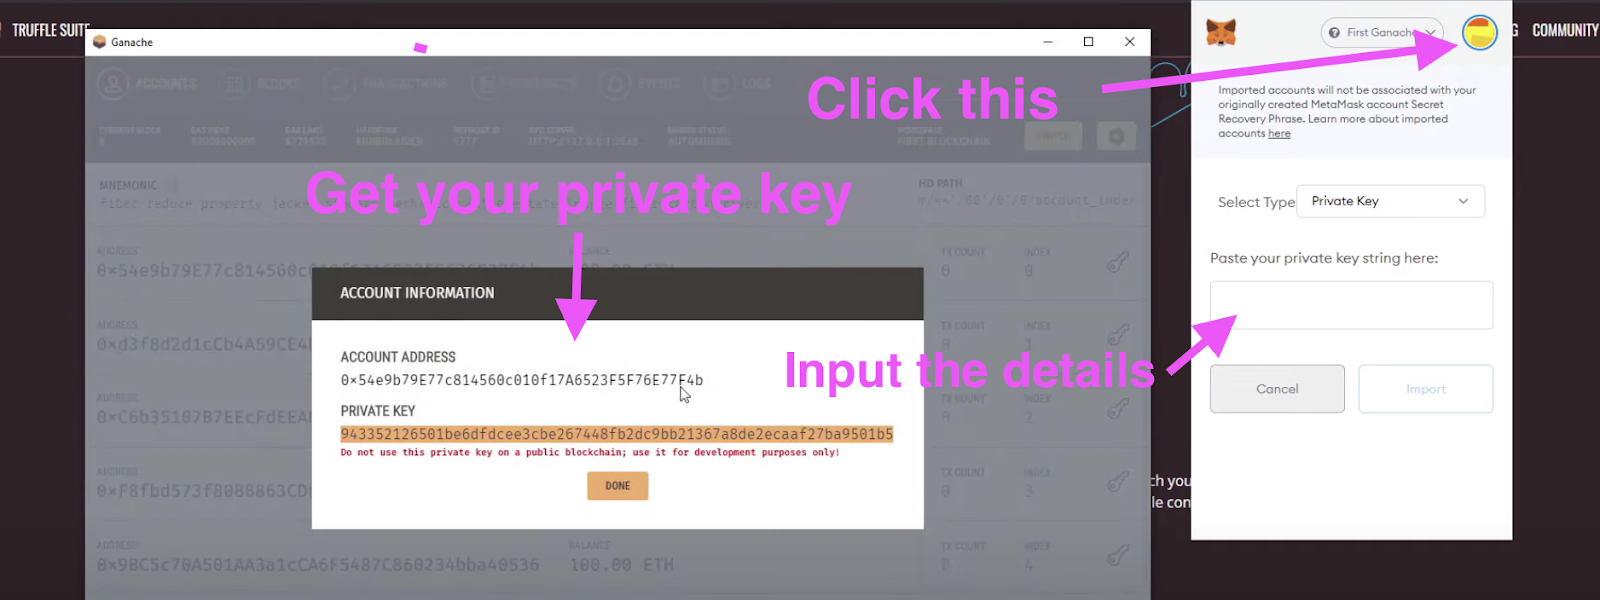
Once you press import, you’ll find the 100 test ETH on your account. Then, by using the same steps, import a second account so that you can practice sending transactions between the two.
Fund Your Wallet with Public Testnet ETH
After funding your wallet with local blockchain ETH, you’re now ready to proceed to use public testnet ETH.
Using the Ropsten and Rinkeby ETH testnet networks, you can test your dApp in a real setting without the need to buy real ETH. Moreover, you can fund your testnet wallet for free using faucets. It’s easy to find a Ropsten Ethereum faucet on the web, and they might look like the one below:

Go to your MetaMask wallet, select “Ropsten Test Network”, and copy the address. Afterward, input your testnet account address to get free testnet ETH. When the testnet ETH shows up on your account, practice sending it back and forth between wallets to make sure everything works.
You can do the same with the Rinkeby network. However, Rinkeby may require you to do some social media posting to earn testnet ETH and get the URL. Moreover, on Rinkeby, you can request the rate at which you obtain your Ether.
Step 3 – Build Your Cross-Chain dApps
For a sample cross-chain dApp project, you can refer to the video posted above. Go to the demo part, starting at 25:04, and proceed to build the dApp with the instructions from 27:18 onwards. You’ll see that this project begins with creating a brand new session on Visual Studio Code and working on the form initially. Hence, it starts with downloading Bootstrap boilerplates for the “Dashboard” and “Sign-in” components.
After working on the form aspects with HTML, you can proceed to the JavaScript part of the project. As such, connect your JavaScript file to the HTML index file, as shown here:
Run it in the browser to make sure that the JavaScript file has been properly connected.
Step 4 – Connect to a Moralis Server
In the process of building your dApp, you’ll need to set up a Moralis account. Moralis gives you all the tools you need to start building your dApp, from server creation to seamless backend support, features, and API integration.
- Create a Moralis Account
To create a new Moralis account, simply sign up on the Moralis website. It’s easy, simple, and free. By creating an account, you get access to the excellent features that make Moralis the ultimate Web3 tool for building phenomenal cross-chain dApps.
- Add a New Server
The first thing you need to do once you get your account is to create a new server in Moralis. This saves you the need to set up your own backend, including buying your own hardware infrastructure. Furthermore, using Moralis frees you from the cumbersome step of syncing your node(s), which could take weeks.
Simply click on the button in the upper-right corner, select the “Mainnet Server” option, name your project, choose your region, and select your networks. Then, click “Add Instance”.
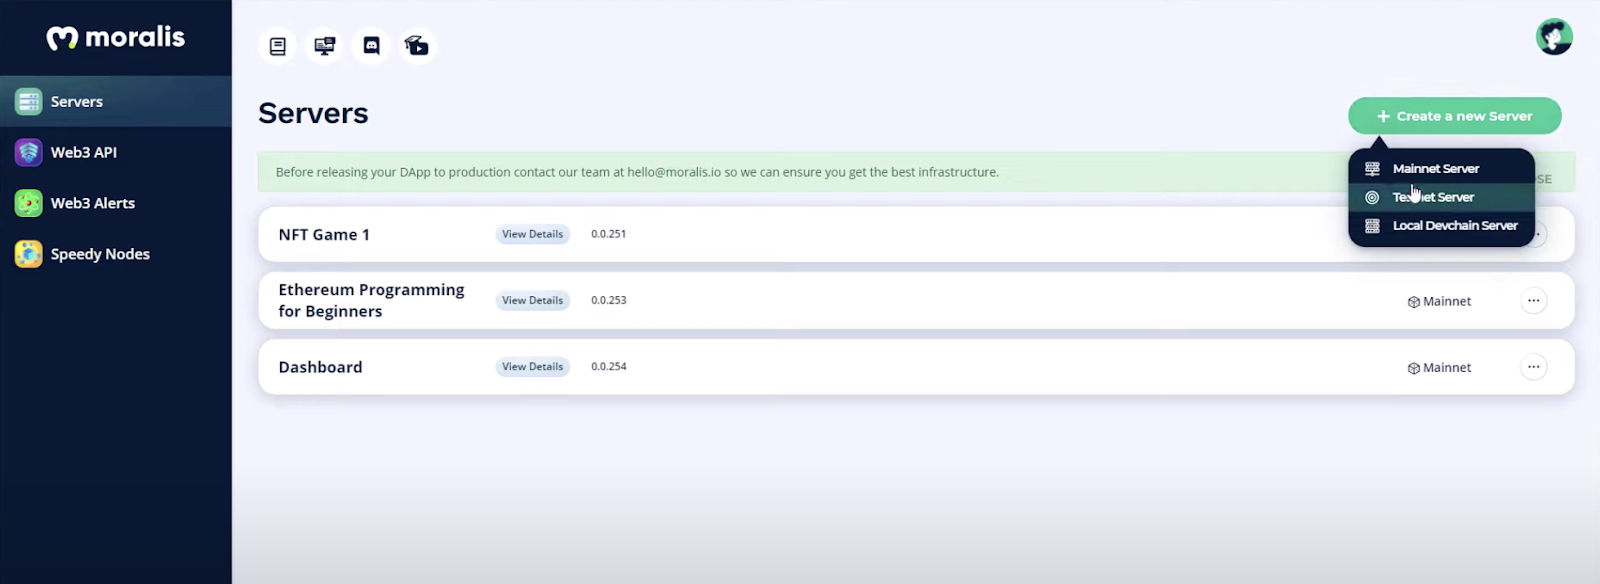
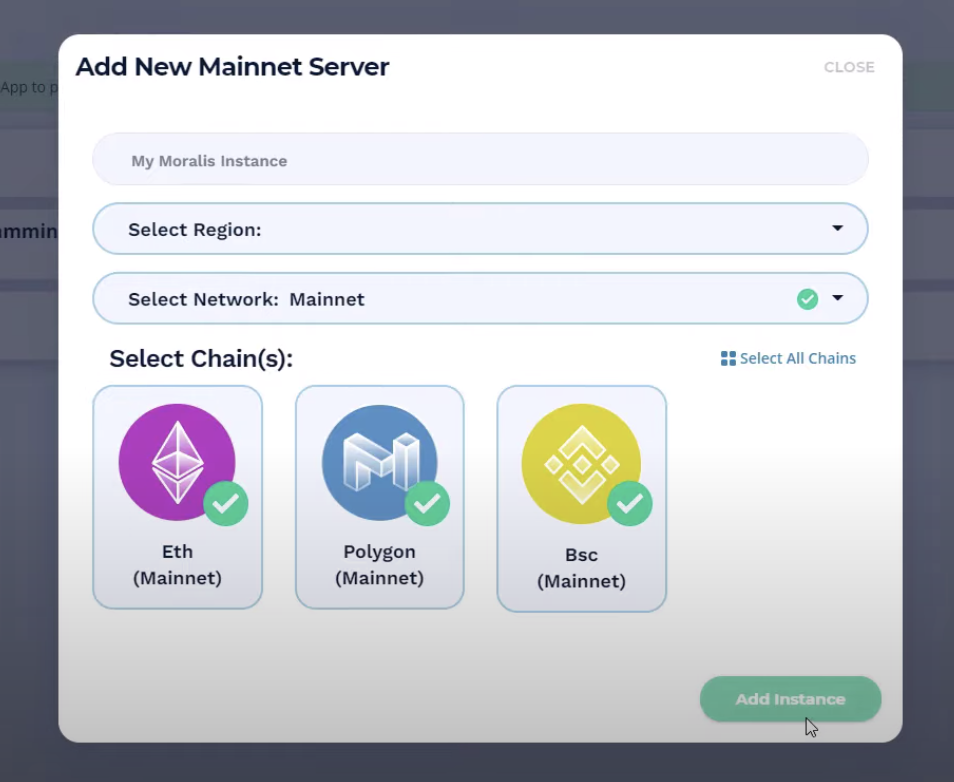
Notice how you can easily make your dApp cross-chain by choosing multiple blockchains at once. This demonstrates the power of Moralis in making the process of building cross-chain dApps with powerful support as simple as a few clicks.
Serverless dApp Creation
With Moralis handling your servers for you and providing serverless computing, you no longer need to do the heavy lifting. As such, you are free to focus on creating a beautiful frontend.
Make sure you obtain the server URL and application ID by clicking on “View Details” on the Moralis server instance bar and storing the information on the clipboard for future use in your development.
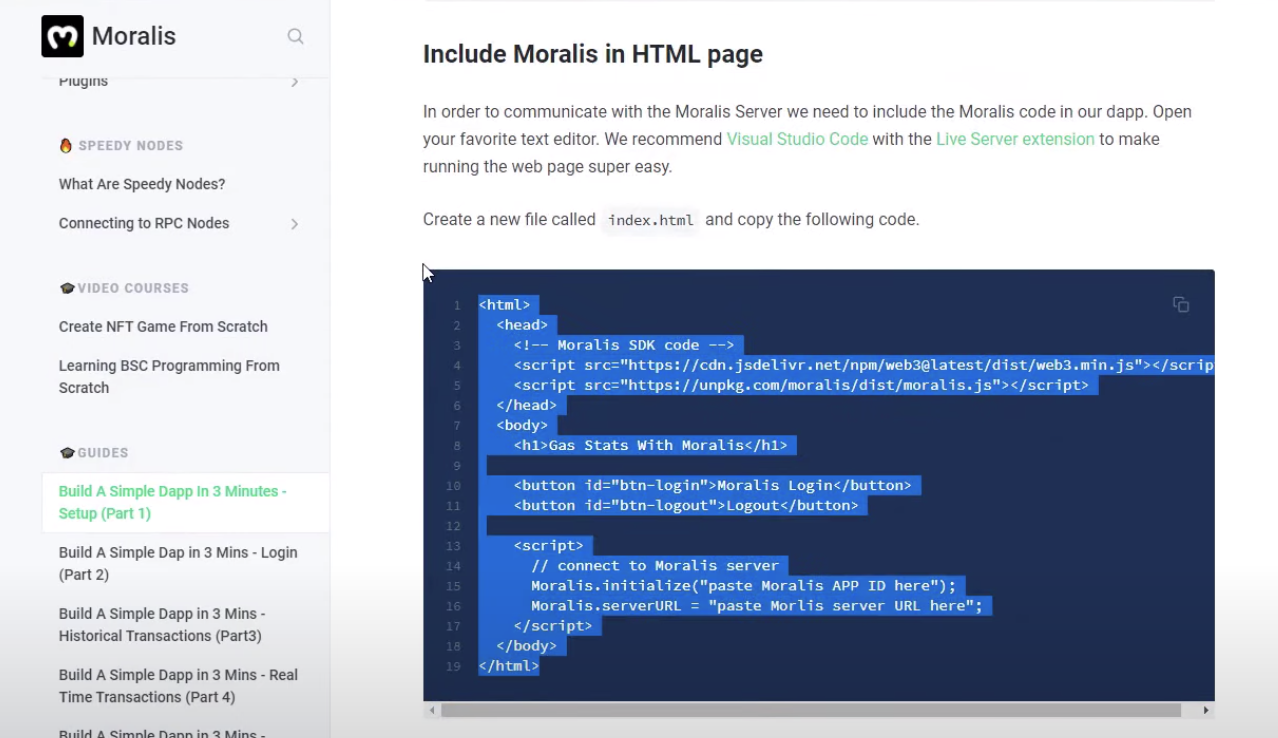
- Connect Your Moralis Server
Go to the Moralis documentation page. There, you’ll find the “Build a Simple dApp in 3 Minutes” section on the left-hand side – click on it. Then, scroll down, and copy the source code under the “Include Moralis in HTML Page” title and proceed with the steps in the video tutorial starting at 36:05.
- Keep Building Your Cross-Chain dApps
These are just the initial steps to get you started. Therefore, make sure that you proceed with the instructions in the above video tutorial to give you a comprehensive idea of how to build cross-chain dApps.
How to Build Cross-Chain dApps – Summary
With cross-chain dApps, the possibilities are multiplied. Ethereum remains the most widely-used blockchain in the world. However, chains such as Binance Smart Chain, Polygon, Avalanche, and Arbitrum are equally formidable in supporting your cross-chain infrastructure. Furthermore, Moralis offers you the chance to build on all of them.
You may choose to build dApps on Ethereum first and add cross-chain features later. The great thing about Moralis is that it’s made for this type of build and offers such options seamlessly. Thus, Moralis lets you plan out your cross-chain interoperable dApps from the ground up and gives you the options to scale as you go along.
What’s more, the Moralis snippets extension in Visual Studio Code helps you create numerous features on all kinds of cross-chain dApps. Learn more about Moralis snippets in the following video to speed up your Web3 programming and create feature-rich dApps in record time:
To make the most out of your cross-chain dApps, register an account on Moralis, the most powerful “swiss army knife” for Web3 developers today!
