Ethereum is still the most widely used network for Web3 development. However, adverse effects of the network’s popularity include a congested network and high Ethereum gas fees. This incentivizes developers to direct their attention elsewhere to more economically viable solutions such as the Polygon network. Polygon is a decentralized Ethereum platform that emphasizes low transaction fees and high scalability. Nevertheless, even with Polygon’s relatively low transaction fees, it’s still beneficial to utilize a testnet for blockchain development. Herein, we’ll look closer at the Mumbai testnet from Polygon and see how you can acquire free tokens through a Mumbai testnet faucet.
We’ll start by taking a closer look at the Mumbai testnet and the positive aspects that testnets bring to Web3 development. Then, we’re going to explain what faucets are and why they are necessary. Once you’ve read through the article, you will know more about developing dapps for the Polygon network.
Moreover, Moralis has native support for Polygon. So, if you’re serious about building Web3 projects for the Polygon network, you should definitely sign up with Moralis. The Moralis operating system is excellent for blockchain development, and as a member, you’ll be able to cut the average development time for all future projects by 87%. For example, with an account at hand, you’ll receive access to Moralis Speedy Nodes, which supports both Polygon’s mainnet and the Mumbai testnet. As such, this allows you to connect to Polygon nodes easily!
If you’re already familiar with Polygon, the Mumbai testnet, and faucets, check out the articles on how to build Polygon dapps and create a Polygon token. With Moralis, you’ll be able to develop dapps and tokens for the Polygon network with ease!
What is the Mumbai Testnet?
If you’re somewhat familiar with Web3 development, you know that all blockchain transactions require gas fees. Developing dapps on a mainnet can become quite expensive as launching and testing an application requires developers to pay for each transaction. This is where testnets, such as Mumbai, enter the picture to make it more economically viable to develop dapps.

Mumbai is Polygon’s testnet, and it’s a replica of the network’s mainnet. However, Mumbai’s testnet tokens are distinct and separate from the tokens of the Polygon mainnet. These tokens are supposed to be without value as it allows developers to experiment without committing to any real assets. It’s further a way for developers to ensure that a dapp works as intended without damaging the Polygon mainnet.
Once you have launched your dapp to the Polygon mainnet, it’s also possible to utilize Mumbai when upgrading your project. As such, you can test all changes on the Mumbai testnet before making any real commitments to your main dapp. The same principles apply to smart contract development, making it more beneficial to test smart contracts before deploying them to a mainnet.
If you’d like to learn more about creating contracts, check out our guide on how to create smart contracts. That tutorial explains the intricacies of smart contract development and the necessary skills required.
What is a Faucet, and Why is it Necessary?
Using the Mumbai testnet for Polygon dapp development provides loads of benefits and will allow you to save both valuable time and resources. However, even if you’re developing on the Mumbai testnet, you still require the network’s native token, which is where faucets enter the equation.

Faucets are applications or websites distributing small amounts of tokens that developers can utilize to pay for gas fees on a testnet. Hence, using a Mumbai testnet faucet allows you to acquire the network’s native token entirely for free.
Mumbai’s native token is also called MATIC; however, as explained in the previous section, they are separate and distinct from Polygon’s native token. That means they don’t have any value for trading but are helpful for Web3 development.
Faucets aren’t unique to Polygon, and faucets are also available for other networks. That means you can find faucets for Bitcoin, Ethereum, BNB Chain, etc. As such, it’s possible to acquire free tokens for other testnets alike, making it feasible to apply the same principles to other blockchain networks.
So, now that we have a more solid understanding of what the Mumbai testnet is and what faucets entail, we can take a closer look at how a Mumbai testnet faucet works!
Mumbai Testnet Faucet – Getting Free Testnet MATIC Tokens
In the following sections, we’ll take you through the process of acquiring MATIC through a Mumbai testnet faucet. Getting MATIC for the Mumbai testnet is relatively easy; however, to make the process even more comprehensible, we’ll break it down into the following three steps:
- Acquiring a MetaMask Wallet
- Adding the Mumbai Testnet
- Getting the Tokens
If you’re new to the blockchain development space, you might not be familiar with MetaMask or cryptocurrency wallets in general. We recommend reading the article explaining Web3 wallets if that’s the case. That article will provide you with a brief overview of what they are, why they are useful, and some different alternatives.
But, without further ado, let’s kick everything off by setting up MetaMask!
Step 1: Mumbai Testnet Faucet – Acquiring a MetaMask Wallet
In this initial step, we’ll provide a brief walkthrough of the setup process for MetaMask. However, if you already have a MetaMask wallet at your disposal, you can simply skip this step and move on to the second part of this tutorial, where we show you how to add the Mumbai testnet to your wallet.

MetaMask comes in two versions; either as a mobile application or a browser extension. For this example, we’ll utilize the extension. Thus, the first thing you must do is download MetaMask to your browser. You can do so by visiting the official MetaMask website and clicking on the “Download” button at the top right of the interface.
Once you’ve added the extension, you’ll need to create an account. MetaMask will provide two options here. You can either create a new wallet from scratch or import an already existing one using a seed phrase. Both alternatives work just fine, and all you need to do is follow the instructions provided by MetaMask. However, if you decide to create a new wallet from scratch, make sure to keep the seed phrase safe and secure since it’s if you ever need to recover the wallet.
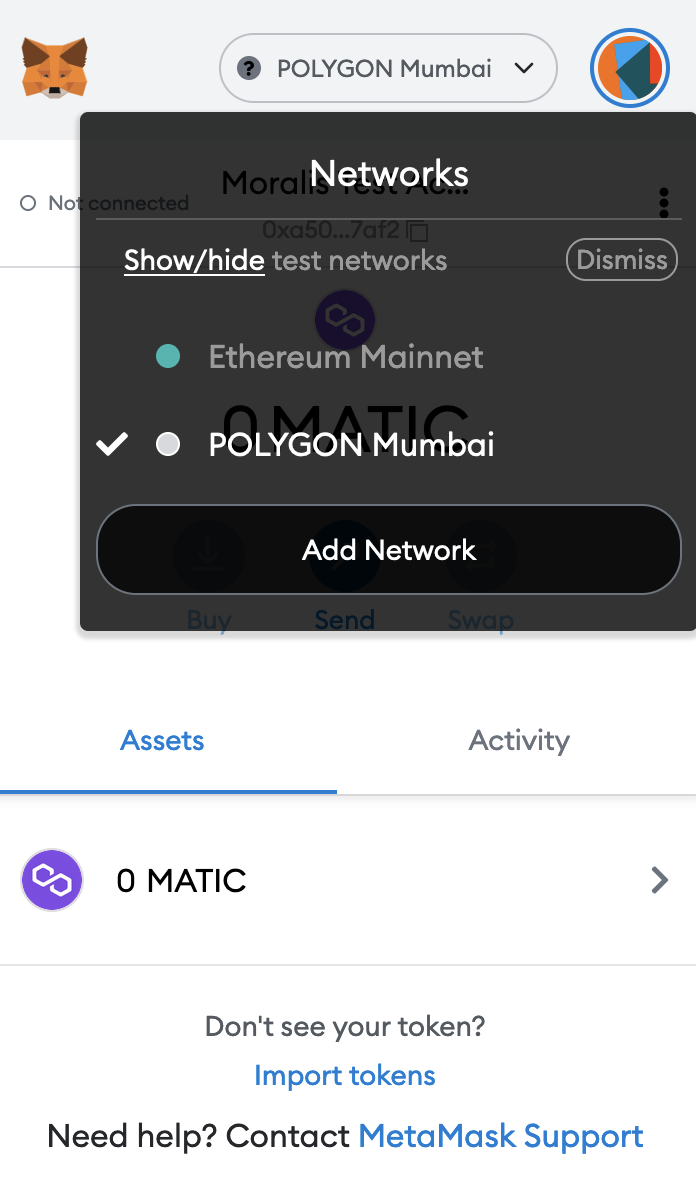
With an account at your disposal, you’ll see the ”Networks” drop-down menu at the top of the MetaMask interface. If you click on this menu, you’ll quickly notice that the Mumbai testnet isn’t among the default alternatives. This takes us to the next step, where we need to manually add the Mumbai testnet to our wallet.
Step 2: Mumbai Testnet Faucet – Adding the Mumbai Testnet
This section will present two alternative ways of adding the Mumbai testnet to our MetaMask wallets, and we’re going to initiate with the Moralis option. If you haven’t already, you’ll need to sign up with Moralis. Not only will this allow you to easily add the Mumbai testnet to your wallet, but it will prove useful in any future Web3 development endeavors.
With a Moralis account at hand, all you need to do is navigate to the ”Speedy Nodes” tab, click on the ”Endpoints” button for the Polygon network, and finally click on ”Add to MetaMask” for the Mumbai alternative. Once you click this button, this should prompt your MetaMask wallet, and you’ll be able to add the network.

The second alternative is “Chainlist.wtf”, and once you navigate to the website, you can search for the Mumbai testnet. Once you find the proper network, you can continue by clicking on the ”Connect Wallet” button.

This will allow you to either authenticate with MetaMask or with WalletConnect. If you’re using a mobile application, you can utilize WalletConnect to add the network. Otherwise, you can press the MetaMask alternative, which should prompt your extension. All that remains is to follow MetaMask’s instructions, and the network should be added to your wallet!
Step 3: Mumbai Testnet Faucet – Getting the Tokens
Now, with the Mumbai testnet added to our wallets, we can continue and acquire the tokens themselves. However, before this, you’ll need to change the MetaMask network. To do so, you need to click on the ”Networks” drop-down menu and select the newly added Mumbai testnet.
With the right network selected, you can also go ahead and copy your wallet address. With the address at your disposal, you can navigate to “https://faucet.polygon.technology”. All that remains is to paste your wallet address into the appropriate field and submit.
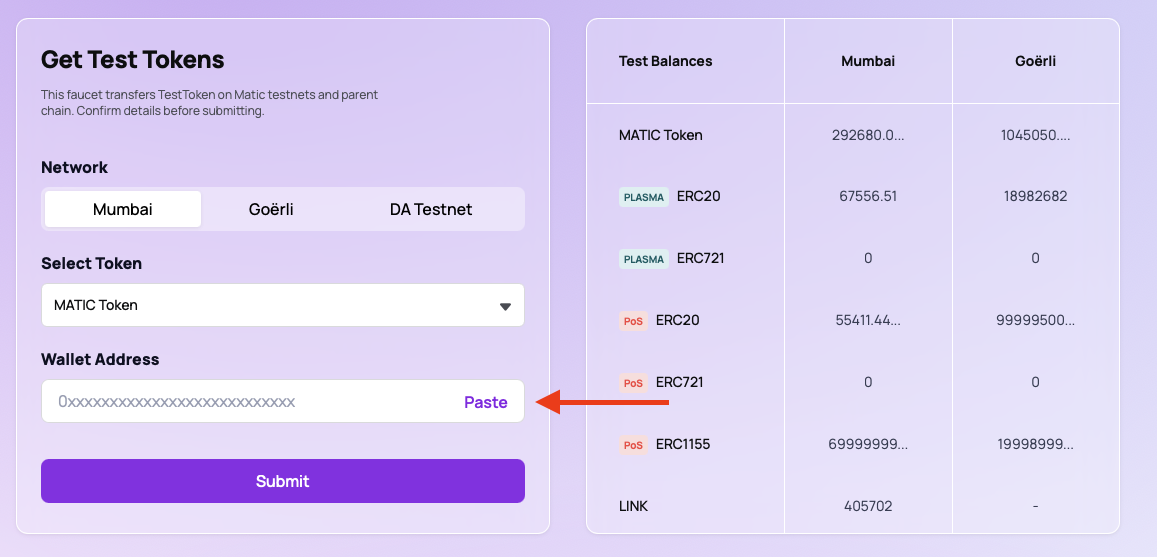
As a result, the faucet will supply your account with 0.5 MATIC that you’ll be able to use when launching and testing dapps on the Mumbai testnet. Note that the tokens might not appear in your wallet immediately, but worry not, as the tokens should be added to your wallet momentarily.
That’s it for acquiring MATIC tokens through a Mumbai testnet faucet; however, if you’re looking to develop dapps for any other chain, you should be able to follow the same process and, for example, add tokens for any Ethereum testnet just as easily!
Exploring Polygon with PolygonScan
PolygonScan is the definitive blockchain explorer for the Polygon network, and explorers are some of the most frequently used tools within the crypto industry. A blockchain explorer utilizes data from a network which is then presented to users in an accessible and searchable format.

Essentially, PolygonScan allows users to explore the Polygon network, similar to what BscScan does for Binance or Etherscan does for Ethereum. Furthermore, PolygonScan is developed by the same team behind both Etherscan and BscScan. As such, if you’re familiar with either one of these blockchain explorers, you won’t have any trouble navigating the others.
PolygonScan allows users to check all sorts of blockchain data, including transactions, addresses, average gas prices, daily gas usage, average block sizes, etc. The blockchain explorer also launched with highly requested features, such as intuitive transaction tracking along with contract and ABI verification. Also, PolygonScan is further available as a blockchain explorer for the Mumbai testnet. As such, the same features that are available on the blockchain explorer for the Polygon mainnet are also available for the testnet. This makes it even more accessible to launch and test dapps before committing to the mainnet.
Furthermore, PolygonScan provides a better user experience for anyone using dapps on the Polygon network. It doesn’t matter if you’re trading, selling, buying NFTs, or playing your favorite blockchain-based game; PolygonScan provides a better experience for everyone.
Moreover, if you’re interested in blockchain game development, you should definitely check out the Moralis Metaverse SDK. This kit will allow you to, for example, build a medieval metaverse game in no time!
Mumbai Testnet Faucet – Summary
If you’re familiar with Web3, you understand that all blockchain transactions require gas fees. As such, it’s beneficial to launch and try out dapps on a testnet before committing assets to a mainnet. One such network is Polygon’s Mumbai testnet – a replica of the network’s mainnet.
However, one distinction between Mumbai and Polygon’s mainnet is the native tokens. The Mumbai token doesn’t have any inherent trading value and is only helpful for Web3 development. Due to the nature of this token, it’s possible to acquire them entirely for free using a Mumbai testnet faucet. This suggests that it’s more economically viable to develop dapps on a testnet as you don’t have to pay for gas fees using “real” tokens.
Acquiring MATIC through a Mumbai testnet faucet is relatively easy, and we demonstrated how to do so earlier in the article. In fact, it’s possible to get tokens through the following three steps:
- Acquiring a MetaMask Wallet
- Adding the Mumbai Testnet
- Getting the Tokens
However, a Mumbai testnet faucet is only one of many useful tools when it comes to Web3 development. If you’re serious about it and want to become a blockchain developer, you need to check out Moralis.

As a member of Moralis, you’ll receive access to some of the best development tools on the market. Along with the Moralis Metaverse SDK that we mentioned earlier, you’ll also gain access to Moralis’ NFT API, Price API, native support for IPFS, and much more!
If you want to delve deeper into blockchain development, sign up with Moralis. Creating an account is free, and you can begin your journey as a developer right away! In addition, if you’re interested in becoming blockchain certified, make sure to check out Moralis Academy. There, we offer industry-leading blockchain courses that are video-led by industry experts! Let Moralis Academy kickstart and future-proof your career, from start to finish!
