The metaverse has piqued the interest of users and large tech companies worldwide. As such, we realize that the Web2 internet age is passing, and the rise of a new era is looming – the metaverse. With the metaverse and Web3 realm on the horizon, now is the time to dive deeper into this new field and learn how to create your own metaverse. Will it be your virtual landscape that will attract the masses? Who knows what the future holds for any of us, but one thing is certain, fortune favors the bold! Therefore, we strongly encourage anyone who aspires to become a blockchain developer to follow along in this article as we will demonstrate how you can create your own metaverse.
Of course, as you might have guessed, creating a metaverse is an advanced task. However, it is a lot simpler than you might think. When you use the right Web3 tech stack, you can create your own metaverse with your JavaScript or Unity skills. Furthermore, when using the Moralis SDK, you can focus on the frontend while this “Firebase for crypto” platform covers your backend. Also, when using the best Web3 backend platform, you’ll save a lot of time and resources. Thanks to Moralis’ documentation, you can copy and paste short code snippets to cover Web3 functionality with ease. On top of that, you have a wide range of options since Moralis is all about cross-chain and cross-platform interoperability. So, create your free Moralis account and join us as we tackle our example project herein.

What is the Metaverse?
Before we can show you how to create your own metaverse, we need to cover the basics. So, what is the metaverse? In its most broad definition, the metaverse is a virtual universe that people can access via electronic devices. Sure, the most advanced metaverse would enable full immersion, including several if not all five senses (think Ready Player One). However, the technology is not there yet for us to experience that kind of immersion. The “metaverse” term is currently mainly focused on various online projects that exist on top of blockchain technology. The latter introduces the aspect of much sought-after decentralization. Thus, it has the power to make digital platforms censorship-resistant. Also, it enables users’ true ownership of virtual assets, which they can trade at free will. Furthermore, blockchain-based metaverses also incorporate digital economy (cryptocurrencies), which has its own appeal.
With that said, basically all Web3 games (GameFi and play-to-earn [P2E]) are considered a Web3 metaverse, in one way or another. The same is true for platforms that utilize NFTs and allow users to socially interact on-chain. As such, not all metaverses are 3D. Hence, we will create a simple 2D metaverse moving forward. Nonetheless, if you want to dive deeper into the metaverse, read our “What is the Metaverse?” article!
Create Your Own Metaverse – Example Project
Before we roll up our sleeves and start coding, we will take a look at a demo of our metaverse example. As a result, you will get a clear picture of what to expect moving forward. That will also help you decide whether or not you want to create your own metaverse of this sort. After the demo, we will focus on maps. The latter is a pretty important part of our virtual land, which is the core of our metaverse example. Our next step will be all about animating our map, which will be the most extensive part of our quest. After successfully animating our map, we will show you how to get plot data. Next, we will take a look at our smart contract. Finally, we will complete blockchain integration, which is where Moralis will make things a lot simpler.
Create Your Own Metaverse – Demo
Since a picture is worth a thousand words, let’s look at the screenshot of our metaverse:
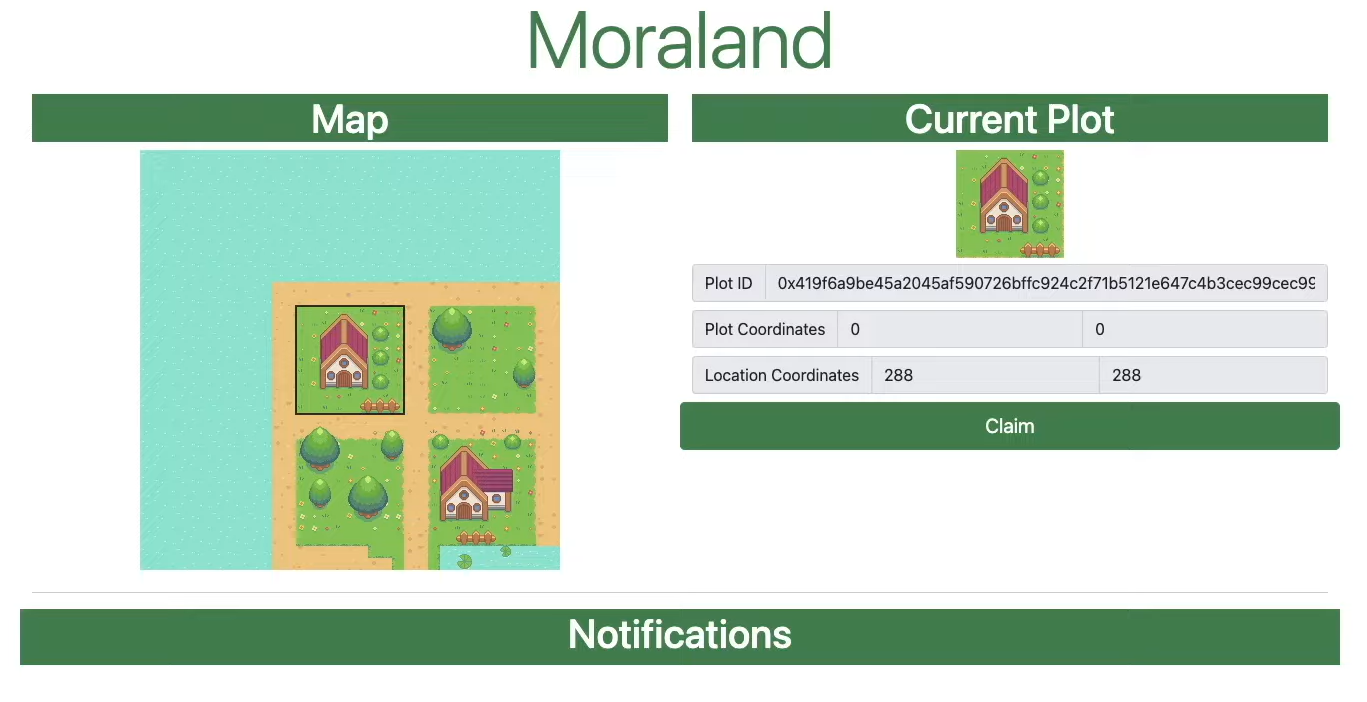
As you can see, we named it “Moraland” (short for Moralis land). Furthermore, we decided to keep the interface as simple as possible. As far as our map goes, we’ve drawn inspiration from Pokemon. Our metaverse’s interface has two main sections: the map and the current plot. The map comes with a selection tool (black square), which enables users to select various plots. Moreover, the selected plot is then displayed inside the “Current Plot” section. The latter includes the selected plot’s ID, plot coordinates, and location coordinates. Also, there’s the “Claim” button, which enables users to claim the selected plot. Of course, only plots that haven’t been claimed yet are applicable. So, if a user tries to claim plots that were claimed before, the “Plot is already assigned” notification will appear:

In addition, certain plots, like those on water, can’t be claimed. When such plots are selected, the “Claim” button is automatically disabled:

The above three screenshots display the gist of our example metaverse, which is all about virtual lands. Of course, this is just the frontend of which animating the map is the trickiest part. However, the thing that qualifies our application as a simple metaverse is hiding on the backend. This is where we used the Moralis SDK and our smart contract example. The latter takes the plots of our virtual land and converts them into on-chain assets. As such, we create (or mint) non-fungible tokens (NFTs) that represent the plots and can be owned by users. Hence, let’s also do a quick demonstration of claiming the selected plot.
Claiming a Plot of Land in Moraland
So, let’s say a user wants to claim this coastal plot of land:

After clicking on the “Claim” button, their MetaMask extension prompts them to confirm the transaction:

Since there’s no cost associated with our plots, they only need to cover the transaction fees. After they complete the transaction, the “Notifications” section will provide them with a transaction hash:

They can use that transaction hash to check the details of the above transaction. Moreover, since we are using Polygon’s testnet (Mumbai), we can do so with PolygonScan (Mumbai):

For the sake of this example project, we enabled users to directly claim the plots. However, we could take things further and also include pricing and, thus, enable users to sell the lands. The lands could then be traded among users. We could also build an NFT trading interface to be implemented. As such, we strongly encourage you to explore these additional options. However, first, create your own metaverse using the instructions below. Nonetheless, in case you’re more of a video person, make sure to check out the video at the end of this article. The demonstration of our example metaverse starts at 0:46.
Create Your Own Metaverse – Code Walkthrough
Moving forward, you can just read/watch our tutorial, or you can take action yourself. The latter will enable you to create your own metaverse. If you decide to roll up your sleeves, you have two options. You can use our starter code and implement the necessary code yourself, or you can use our final code. The latter will enable you to create your own instance of this example metaverse in minutes. Nonetheless, both of these codes await you on GitHub.
Here’s our example project’s folder structure inside Visual Studio Code (VSC):

As you can see in the screenshot above, our “MORALAND” folder includes the “Contract”, “Maps”, and “Moraland_Frontend” folders. The first one contains the smart contract that will enable us to mint NFTs and make sure that our plots become on-chain assets. We made things as simple as possible for ourselves by using OpenZeppelin. There, we obtained an ERC-721 contract, which is verified and suitable for minting ERC-721 tokens. The second folder contains all the details, including open-source PNG assets, that form the graphics of our map. The third folder is all about the frontend, as presented in the above demo.
Virtual Lands – Creating and Animating Maps
Dealing with maps can be quite useful; however, it is not what makes our example application a metaverse. Thus, it is not something we want to focus on primarily. Instead, we leave it up to you to explore the details of the “Maps” folder on your own. However, make sure to use the video below starting at 3:48 for a walkthrough of the folder in question:

Starting at 7:50, you will begin to unravel the mystery of animating the above map. This is where you will work with the “index.html” and the “logic.js” files inside the “Moraland_Frontend” folder. Further, your goal will be to create the same frontend as presented in the demo above.
Obtaining Plot Data
After successfully animating the map, you’ll need to get the plot data into the “Current Plot” section. If you remember, the plot data includes the following:
- Plot ID
- Plot Coordinates
- Location Coordinates
You will get the plot data inside the “logic.js” folder with the following lines of code (video below at 45:16):
function setPlotData() {
    const plotID = ethers.utils.id(JSON.stringify(plotView));
    document.getElementById("plotX").value = plotView.plotX
    document.getElementById("plotY").value = plotView.plotY
    document.getElementById("locationX").value = plotView.locationX
    document.getElementById("locationY").value = plotView.locationY
    document.getElementById("plotID").value = plotID;
    isPlotAssignable(plotID);
}
Here, the plot ID is the most important data, which you will “hash” using the Ethers.js library. The latter is included in Moralis. This line of code grants access to it:
const ethers = Moralis.web3Library;
Moreover, you’ll also want to ensure that the animate functions and the “initializedMap()” functions incorporate “setPlotData()”. Finally, you will add the code required to determine which plots are not claimable (50:53).
ERC-721 Smart Contract
At this point, you should have your frontend ready. Thus, it’s time to shift your attention to the backend. This is where our metaverse smart contract will play an essential role (54:09). You can access the “Moraland.sol” smart contract on GitHub. The latter is basically an ERC-721 contract boilerplate. We did add our unique “assign” function to properly deal with our plots. Also, we are using the “exist” function to check if the current plot already exists as an NFT. As such, we are able to determine if the plot in question has already been claimed. Moreover, you can just copy the code and paste it into Remix. There, you will be able to deploy it to the Mumbai testnet.

Using Moralis to Create Your Own Metaverse
Using Moralis is pretty straightforward. Moralis makes creating all sorts of dapps (decentralized applications), including metaverses, feel like a breeze. All it takes is a couple of minutes to complete the initial setup. So, after creating your free Moralis account, you can log in to your Moralis admin area and create your Moralis server (57:36). Once your server is up and running, you get to obtain its details (server URL and application ID). Then, you add those details to the top of the “logic.js” file:
const serverUrl = "PASTE YOUR SERVER URL";
const appId = "PASTE YOUR  APP ID";
The above lines of code will enable you to access Moralis’ SDK, but you also need to include some other Web3 constants:
const contractAddress = ""; // your own contract
const contractABI = []; // your contract’s ABI
You get to copy both of the above contract details from Remix after deploying the above-presented contract (59:28). Next, you will need to add the proper Web3 functions (1:01:05). That way, you will cover Web3 authentication and enable your dapp to interact with the smart contract. As such, you will ensure that NFTs representing claimed plots get minted. This is also where you will make sure that the “Plot is already assigned” notification is displayed for the previously claimed plots.
Finally, here’s the video tutorial we’ve been referencing throughout the article:
How to Create Your Own Metaverse – Summary
We’ve covered quite a lot of ground throughout our “how to create your own metaverse” quest. First, you’ve learned what the metaverse is. Then, you were able to see a demo of our metaverse example. Next, you had a chance to roll up your sleeves and create your own metaverse. Along the way, you’ve deployed your own instance of our smart contract and created your Moralis server. Ultimately, you now know what it takes to create your own metaverse. So, if you enjoyed this example project, we encourage you to visit the Moralis blog and the Moralis YouTube channel. There, you’ll find several tutorials revolving around the metaverse and NFT use cases.
There are also many other tutorials on these two outlets to help you explore the entire crypto realm. For instance, if Web3 game design interests you, you need to check out our Unity Web3 projects. Or, perhaps you want to learn how to build a Web3 Spotify clone, a Web3 Netflix clone, or a Reddit clone for Web3. In addition, you may want to focus on our latest topics and tutorials. These illustrate how to create a BNB NFT, what fractional NFTs are, how to build a play-to-earn (P2E) game smart contract, what NFT-based memberships are, what dynamic NFTs are, how to build a Uniswap DEX clone, how to get blockchain SMS notifications, and how to add a Web3 connect wallet button.
Nonetheless, if you want to become a Web3 developer fast and with confidence, consider enrolling in Moralis Academy. Aside from top-quality blockchain development courses, you’ll also get a personalized study path. However, an even greater value lies in expert mentorship and in becoming a member of one of the most advancing communities in the industry.
