Building a functional and high-quality NFT trading interface should, without a doubt, be part of the NFT token development curriculum. Creating an interface for NFT trading that holds all the necessary functionalities and components also plays a massive role in how users find your Web3 app valuable or not. Moreover, you might have noticed a lack of quality interfaces and, more importantly, practical solutions to develop an NFT interface. However, when taking advantage of Moralis’ ultimate Web3 development platform (a.k.a. Firebase for crypto), you can easily build an NFT trading interface that will attract users and make it stand out from the competition.
In this full guide, you’ll learn how to use Moralis to create a fully functional NFT interface which will teach you how to make the most out of this blockchain developers’ suite. Moreover, by building an example NFT trading interface yourself, you’ll get a clear understanding of how Moralis takes complete care of the blockchain-related backend. As such, it enables you to devote your resources to the most critical aspect of most dApps (decentralized applications) – the creation of an appealing and user-friendly interface. If you have any experience with programming, you know that an excellent user interface (UI) ensures a great user experience (UX), which leads to the success of an application. Furthermore, especially with an NFT trading interface, the UI must be a perfect combination of simplicity and eye-catching looks. Moreover, with Moralis covering your backend, you get a chance to deliver precisely that.
Build an NFT Trading Interface – Example Project
As mentioned above, we will take on the challenge of building an example NFT interface. We encourage you to follow our lead and build your own version of an NFT trading interface using Moralis’ SDK, including its ultimate NFT API. Moving forward, we will first do a preview of the example NFT interface that we’ll be creating. Next, we’ll cover the necessary setup. Then finally, we’ll walk you through the code required to finish this example project. Of course, we encourage you to then use your JavaScript skills to create a unique UI, which will provide your users with a memorable and seamless NFT experience.
Preview of Our NFT Interface
Having a clear image of what you’ll be creating is important when programming. As such, we prepared some screenshots of our NFT trading interface accompanied with an explanation, which should paint a clear picture of where we’re headed.
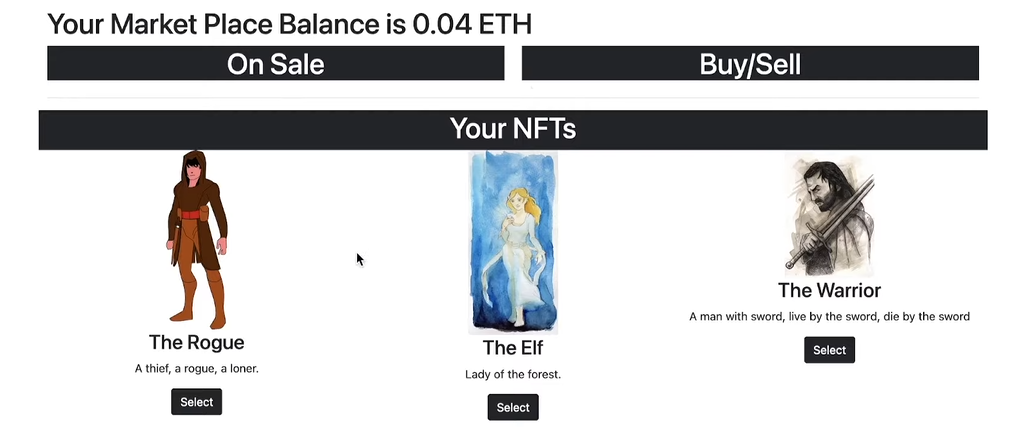
Looking at the screenshot above, you’ll notice that our example NFT trading interface includes several options and features. These options and features are as follows:
- Display a logged-in user’s native token balance. You can see this at the top of our dApp. It’s important that the user can see the available token balance to purchase NFTs for.
- Monitor NFTs that are on sale in our marketplace. This is covered by the “On Sale” section (it is empty in the screenshot above).
- Users are given a chance to buy or sell NFTs. This option is covered by the “Buy/Sell” section, which displays NFTs that the user decides to take action on (buy or sell).
- Our NFT interface also displays collections that a logged-in user holds. The “Your NFTs” section serves that purpose.
Note: Both the “On Sale” and the “Buy/Sell” sections contain no NFTs in the screenshot above because there are no NFTs that we or any other user that uses our example NFT trading interface (our marketplace) is selling.
Preview of Our NFT Interface – Listing an NFT
With the basics of our NFT interface covered, let’s now see it being used to list an NFT. We start by selecting one of the NFTs in the connected wallet. We do this by clicking on the “Select” button under one of the NFTs in the “Your NFTs” section.

By doing so, the NFT becomes available in the “Buy/Sell” section, which indicates that we can perform an action regarding that NFT. This gives us a chance to enter the price and offer the selected NFT for sale by clicking on “Offer for Sale”. Next, our MetaMask is automatically prompted, asking us to confirm the transaction. MetaMask is one of the best authentication tools and is fully integrated with Moralis. After confirming the transaction, it should get processed on-chain (sufficient funds are required). Once the transaction is processed, we are able to see the NFT in the “On Sale” section:

Preview of Our NFT Interface – Buying an NFT
Let’s now cover the second aspect of what a proper NFT trading interface should offer – buying NFTs. Keep in mind that users cannot buy their own NFTs. As such, we use another account to showcase this feature. In the screenshot below, you can see us using another account to purchase the above-listed NFT. For starters, we focus on the “On Sale” section, where we click on “Select” next to the listed NFT. This displays it under “Buy/Sell” (a.k.a. the “take action” section). Next, we click on the “Buy” button under the selected NFT, which prompts MetaMask to ask for confirmation:

Once the transaction is confirmed, the NFT is successfully purchased. Thus, it is no longer available in the “On Sale” section. However, it is now present in the accounts “Your NFTs” section. Of course, this also gives the new owner an option to sell that NFT:


This wraps up our preview. As you can see, we went with a plain design for our example NFT trading interface. We did that because the goal of our NFT interface is to show you the impressive backend functionality available when using Moralis. However, when you create your own NFT trading interface, make sure to put your creativity to work to ensure the most eye-catching interface and most user-friendly experience.
Build an NFT Trading Interface with Moralis
To obtain all of the functionalities showcased in the previous section, we need the following backend features and components:
- User Authentication – Your NFT interface must be able to authenticate users (Web3 login). Without logging in, your dApp doesn’t have the necessary insight in their wallet and their NFTs.
- Tracking Users’ Balance – If you remember, our dApp shows the native token’s balance at the top. As such, you need to be able to track your users’ balances in real-time.
- Tracking Smart Contract Events – As you may know, we rely on smart contracts that are operators of our marketplace and other smart contracts, including those used to mint NFTs to provide signals (events). Therefore, we must have a way to track smart contract events in our dApp.
If you have taken on the old-fashioned approach of creating a dApp in the past, you know that the limitations of RPC nodes make things tedious and time-consuming. Thus, setting all of the above backend functionalities in place would take you weeks. Fortunately, Moralis enables us to reduce that time by ninety percent, mainly because it enables us to cover the entire backend of our dApp by copying and pasting short snippets of code from the Moralis documentation. Moreover, Moralis is all about cross-chain interoperability, which means that you can create a multi-chain NFT trading interface and, in turn, future-proof your work. As such, make sure to follow the initial setup required to use Moralis’ SDK.

Initial Setup – Create a Moralis Server
Whether you want to use Moralis to build an NFT trading interface or any other dApp, you need to create your Moralis server first. Follow these steps to do this properly:
- Create Your Free Moralis Account – Click the link, enter your email, create your password, and click the confirmation link that will be sent to your email. However, if you already have a Moralis account, just log in to access your admin area.
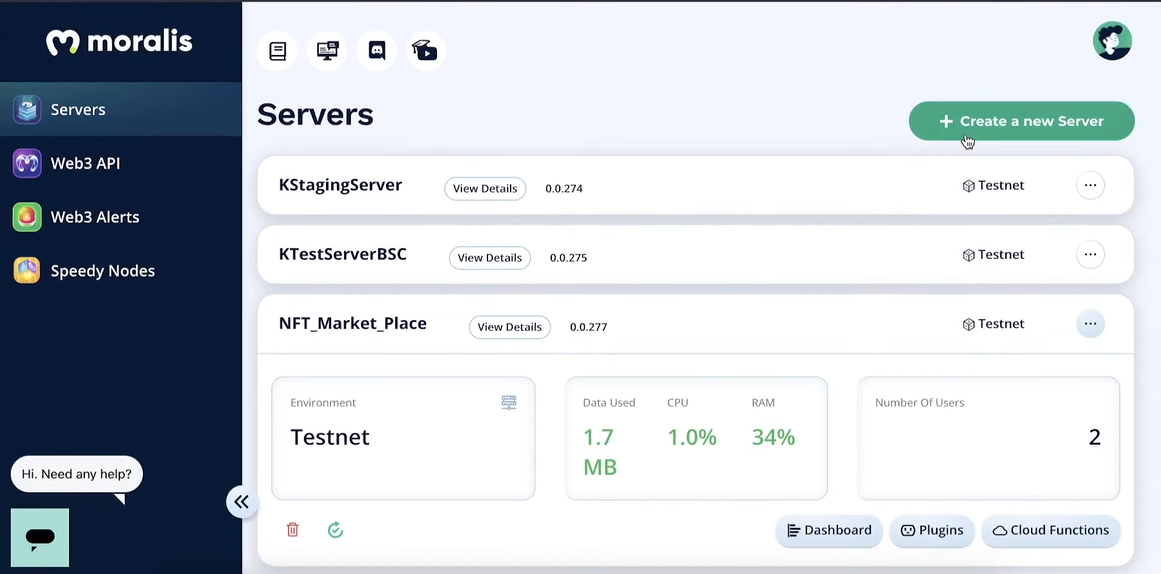
- Create a Moralis Server – Once logged in, select the “Servers” tab on the left-hand side in the navigation tab. Then, click on the “+ Create a new Server” button in the top-right corner and select the network type that best suits your needs (see the image below) from the drop-down menu. When working on example projects, always select the “Testnet Server” option (connect to Ethereum testnets).

Next, a pop-up window asking for server details will appear. Just enter the server name (this can be anything you want), select your region, select network type, chain(s), and spin up your server by clicking on the “Add Instance” button:

- Access Server Details – Now, you get to access your server’s details by clicking on the “View Details” button:

All the information you need will be displayed in a new window. You can copy those details (one by one) by clicking on the copy icons:

- Initialize Moralis (skip for now) – To obtain the required backend functionality covered by Moralis, you need to populate your coding files (“.env” [if using the Web3 boilerplate], “.js”, “.html”, “.jsx”, etc.) with the Moralis server details (application ID and server URL):

The above setup is essential in order for you to build dApps with Moralis. Fortunately, you can see how easy those steps are. Now that you have an active server, you can put Moralis’ Ethereum API to use.
Sync and Watch Contract Events with Moralis
One of the great features of Moralis is its capability to sync and index smart contract events. Moreover, if you remember the list of functionalities we need, this is on our to-do list.
Creating sync events with Moralis is easy, and you use your Moralis server (“View Details” > “Sync” tab) to do so. For the purpose of creating your example NFT interface, you will need two “listeners” (see the image below) – one for detecting when a new offer is placed (selling) and another one to know when an offer is closed (buying).
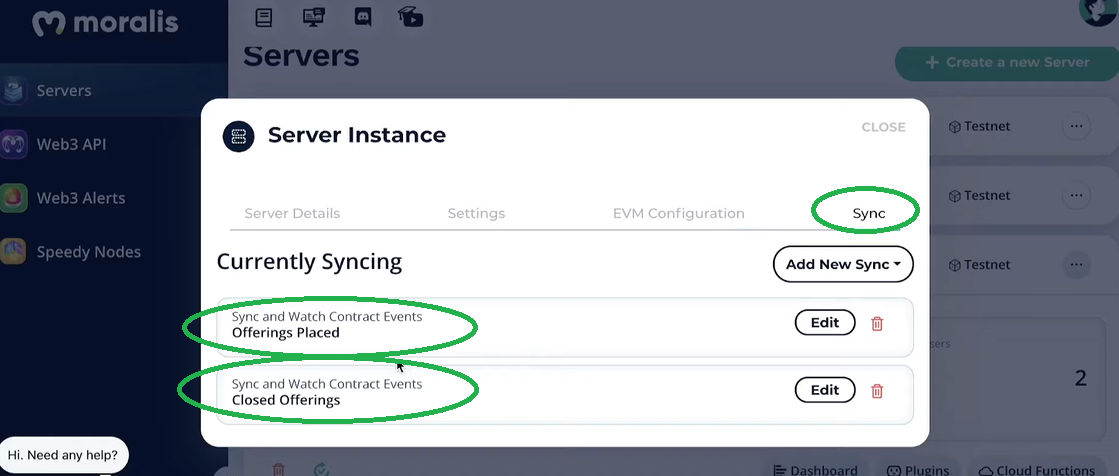
In addition to the “Sync” feature, Moralis also comes with a database (Moralis dashboard) for your server. You can access live on-chain data in your database regarding your users, including their token balances, transaction history, pending transactions, NFTs, and much more. Moreover, this is also where the signals from our listeners show up:

With the two listeners in place and our database at our disposal, we have all the on-chain data we need to create the above-presented NFT trading interface.
Build an NFT Trading Interface with Moralis – Code Overview
There are two parts we need to cover in order to build our example NFT interface. We need to create a dApp, which will be our authorized contract operator of the marketplace. Also, we need to use a smart contract to ensure that all transactions execute accordingly. Let’s start with the latter.
Note: You can access our smart contract on GitHub.
Here are the events that our smart contract covers:
contract MarketPlace{

    event OfferingPlaced(bytes32 indexed offeringId, address indexed hostContract, address indexed offerer,  uint tokenId, uint price, string uri);
    event OfferingClosed(bytes32 indexed offeringId, address indexed buyer);
    event BalanceWithdrawn (address indexed beneficiary, uint amount);
    event OperatorChanged (address previousOperator, address newOperator);
Moreover, the remainder of our smart contract code defines specific functions to ensure that the above four events are fully covered. As such, we ensure that things follow general rules. For instance, users can only sell NFTs in their possession, and buyers can only purchase listed NFTs. In addition, our smart contract also assigns the price to the token in question.
Build an NFT Trading Interface with Moralis – The dApp Part
This is where we ensure that the users get to view and use our NFT interface as presented in the “Preview of Our NFT Interface” section. Further, there are many ways to go about creating dApps; however, we prefer to use JavaScript. As such, we created the “logic.js”, “cloudCode.js”, and “index.html” files in Visual Studio Code, and the files are at your disposal on GitHub. Moreover, the main functionality of our dApp is achieved with the “logic.js” file. This is also where you get to complete the final step of the “Initial Setup – Create a Moralis Server” section. Just paste your Moralis server URL and application ID in a designated line of code:
Moralis.initialize(""); // Application ID from moralis.io
Moralis.serverURL = ""; // Server URL from moralis.io
The lines of code below cover the main purpose of our dApp. By using “Moralis.authenticate()”, we ensure that proper functions are executed upon authenticating users:
 Moralis.authenticate().then(function(){
    populateNFTs();
    populateOfferings();
    populateBalance();
    subscribeOfferings();
    subscribeBuys();
    subscribeUpdateNFTs();
});
Our code works with the “populate” and “subscribe” functions. Therefore, it obtains the proper data and neatly displays it for our users. This is where Moralis does all the heavy lifting by obtaining data from your “moralisDashboard” database. Further, these are the core code snippets used for that purpose:
Moralis.Query("PlacedOfferings")
Moralis.Query("ClosedOfferings")
Moralis.Query("PolygonNFTOwners")
Moralis.Cloud.run("getBalance", params)
Moralis.Units.FromWei(presentBalance)
Moralis.Cloud.run("placeOffering", params)
Moralis.Units.ETH(offering.price)
If you are interested in a more detailed walkthrough of the code, make sure to watch the video below (starting at 6:35), where a Moralis expert guides you through the details step-by-step.
Build an NFT Trading Interface – Full Guide – Summary
We hope you’ve followed our advice and built your own NFT trading platform following our lead. If you did, you now know that Moralis provides you with all the backend functionality needed to create a proper NFT interface. By creating your Moralis server and setting up two sync events for the smart contract that we provided you with, you ensured that you got all the on-chain data accordingly. The rest of the job was easily covered by using short snippets of code and building the frontend around it. Moreover, we hope you’ve given it your best to create a stunning UI for your NFT interface.
Moving forward, we encourage you to take on other example projects covered on the Moralis YouTube channel and the Moralis blog to upgrade your blockchain development skills. Some of our latest topics show you how to build a cross-chain bridge, how to use the OpenSea API alternative, how to do gasless transactions on Ethereum, the aspects of MetaMask for developers, how to create a DAO in minutes, how to build a prediction market dApp, how to create free token, how to create NFT on Binance Smart Chain, how to get Web3 events with SMS messages, and much more.