In case you still doubt whether Web3 is here to stay, let us reassure you – the transition from Web2 to Web3 is already underway. Therefore, we can expect decentralization, cryptocurrency payments, and other Web3 features to be implemented all across the internet in the near future. As such, you may want to focus your development skills on blockchain technology and evolve them to meet the market’s demands in the best way possible. Moreover, it is important to use the most advanced tools to gain an extra edge. That way, you get to implement features that users love without dealing with complicated blockchain backend programming quickly and easily.
Furthermore, one feature that customers have gotten used to is SMS and email notifications. As such, let us show you how easy it is to accompany Web3 events with SMS messages when approached the right way. By using Moralis’ ultimate Web3 development platform and some other digital communication services, you get to send text messages for on-chain events without breaking a sweat or the bank.
Throughout the following sections, we’ll take on an example project where we will show you how to set up notifications via text message for on-chain events. Of course, we will use Moralis (a.k.a. Firebase for crypto) to avoid all the limitations of RPC nodes. Along the way, you’ll learn that dealing with smart contracts is extremely simple, especially since you can use excellent templates and Remix. You’ll also learn how to sync and index smart contract events, which will be the key to accompanying Web3 events with SMS messages. So, just follow along with our steps, and by the end of the article, you’ll know how to automate text messages for on-chain events in record time.
Get Web3 Events with SMS Messages – Example Project
As mentioned above, we believe that you can learn blockchain development in the fastest way possible by taking on example projects, where you roll up your sleeves and do the actual work. However, do not worry; there is no hard work involved. By using Moralis, you get to skip all the blockchain-related backend programming, which makes things a whole lot simpler. Moreover, to make things even easier on you, we provide you with the finished code from GitHub. As such, you can simply copy and paste the code, replace the placeholders with your particular information, and you’ll be all set. Of course, you can also start from scratch if that’s something you prefer.
Moving forward, we will first cover an overview of how Web3 events with SMS messages are functioning for our example project. After the preview, we’ll take care of the initial Moralis setup, which you need to complete in order to use Moralis to follow Web3 events with SMS messages. By doing so, you’ll gain access to a live database that will serve as a sort of intermediary between on-chain events (smart contract events) and trigger any text message for on-chain events to be sent. Finally, we’ll take you through the steps required to incorporate sending a text message for on-chain events on your own. Along the way, you will learn how to use Moralis and how to use some other excellent tools that are extremely practical when setting up automated SMS or email sending.
Send a Text Message for On-Chain Events – Functionality Preview
Looking at the image below, you can see our smart contract in action using “Polygonscan” on the left and a preview of our phone’s display on the right.
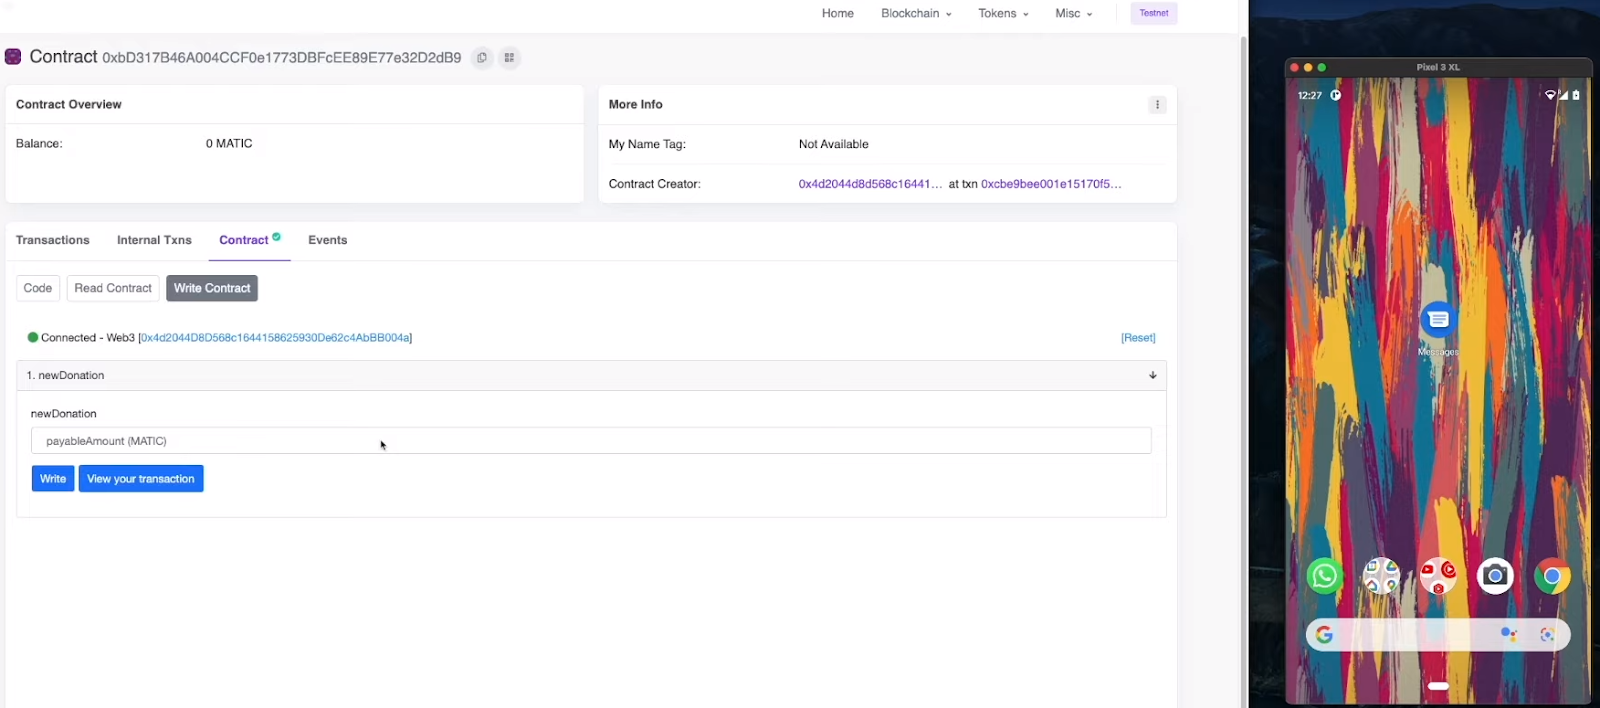
When we enter the amount we want to donate and then confirm it by clicking the “Write” button, the MetaMask extension is prompted. The latter is used to confirm our transaction:
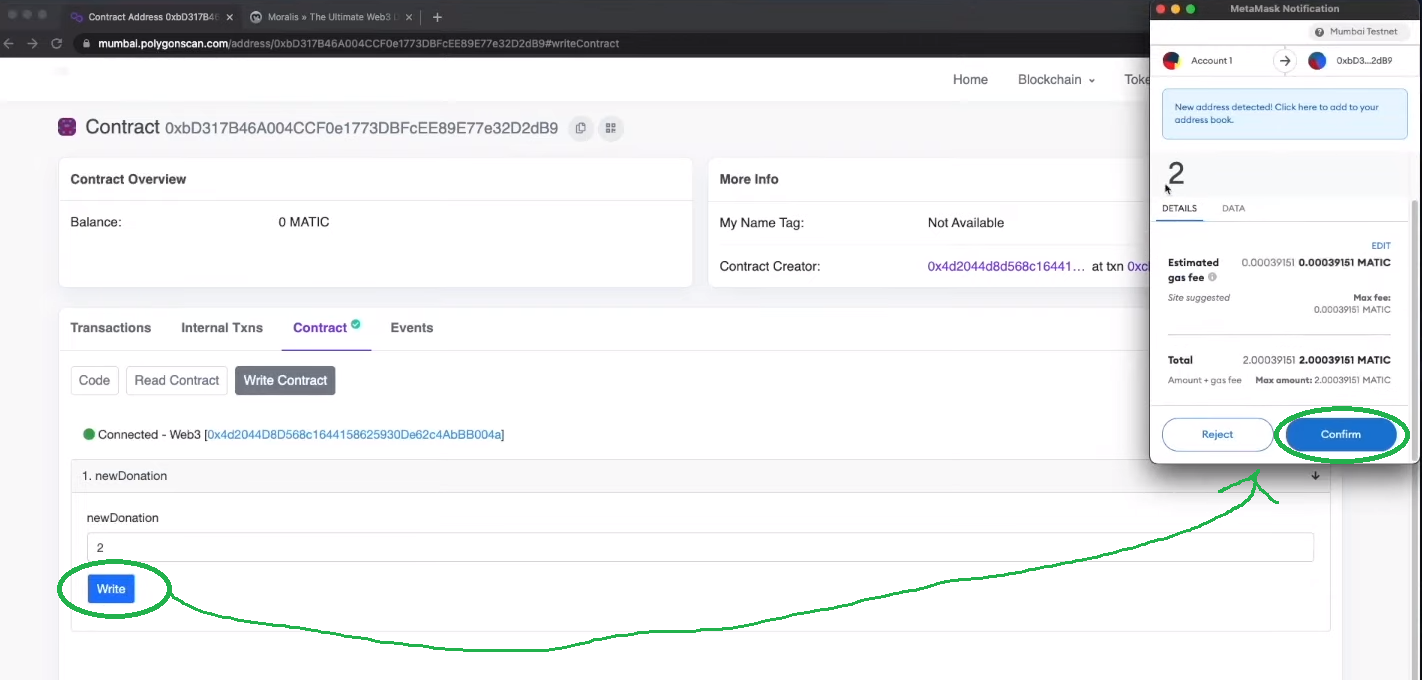
Once the transaction goes through (an on-chain event), we receive a text message as confirmation for the on-chain event to our phone:

In combination with explanations, the above screenshots should be sufficient to show that you can get Web3 events with SMS messages (confirmation for someone making a donation in our case). Moreover, please keep in mind that the exact smart contract event triggering SMS sending could be anything you want; however, you have to use the appropriate smart contract.
Example Donation Smart Contract
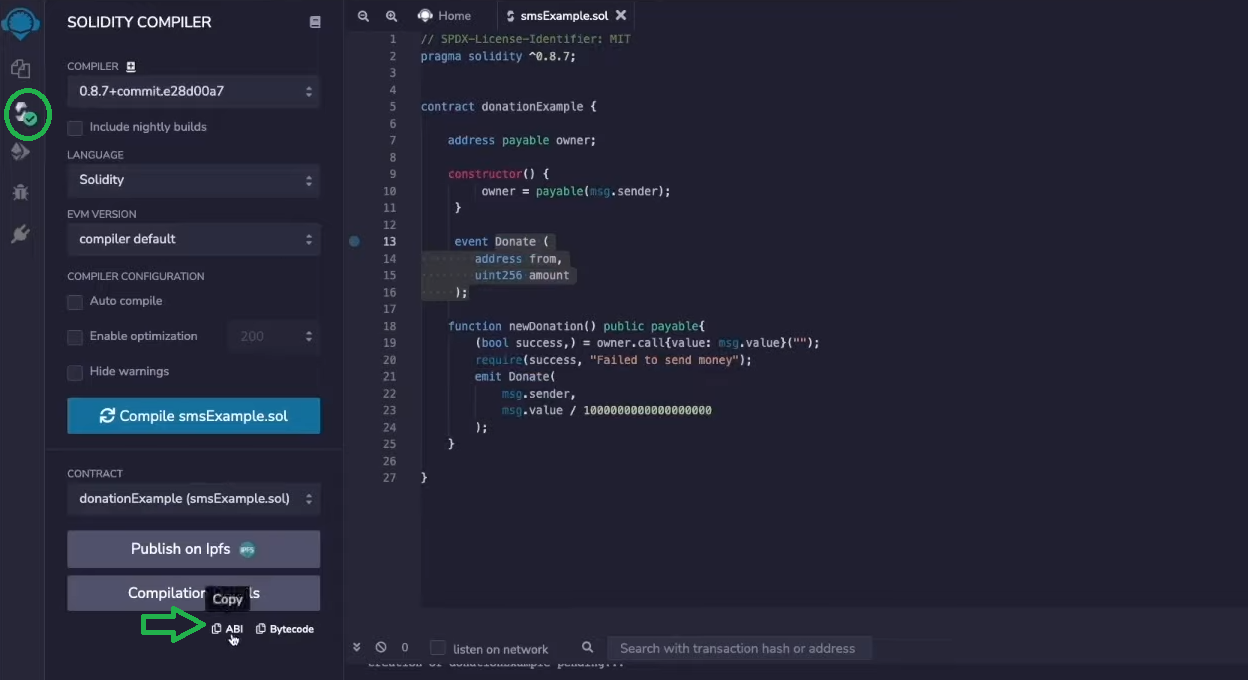
You probably know that programmable blockchains, such as Ethereum, use smart contracts to execute specific predefined actions automatically. Moreover, whenever a smart contract does something meaningful, it emits an event, namely, a smart contract event. With that said, we need a smart contract to focus our text message for on-chain events. For the sake of this example project (as explained in the preview), we are tracking donations made on the Polygon chain (“Donate” event). The example smart contract is available at GitHub (“ExampleDonationContract.sol”). You can simply copy the code into Remix, where you’ll be able to deploy it effortlessly.
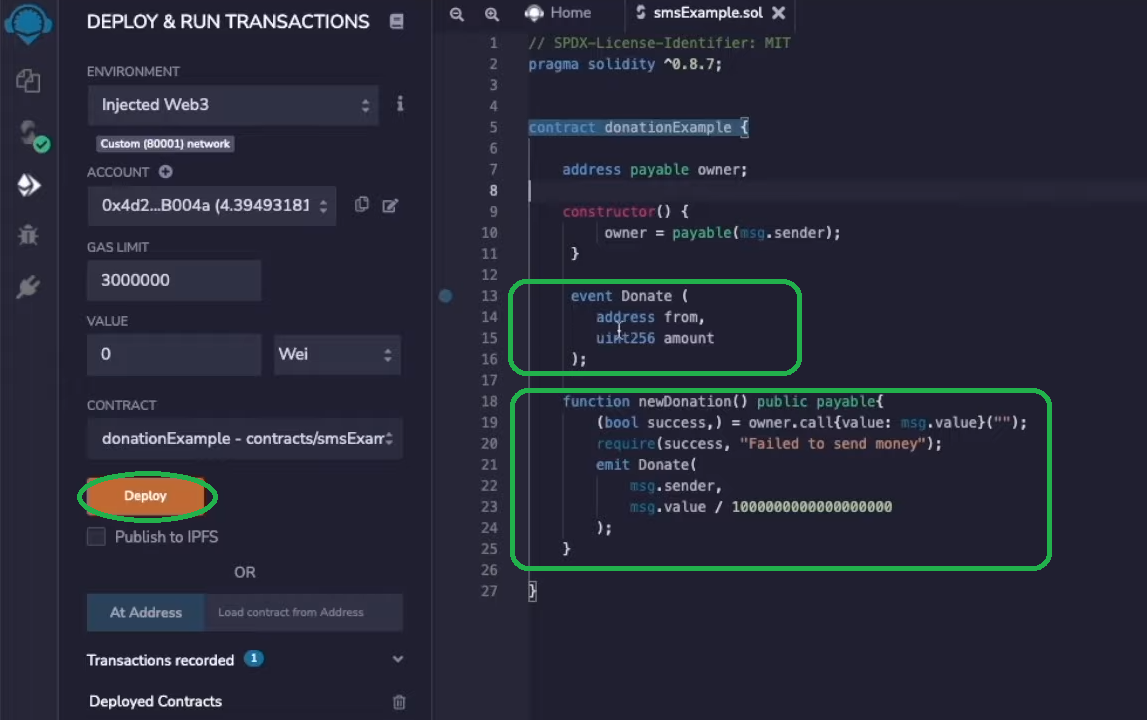
The smart contract that we use includes a payable address (the user that will be making a donation), an event that gives the address of a donor and the donated amount, and the function that ensures that the message value is sent to the owner of the contract (“constructor”). It also emits the “Donate” event. With the smart contract deployed, you are ready to use Moralis to start listening to the smart contract events. For that purpose, you need to complete some initial setup steps and then use the “Sync” option for the Moralis server.

Web3 Events with SMS Messages – Moralis Setup
In order to obtain Moralis’ full backend functionality, you need to create a Moralis server. As such, this will also enable you to get Web3 events with SMS messages. Thus, here are the steps to follow:
- Create a Free Moralis Account – Click the link to the left and create your free Moralis account. You’ll only need to enter your email address and create your password. Finally, you’ll also need to confirm your account to complete the process (click the confirmation link in the confirmation email that will be sent to you). On the other hand, if you already have your Moralis account, just log in.
- Create a Moralis Server – Once logged in, you need to go to the “Servers” tab of your Moralis admin area. Then, click on the “+ Create a new Server” button in the top-right corner (see the image below). A drop-down menu will appear, giving you three network-type options. Since we will take on an example project, we recommend that you select the “Testnet Server” option (see our Ethereum testnet guide). However, when you want to interact with the various mainnets, you’ll need to go with the “Mainnet Server” option.

Customize Your Server
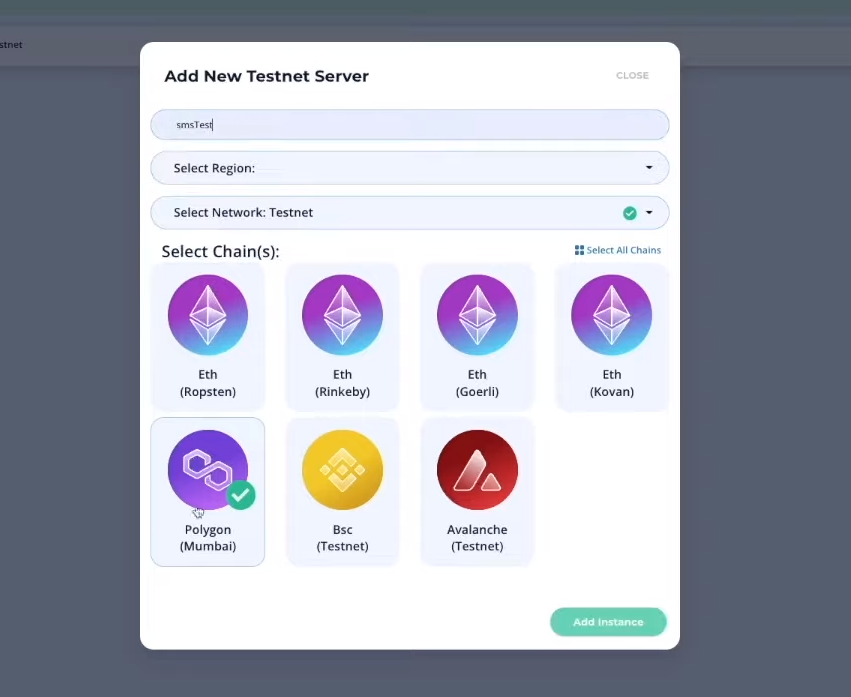
Next, another pop-up window will appear asking you to enter your server’s name (this can be anything you want), select region, network, and chain(s) (we will be using Polygon’s testnet for this project). To complete this step, click on “Add Instance” to spin up the server.
By successfully creating your Moralis server, you essentially gain access to the Moralis’ backend capabilities. For instance, if you were to build your first dApp, you’d need to obtain your server’s details, which are now available to you. However, for the purpose of tracking Web3 events with SMS messages, we do not need to create a dApp. All we need to do is to use the “sync” feature that will index our smart contract events. Though, before we go to the “Sync” tab, let’s look at a preview of a text message for on-chain events already set in place.
How to Navigate to “Sync”
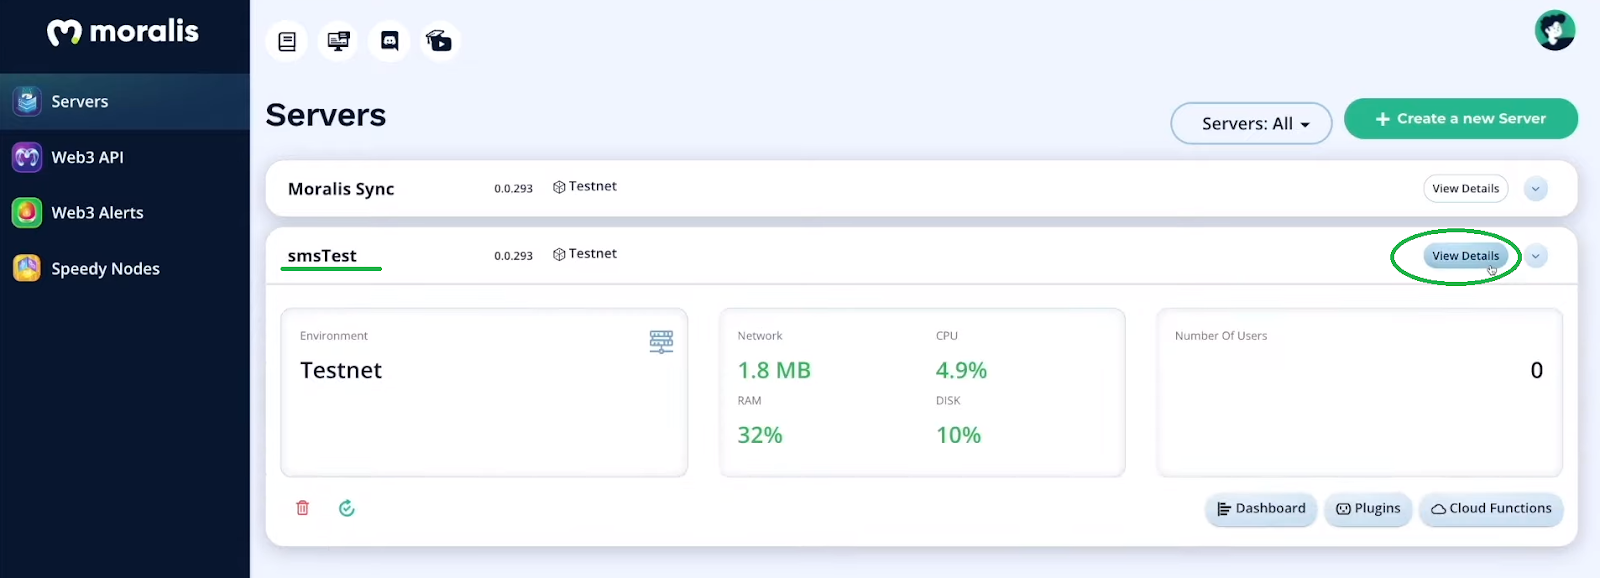
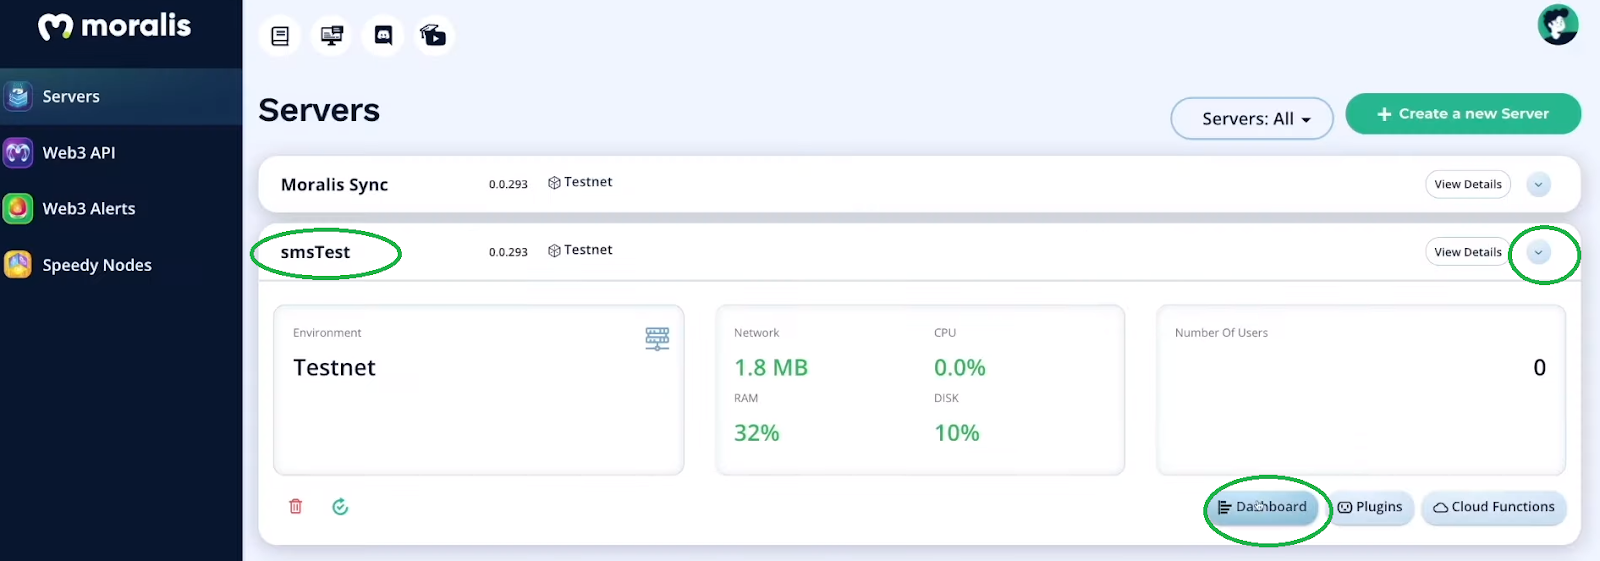
To access the “Sync” tab, click on the “View Details” button next to the server you’ve created in the previous section:
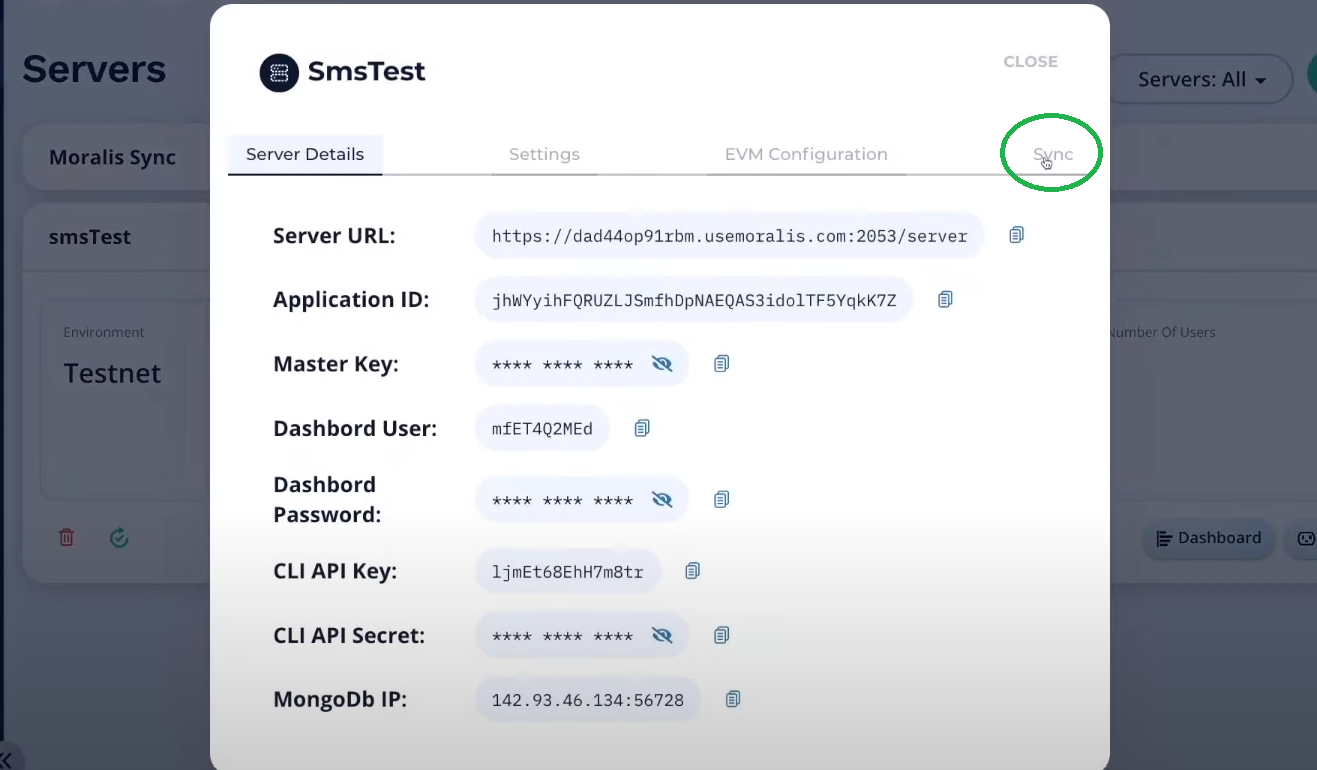
After clicking the “View Details” button, a pop-up window will appear (see the image below). The “Server Details” tab is selected by default (this is where you get your server URL and application ID from when creating dApps). However, for the sake of setting an automated text message for on-chain events, you need to select the “Sync” tab, which is on the far right side:
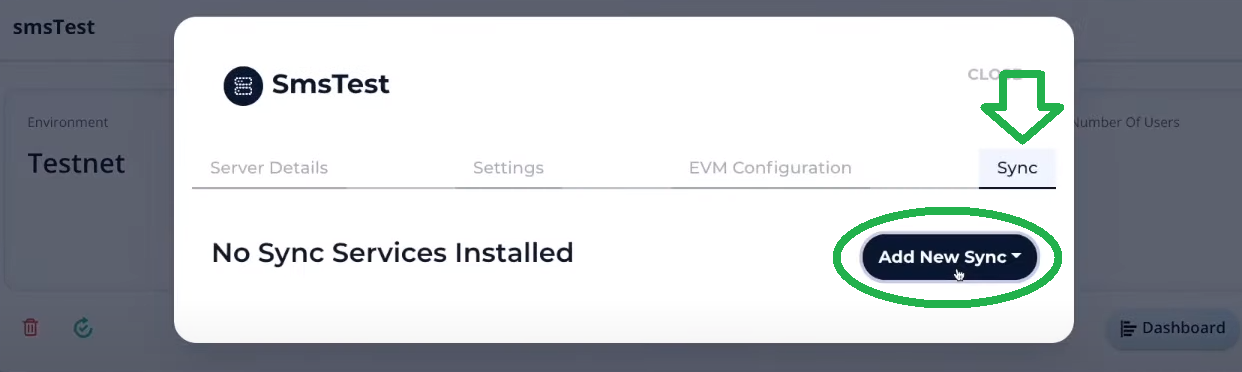
Once on the “Sync” tab, you will see the window shown in the image below. Because you are using a new server, there are definitely no existing sync services on it. Next, click on “Add New Sync” to add your new sync service:
By clicking on the “Add New Sync” button, two options will appear:
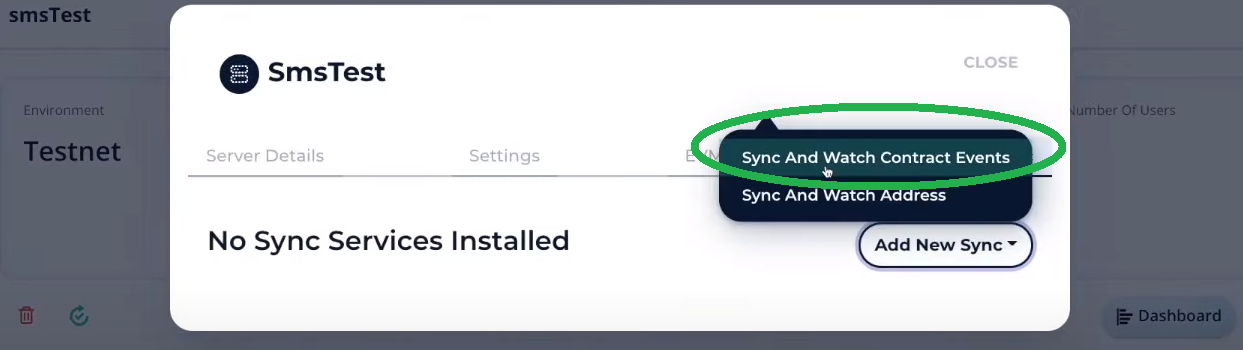
You need to select the top option, “Sync and Watch Contract Events”. Now, you will see the options to configure sync and watch smart contract events. Fortunately, it is straightforward to set a sync service; essentially, you just copy and paste the details of the smart contract in question.
Sync and Listen to Smart Contract Events – Setup
At the top, you get to select the network, and since you’ve created your server for the Polygon Mumbai testnet, it is the only option available. Thus, just click on it:
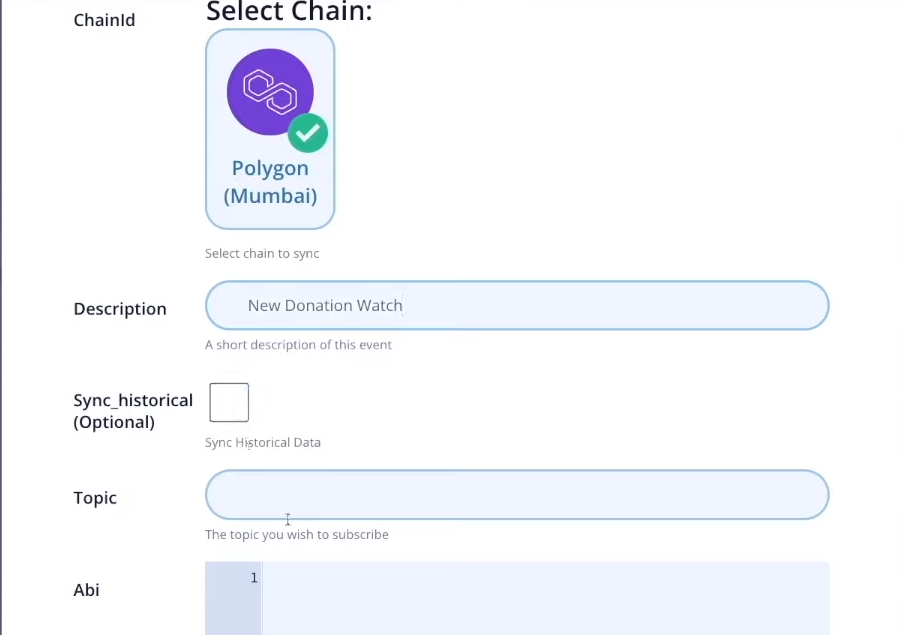
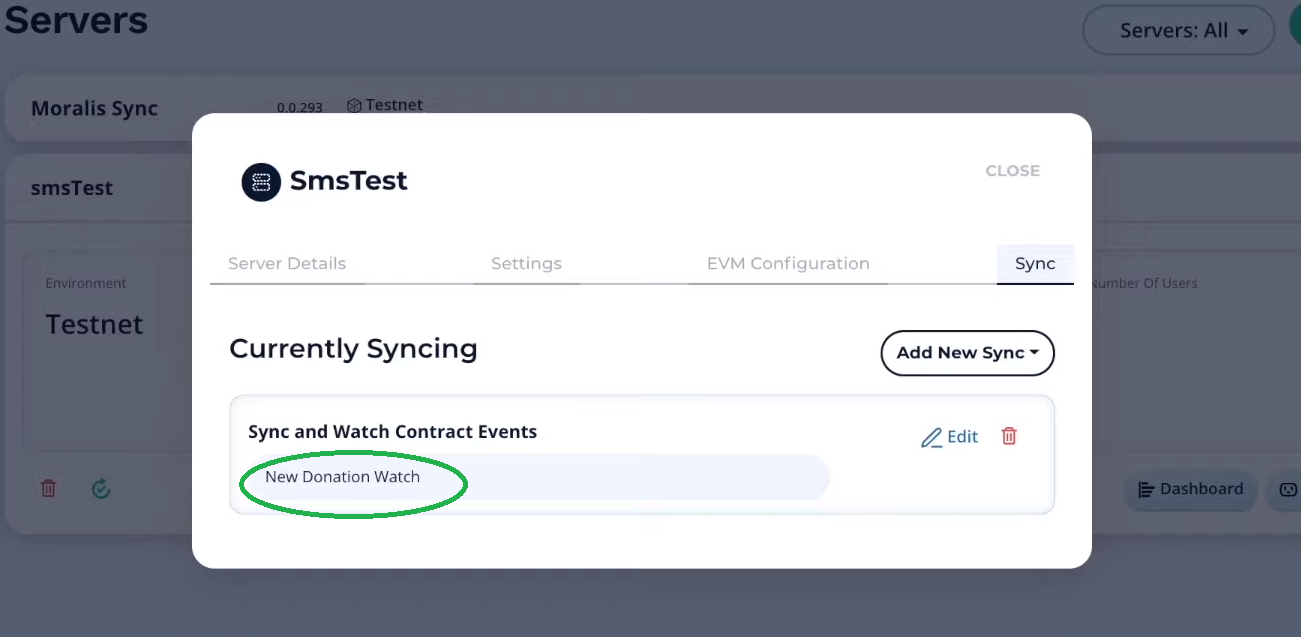
Next to “Description”, you can type in whatever you want (we went with “New Donation Watch”). Moreover, the “Sync-historical” data option will be checked by default. However, in our case, we will only need live data in the future, so you can click on the square to uncheck it. For the topic, you need to use the details of the smart contract:

You can simply copy-paste the above-selected lines next to “Topic” into the field. However, you also need to delete the variable names (we only need the variable types). So this should be your topic:

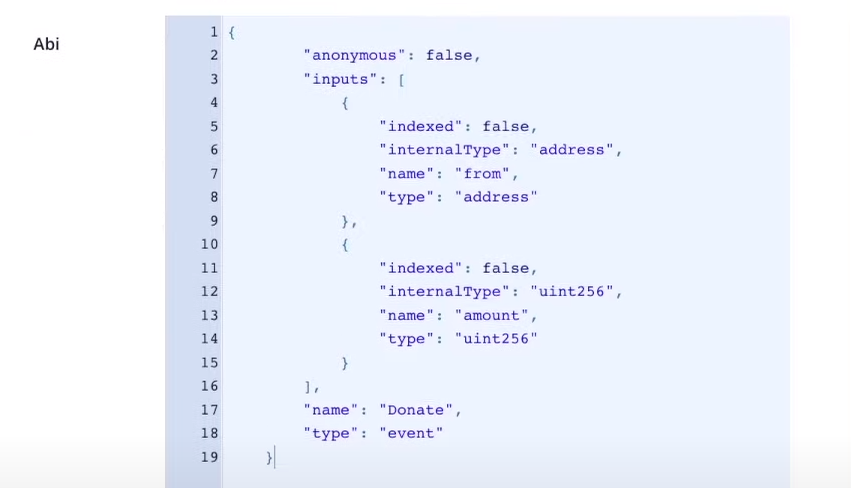
In order to obtain the relevant ABI, you need to go to Remix (where you’ve compiled the above smart contract):
Once you’ve copied the ABI, just paste it in the relevant area within the “Sync” setup. There are parts you don’t need, so make sure you’re only left with this:
Next, you need to copy and paste your smart contract’s address. We again use Remix, but this time in the section where you deployed your contract:
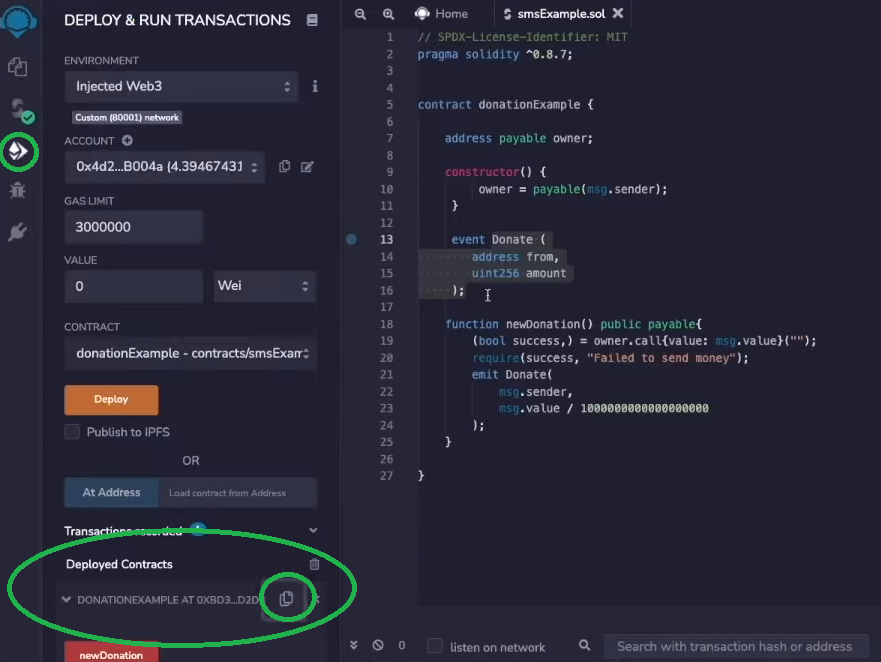
Then paste the address to your “Sync” settings:

You can again type in whatever you want in the final field (“TableName”). We went with “NewDonations”. To create your sync, click on the “Confirm” button. Once it is set up, you’ll be looking at this:
Send a Text Message for On-Chain Events Using Moralis Dashboard
You can now view all tracked events within your Moralis dashboard (database) for the server at hand. To access it, close the above window and click on the “Dashboard” button for your server:
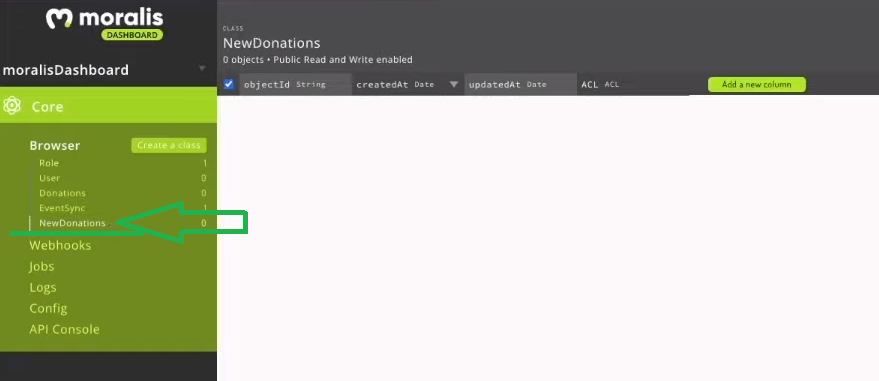
Inside your dashboard, you will see the “NewDonations” class (see the image below) that was automatically created when we added our sync event. This is where we record the events, and you can use them as triggers to get Web3 events with SMS messages.
With everything set up properly, we hand you over to one of Moralis’ experts, who will explain the details of the next steps in the video below starting at 5:27. He will first lead you through the creation of an appropriate cloud function (“CloudFunction.js”). He will also demonstrate how to use a Google spreadsheet to track the total amount of donations (7:21).
Moving forward, he will introduce you to some useful messaging tools, namely, Twilio and OneSignal. Moreover, he’ll show you how to set things up properly to use these tools to get Web3 events with SMS messages. With the two tools set up correctly, he’ll present you with his thought process behind creating the proper cloud function, which will actually trigger by sending every text message for on-chain events related to our example, including customizing the text message content.
In addition, you can continue watching the video past the 21:56 timestamp, where you’ll learn how to apply the same principles to get Web3 events with emails.
Get Web3 Events with SMS Messages – Summary
If you are reading this, you must have completed the example project above, which means that you now know how to set things up to get a text message for on-chain events. Moreover, you know that Moralis is the ultimate Web3 development tool that makes this feature as simple as possible. All-in-all, you need to complete the following steps:
- Create a Moralis server.
- Use our smart contract template or create your own and deploy it with Remix.
- Add a new sync event.
- Set up Twilio and OneSignal accounts.
- Create a proper cloud function to establish communication between smart contract events and OneSignal to send a text message for on-chain events.
Furthermore, if you’ve enjoyed this example project, we encourage you to visit the Moralis YouTube channel and the Moralis blog. There, we post fresh educational and inspirational content on a regular basis. Some of our latest topics show you how to build cross-chain dApps, host a dApp, build a decentralized messaging app, create an OpenSea clone, mint NFTs without gas fees, introduce you to the ultimate Web3 boilerplate, and much more. Essentially, both of our outlets serve as great blockchain development educations that can be extremely valuable if you want to become a blockchain developer. In addition, if you want to go full-time crypto with maximum confidence, we recommend checking out high-quality courses at Moralis Academy.