Whether you’re developing dApps, NFTs, or want to create free tokens, there is a crucial part in blockchain development programmers cannot overlook – working with testnets. Deploying your own token on a testnet ensures that everything runs smoothly before launching it to the mainnet. Moreover, with Moralis (Firebase for crypto) and its ultimate Web3 SDK and Web3 API, you can overcome all of the limitations of RPC nodes and create free token on testnets quickly and easily. Therefore, an excellent way for anyone wanting to go full-time crypto and start their blockchain journey is by utilizing Moralis’ tools which can help you to create your own crypto tokens for free. As such, this article will focus on showing you how to create free token and deploy your own testnet crypto token in 10 minutes.
Throughout this article, you’ll discover what it takes to create free token. Moreover, thanks to the ultimate Web3 development platform – Moralis, you’ll see that you can have your crypto token ready in ten minutes. Aside from learning to work with Moralis, we’ll also show you how to make the most out of another excellent tool, namely, “ETH Brownie”. This Python-based framework is great for testing and developing dApps (decentralized applications), including “create free token”. In addition, we’ll use OpenZeppelin, which is an open-source platform for building secure dApps, where countless smart contract code templates are available. With that said, we invite you to follow our lead and implement the same action steps on your own to best learn how to create free token. However, before we dive deep into our example projects, let’s make sure that all of you know what testnet tokens are.
What are Testnet Tokens?
As you can imagine, testnet tokens are crypto tokens used on testnets. However, to properly explain what testnet tokens are, we need to take a closer look at each of the two words. So, let’s start with “tokens”. In the crypto realm, tokens refer to non-native cryptocurrencies, which means that they do not have their own blockchain. Rather, they are minted on top of other existing blockchains. The most common kind are tokens based on the ERC-20 token standard, which are built on the Ethereum chain. Moreover, let’s also mention that in the case of Ethereum, its native token (coin) is ETH. Now that you know what tokens are, we can move on to the word “testnet”.
For the purpose of the development process and testing, most blockchains have one (testnet) or even more testing environments (testnets), which try to mimic the real network (a.k.a. the mainnet) in the best possible way. Furthermore, since Ethereum is the most popular programmable blockchain, let’s touch on it briefly. For one, you need to know that Ethereum has several testnets – Kovan, Ropsten, Rinkeby, and Görli. Moreover, since each testnet has its own advantages and disadvantages, it is important to know which Ethereum testnet to use for your particular project.
Why Can You Create Free Token on Testnets?
Now, we can finally put it all together. Testnet tokens are tokens deployed on testnets intended for covering transactions for testing purposes. With that in mind, you can also see that using testnets is the right way to create free token. How come, you might ask? Well, when you mint tokens (execute a transaction that stores your tokens on-chain), you need to pay gas fees. Now, while there are blockchains with low transaction fees, there are those with incredibly high fees, such as Ethereum. Of course, if you use its mainnet, it would cost you real monetary value (in the form of real ETH). However, when working with testnets, you get free access to “test” native coins (“play” or “test” ETH). You can obtain test ETH by using faucets. However, you need to use the right kind of faucet for each of the Ethereum testnets.
Now that you know what testnet crypto tokens are and why you can create them for free, it is time to take on an example project. Our mission will be to create our own ERC-20 token on one of the Ethereum testnets (we will go with Ropsten). As such, we invite you to follow along and create your own testnet token. Then, once you learn to create a free token, you will be able to use that knowledge and apply essentially the same steps to create ERC-20 tokens on the mainnet.
Create Free Token – Example Project
As mentioned previously, we will rely on Brownie’s testing environment, OpenZeppelin, and Moralis Speedy Nodes, to create free token on the Ropsten testnet. Of course, you may also use the same smart contract presented herein with Remix. In addition to these three tools, we will use MetaMask as an authentication tool and a wallet to view our balance on a particular address. Furthermore, we will also use a code editor (we prefer Visual Studio Code [VSC]).
Create Free Token Using Moralis Speedy Nodes
Aside from providing developers with the ultimate Web3 SDK, Moralis is also a node provider (an Infura alternative). Moreover, by creating your free Moralis account, you get access to Moralis Speedy Nodes. So, just follow these steps:
- Create your free Moralis account by clicking the link. Then, enter your email address, create your password, and click on the link in the confirmation email. If you already have an active Moralis account, just log in.
- Once inside your admin area, select the “Speedy Nodes” tab as shown in the image below and click on the “Endpoints” button under “ETH Network”.

- As such, you’ll see a list of all Ethereum networks. Since we decided to use the Ropsten testnet to create free token in our example, this is the one we’ll focus on. All Ethereum testnets should be added to your MetaMask extension by default; however, in case you don’t have it there, click on the “Add to MetaMask” button next to the Ropsten network. But more importantly, copy the URL address:

- Paste the above-copied address inside the “network_setting.bash” file that you created in your code editor (you can use our file from GitHub; just make sure to add your details). As such, this is the code:
#!/bin/bash
brownie networks add Ethereum ropsten_test host='YOUR LINK' chainid=3 explorer='https://api-ropsten.exit'
Note: In case you’re not familiar with Brownie but know how to use Remix, you can use the latter to deploy the smart contract in the next section. However, keep in mind that in that case, you need to obtain “play” ETH on Ropsten (Ropsten faucet). Furthermore, we made the code for other networks available at GitHub, so you can easily create free token on other Moralis-supported networks.
Smart Contract to Create Free Token
Smart contracts are essential parts of programmable blockchains. These automated “condition-execution” programs ensure that things run as predefined and in accordance with a particular chain. When it comes to creating tokens on Ethereum, it has a particular standard set in place for fungible tokens (ERC-20). As such, we can use an ERC-20 contract template provided by OpenZeppelin and add a few lines of code to adjust it for our particular case.
We’ll use VSC to create our smart contract called “my_token.sol”. You can type it yourself, or simply copy the lines of code below and make the changes to match your details:
// SDPX-License-Identifier: MIT
pragma solidity ^0.8.0;

import "OpenZeppelin/[email protected]/contracts/token/ERC20/ERC20.sol";


contract TheFellowShip is ERC20 {
    constructor(uint256 initialSupply) ERC20("LordOFTheRings", "Tolkien") {
        _mint(msg.sender, initialSupply);
    }
}
Looking at the code above, we can see that the first line defines a license. The second line represents the compiler (anything above the defined version will be accepted). Then, you can see “import”. The latter is crucial as it does all the heavy lifting by using OpenZeppelin’s template for the ERC-20 token standard. However, for the import to function, you need to install the proper packages. Moreover, the instructions on how to do that are provided in the video further down in this article, starting at 2:45. Essentially, you need to have a proper version of OpenZeppelin contracts installed (“[email protected]” in our case):

Our Smart Contract
Moving forward, below “import” are the three lines of code where we actually create free token for our example. Furthermore, “TheFellowShip” is our token contract example name. However, this can be anything you want. Next, we use “constructor” to define the initial supply of our token. On the same line, we have “LordOfTheRings”, which is the name of our token, and “Tolkien”, which is the symbol (ticker). Both of these can be anything you want. However, when creating tokens on mainnets, it is recommended to use shorter names and stick to three or four characters for the symbol. The final line of our code is the body of the constructor and is there to ensure that the tokens get minted. Moreover, thanks to OpenZeppelin, we only need three lines of code to create our own smart contract that will enable us to create free token.
Using Brownie to Create Free Token
Let’s first ensure that everything is set up properly by using the terminal in our editor and typing in “brownie console” (see the video at 5:52):

If everything is set up, you should see the “Brownie environment is ready” message:

Furthermore, to be able to deploy our tokens to a live testnet (Ropsten in our case), we also need to have an account ready (we need a private key). For that, we use the terminal and the proper commands. For starters, we use “brownie accounts new”, followed by our account’s name (we used “testing_account”):

Looking at the image above, you can see that the terminal prompts us for our private key. To obtain it, you can go to MetaMask and export your private key. You need to click on your account and then click on your account details:

In the pop-up window, you’ll see the “Export Private Key” button:

Now, paste the private key into the terminal. Moreover, you’ll also need to create your password (make sure to memorize/write it down). As such, this will create your account required for the deployment.
Deploying Our Smart Contract
Moving forward, we’ll enter “brownie console –network ropsten_test” in the command line:

Once you see “Brownie environment is ready”, it means that our project loaded properly in the Ropsten testnet network. Next, we need to load our account (the one created in the previous step) so that we can use it to deploy our tokens:
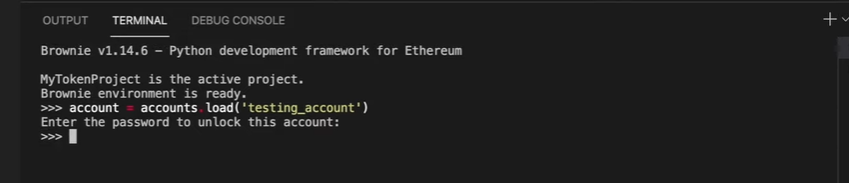
The terminal will prompt you for your account’s password (the one you created above). So, enter the password and move on to the deployment of your tokens, which is the final step of our “create free token” quest:

Looking at the image above, you can see that we used our smart contract’s name (“TheFellowShip” defined above). However, make sure to use the name you choose. The “10**27” part (ten to the power of twenty-seven) refers to the initial number supply. For our example, we decided to use one billion tokens, which is ten to the power of nine. However, we also need to account for eighteen decimals, which gets us to twenty-seven. Finally, we use “account” to instruct the Brownie console that the logged-in account is the one we want to use for deployment. If everything is done correctly, this is where we get our token contract address:

If you’ve followed the above steps, you can now use your token contract address to see the balance. Just go to your MetaMask, select the Ropsten testnet, click on the “Add Token” button, and paste your token address at the top. Your token’s symbol and decimals will automatically be added. Then, click “Next” and then “Add Tokens” (watch the video at 9:36).

Here is the video that we’ve been referencing throughout this article. It’s where you can look over a Moralis expert’s shoulder as he completes all of the steps covered above:
Create Free Token – How to Deploy Your Own Testnet Crypto Token in 10 Minutes – Summary
At this point, you should know what testnet tokens are, why they are free to create, and how to create free token yourself. Thanks to Brownie, Moralis Speedy Nodes, and OpenZeppelin, it shouldn’t take you more than ten minutes to complete the process once you get used to the concept. The same principles can be used for other testnets, where you can create free tokens.
If you liked this example project and would like to take your blockchain development skills further, we recommend checking out Moralis’ YouTube channel and Moralis’ blog. Both of these outlets provide a ton of quality content by posting new videos and articles on a daily basis. Aside from example projects, this is also a great way to learn about different crypto terminologies. For example, some of our latest topics cover how to create NFT on Binance Smart Chain, how to mint NFTs for free without paying gas fees, how to build with the Covalent API, how to sync and index smart contract events, how to build cross-chain dApps, how to host a dApp, how to build a decentralized messaging app, and much more.