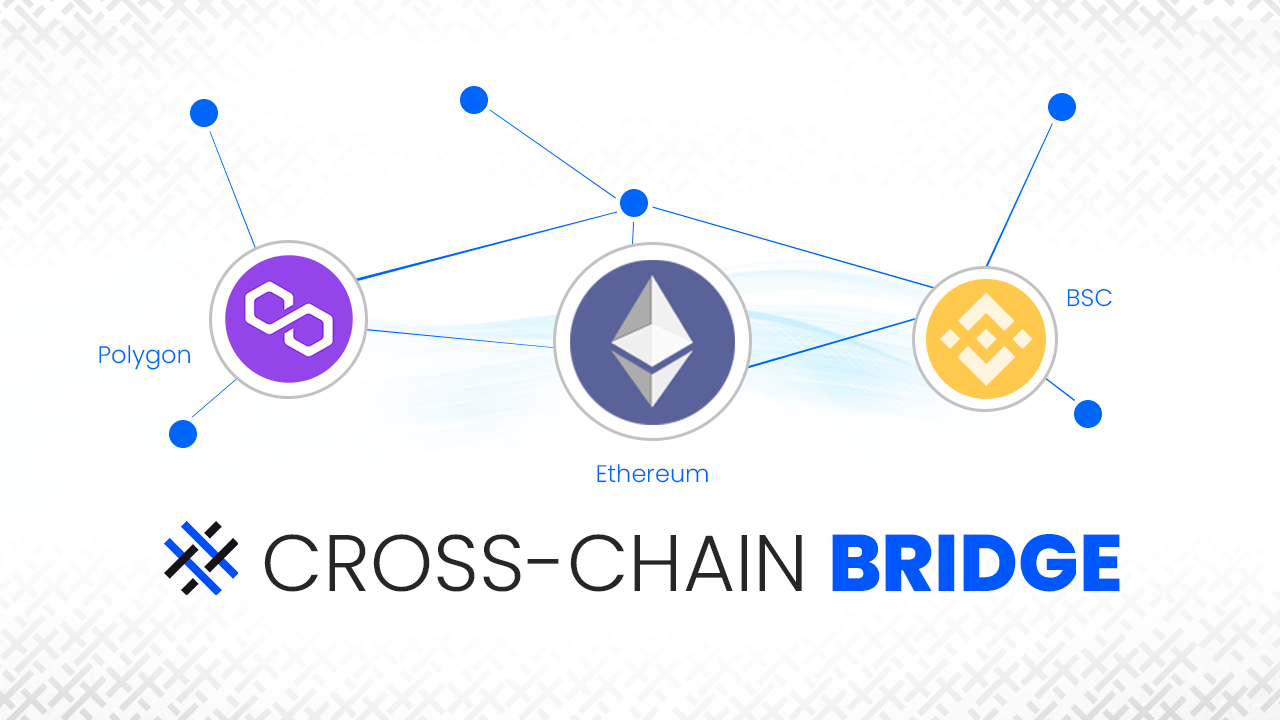
With all the various programmable chains, it’s not a surprise that developers want to connect these with “cross-chain” projects. As cross-chain compatibility becomes increasingly popular, as it enables connectivity and scalability, it’s clear that the future will be all about cross-chain interoperability. With that in mind, it’s paramount for any blockchain developer to implement this into their Web3 apps. However, some have previously launched smart contracts, tokens, etc., and would now like to enable users to utilize these elements on other blockchains. In that case, learning how to build a cross-chain bridge will be highly beneficial. In this article, we’ll break down the term “cross-chain bridge” and explore its topic so that you’ll have a firm grasp of what it is. With a solid understanding of what cross-chain bridges are and how they work, you’ll be an aspiring cross-chain expert, well equipped to build a cross-chain bridge with Moralis.
Moreover, some pretty impressive “world-disruptive” tech and tools have been developed to make blockchain programming a whole lot simpler. However, there is one premier software that developers have found to be the ultimate Web3 platform providing the most advanced Web3 API – Moralis. This “Firebase for crypto” was built with cross-chain interoperability from its inception, which makes it just the right tool to build a cross-chain bridge. In the upcoming sections, you’ll be able to preview the cross-chain bridge example we’ve built to serve as a guide for you. Plus, you will take a closer look at smart contracts, which are the core part when you want to build a cross-chain bridge. Moreover, a Moralis expert will show you how to make use of Moralis’ database, “sync” feature, and cloud function feature. Furthermore, you’ll also learn how to code a simple user interface (UI) for your cross-chain bridge.

What is a Cross-Chain Bridge?
Before we dive deeper into our “build a cross-chain bridge” example project, let’s make sure you all know what a cross-chain bridge is. After all, having a clear understanding of its concepts makes development a whole lot simpler. So, what is a cross-chain bridge?
Just by looking at the words “cross”, “chain”, and “bridge”, you can presume that a cross-chain bridge has something to do with enabling some sort of connection or transfers between different blockchains. Yes, that’s exactly what it is. Essentially, a cross-chain bridge (a.k.a. a blockchain bridge) is a set of properly written code, including smart contracts, that enables users to transfer tokens (or other crypto assets), smart contract events or instructions, or even data between different blockchains. As such, despite the difference in two chains (different protocols, rules, governance models, etc.), a cross-chain bridge ensures that they interoperate securely.
How Does a Cross-Chain Bridge Function?
To ensure that you get a clear understanding of how a cross-chain bridge works, we’ll use the image below. The icons of a paper with a pencil represent smart contracts. Furthermore, we have four smart contracts, two with a stack of coins (the cylinders with horizontal lines) and two with a bridge. Moreover, we also have a gear icon, representing that some sort of process/work is done, and an antenna icon, which represents a signal (incoming and outgoing).
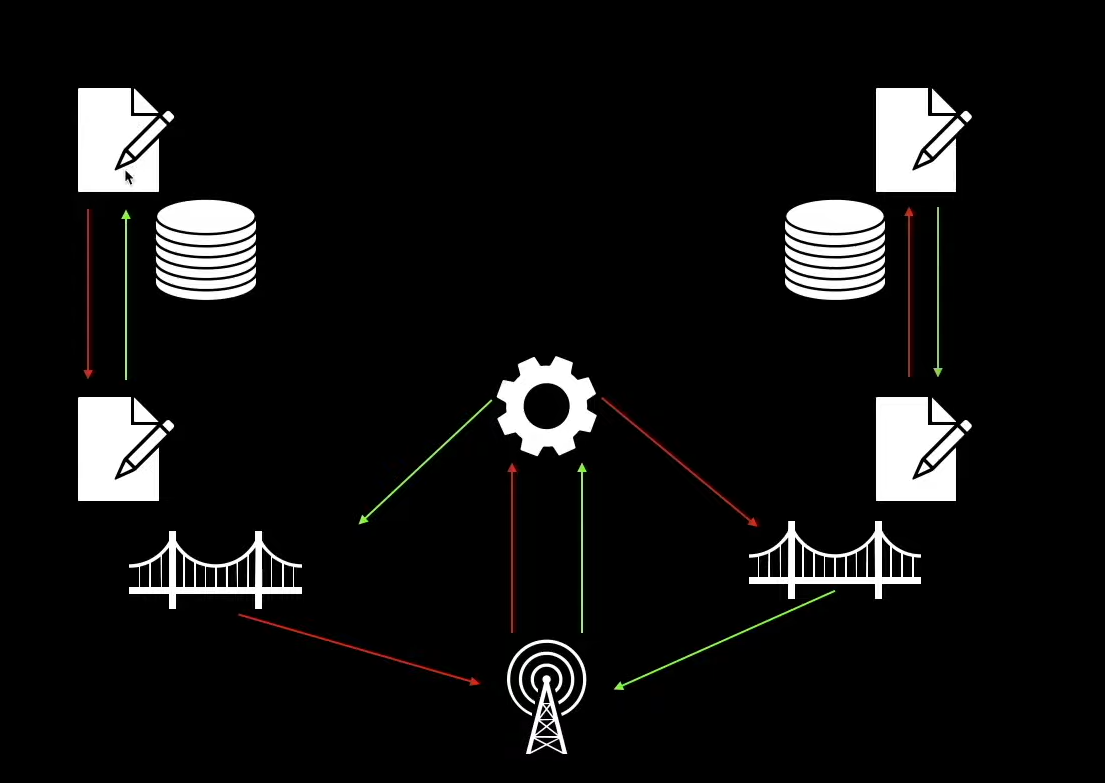
We have the “main chain” on the left-hand side (if you have an existing token, you already have that side). Moreover, on the right-hand side, we have a “side chain”, where we need to have a child-token contract, which we need to create when designing the architecture of a particular cross-chain bridge. Moving forward, we have a bridge contract on each side to ensure that the token transfer is done safely. Moreover, the red arrows represent transfers of tokens from the main chain to the side chain, while the green ones show the opposite direction.
For instance, when users want to transfer tokens from the main chain over to the side chain, they are first locked using the bridge contract on the main chain. This also sends a signal to the relay (the antenna in our image), which then triggers the gateway (the gear in the image) to mint the locked amount of tokens on the side chain using the child-token contract.
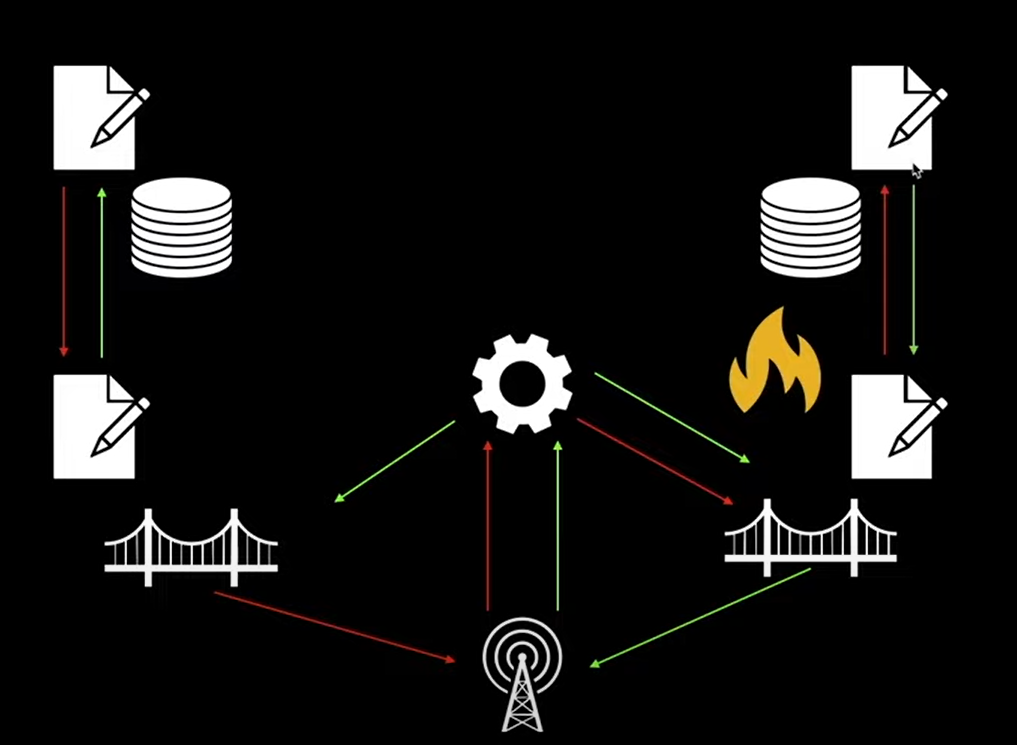
When the transfer goes from the side chain back to the main chain, the process happens in reverse. This means that the tokens on the side chain (using a side chain bridge contract) are burned, and the ones on the main chain are unlocked simultaneously:
How to Build a Cross-Chain Bridge with Moralis
Since you now have a clear understanding of what a cross-chain bridge is and how it works, let’s focus on our example project. As mentioned at the beginning of this article, we’ll use Moralis to make blockchain-related backend programming a whole lot easier. Thanks to Moralis, building a cross-chain bridge is much easier than you might think. With access to its ultimate Web3 SDK, you get to listen to smart contract events easily and make required information accessible in your Moralis database. However, before we take on our example project, let’s take a look at the finished version of our cross-chain bridge.

Our Cross-Chain Bridge Preview
When working on example projects, we normally focus on testnets, and this is exactly what we will do herein as well. In case you lack experience with testnets, check out our Ethereum testnet guide. With that said, our cross-chain bridge will enable users to transfer funds between the Rinkeby and Mumbai testnets. Moreover, we must point out that this project aims to show you the possibilities and simplicity of using Moralis. As such, we’ve created a simple and basic UI, and you can utilize our code available on our GitHub page. Then, it is up to you and your JavaScript skills to take it to the next level.
Sending Tokens from the Main Chain to the Side Chain
So, here’s a screenshot of our cross-chain bridge:
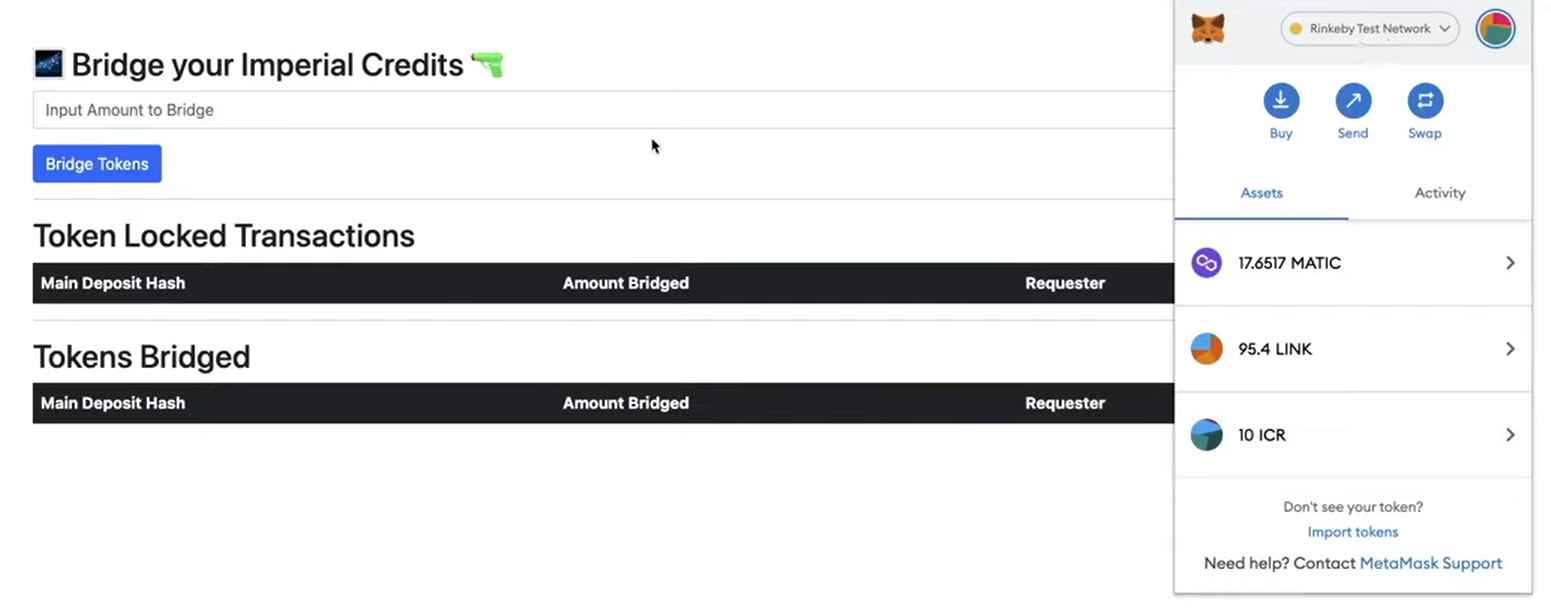
Looking at the screenshot above, you can also see our MetaMask extension, which we use to authenticate users and confirm transactions. Moreover, you can see that our MetaMask connects to the Rinkeby testnet, which is the main chain for our example. Furthermore, you can also see that we have ten ICR (imperial credits) tokens (using the ERC-20 token standard), which are the example tokens we created for the purpose of showing you how to build a cross-chain bridge.
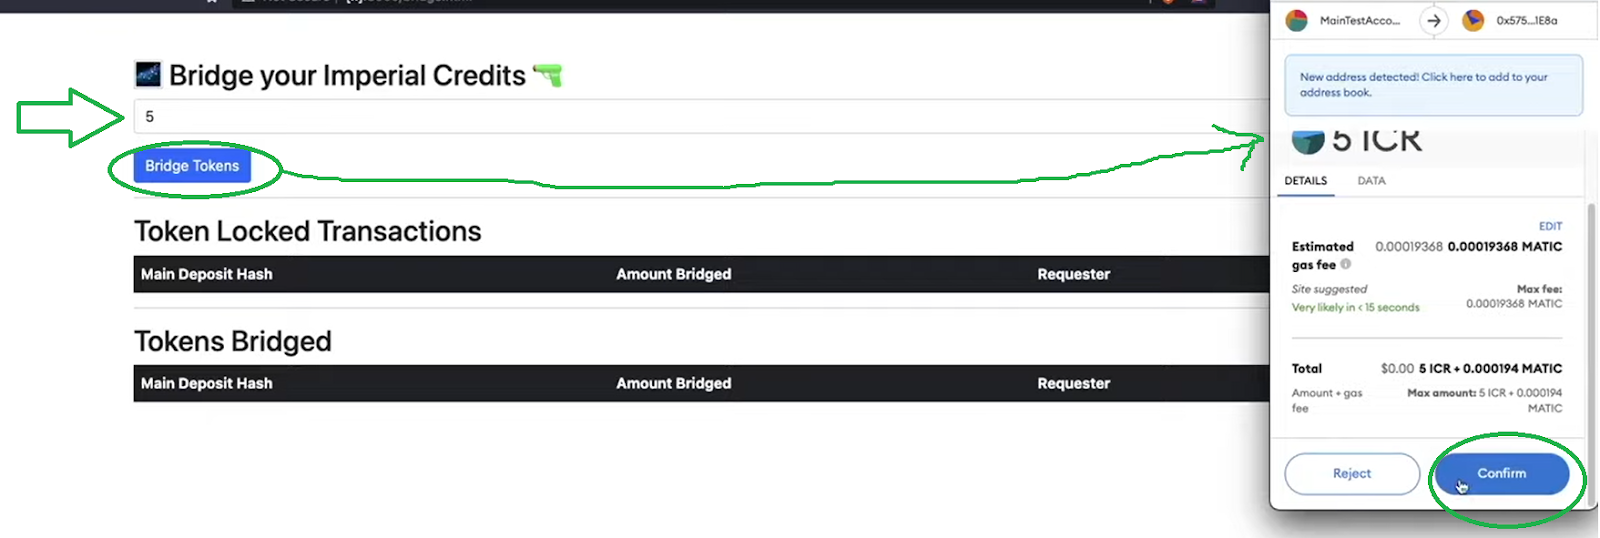
If users want to bridge their ICR tokens, they need to click on the input field, enter the amount and click on the “Bridge Tokens” button. Next, they need to confirm the transaction using MetaMask:
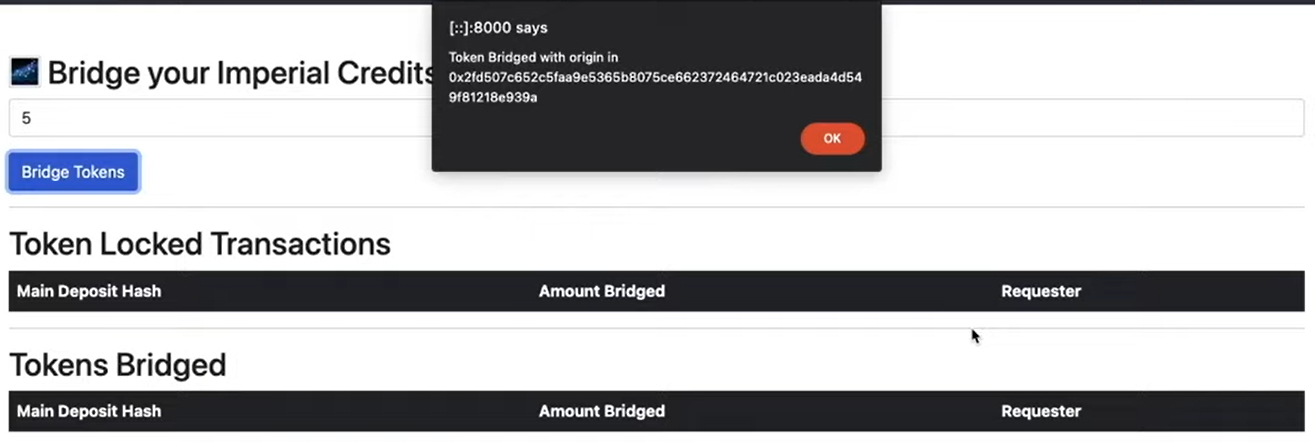
Once the transfer is done properly, our UI provides users with a confirmation message:
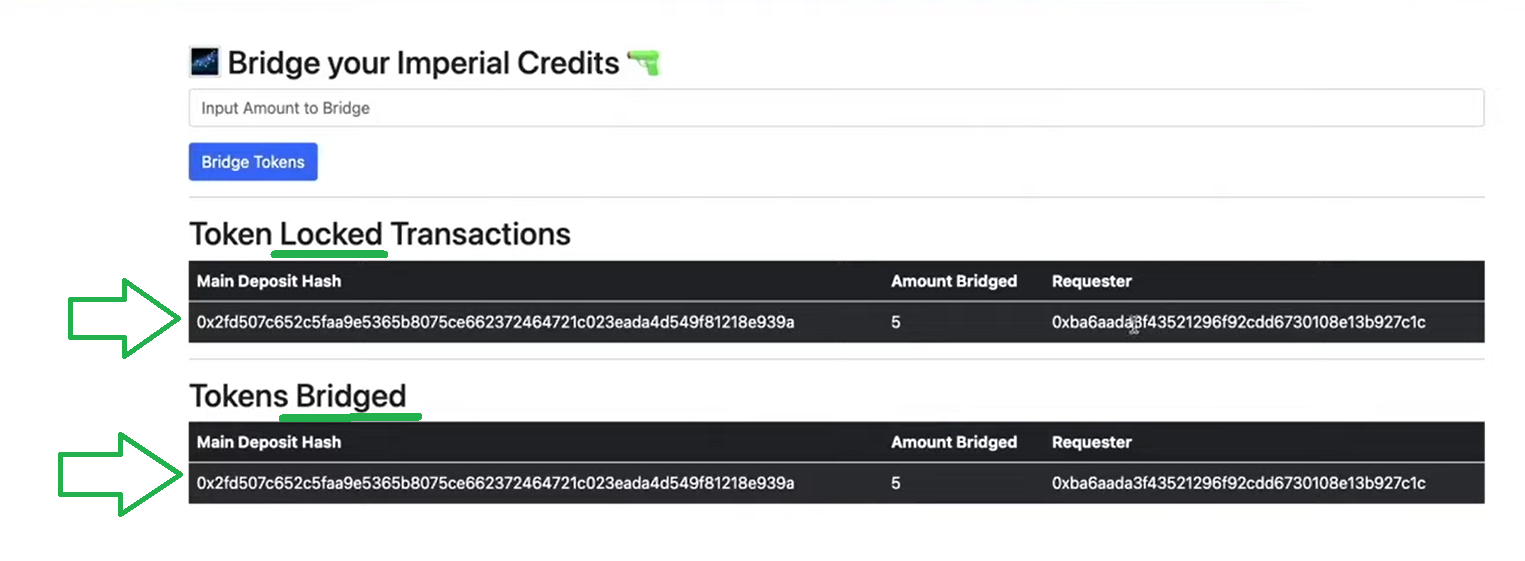
Moreover, if the users now refresh their browser page, their dashboard will reflect their transfer:
Sending Tokens from the Side Chain to the Main Chain
In addition, users can now bridge their tokens from the side chain (the Mumbai testnet in our case) back to the main chain. To do this, they need to switch their MetaMask network to the side chain and repeat the steps explained above:
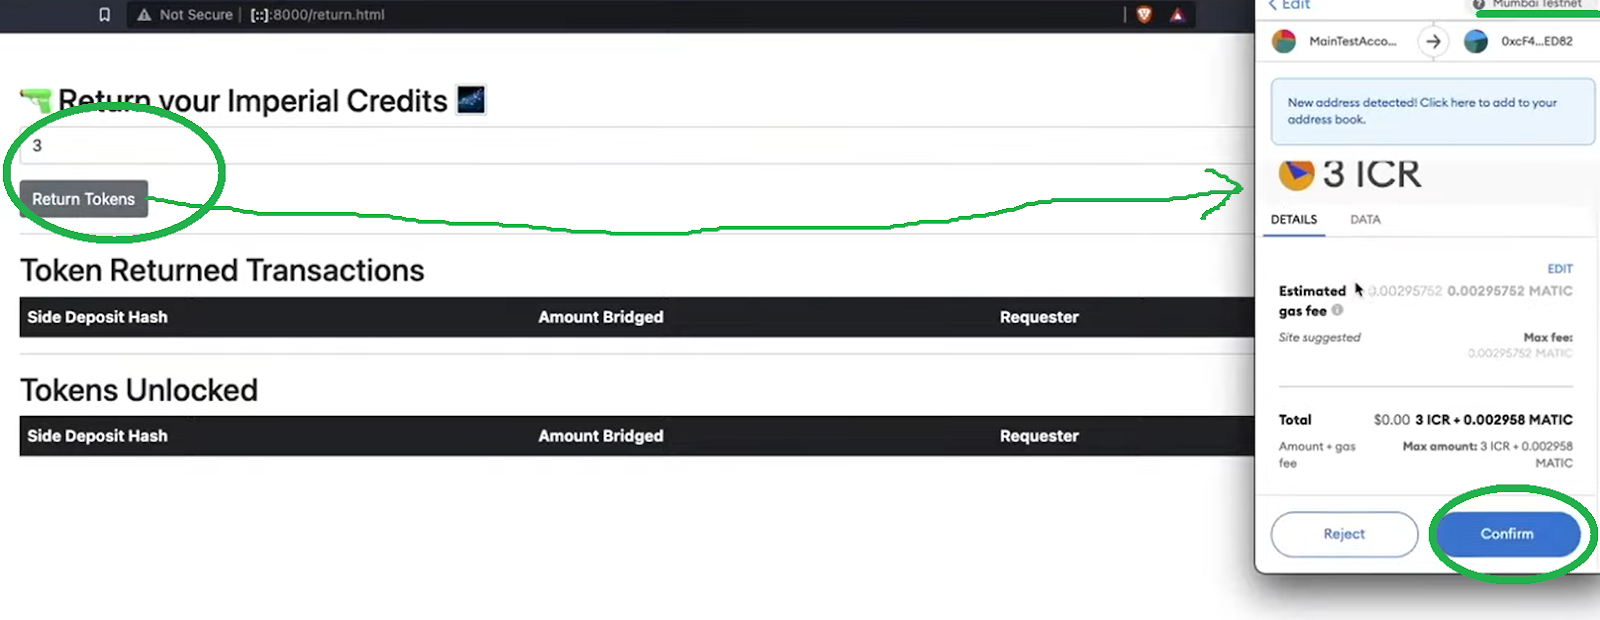
Again, users get a message confirming the successful transfer:
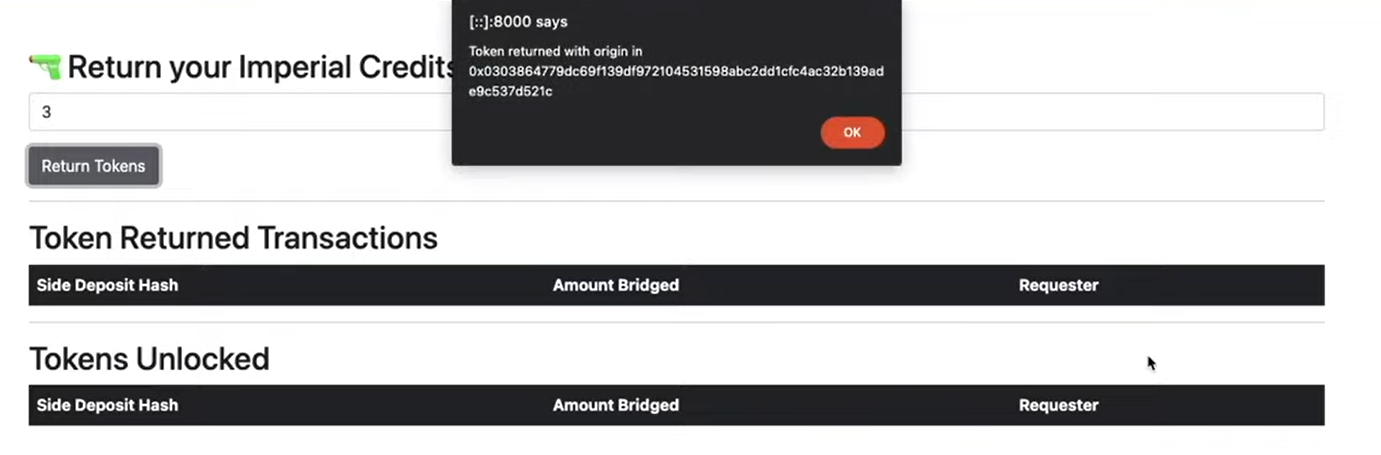
After refreshing the page, the dashboard reflects the transfer that we made from the side chain back to the main chain:
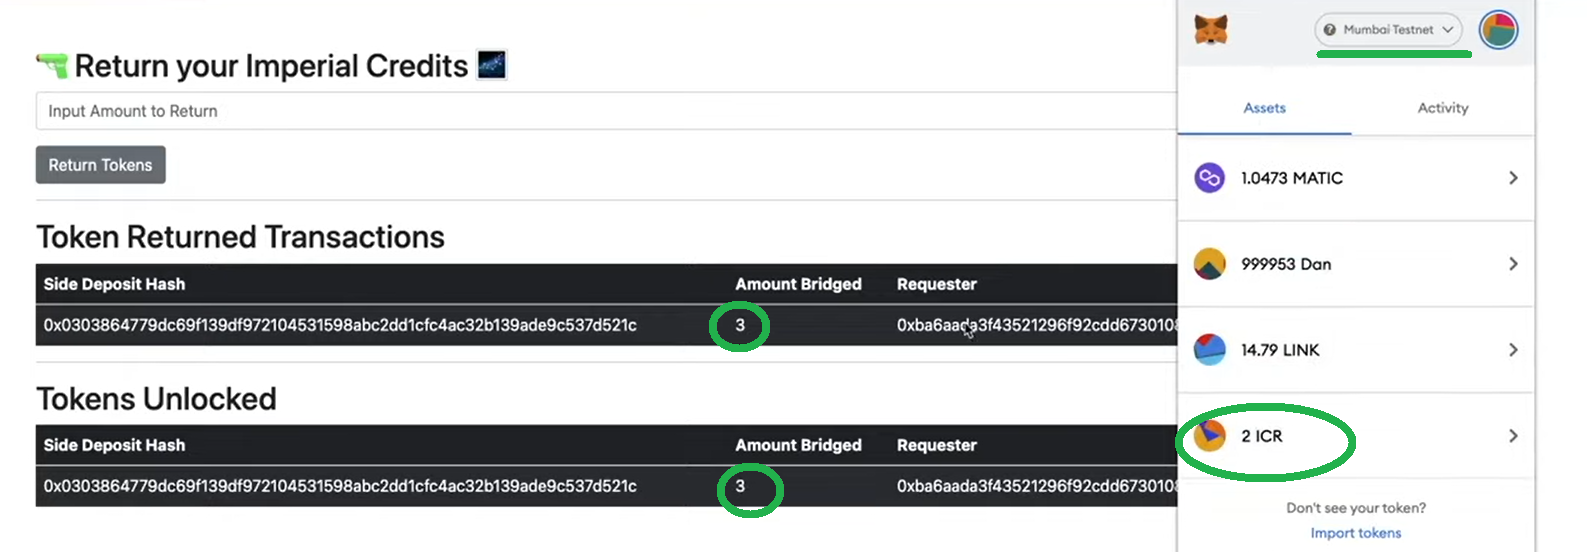
Furthermore, we can now see that three ICR tokens have been unlocked. This means that we now have eight ICR tokens on the main chain and two on the side chain for that particular address.
An Example Project to Build a Cross-Chain Bridge with Moralis
It is now time to show how you can build a cross-chain bridge (as the one seen above) yourself. Since we believe that code walkthroughs are much easier to present in a video, we will hand you over to one of Moralis’ experts to show you the details in the video located towards the end of this article. However, before you move on, you need to set up your Moralis account to complete the steps yourself and build a cross-chain bridge with Moralis.
Therefore, make sure to take a minute of your time and create your free Moralis account to gain access to your admin panel, dashboard, and the entire Moralis SDK. Furthermore, after creating your account, you’ll be able to create your Moralis server, which will open the mentioned shortcuts.
Create a Moralis Server
- Log In to Your Moralis Account – Access your admin area by logging in to your Moralis account. In case you haven’t already done so, create an account.
- Create a Moralis Server – Once inside your admin area, select the “Servers” tab. Then click on “+ Create a new Server” in the top-right corner and select “Testnet Server” (see the image below). The “Testnet Server” option is what you should focus on when creating and working on new projects; however, once your dApp is properly tested, you can create a mainnet server.

After selecting the network type, a pop-up window will appear asking for a server name (this can be anything you want), region, network, and chain(s):
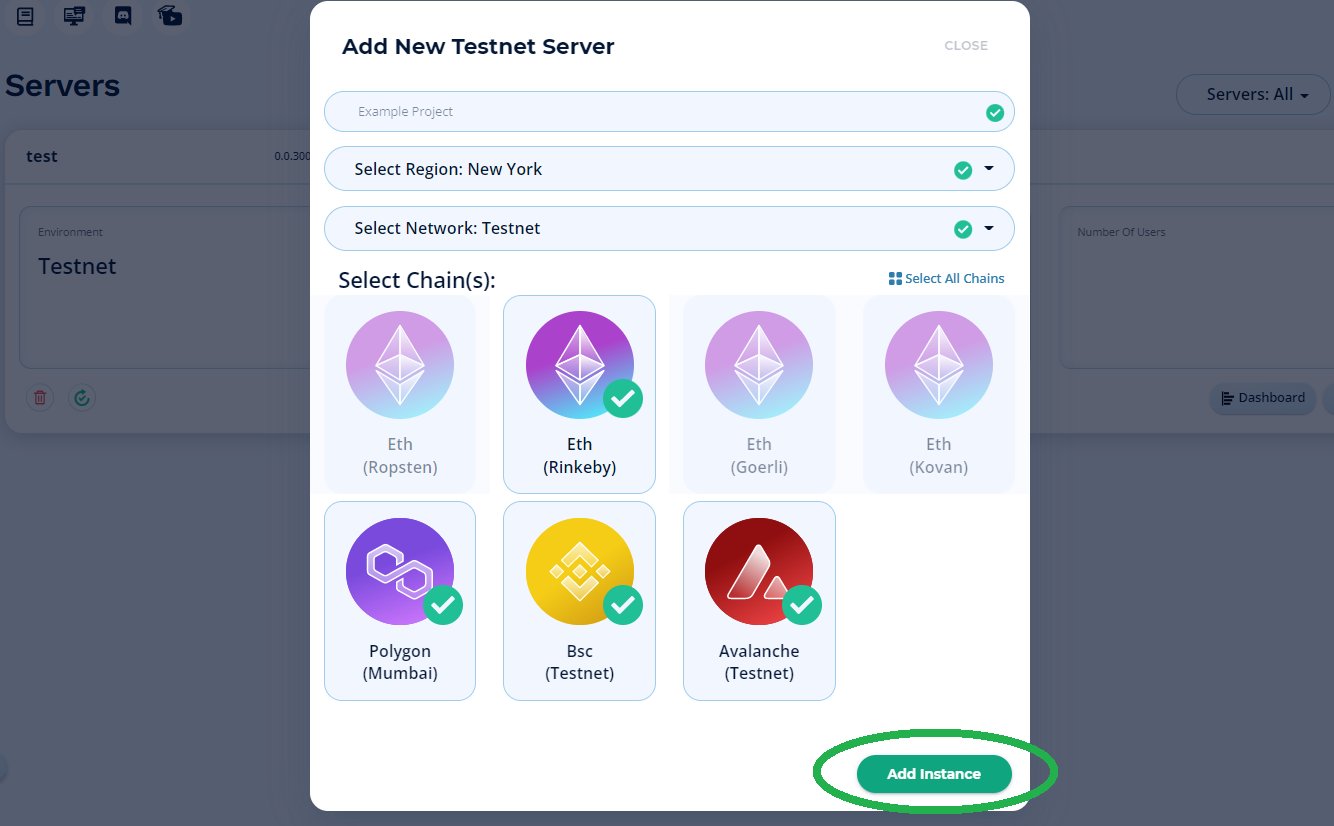
Then, click on “Add Instance” to finally create and spin up your server.
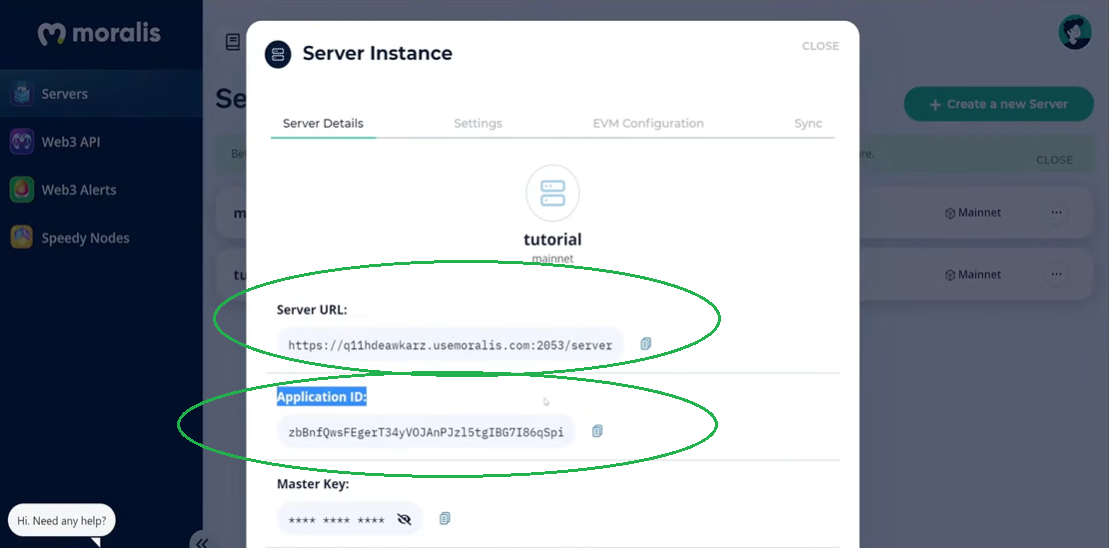
- Using Your Server – Now that your server is up and running, you have all the tools at your disposal. For one, you get to access your server’s details by clicking on “View Details” next to your server name:
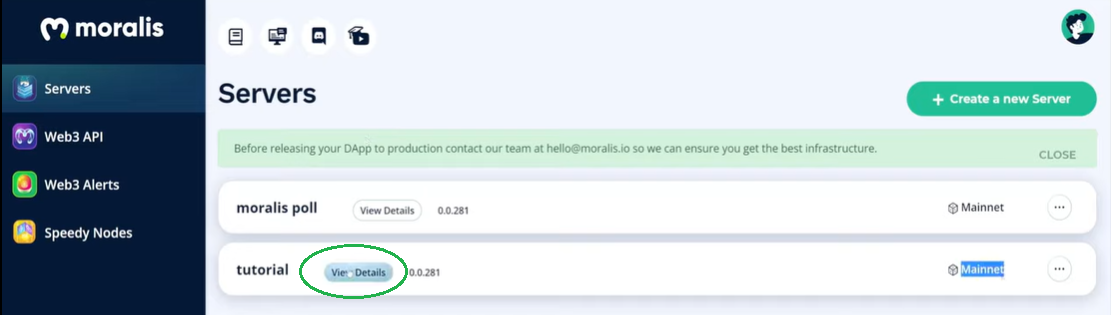
When doing so, you’ll see all the necessary information you need to paste inside your code files.
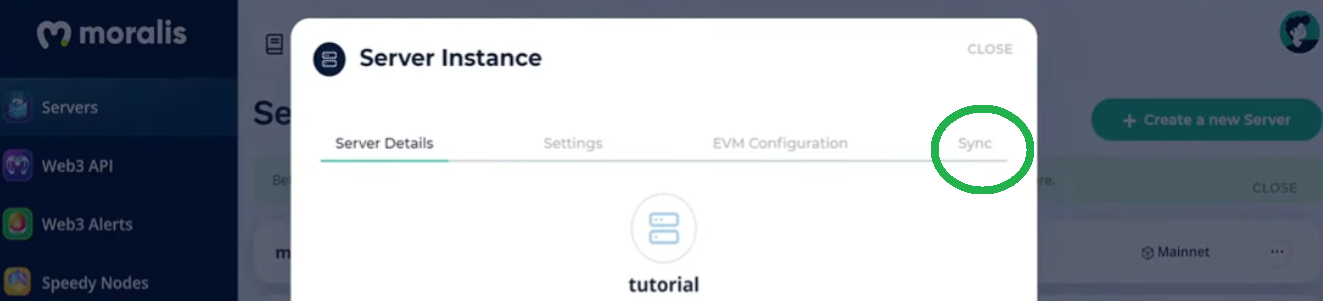
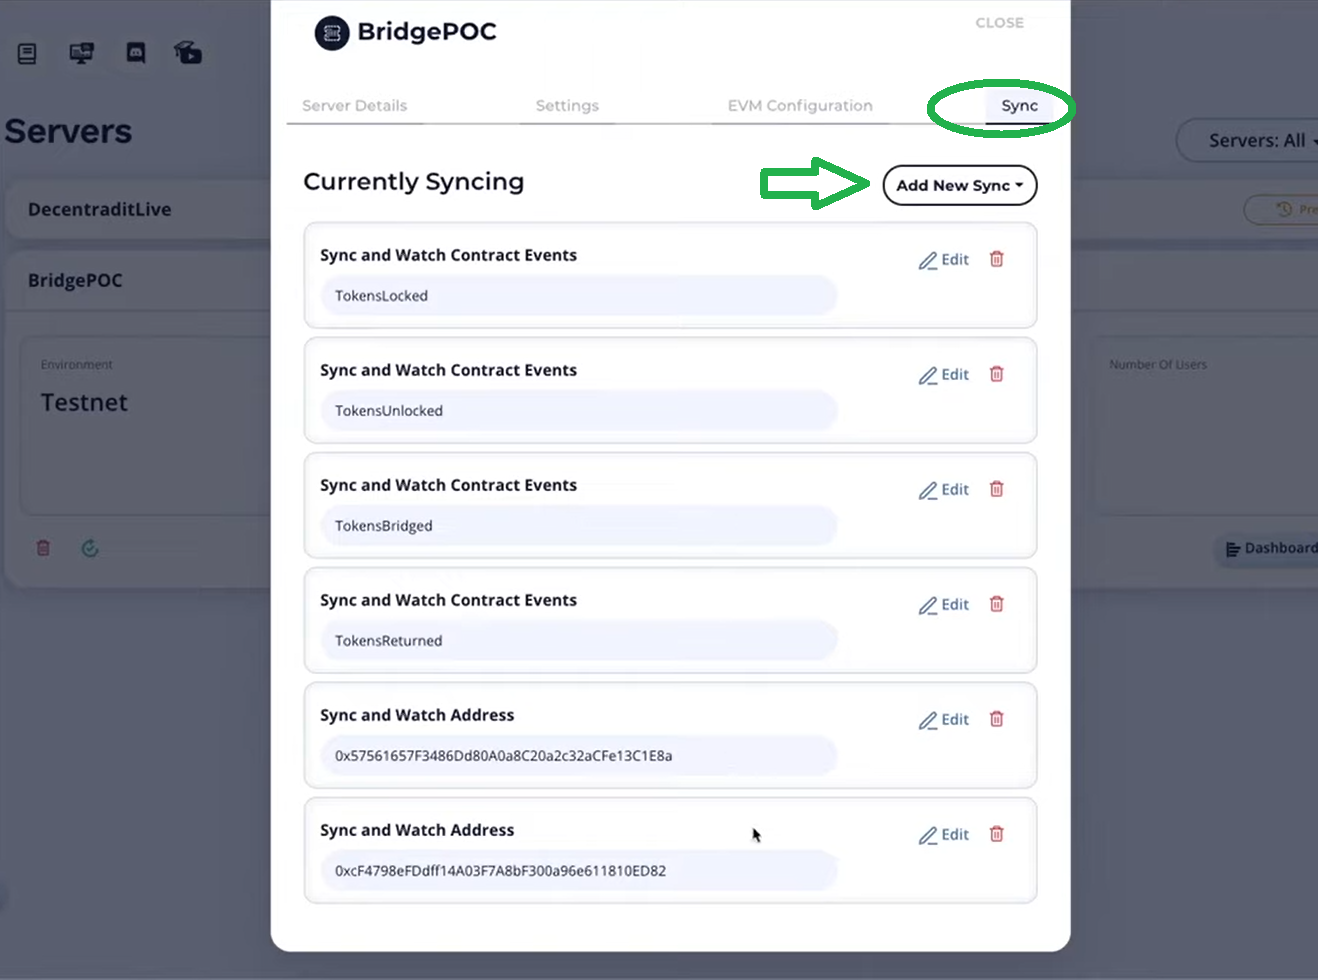
Aside from the server’s details, you can access the “Sync” tab, where you set up smart contract event listeners (sync and index smart contract events):
Furthermore, your server’s dashboard and its cloud functions are now at your disposal:
Build a Cross-Chain Bridge with Moralis – Step-by-Step
With your Moralis server set up, you are finally ready to build a cross-chain bridge following our lead. As mentioned, you’ll get to peek over the shoulders of one of Moralis’ experts as he explains all the details (see the overview below for guidance). In addition, we made the entire code required to build a cross-chain bridge available at GitHub. As such, make sure to clone the project before moving forward. Moreover, the entire code is neatly divided into the following folders: “frontend”, “moralis_server”, and “solidity”. The “frontend” folder contains the files that power the UI presented in the “Our Cross-Chain Bridge Preview” section. Furthermore, the “moralis_server” folder is where you’ll find all ABIs for the “sync and listen” events and the cloud function. The “solidity” folder is where you’ll find all required smart contracts.
Step-by-Step Guide Overview
- Starting at 12:07 in the video below, the Moralis expert explains the meaning of all smart contracts required to build a cross-chain bridge and takes you through their code.
- Moving forward, you will be able to learn how to deploy the gateway and relay of your cross-chain bridge (video below at 19:31).
- You will first see a quick overview of setting up a Moralis account and creating a Moralis server, which we’ve already covered above.
- Next, you will be adding “sync and watch” event listeners for both the main and side chains.
(remember, you can copy the required ABIs). These listeners will represent the relay for your cross-chain bridge.
With the event listeners in place, you will also start populating your Moralis dashboard with the required data.
- Moreover, starting at 25:05, you will learn to use the data from your Moralis dashboard (database) inside your cloud function (“cloudCode.js”) to ensure that your gateway operates properly.
- Finally, you’ll learn how to build a basic UI for your decentralized application (dApp) at 38:08.
Here’s the video we’ve been referencing throughout this article:
How to Build a Cross-Chain Bridge – Summary
With new programmable chains emerging and gaining popularity, we can expect the future of blockchain applications to be all about cross-chain interoperability. As such, existing tokens must be able to transition from one chain to another in a safe manner. Moreover, if you’ve followed the instructions provided in the sections above, you now know how to build a cross-chain bridge that enables such transitions. By using smart contract templates available at OpenZeppelin, tools like Remix or Brownie, and the ultimate Web3 development platform – Moralis, you get to build a cross-chain bridge in less than an hour. However, this is possible only if you use the code files we provide you with.
If you found this example project interesting and would like to take on other blockchain development example projects to level up your skills, make sure to visit the Moralis blog and the Moralis YouTube channel. Some of our latest quests show you how to create a DAO in ten minutes, how to launch Web3 apps with MetaMask, how to create free token, how to get Web3 events with SMS messages, how to create NFT on Binance Smart Chain, how to mint NFTs for free without paying gas fees, how to build with the Covalent API, and much more. Nonetheless, if you want to become a blockchain developer with advanced skills and go full-time crypto, we encourage you to visit courses available at Moralis Academy.