Placing bets and trying to predict which way the market is heading is hugely popular. Moreover, prediction markets have been around for thousands of years, rarely being set fairly. But now, total transparency and proper odds may be set in place with the correct implementation of blockchain technology. As such, for the first time in history, prediction markets may actually be what they are meant to be – a fair game of chance. Moreover, judging by the past, the demand for this kind of application will be huge. Therefore, developers that know how to build a prediction market dApp face a bright and prominent future ahead.
Furthermore, while building a prediction market dApp (decentralized application) may sound daunting, we assure you that it is rather simple when utilizing the right set of tools and proper guidance. As a matter of fact, by using Moralis (a.k.a. Firebase for crypto) and its ultimate Web3 SDK in combination with the best Ethereum dApp boilerplate and some other practical tools, you can build a prediction market dApp in about six hours. As far as the guidance goes, we will provide you with clear instructions and a comprehensive overview of the steps required to complete this task.
However, this article will demonstrate the first couple of steps needed to start when building a prediction market dApp. Then, you will have the chance to finish the remaining parts as you watch one of Moralis’ experts as he takes on this quest in our YouTube video. Moreover, we encourage you to take action and implement all the steps yourself in order to get the most out of this article and actually learn how to build a prediction market dApp.

How to Build a Prediction Market dApp – Preview
Knowing what you will be building is crucial. Therefore, let’s start with an overview of our prediction market dApp (the one we will build together as we move forward). Keep in mind that while our dApp looks decent, the focus herein is on the functionality. Once you get used to working with Moralis and other Web3 development tools, you’ll be able to use your JavaScript proficiency to perfect the UI. Moreover, if you are familiar with React Native, you may later also build a prediction market dApp with a mobile-first approach. For that purpose, we’ve created the most practical Ethereum mobile boilerplate. With that said, let’s look at how our prediction market dApp will look like and what functions it will have.
Essentially, we will create a betting game where two users need to deposit funds into the game. The winner is then chosen trustfully using smart contracts (predefined conditions) and on-chain data. Moreover, the winner gets all the funds, which means that the loser loses the money used for the game. The winner will be determined using Chainlink to generate random numbers. However, note that you may also use Chainlink to obtain real-world data (sporting events, politics, etc.). As such, you could easily build a prediction market dApp with many other betting options following the same principles that you’re about to learn.
Our Prediction Market dApp
Here’s a screenshot of our prediction market dApp’s dashboard:
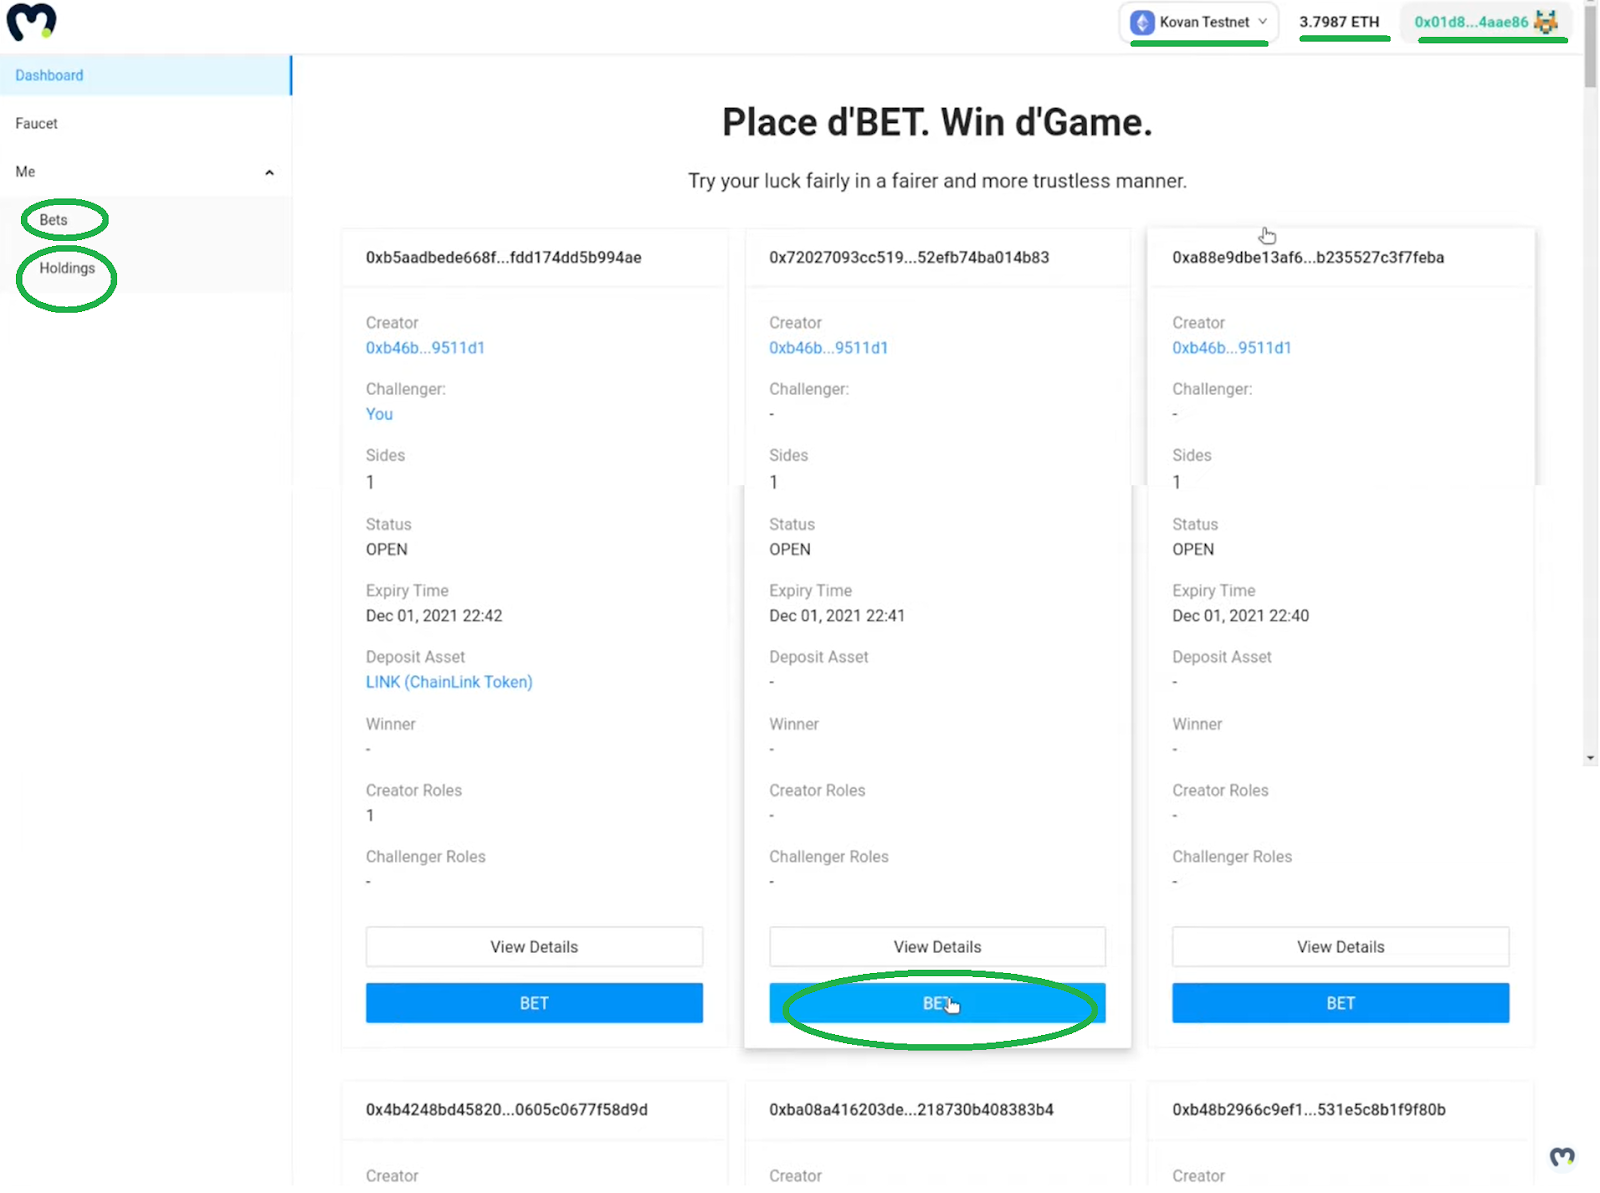
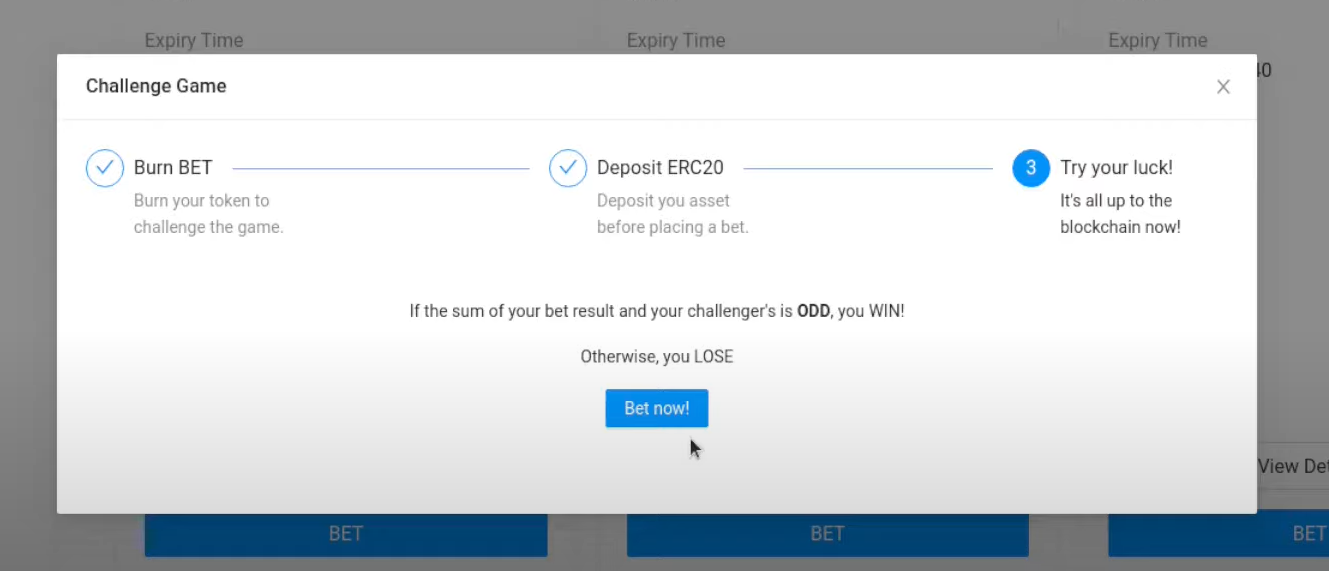
At the core of the dashboard are the posted games, in which users get to participate by clicking on the “BET” button. The betting games can be created by all users, which means that every user can create their own betting games or bet on an existing game created by any other user. Moreover, this is the pop-up window that users will see after clicking on the “BET” button:
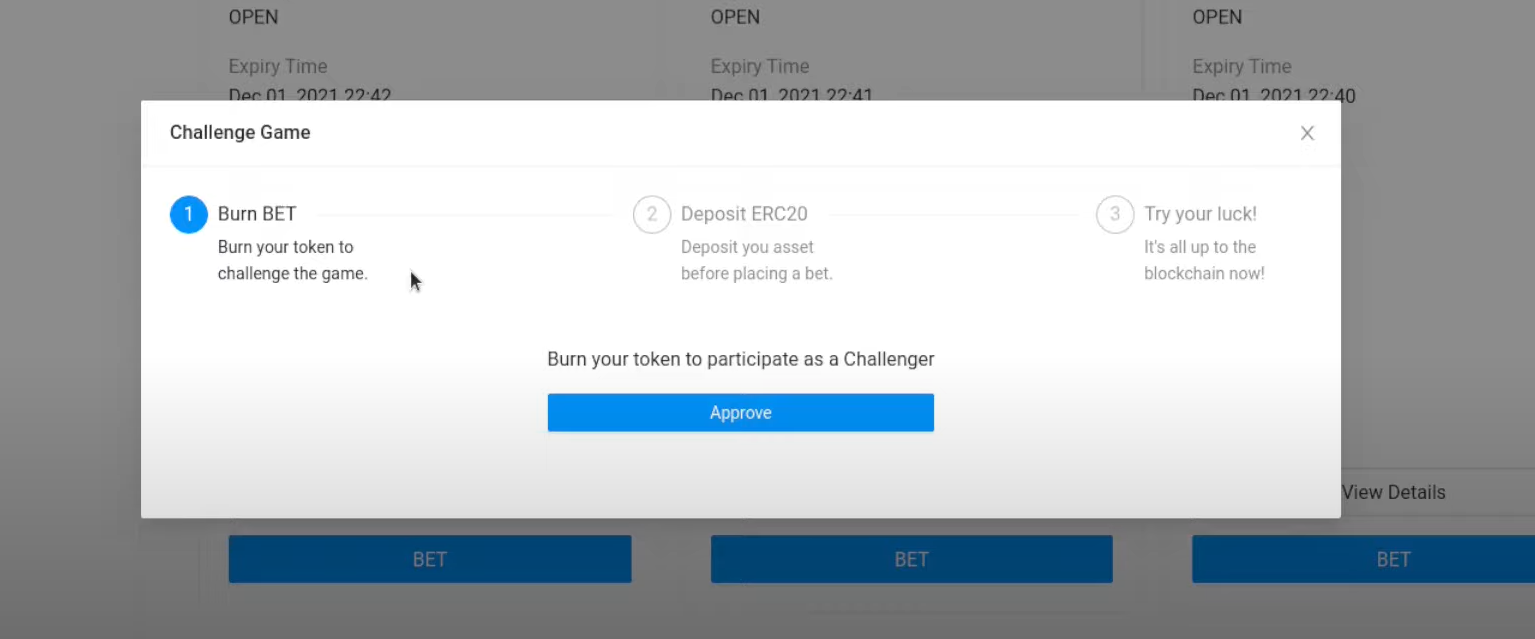
The pop-up window provides users with instructions on how to participate in the bet. First, they need to burn their “BET” tokens (utility ERC-20 tokens that we’ve created), which means that they need to hold our tokens. After clicking on the “Approve” button, users need to deposit their ERC-20 token (we used “LINK”). These deposits are also prizes for the winners:
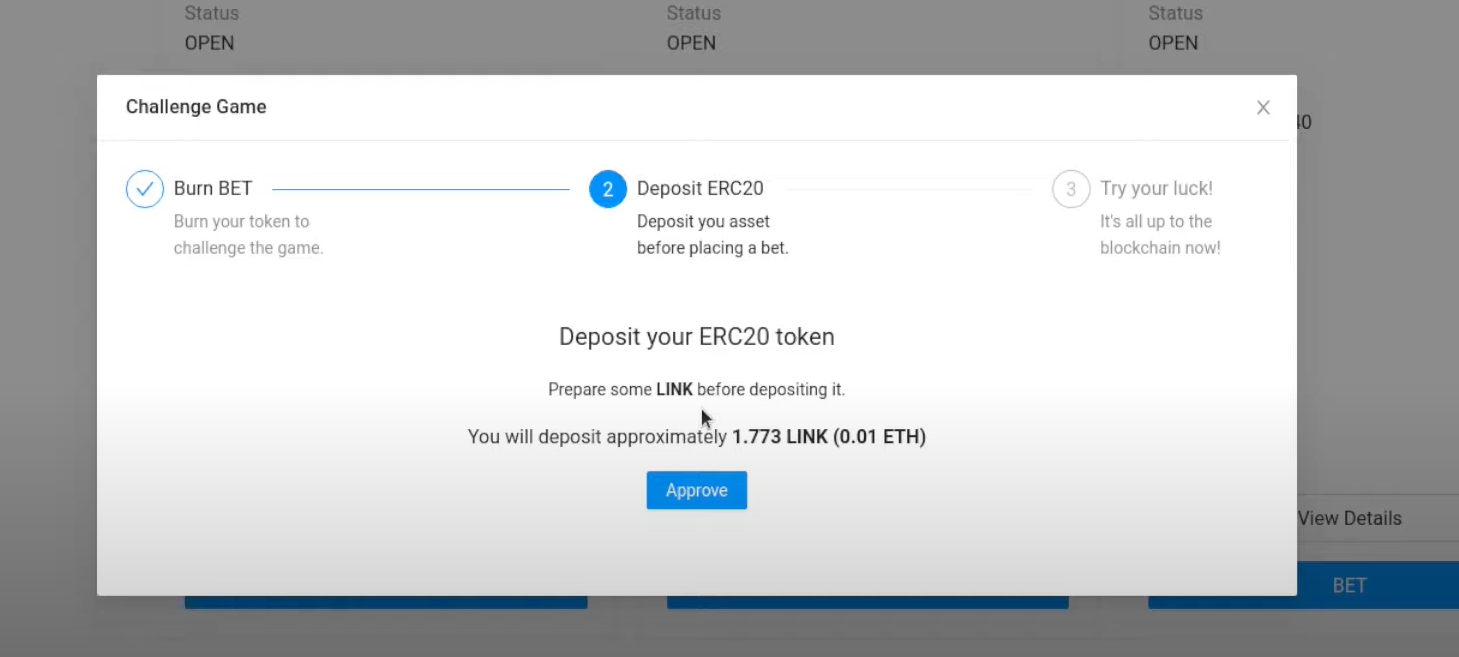
After confirming a deposit, users can place a bet:
As mentioned previously, we went with a relatively simple rule for betting; based on the sum of random numbers being odd or even. Furthermore, the winner of any bet will be able to withdraw all the related funds to that bet by clicking on the “WITHDRAW” button that appears under the games won by that user:
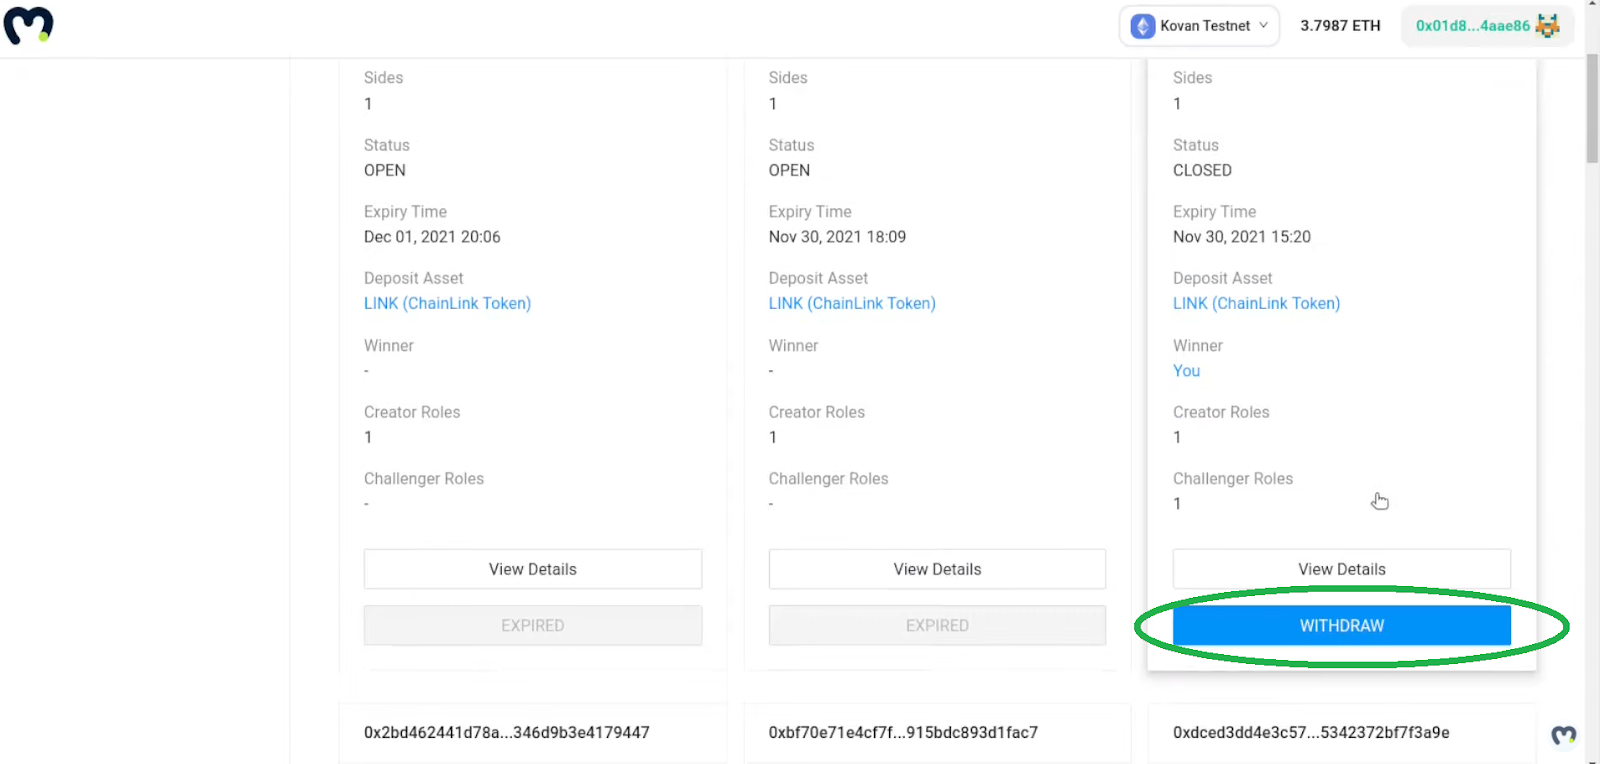
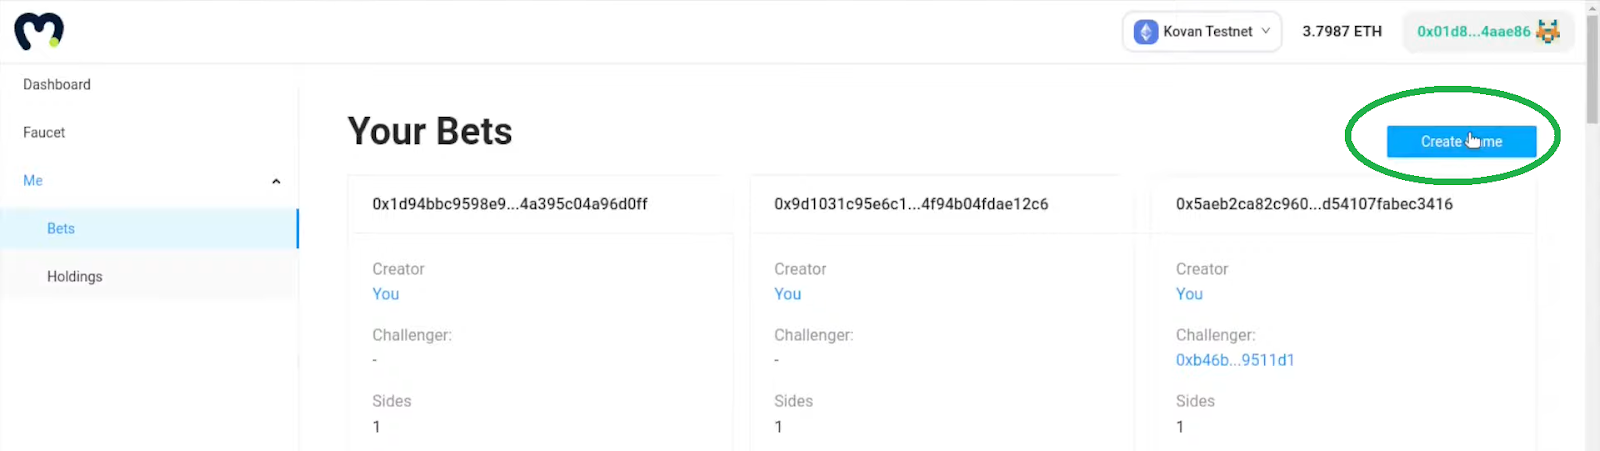
After clicking on “WITHDRAW”, a user’s MetaMask will be prompted to confirm the transaction. Moreover, as mentioned above, all users can create their own betting games by navigating to the “Me” and “Bets” section, where they can find the “Create Game” button:
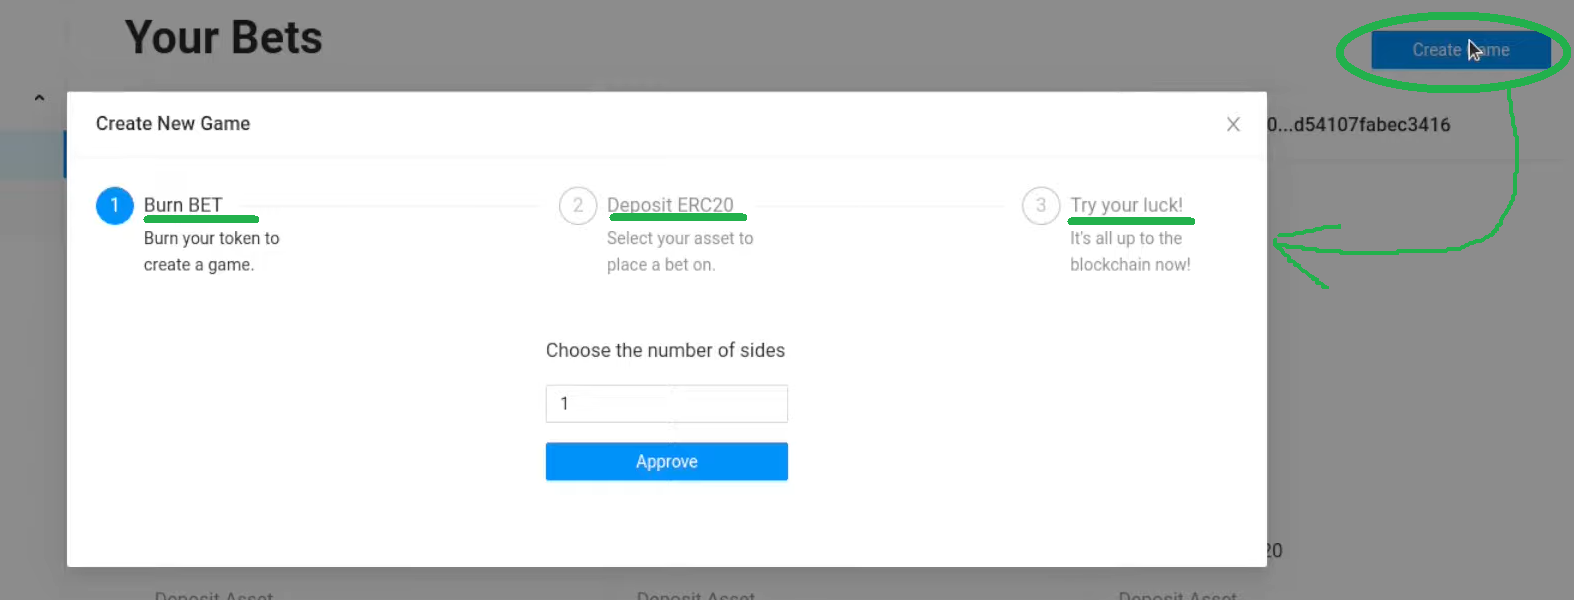
The process of creating a game is quite similar to betting on a created game (this is a three-step process):
Note: If you are more of a video person, make sure to check out the video at the bottom of this article, starting at 0:33, for the preview of our betting dApp.
How to Build a Prediction Market dApp – Project Overview
Now that you have a clear picture of what our quest will be all about, it’s time to give you a proper overview of the process required to build a prediction market dApp. As mentioned, you can do it in less than six hours; however, if you are new to blockchain development, it will most likely take you a bit longer.
Six hours is not a lot of time to build a prediction market dApp from scratch. Nevertheless, this is quite a mouthful task. However, we can simplify things for you by breaking down the entire process into eight parts (see the outline below).
Prediction Market dApp Project Outline:
- Environment setup – setting up a Moralis server and cloning the boilerplate (video at 7:14).
- Create a betting game smart contract with Solidity (video at 19:59).
- Creating an ERC-20 token and learning how to handle it in a smart contract (burn, deposit, withdraw) (video at 57:30).
- Integrating Chainlink’s price feeds and VRF (video at 1:40:16).
- Deploy our smart contracts to the blockchain with Moralis Speedy Nodes (video at 2:26:30).
- Create a UI by integrating smart contracts on React with Moralis’ SDK (video at 2:56:31).
- Sync events, use the Moralis database, and Moralis’ cloud function option to enhance our dApp with real-time blockchain data (video at 4:41:39).
- Host our dApp with our Moralis server (video at 5:54:10).
By completing the outlined parts, you will not only learn to build a prediction market dApp, but you’ll also learn numerous valuable blockchain development skills that you can use during other projects.
Environment Setup to Build a Prediction Market dApp with Moralis
In order to make the most out of Moralis, you need to create your free Moralis account. This will provide you with access to your admin panel, dashboard, and the entire Moralis SDK. Moreover, it will also enable you to create your Moralis server. As such, with your Moralis account created, complete the steps below to create a Moralis server.
Create a Moralis Server
- Log In to Your Moralis Account – Just log in to your Moralis account to access your admin area. If you do not have an account, make sure to create one now.
- Create a Moralis Server – Select the “Servers” tab inside your Moralis admin area and then click on the “+ Create a new Server” button in the top-right corner. A drop-down menu will appear offering different network types (see the image below). For the purpose of our example project, select “Testnet Server”. The “Testnet Server” option (connect to Ethereum testnets) tends to be the best option when creating and working on new projects; however, once your dApp is properly tested, you can create a mainnet server.

Next, a pop-up window will appear where you need to enter the server name (this can be anything you want), select region, network, and chain(s):

To finally create and, in turn, spin up your server, click on “Add Instance”.
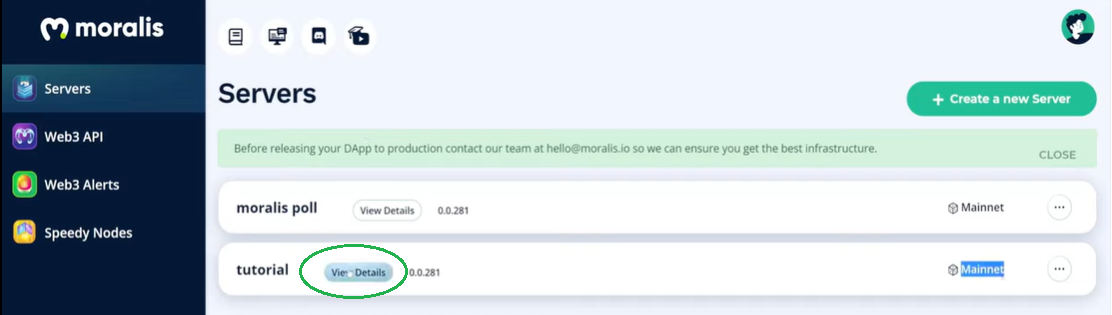
- Access Server Details – Now that your server is up and running, you can access its details by clicking on the “View Details” button next to your server name:
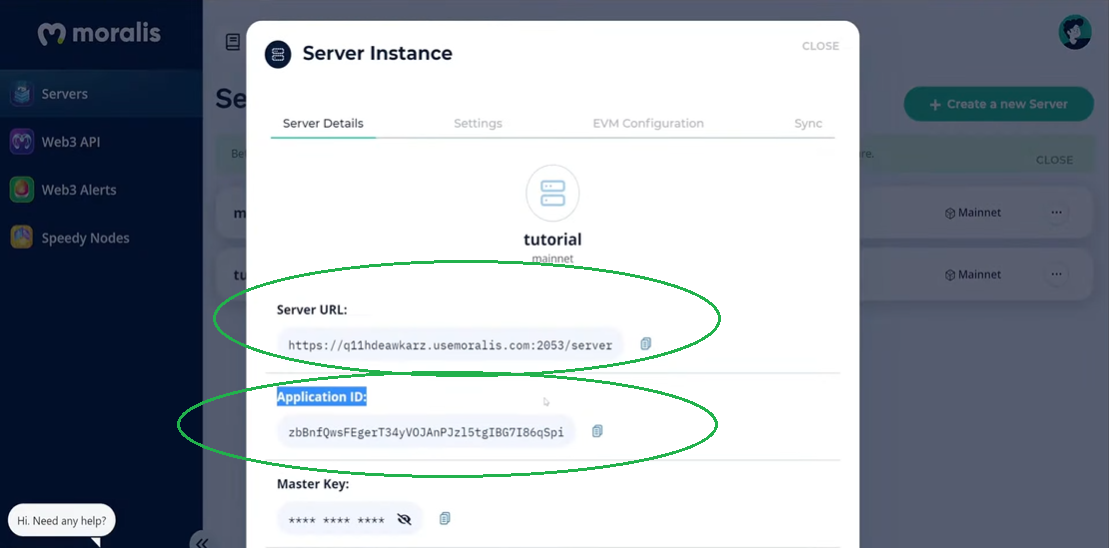
You’ll see all the information you need in the pop-up window. As such, you need to copy the server URL and application ID details by clicking on the “copy” icon:
- Initialize Moralis – Use your server’s details and populate the “.env” file (you may also need to rename the file from “.env.example” to “.env”):
Note: Move on to the next section and complete this step (step four) later on.

Note: Make sure to use the details of your particular server and NOT the details presented in the image above.
Clone Our Project
At this point, you have two options: you can use the ultimate Web3 boilerplate and start from there (as we did), or you can clone our project to make things even simpler for yourself. If you decide to start with our Web3 boilerplate, use the detailed instructions provided on the Ethereum boilerplate’s GitHub page. However, if you decide to take the shortcut, just clone our project using the following instructions:
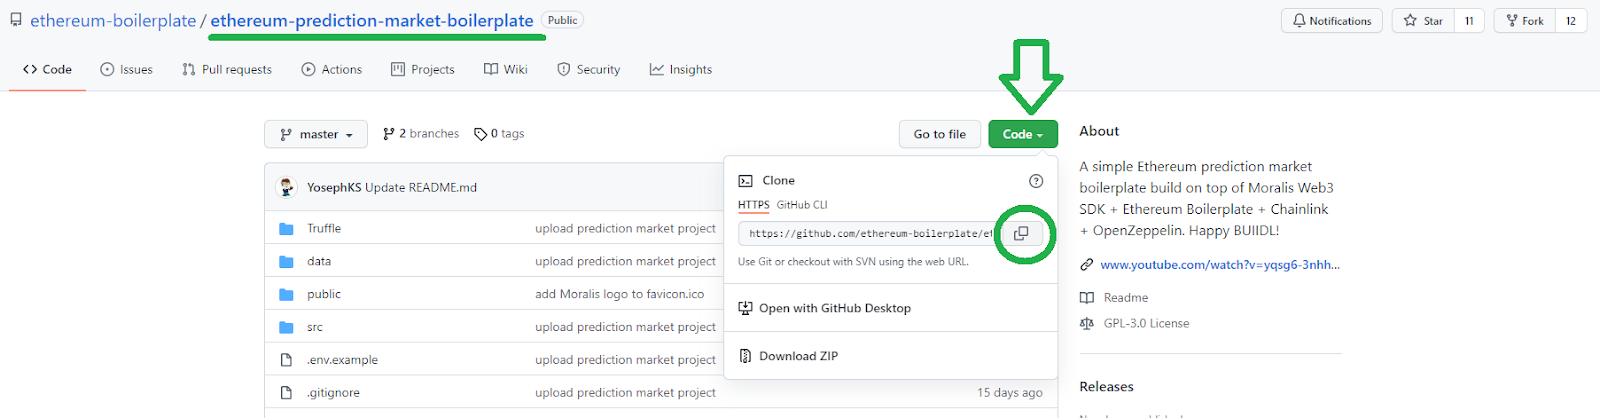
- Go to our project’s GitHub page: https://github.com/ethereum-boilerplate/ethereum-prediction-market-boilerplate.
- Once on the page, click on the “Code” button and then copy the address by clicking on the “copy” icon:
- Then, open up your terminal (of course, you may use the one inside your code editor), go to any directory where you want to clone the project, and then use the “git clone” command followed by the copied address:

- Now, open up the project inside your code editor (we use Visual Studio Code [VSC]) and install all dependencies. Moreover, you can use either the “npm install” or “yarn install” command in your code editor’s terminal. For more details about the project’s structure, check out the video below at 9:56.
- You can now complete step four from the previous subsection. Aside from adding your server’s URL and application ID, also copy “CLI API Key” and “CLI API Secret” (within your server’s “View Details” option):

Note: There’s a similar optional setup inside the “Truffle” folder (video at 13:02). This is also where you will learn about the Moralis Speedy Nodes API and how to add it to the “truffle-config.js” file.
- Populate the “.secret.example” file with your MetaMask wallet’s mnemonics and rename the file to “.secret”. In case you don’t remember your secret phrases, use Truffle to generate new ones (video at 15:46).
- Finally, ensure that you have enough native tokens in your wallet (video at 16:30).
Build a Prediction Market dApp – Step-by-Step Video Instructions
With the environment setup completed, you are ready to roll up your sleeves and build a prediction market dApp as presented above. Since there are many rather detailed aspects to be covered, you’ll be way better off by following the instructions provided by our Moralis expert in the video below. He will guide you through the remaining seven parts of this example project. In case six hours are too much for you to take on in a single sitting, make sure to spread out your “build a prediction market” quest over a couple of days.
Here are the remaining seven parts that you will complete by following the Moralis expert’s guidance:
- Create your smart contract with Solidity (19:59).
- Create your ERC-20 token and learn how to properly handle it (57:30).
- Integrate Chainlink’s price feeds and VRF (1:40:16).
- Deploy your smart contracts to the blockchain with Moralis Speedy Nodes (2:26:30).
- Create a UI by integrating smart contracts on React with Moralis’ SDK (2:56:31).
- Sync events, use the Moralis database, and Moralis’ cloud functions to enhance your dApp with real-time blockchain data (4:41:39).
- Finally, host your dApp with your Moralis server (5:54:10).
Moreover, here’s the video with the timestamps that we’ve been referencing throughout this article:
How to Build a Prediction Market dApp – Summary
If you’ve followed the guidance provided in the article and within the video above, you now know how to build a prediction market dApp in six hours. Furthermore, by completing this rather complex example project, you’ve also learned how to properly set up a Moralis server, how to clone GitHub projects, how to create smart contracts and ERC-20 tokens. Furthermore, you’ve also learned how to integrate Chainlink’s price feeds and VRF, how to deploy smart contracts using Moralis Speedy Nodes, and how to use your JavaScript skills to create a UI with Moralis’ SDK. In addition, you now know how to sync events, how to use Moralis’ database and Moralis’ cloud functions, and how to host a dApp with Moralis.
As mentioned at the beginning, this was quite an extensive example project. So, if you’d rather start with something simpler, we encourage you to check out the Moralis blog and the Moralis YouTube channel. There you can find a ton of valuable content that explains various crypto concepts, and terms and that also features many example projects. For instance, some of our latest guides show you how to create free token, how to get Web3 events with SMS messages, how to create NFT on Binance Smart Chain, how to mint NFTs for free without paying gas fees, how to build with the Covalent API, how to sync and index smart contract events, how to build cross-chain dApps, and much more.
However, in case you are not yet JavaScript-proficient but eager to become a blockchain developer, we recommend enrolling in the 2021 JavaScript Programming for Blockchain Developers course at Moralis Academy. Moreover, to go full-time crypto sooner rather than later, make sure to check out other valuable courses at Moralis Academy.