If you’ve been executing transactions on Ethereum in the past two years, you’ve most likely experienced exorbitant gas fees. Unless we consider fees for a million-dollar transaction where hefty gas fees are justifiable, there’s a much more profitable way available – to send gasless ETH transactions. Fortunately, excellent tools are available that can enable you to do gasless transactions on Ethereum and several other reputable EVM-compatible blockchains. As a matter of fact, as part of the example project covered herein, we will use the Avalanche testnet named “Fuji” to accomplish this. However, you can apply the same principles when developing on the Ethereum chain.
Moving forward, you’ll learn how to do gasless transactions on Ethereum and also on Avalanche’s testnet by using Moralis’ ultimate Web3 development platform. In addition, we will be using “Biconomy”, which will be the key to enabling the “send gasless ETH transactions” feature within our example dApp (decentralized application). If you want to get the most out of this article, we invite you to take on the example project below with us by following our lead. Aside from ending up with your own dApp that will offer gasless transactions on Ethereum, Avalanche, Binance Smart Chain (BSC), or Polygon, you will learn other details that will enable you to use Moralis for other Web3 development tasks.
As such, consider this as a free ticket that will take you a lot closer to going full-time crypto. You can also take a more professional approach by enrolling in some of the high-quality courses at Moralis Academy.

What is Gas on Ethereum?
Before we move on to our example project, which will teach you about gasless transactions on Ethereum, we need to ensure that you understand the basics. So, unless you can answer “what is gas on Ethereum?” with confidence, make sure to cover this section before moving on.
Following the common meaning of the word “gas”, gas on Ethereum also fuels something. Specifically, smart contracts or transactions, to be exact. Ethereum is the leading programmable blockchain, and was also the first one with that feature. This enables developers to deploy dApps and other tokens on top of it. Essentially, you need gas to cover all transaction fees. So, gas is the unit for the computational effort required for the execution of specific operations on Ethereum. Furthermore, each transaction on Ethereum requires computational resources to execute (Ethereum is still using the proof-of-work concept). This means that there are fees related to every transaction.
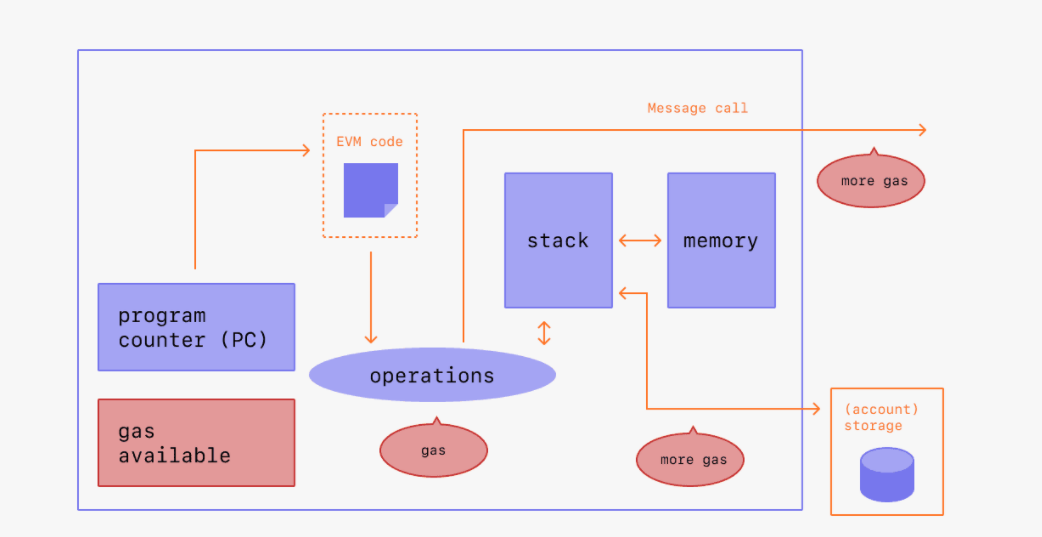
Transaction fees, or gas, must always be covered in the native coin; in the case of Ethereum, that means that ETH is required to complete transactions. Moreover, since fees are fractions of ETH, they’re referred to as “Gwei” (a.k.a. “nano eth”). On the other hand, other EVM-compatible chains use the proof-of-stake concept, which enables much lower transaction fees. One of such chains is Avalanche, which is also the reason why we decided to develop our example project on its testnet.
In addition, while it may be obvious, let’s also point out that “gasless” means that users do not pay for the transaction fees themselves. However, since fees are essential and no transactions can be completed by not paying for fees, the developers or the owners of the dApp need to cover the fees.
Offer Gasless Transactions on Ethereum – Example Project
As mentioned above, it’s time for us to take on an example project, where you will learn how to do gasless transactions on Ethereum and other EVM-compatible chains. Moreover, our project will exist on the Avalanche Fuji testnet. To start, we’ll do a preview of the dApp that we will be building, which will enable users to send gasless ETH transactions. Once you have a clear understanding of the end goal of our mission, we will help you set things up properly. This includes creating your Moralis server and Biconomy account. Then, we will hand you over to one of Moralis’ experts, who will walk you through the code and provide you with the guidance you need to complete this example project yourself.
Send Gasless ETH Transactions – Example dApp Preview
The dApp that we’ve created for the purpose of this project is incredibly simple; however, it serves the purpose, which means that users get to send gasless transactions on Avalanche. Of course, the same principles can be applied to one of the testnets on Ethereum (see our Ethereum testnets guide), Ethereum’s mainnet, or any of the other EVM-compatible mainnets.
Our example dApp is a simple storage Web3 app, which means that users get to store a string by clicking on the “Edit Storage” button (see the image below). Moreover, since we are on a blockchain, storing that string means executing a transaction, which will, in our case, come with zero fees for users.

Looking at the image above, you can see that our example dApp can switch among different blockchains (testnets in our case). In addition, it also displays the native token balance for connected users, and it offers connected users a chance to edit storage.
Demonstrating How to Send Gasless ETH Transactions
To demonstrate that our example dApp charges no transaction fees for its users, let’s complete a demo transaction. Specifically, we’ll do this with a wallet containing zero AVAX tokens (native tokens on Avalanche). To do this, we click on the “Edit Storage” button. This enables us to enter new storage data (a string in our case):

We’ve entered “Hello Moralis” as the new storage data. Next, we select the EIP-712 signature option (we’ll explain this later on) and then click on the “Set Storage” button. This prompts MetaMask for confirmation:

This completed the transaction without the need for a gas fee from a user. This is achieved with the help of Biconomy (see the top-right corner of the image above). This enables developers to set things up so the developers or dApp owners can automatically cover the gas fees. Moving forward, after completing the gasless transaction on Ethereum or Avalanche (in our case), we get the new storage state:

Offer Gasless Transactions on Ethereum and Other EVM-Compatible Chains – Initial Setup
As mentioned, we’ll guide you through the initial setup, which consists of several steps. For one, in order to gain full backend functionality, you need to create your free Moralis account. This enables you to create your Moralis server and access Moralis’ SDK, including Moralis Speedy Nodes. Furthermore, in combination with Moralis, you also get to use the ultimate Web3 boilerplate, which provides you with many components seen in the preview section above. In case you want to tweak the Ethereum boilerplate yourself, feel free to clone its GitHub address. However, you may take an additional shortcut by using the finished code for our example project, which is also waiting for you at GitHub (for instructions, watch the video at the end of this article at 6:07).

Moreover, as mentioned previously, you’ll also need to set up your Biconomy account. This will allow you to offer gasless transactions on Ethereum and other EVM-compatible blockchains. Fortunately, this is a straightforward process. Nonetheless, you’ll also need a code editor (we use Visual Studio Code [VSC]), where you need to install all dependencies for a package manager (yarn or npm) and for Truffle.
With things set up, you’ll be able to complete the coding to get your own version of the above-presented dApp. What’s more, this will enable your users to complete gasless transactions on Ethereum, Avalanche, Polygon, and BSC.
Creating a Moralis Server
Here are the steps you need to follow to create your Moralis server:
- Create Your Moralis Account – In case you don’t have a Moralis account yet, create one now. Simply click the link, enter your email address, and create your password. Don’t forget to confirm your email address by clicking on the confirmation link (you’ll receive an email). However, if you already have an active Moralis account, just log in.
- Create a Moralis Server – As soon as you sign in to your Moralis account, you will access your admin area. Make sure to select the “Server” tab. Then, click on the “+ Create a new Server” button in the top-right corner (as shown below). Next, you’ll need to select the kind of network type that best suits your needs from the drop-down menu. We recommend starting with the “Testnet Server” option when working on example projects.

Then you’ll see a pop-up window asking you for server details. Thus, enter your server’s name (it can be anything you want), select region, network, chain(s), and click on “Add Instance”:

- Access Server Details – It may take a couple of minutes for your server to get ready. Nevertheless, once it’s up and running, you can obtain its details by clicking “View Details” next to your server name. You need to copy some of these details (server URL and application ID) and paste them into your code file. This will let you gain Moralis’ backend functionality (see the image below).

- Initialize Moralis – To initialize Moralis, you need to populate your “.js”, “.html”, or “.env” (in case of using the Ethereum boilerplate) file with the Moralis server details:

Note: Do not use the details from the image above. Instead, make sure to use the details of your particular server.
Accessing Moralis Speedy Nodes
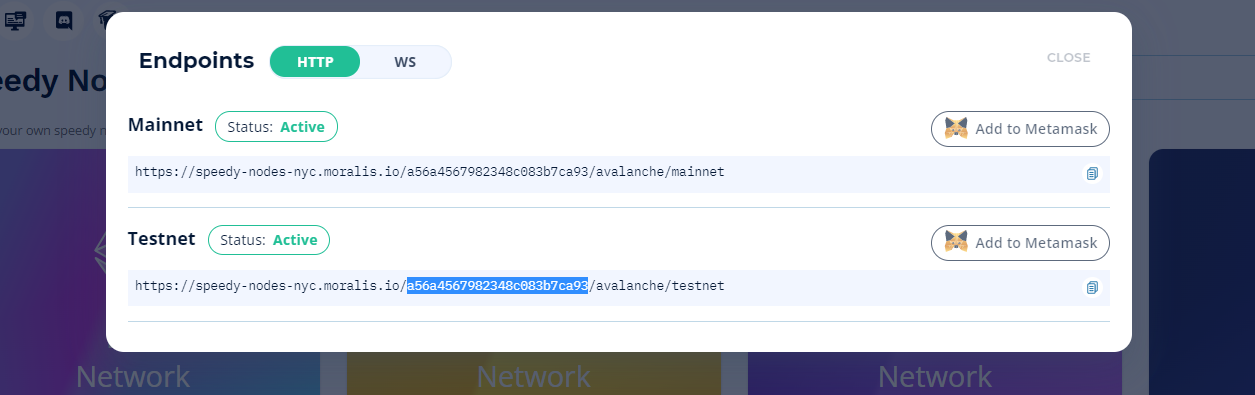
As you will see in the video below, you get to use Moralis Speedy Nodes to deploy smart contracts. To access this functionality, you need to select the “Speedy Nodes” tab in your Moralis admin area. There you’ll be able to click on “Endpoints” for all of the supported chains. In our case, we decided to work with Avalanche. As such, click on the “Endpoints” button on the Avalanche network option:

After clicking on the “Endpoints” button for the Avalanche network (the same goes for other chains), you’ll see the following pop-up window:

From there, you just click on the “Add to MetaMask” button next to the network you are using. For our example, we decided to use Fuji (Avalanche testnet). In some code files of our example project, you’ll need to use the highlighted part of the address:
Setting Up Biconomy
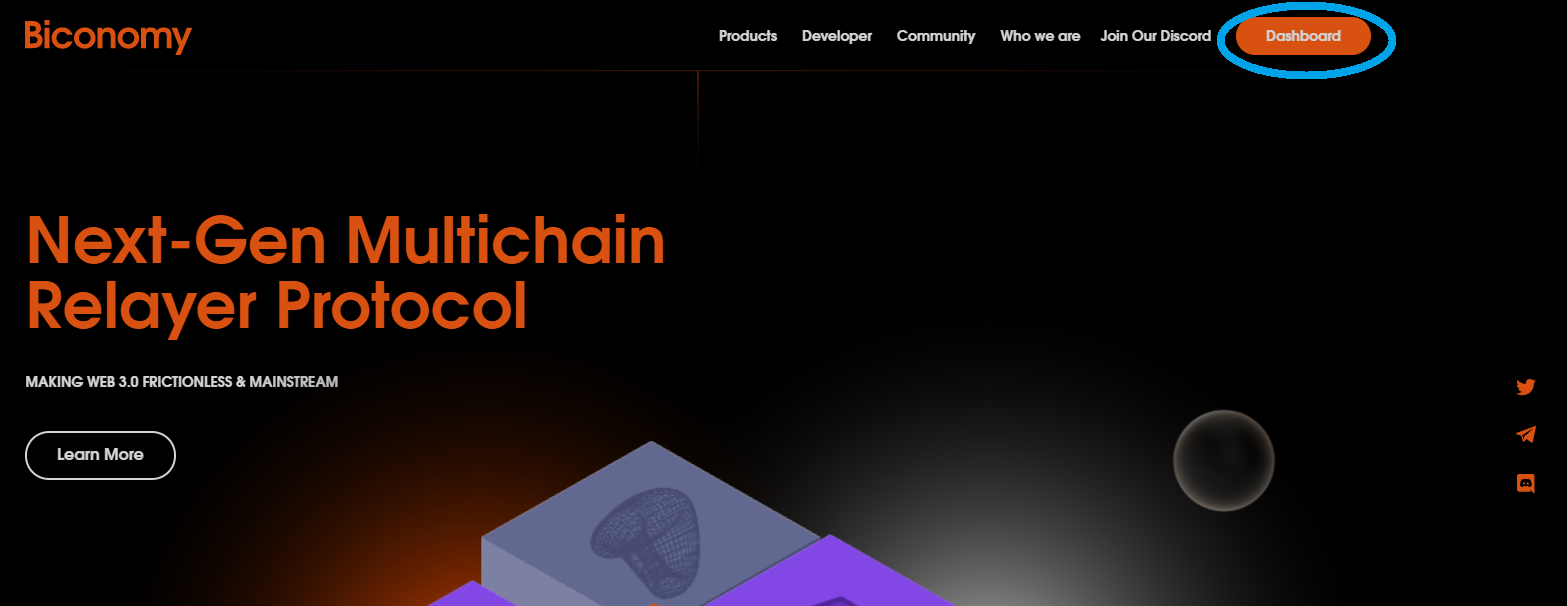
As mentioned previously, Biconomy is a trusted forwarder that will be the key in offering our users gasless transactions on Ethereum and other EVM-compatible chains. Therefore, you need to create your Biconomy account. As such, go to biconomy.io and click on “Dashboard”:
This will give you an option to create your account. Just enter your details and click on the sign-up button:

Once inside your dashboard, you’ll get to set up your “forward”. This is where you also need to ensure that you have a sufficient amount of native tokens to cover all of your users’ transaction fees.

Note: Watch the video in the next section that’ll guide you through the process of setting up your “forwarding” properly (26:45) and obtaining the details you’ll add to your code. Remember that this part is essential to send gasless ETH transactions.
Do Gasless Transactions on Ethereum and Other EVM-Compatible Chains – Code Walkthrough
With everything set up properly, you are ready to take a closer look at the code required to send gasless ETH transactions. For that purpose, make sure to check out the video below, starting at 12:14, where a Moralis expert will first show you the details of the smart contracts used for doing gasless transactions on Ethereum.
Note: In case you haven’t cloned the final code yet, make sure to watch the video at 6:07 and complete that step first.
By following the video, you will also learn the details of how to deploy smart contracts using logic files (video at 21:35). Moreover, at 23:48, you can also see how to use “ShowTrace”, equivalent to Etherscan or BscScan for Avalanche. In case you haven’t set up Biconomy yet, make sure to do so now (video at 26:34). Moving forward, you’ll cover the remaining details of the code (“BiconomyProvider.js”, “index.js”, “App.js”, “index.jsx”, and other files), including Moralis integrations, starting at 30:05. Furthermore, you’ll learn about the details of signature types (“personal” and “EIP-712”), starting at 42:15. Finally, you’ll see the example dApp in action (video at 47:38).
How to Do Gasless Transactions on Ethereum – Summary
If you’ve completed the setup and followed the instructions provided by the video above, you now have your own dApp that offers gasless transactions on Ethereum, Avalanche, BSC, and Polygon. With the use of a combination of powerful tools, namely, Moralis, Biconomy, Truffle, and MetaMask, you are able to offer users an option to send gasless ETH transactions. Furthermore, while you (as a developer or an owner of a dApp) still need to cover the transaction fees, the user experience becomes much more pleasant. Therefore, implementing this sort of functionality in other types of dApps surely gives you extra points with users.
Moreover, we need to point out that this project is not as basic as some of our other tutorials. As such, in case you found it too advanced for your current level, make sure to learn how to build your first dApp. However, if you are ready for more interesting challenges that will expand your blockchain development skills, make sure to check out the Moralis blog and Moralis YouTube channel. Some of our latest articles will show you how to build a cross-chain bridge, how to build a prediction market dApp, how to create a DAO, how to launch Web3 apps with MetaMask, how to create free token, how to get Web3 events with SMS messages, how to create NFT on Binance Smart Chain, how to mint NFTs for free without paying gas fees (lazy mint NFTs), and much more.

